Have you been using your Chromebook for a while and noticed that it’s running out of storage space? Your first thought might be to delete some files, but that can only do so much. The best solution is to upgrade your SSD (Solid State Drive). In this blog post, we will show you how to change the SSD on a c740-c4pe Chromebook.
Don’t let technical jargon intimidate you; we’ll break it down into manageable steps, so even if you’re not a tech wizard, you’ll be able to follow along. So, grab your tools and let’s get started!
Step 1: Backup Data
Before making any changes to your C740-C4PE SSD, it’s vital to backup your data to avoid losing any important information. Losing data can be frustrating and sometimes even cost you time and money. The good news is, backing up data is a straightforward process.
You can transfer your data to an external hard drive, cloud storage, or even burn files to a DVD. Whatever method you choose, make sure to double-check that you’ve backed up everything you need before making any changes to your SSD. This way, you can have peace of mind knowing that your data is safe and secure.
By taking this step, you can proceed with confidence knowing that you won’t lose any important data during the SSD replacement process. With your data backed up, you can now begin to explore replacing the SSD on your C740-C4PE.
Save important files to cloud or external drive
Backing up your data is an essential step in ensuring the safety and security of your important files. One effective way to create a backup is to save your files to either a cloud-based storage service or an external drive. Storing your data in the cloud allows you to access it from anywhere with an internet connection, and you won’t have to worry about losing your data if your computer crashes or is stolen.
On the other hand, saving your files to an external drive gives you a physical backup that you can keep in a safe place separate from your computer. It’s crucial to have a backup plan in place to protect your valuable data from unforeseen circumstances. By regularly backing up your files, you can rest assured that you won’t lose any critical data in the event of hardware failure or unexpected disasters.
So, the next time you want to secure your data, think of backing it up to either the cloud or external storage drive.

Step 2: Shutdown and Unplug
Next step, before proceeding with changing the SSD on your C740-C4PE Chromebook, make sure to shut it down and unplug it. This is important to prevent any possible electric surge while working on the device’s hardware. To shut down the Chromebook, click on the power button on the menu at the bottom right of the screen and select the “Shut down” option.
Once the device is fully turned off, disconnect it from its power source and unplug any cables connected to it. Take a few minutes to double-check that the Chromebook is entirely calm before moving on to the next step. This simple precautionary measure can save you from any unlikely electrical hazards that may nullify your effort to change the SSD.
Remember, before the approach, there’s nothing wrong with being extra cautious.
Power off and disconnect all cables
When it comes to shutting down your electronic devices, it’s essential to do it properly to avoid any possible damage. So, the second step in preparing your device for maintenance or relocation is shutting it down and unplugging it. To do this, make sure to close all programs and save any unsaved work before clicking the shutdown button.
After the device has completely shut down, you can then proceed to unplug all cords and cables. It’s crucial to ensure that you turn off the power button before disconnecting anything as an added precaution. By following these simple steps, you’ll prevent any potential harm to not only your device but also to yourself.
Remember, prevention is always better than cure!
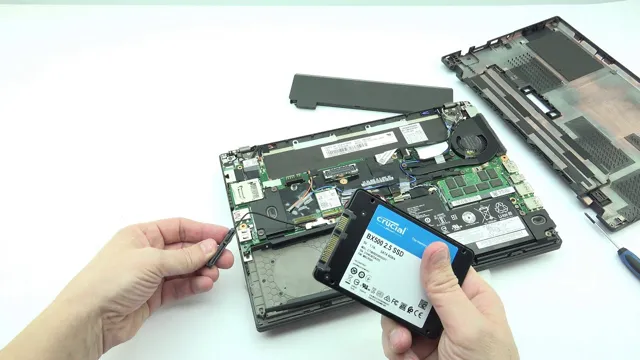
Step 3: Locate the SSD
Once you have prepared all the necessary tools, the next step is to locate the SSD on your Acer Chromebook c740-c4pe. The SSD can be found underneath the bottom panel, and you may need to remove a few screws to access it. Make sure to keep track of the screws as you remove them so you can easily put them back in place later.
Once the screws are removed, gently remove the bottom panel to reveal the SSD. It is a small rectangular component that is usually secured in place with a screw or two. Before proceeding further, make sure to ground yourself by touching a metal surface or wearing an anti-static wristband.
This will prevent any electrostatic discharge from damaging the SSD or any other internal components. Now that you have located the SSD, you can proceed with removing and replacing it with the new one.
Identify the SSD in the laptop
To locate the SSD in your laptop, you need to follow some steps. Step 3 involves finding the SSD. Typically, the SSD is situated near the battery, but the location can differ depending on your laptop’s brand and model.
You may find the SSD by removing the back cover. If you’re not sure where your laptop’s SSD is located, you should consult the user manual or the manufacturer for guidance. Identifying the SSD is crucial, as you need to know where it is before proceeding with any maintenance or upgrades.
Knowing the location of the SSD will help you replace or install it quickly and safely. So, take some time to locate the SSD before you move ahead.
Step 4: Remove the Old SSD
Now that you have successfully backed up your data and removed the cover, it’s time to remove the old SSD from your Lenovo C740-C4PE. This step requires a bit more technical know-how, so if you’re not confident here, it’s best to seek the help of a professional. To begin, locate the old SSD and carefully unscrew any screws that are holding it in place.
Gently disconnect any cables or connectors that are attached to it and carefully remove it from the laptop. Be sure to handle it with care, as SSDs are delicate and sensitive to electrostatic discharge (ESD). Once the old SSD has been safely removed, you can move on to the exciting part of installing the brand new SSD.
Detach the SSD from the motherboard
Now that you’ve backed up your data and shut down your computer, we can move on to Step 4: removing the old SSD. The first thing you’ll need to do is detach the SSD from the motherboard. Depending on your computer model, this may involve removing a few screws or simply pushing a button to release the SSD from its slot.
It’s important to be gentle when handling your hardware to avoid causing any damage. Once you’ve successfully detached the SSD, you can set it aside and prepare for the next step in the installation process. Remember, it’s always a good idea to keep your old hardware in case you need to revert back to it later on.
With the old SSD removed, you’re one step closer to upgrading your computer and giving it a new lease on life!
Step 5: Insert the New SSD
Now that you’ve detached the old SSD, it’s time to insert the new one into your Lenovo C740-C4PE. Firstly, open the SSD slot and carefully insert the new SSD, ensuring that it fits properly and securely. Make sure to align the notches on the SSD with the tabs on the slot.
You don’t want to force the SSD in as it can damage the connectors. Once you have inserted it, push gently on the SSD until you hear a click, indicating that it is locked in place. Next, replace the screw(s) that you removed earlier to secure your new SSD in the slot.
You can now move on to the next step of installing your operating system. Congratulations, you’ve successfully completed the hardware portion of your SSD upgrade for your Lenovo C740-C4PE!
Gently insert the new SSD into the slot
Now that you’ve successfully removed the old SSD, it’s time to install the new one. Find the slot where the old SSD was housed and gently slide the new SSD into place. It’s important to be careful during this step and not force the SSD into the slot as it may damage the delicate components.
The slot may have a securing mechanism such as screws or clips, so be sure to fasten them accordingly. Once the SSD is securely in place, it’s time to reconnect any cables that were disconnected during the removal process. Double-check all connections to ensure that everything is properly aligned and seated.
Congratulations, you have successfully installed your new SSD! The next step is to install the operating system and any other necessary software onto the new drive. Now you can enjoy faster loading and boot times, improved performance, and more storage space.
Step 6: Reassemble and Restart
Now that you have successfully cloned your old SSD onto the new one, it’s time to reassemble your Chromebook C740-C4PE. Start by carefully placing the cover back onto your device, ensuring that all the screws and clips are securely in place. Then, you can plug your battery back in and screw it in place.
Once everything is reattached, plug in the power cord and press the power button to start your device. If you encounter any issues, try resetting the device by holding down the power button for 10 seconds. Congratulations! You have successfully changed your SSD and can now enjoy a faster and more efficient Chromebook experience.
Put everything back together and turn on laptop
Once you’ve finished cleaning the inside of your laptop, you can start reassembling everything. Make sure you put the parts back in the right places and screw them tightly, but don’t overdo it. Once everything is back in place, it’s time to turn on your laptop and see if it still works.
If it doesn’t turn on, double-check your work and make sure everything is connected correctly. If it does turn on, check to see if everything is working correctly. Test the keyboard, touchpad, speakers, and any other components that you had to disconnect.
The most important thing is to make sure that your laptop is functioning properly before you start using it again. With a little bit of patience and careful reassembly, you can have your laptop up and running like new again. Don’t rush the process, take your time and ensure that everything is back in place correctly.
Conclusion
Well folks, it looks like it’s time to dust off the old screwdriver and get tinkering: changing your SSD on a C740-C4PE is not as daunting as it may seem. With the right tools and a little know-how, you can upgrade your storage with ease. Plus, you’ll be the envy of your tech-savvy friends, impressing them with your ability to navigate the ins and outs of your laptop’s hardware.
So, go ahead and take the plunge – in no time, you’ll be enjoying faster load times and increased storage capacity. And who knows, you may even discover a newfound passion for computer repair!
FAQs
What is c740-c4pe?
c740-c4pe is a model of Lenovo laptop.
Can I upgrade the SSD in my c740-c4pe laptop?
Yes, you can upgrade the SSD in your c740-c4pe laptop.
How do I access the SSD in my c740-c4pe laptop?
To access the SSD in your c740-c4pe laptop, you will need to remove the bottom cover of the laptop.
What size SSD can I install in my c740-c4pe laptop?
Your c740-c4pe laptop can accommodate an M.2 NVMe SSD with a maximum capacity of 2TB.
How do I install a new SSD in my c740-c4pe laptop?
To install a new SSD in your c740-c4pe laptop, you will need to remove the old SSD, install the new SSD, and then reinstall the operating system and any necessary drivers.