Ready to give your MacBook Pro a performance boost? Upgrading to a solid-state drive (SSD) is a game-changer. With SSD installed, your MacBook Pro can boot up faster, launch apps in a snap, and store more files with reliability. But how can you install an SSD on your MacBook Pro without data loss, errors, or headaches? Fear not, we’ve got you covered.
In this blog, we’ll walk you through step-by-step, from backing up your data to cloning your system, to physically swapping your hard drive with an SSD. Whether you’re a first-time upgrader or a seasoned pro, we’ll make the process as smooth as silk. So, buckle up and join us on this exciting ride to unleash the full potential of your MacBook Pro.
Backup Your Data
Congratulations on your new SSD for your MacBook Pro! Installing an SSD for your MacBook Pro can significantly improve your computer’s speed and overall performance. However, before installing the new drive, it is essential to back up all your data to prevent losing any information during the installation process. It is recommended that you use Time Machine or a cloud backup service to ensure that all your files are securely stored.
To install your new SSD, you must first power off your MacBook Pro, remove the back panel, and locate the old hard drive. Carefully remove the drive and replace it with the new SSD, securing it with screws and reconnecting all cables and connectors. Once installed, turn on your MacBook Pro, and you should have a faster and more efficient computer.
Remember to ensure your backup is up to date before making any significant changes to your computer. Enjoy your new and improved MacBook Pro with your new SSD!
Use Time Machine or iCloud
Backing up your data is crucial in today’s digital age. You never know when your device will crash, get lost, or stolen. That’s why it’s essential to use reliable backup methods like Time Machine or iCloud.
Time Machine is an automated backup system for Mac users that backs up all the data on your device and keeps it secure. With Time Machine, you can rest easy knowing that all your important documents, photos, and files are safe and easily recoverable. On the other hand, iCloud is a cloud-based backup system that automatically backs up your data to the cloud.
You can access your data from anywhere with an internet connection and quickly recover it in case of an emergency. Both Time Machine and iCloud are excellent options for backing up your data, and it’s best to use both for added protection. Don’t wait until it’s too late.
Backup your data now, so you don’t regret it later.
Gather Materials
Congratulations on purchasing an SSD for your MacBook Pro! Installing it can seem intimidating, but don’t worry, it’s easier than you think. The first step is to gather all of the necessary materials. You’ll need a screwdriver (either a Phillips or a Torx depending on your MacBook model), an external enclosure to clone your current hard drive (you can find these for relatively cheap online), a USB to SATA adapter, and of course, your new SSD.
Before we get started, be sure to backup any important files on your current hard drive. Once you have all of the materials, you’re ready to dive into the installation process.
SSD, Screwdriver, and External Enclosure
If you’re looking to upgrade your computer’s storage, there are a few essential materials you’ll need to get started. First and foremost, you’ll need an SSD (solid-state drive) to replace your old hard drive. This will ensure faster boot times, quicker load times for your applications, and an overall smoother user experience.
Next, you’ll need a screwdriver to open up your computer’s case and access the hard drive bay. Make sure to choose the right size and type of screwdriver for your computer’s specific model. Finally, you’ll want to invest in an external enclosure for your old hard drive so you can transfer any important files or documents to your new SSD.
The enclosure will allow you to connect your old hard drive to your computer like an external hard drive and make the data transfer process much smoother. With these three materials in hand, you’ll be well on your way to upgrading your computer’s storage and improving its overall performance.
Remove Old Hard Drive
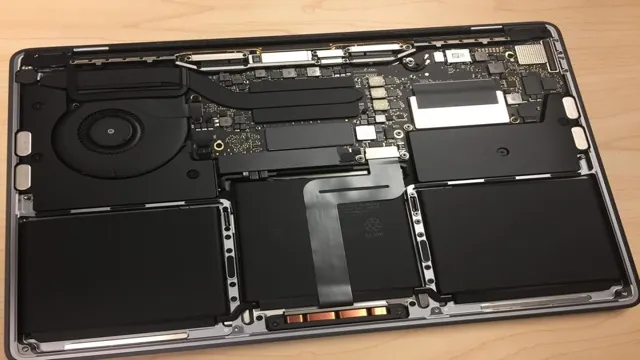
If you’ve just bought a solid-state drive (SSD) for your MacBook Pro, you might be wondering how to install it. The first step is to remove the old hard drive from your MacBook. This can be a bit tricky, so it’s important to be careful.
Start by shutting down your MacBook and disconnecting it from any power sources. Then, use a small Phillips head screwdriver to remove the screws on the bottom case. Once you’ve removed the case, you should be able to see the hard drive.
Carefully disconnect the cables and unscrew the screws holding it in place. Then, gently remove the hard drive from your MacBook. Be sure to keep the screws in a safe place so you don’t lose them.
With the old hard drive removed, you’re ready to install your new SSD and enjoy faster speeds and better performance on your MacBook Pro.
Unplug battery, unscrew and replace drive
When it comes to replacing your hard drive, the first step is to unplug the battery. This is important as it reduces the risk of electric shocks and ensures the safety of your device. Once this is done, it’s time to locate and unscrew the drive.
This step may be tricky, and you may need to consult your device’s manual for guidance. Once you find the drive, unscrew it carefully, and remove it from the device. It’s important to note that different devices may have varying configurations, so ensure you’ve followed the correct procedures when removing the drive.
With the old drive removed, you can now replace it with your new drive. This may involve reversing the steps above, including screwing the new drive in place. Once this is done, you can reattach the battery and start up your device.
You should confirm that your new drive is functioning correctly by checking your device storage and ensuring that the new drive is recognized. In conclusion, replacing your hard drive may seem daunting, but following the correct steps can ensure the process is straightforward and easy.
Clone Data to SSD
So, you’ve got yourself an SSD for your MacBook Pro and you’re ready to enjoy some fast data speed. But, wait, how do you install it? Well, the first step is to clone your data to the new SSD. Start by connecting the SSD to your Mac and opening the Disk Utility app.
Select your old hard drive and click on the “Restore” tab. Choose your new SSD as the destination drive and click on “Restore”. Wait for the process to complete and then restart your Mac while holding down the “Option” key.
Choose the new SSD from the list of available drives and you’re good to go! In summary, the process involves cloning your data to the new SSD, which can be done through macOS’s Disk Utility app. With the new SSD installed, you can enjoy faster data speeds and improved performance on your MacBook Pro.
Use Migration Assistant or Terminal
If you’re looking to transfer your data to an SSD, there are a few different methods you can use. One popular option is to use Migration Assistant, which is built into macOS. This tool makes it easy to transfer all of your files and settings from your old hard drive to your new SSD.
Alternatively, you can use Terminal to clone your data to the SSD. This method requires a bit more technical knowledge, but it can be faster and more efficient than using Migration Assistant. Whichever method you choose, it’s important to make sure you have a backup of your data before you start the transfer process.
This way, if anything goes wrong during the transfer, you can still access your important files and data. Overall, transferring data to an SSD is a great way to improve the performance and speed of your Mac, and both Migration Assistant and Terminal offer effective ways to accomplish this task.
Install New SSD
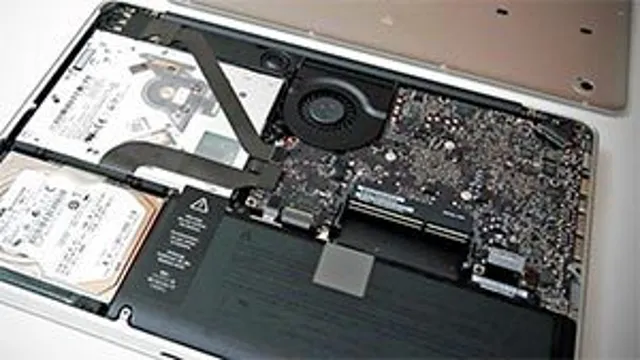
If you’ve recently bought an SSD for your MacBook Pro, you might be wondering how to install it. Luckily, it’s a fairly simple process that can be done at home with a few basic tools. First, shut down your computer and unplug any cables.
Flip your MacBook Pro over and use a screwdriver to remove the bottom case. Locate the current hard drive and disconnect any cables connecting it to the computer. Gently remove it from its slot and replace it with the new SSD.
Reconnect any cables and screw the bottom case back on. Boot up your computer and use a cloning tool to transfer all of your data from the old hard drive to the new SSD. Once the transfer is complete, you can enjoy faster startup times and improved overall performance on your MacBook Pro.
Screw in place, reconnect battery, and turn on
Installing a new SSD can greatly improve the performance of your computer. Before you begin, you’ll need to gather a few tools: a screwdriver, an anti-static wristband, and of course, your new SSD. First, shut down your computer and unplug it from the wall.
Then, locate the existing hard drive, unscrew it, and carefully remove it from the computer. Next, put on your anti-static wristband to prevent any static electricity from damaging your new SSD. Now it’s time to screw in your new SSD in the place where the old hard drive was.
Make sure it’s secure before reconnecting the battery and turning on your computer. Congratulations, you’ve successfully installed a new SSD and can now enjoy faster performance and increased storage capacity!
Verify New SSD
So you’ve bought an SSD for your MacBook Pro, and now you’re wondering how to install it? Well, the good news is it’s not as complicated as you might think! Before you get started, make sure you have all the necessary tools, including a screwdriver and a tool to remove the bottom panel of your MacBook. Once you’ve got everything you need, the first step is to turn off your MacBook and unplug it from the power source. Then, remove the bottom panel and locate the hard drive.
Carefully remove it from its bracket and disconnect the SATA cable. Now, it’s time to install your new SSD! Slide it into the bracket and connect the SATA cable, then place it back in its holder. Replace the bottom panel and screw it back into place, and you’re all done! Now, to make sure everything is working properly, you’ll need to verify your new SSD.
You can do this by opening up Disk Utility and selecting your new SSD. Check that everything looks good, including the size and format, and then you’re good to go! Congratulations on your new and improved MacBook Pro!
Check storage and performance
If you just purchased a new SSD, it’s imperative to verify its storage and performance to ensure you’re getting your money’s worth. First, you can check the storage capacity by looking at the total space available on your computer versus what’s advertised on the SSD packaging. Keep in mind that some space may be taken up by the operating system and software.
Next, it’s crucial to test the performance of your new SSD. There are several benchmarking tools available online that you can use to measure its read and write speeds. This will show you how quickly your device can transfer data and how well it performs under heavy loads.
When verifying your SSD’s performance, make sure you check that it’s running at its maximum capacity and that it’s not experiencing any issues that could lead to reduced performance. Overall, checking the storage and performance of your new SSD can help you identify any initial problems and ensure you’re getting the most out of your investment.
Enjoy Improved Speed
If you’ve recently bought an SSD for your MacBook Pro and are wondering how to install it, don’t worry, it’s a relatively straightforward process. The first step is to ensure all your important files are backed up as you will need to erase the current hard drive. You will need a few tools to perform the installation, including a screwdriver set and an external enclosure.
To begin, power off your MacBook Pro and remove the bottom case. You should then locate the hard drive and unscrew it from its place. Replace it with your new SSD and secure it in place with screws.
The next step is to restore your data from the backup, and you’re good to go! The biggest advantage of the installation is the speed improvement. With an SSD, you can expect applications to launch instantly, files to open quickly, and your MacBook Pro to be much snappier overall. Remember to always take care when performing any hardware upgrades and follow the correct procedure to avoid damaging any components of your MacBook Pro.
Experience faster boot and application load times.
If you’re tired of waiting for your computer to start up or struggling with slow applications, then you’ll be glad to know that you can enjoy improved speed with some simple changes. By upgrading your hardware components, you can experience faster boot and application load times. This means that you can get to work or play faster without wasting time waiting for your computer to catch up.
Upgrading your storage to an SSD is an excellent way to boost speed and reduce load times. SSDs use flash memory to store data, which means that they can read and write information faster than traditional hard drives. So, if you want a faster computing experience, then an SSD is a must-have upgrade.
With improved speed, you’ll spend less time waiting and more time getting things done.
Conclusion
In conclusion, upgrading your MacBook Pro with a shiny new SSD is like giving it a shot of caffeine. Suddenly, your old and sluggish laptop is revived with lightning-fast speeds and increased storage capacity. And don’t worry, installing the new SSD is a breeze – even for the least tech-savvy among us.
So go ahead, give your MacBook Pro the upgrade it deserves and enjoy the benefits of a sleek, speedy machine. Your productivity (and sanity) will thank you.”
FAQs
Can I install an SSD in my MacBook Pro?
Yes, you can install an SSD in your MacBook Pro.
Why should I install an SSD in my MacBook Pro?
Installing an SSD can significantly improve the performance of your MacBook Pro. It can make it faster, more reliable, and more efficient.
How do I know which SSD is compatible with my MacBook Pro?
You should check your MacBook Pro’s model and specifications to see which type of SSD is compatible.
Can I install the SSD myself or will I need to take it to a professional?
Installing an SSD in a MacBook Pro can be a bit complicated, so it’s recommended that you take it to a professional if you’re not experienced with computer hardware installation.