If you’re looking to upgrade your laptop’s storage space, adding an additional SSD can be a great option. The ASUS Scar 2 GL704GV is a powerful gaming laptop, but its storage capacity may not be enough for some users. Adding an SSD can provide additional space for your files and games, as well as faster loading times.
But how do you install an additional SSD on the ASUS Scar 2 GL704GV? In this blog post, we’ll go over the steps you need to take to install an SSD on your ASUS laptop, as well as some tips to help you get the most out of your new storage space. Whether you’re a gamer, content creator, or just need some extra room for your files, installing an additional SSD can be a great way to improve your laptop’s performance and functionality. So let’s get started!
Step 1: Check Compatibility
If you’re looking to install an additional SSD in your ASUS Scar 2 GL704GV laptop, the first step is to check compatibility. You’ll want to make sure that your laptop has an available SATA or PCIe slot for the SSD, as well as enough power to support it. You can find this information in your laptop’s user manual or by checking the manufacturer’s website.
Once you’ve determined compatibility, you can proceed with purchasing and installing the SSD into your laptop. Don’t forget to backup your data and take the necessary precautions to avoid static electricity during installation. With a little bit of patience and careful attention to detail, adding an SSD to your ASUS Scar 2 GL704GV can greatly improve your laptop’s performance and storage capabilities.
Confirm that the SSD is compatible with your laptop model
If you’re planning on upgrading your laptop’s storage by installing an SSD, it’s crucial to make sure that it’s compatible with your laptop model. Before purchasing an SSD, you need to figure out what type of SSD your laptop supports and whether it uses a SATA or NVMe interface. This will help you choose the appropriate form factor, capacity, and speed.
Additionally, you need to check whether your laptop’s motherboard has an M.2 slot or a conventional SATA slot. Some laptops also have size restrictions, so you need to check the dimensions of the SSD to make sure it fits correctly.
Checking for compatibility is vital to avoid wasting your money and time on an incompatible SSD that won’t work with your laptop. Remember that every laptop model has specific SSD requirements, making it essential to research or seek expert advice before you buy an SSD.
Step 2: Gather Necessary Tools
If you’re looking to install an additional SSD on your ASUS Scar 2 GL704GV, you’ll need to gather a few necessary tools before getting started. First and foremost, you’ll need a new SSD that’s compatible with your laptop. Once you’ve got that, you’ll need to open up your laptop, which means you’ll need a few screwdrivers to remove the back panel.
Specifically, you’ll need a Phillips head screwdriver and a T5 Torx screwdriver. It’s important that you have both of these to avoid causing any damage during the installation process. Additionally, you may want to consider using a grounding mat or wrist strap to ensure that you don’t accidentally damage any of the electrical components within your laptop.
Once you’ve got all of the tools you need, you’ll be ready to move on to the next step of the installation process.
Tools including screwdriver, spudger and anti-static wrist strap
Before you begin repairing your device, you need to gather all the necessary tools. Having the right tools on hand will make the process much easier and prevent further damage to your device. The three most essential tools you will need for electronic repairs are a screwdriver, spudger, and anti-static wrist strap.
The screwdriver is self-explanatory and crucial for removing the screws without causing any damage. A spudger is a handy tool for opening the device’s cover and prying off small components, such as connectors and wires. Finally, you will need an anti-static wrist strap to protect your device against any static electricity that might build up while working on it.
These tools are inexpensive and widely available, making them a must-have for anyone who wants to repair their electronics. By having all the necessary tools on hand, you will be able to proceed with confidence and complete the repair job successfully.
Step 3: Open the Laptop Chassis
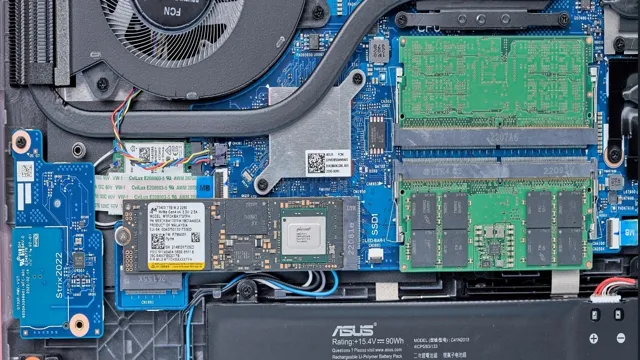
Asus Scar 2 GL704GV how to install additional SSD Opening the chassis of your Asus Scar 2 GL704GV laptop is the next step in installing an additional SSD. Start by removing all screws at the bottom of the laptop and gently prying off the bottom panel. Be sure to keep the screws in a safe place as they will be needed when replacing the panel.
Once the bottom panel is removed, locate the NVMe SSD slot and gently insert the SSD at a 30-degree angle. Push the SSD in until it clicks into place and secure it with the provided screw. Carefully return the bottom panel and screw it in place.
Now that the extra SSD is installed, it’s time to configure it in the BIOS settings and partition it for use. Congratulations, you have successfully installed an additional SSD to amplify the performance of your Asus Scar 2 GL704GV laptop!
Unscrew the back cover of the laptop
When it comes to accessing the internal components of your laptop, it’s important to know how to safely unscrew and open the chassis. This is where Step 3 comes in: unscrewing the back cover of the laptop. Before doing so, make sure that you have all the necessary tools with you – a screwdriver that fits the screws on your laptop, and an anti-static wrist strap to protect the internal components from electrostatic discharge.
Once you have everything you need, carefully flip over your laptop and locate the screws on the back cover. Remove these screws one by one, making sure to keep track of which screw goes where to make reassembly easier. Once all the screws have been removed, gently lift off the back cover and put it aside.
You should now have access to the inside of your laptop, and can proceed with any repairs or upgrades you may need to make. Keyword: Laptop Chassis
Step 4: Locate the M.2 Slot
When it comes to upgrading your Asus Scar 2 GL704GV with an additional SSD, the essential first step is to locate the M.2 slot. This slot is specifically designed to house M.
2 SSDs, which are fast and efficient storage devices that can significantly boost your gaming laptop’s performance. To find the M.2 slot on your Asus Scar 2 GL704GV, you’ll need to remove the back panel of the laptop.
Once you’ve done that, look for a small rectangular slot that’s located near the RAM slots. This is the M.2 slot, where you can insert your new SSD.
Before installing the SSD, make sure it’s compatible with your laptop, and follow the manufacturer’s instructions carefully. Once you’ve installed the SSD into the M.2 slot, reassemble the laptop and power it on to test the new drive.
With a little bit of know-how, you can easily upgrade your Asus Scar 2 GL704GV with an additional SSD and enjoy faster load times and improved performance.
Determine which slot you want to insert your SSD into
After checking your motherboard’s manual, the next step in installing your SSD is to locate the M.2 slot. This slot is where the SSD will be inserted.
M.2 slots are typically located near the bottom of your motherboard, but this can vary depending on the layout and size of your motherboard. It is important to choose the correct M.
2 slot for your SSD because not all M.2 slots support the same type of SSD. For example, some M.
2 slots support both SATA and NVMe SSDs, while others only support one or the other. Make sure to refer to your motherboard’s manual to determine which type of M.2 slot you have and which type of SSDs it supports.
Pay attention to the notches on the M.2 slot and the SSD connector. These notches ensure the correct orientation of the SSD during installation.
Simply insert the SSD into the slot at a 30-degree angle and then gently push it down until it clicks into place. Once the SSD is securely in place, the installation process is complete, and you can move on to configuring your system.
Step 5: Secure the SSD in the Slot
After carefully removing the back cover of your ASUS Scar 2 GL704GV and identifying the M.2 slot, the next step is to secure the SSD into the slot. First, gently lay the SSD into the slot, making sure the notches on the SSD match the key on the slot.
Once in place, use the screw you removed earlier to secure the SSD down. Tighten the screw with care, ensuring that it’s snug but not overly tight. Over-tightening can cause damage to the SSD or the computer’s circuit board.
Once the SSD is secure, replace the back cover, making sure all screws are back in place and tight. Finally, power on your device and check that your new SSD is recognized and functioning correctly. With these simple steps, you have successfully installed an additional SSD in your ASUS Scar 2 GL704GV to increase its storage capacity and improve performance.
Insert the SSD and use the screw to secure it in the slot
After properly aligning the SSD in the slot, it’s time to secure it in place. Using the screw that came with the computer or SSD kit, carefully attach the SSD to the designated spot. It’s crucial to ensure that the screw is firmly tightened without over-tightening, as both scenarios can cause damage or even loss of data.
To avoid the hassle of dropping tiny screws or getting them lodged into unreachable places, it’s wise to use a magnetic screwdriver. Suppose the screwdriver isn’t magnetized, then attaching a magnet to the tip can assist in the process. Once the SSD is secured, it’s time to double-check if everything is fitted correctly and ready to go.
Turn on the computer and access the BIOS to check if the system recognizes the newly installed SSD. Check the performance of the SSD to ensure optimal speed and functionality. Congratulations, your new SSD is up and running!
Step 6: Reassemble the Laptop Chassis
Now that the additional SSD has been installed, it’s time to reassemble the laptop chassis. This step may seem daunting, but with a little patience and attention to detail, it can easily be completed in no time. First, carefully place the bottom cover back onto the laptop.
Take note of the screw holes and ensure that they align properly. Then, use the appropriate screwdriver to tighten the screws and ensure a secure fit. Next, attach the back panel, making sure that the port openings and any other features line up with the corresponding ports on the laptop.
Once the panel is in place, secure it using the provided screws. Finally, it’s time to flip the laptop over and attach the screen. Carefully slide it into place, being careful not to damage any of the cables or ribbon connectors.
Once it’s properly aligned, secure it with screws. And that’s it! Your Asus Scar 2 GL704GV is now ready to use with its additional SSD.
Replace the back cover of the laptop and screw it back in place
Congratulations! You’ve made it to the final step of repairing your laptop. The last step is to reassemble the laptop chassis. It’s vital to ensure that all screws are tightly in place to avoid any further damage to your laptop.
Start by replacing the back cover and screwing it back in place. Ensure that the screws are tightened correctly and are not too tight, which could cause damage to the frame. Once that is complete, replace any brackets or battery that you removed earlier.
Reattach the main battery and plug in the power supply before powering on the laptop to test if it’s working correctly. If everything is okay, put your laptop keyboard back in place and ensure that the screws are tightened properly. And voila, your laptop is up and running again! Don’t forget to double-check everything before you put away your tools and start using your machine again.
In summary, the final step in repairing your laptop is about reassembling the laptop chassis. Ensure that all screws are well tightened and the back cover is in place, replacing any parts that you removed earlier, testing before finally re-attaching the keyboard and putting everything back together. With these simple steps, you can repair your laptop with ease, online guides, and the right tools.
Step 7: BIOS Configuration
If you want to install an additional SSD on your ASUS Scar 2 GL704GV, you will need to configure your BIOS settings first. To do this, start by turning on your laptop and pressing the F2 key repeatedly until you enter the BIOS setup utility. From there, navigate to the “Advanced” tab and select “SATA Configuration.
” Look for an option that says “SATA Mode Selection” and change it to “Intel RST Premium.” Save your changes and exit the BIOS setup utility. Once your BIOS settings are configured, you can proceed with installing your additional SSD.
Just make sure to follow your laptop’s manual on how to properly install additional hardware. With the right BIOS settings and hardware installation, you can quickly boost your laptop’s storage capacity and improve its overall performance. So why not give it a go and see how it enhances your ASUS Scar 2 GL704GV experience?
Configure the BIOS to recognize the new SSD
If you’ve installed a new SSD in your computer, the next step is to configure the BIOS to recognize it. This is important because the BIOS is responsible for identifying and initializing hardware components during the boot process. To do this, you’ll need to enter the BIOS settings by pressing a key during startup (usually F2 or Del).
Once you’re in the BIOS, look for the storage or SATA settings and make sure the new SSD is detected. If it isn’t, you may need to enable AHCI mode or check the physical connections on the drive. You may also want to adjust the boot order to ensure that the computer boots from the new SSD instead of the old hard drive.
Remember, configuring the BIOS settings can be tricky, so be sure to follow the manufacturer’s instructions carefully and make sure you save any changes before exiting the BIOS. With these steps, your computer should now recognize your new SSD and be ready to use it to its full potential.
Step 8: Install Operating System and Drivers
If you’ve just added an additional SSD to your Asus Scar 2 GL704GV, the next step is to install the operating system and necessary drivers. First, insert your Windows installation media and restart your laptop. Follow the on-screen instructions to install Windows onto the new SSD.
Once Windows is installed, you’ll need to install necessary drivers for the hardware components of your laptop. You can find these on the Asus website or on the included driver disc. Be sure to download and install drivers for your specific model to ensure optimal performance and compatibility.
Installing an additional SSD can greatly improve the storage capacity and speed of your laptop, making it a worthwhile upgrade for those looking for more storage and faster performance.
Install the Operating System and necessary drivers for the new SSD
After physically installing your new SSD in your computer, the next step is to install the operating system and necessary drivers. This will ensure that your new SSD is properly recognized by your computer and that it is fully functional. Begin by inserting your installation disk or USB drive and booting up your computer.
Follow the prompts on the screen to begin the installation process. Once the operating system is installed, you’ll need to install any drivers specific to your hardware components. These can often be found on the manufacturer’s website or on a driver disk that came with your computer.
Make sure to download and install the most recent versions to ensure optimal performance. After all necessary drivers have been installed, you’re ready to start using your new SSD and taking advantage of its superior speed and performance.
Step 9: Verify SSD is Working
To make sure that your newly installed SSD is up and running, you need to verify that it’s working correctly. One way to do this is to check if your system recognizes the new device. Start by opening the “Disk Management” tool and look for the disk space that corresponds to your new SSD.
If you can’t find it, try checking your BIOS settings and see if the SSD is detected there. If it’s not, then make sure that the cables are correctly attached and that the SSD is securely placed in its slot. Once you can see the SSD in Disk Management, you can format it and assign a drive letter to start using it.
Check if your system runs faster and smoother with the new SSD, and run a few benchmarks to make sure that you’re getting the speed that you paid for. With all of these steps completed, you can now enjoy the added convenience and performance boost that your newly installed SSD brings to your ASUS Scar 2 GL704GV laptop.
Check if the new SSD is correctly installed and working efficiently
After successfully installing your new SSD, it’s important to make sure that it’s working efficiently. To do this, there are a few steps you can take. First, check the computer’s BIOS or UEFI to ensure that it recognizes the new SSD.
If it does, then you can move on to checking the operating system’s device manager. Here you should be able to see the new SSD listed as a disk drive. Double-check that it’s there and that it’s functioning correctly.
You can also check the transfer speeds by running a benchmark test on the SSD. This will give you an idea of how quickly the SSD can read and write data. If everything checks out, then congratulations! You have a brand new SSD up and running in your computer, providing faster storage and quicker load times for your favorite applications.
Conclusion
So there you have it folks, installing an additional SSD on your ASUS Scar 2 GL704GV is not rocket science, but can certainly take your gaming experience to new heights. Whether you’re upgrading for more storage space or faster load times, it’s always wise to choose a high-performance SSD from a trusted manufacturer. With a little bit of patience and care, anyone can become a pro at computer hardware installations.
So go on, unleash the power of your gaming beast with a shiny new SSD.”
FAQs
What is the maximum storage capacity for additional SSD in Asus Scar 2 GL704GV?
The maximum storage capacity for additional SSD in Asus Scar 2 GL704GV is 2TB.
What is the recommended SSD type for installation in Asus Scar 2 GL704GV?
The recommended SSD type for installation in Asus Scar 2 GL704GV is NVMe PCIe SSD.
Do I need to reinstall the operating system after installing additional SSD in Asus Scar 2 GL704GV?
No, you do not need to reinstall the operating system after installing additional SSD in Asus Scar 2 GL704GV. However, you may need to clone your existing HDD to the new SSD.
How can I install an additional SSD in Asus Scar 2 GL704GV?
To install an additional SSD in Asus Scar 2 GL704GV, you need to open the back panel of the laptop, locate the M.2 SSD slot, insert the NVMe PCIe SSD into the slot, secure it with screws, and close the back panel.