Are you looking to upgrade your Acer Nitro 5 with a solid-state drive (SSD)? Maybe you’ve noticed that your laptop is running slow, and you want faster boot-up and load times for your favorite games and applications. Whatever the reason, installing an SSD on your Acer Nitro 5 is a simple process that will significantly enhance your system’s performance. Think of your Acer Nitro 5 as a car, and your hard drive as the engine.
Without a good engine, your car won’t perform well, and the same goes for your laptop. Switching to an SSD will make your Acer Nitro 5 run like a high-performance car, taking everything you throw at it with ease. In this guide, we’ll take you through all the steps you need to follow to install an SSD on your Acer Nitro
From preparing your system, migrating your data, and finally, installing the SSD, we’ve got you covered. Follow these steps, and you’ll have a faster, more responsive laptop in no time.
Preparation
If you’ve recently purchased an Acer Nitro 5 laptop and want to increase its storage capacity by installing an SSD, there are a few things to consider before diving in. First, make sure you purchase an SSD that is compatible with your laptop and meets your storage needs. Once you have your SSD, you’ll need to gather the necessary tools such as a screwdriver, and prepare your laptop for the installation process.
This involves ensuring that your laptop is completely shut down and unplugged, removing the battery, and locating the existing hard drive. After removing the screws that hold the hard drive in place, carefully slide it out and replace it with your new SSD. Secure it in place with screws and reattach the battery.
Finally, turn on your laptop and configure your new SSD to your liking. With a little preparation and patience, installing an SSD in your Acer Nitro 5 is a simple and effective way to boost your laptop’s storage capacity and performance.
Check compatibility with laptop
When checking compatibility between your laptop and other devices, such as an external monitor or printer, preparation is key. Before purchasing any new device, consult the user manual or product specifications to ensure that it is compatible with your laptop’s operating system and ports. It may also be helpful to check online forums or reviews to see if other users have experienced any compatibility issues with similar setups.
When connecting a new device to your laptop, make sure to use the appropriate cable or adapter and follow any installation instructions carefully. Don’t forget to also update your laptop’s drivers to ensure optimal performance. By taking these steps, you can avoid frustrating issues such as display or connectivity problems and ensure a smooth user experience.
Purchase compatible SSD
When it comes to upgrading your computer’s storage system, buying a compatible SSD is an important first step. Before making a purchase, it’s important to prepare your computer by checking its compatibility with the SSD you’re considering. This involves checking the hard drive bay size and the interface type, ensuring that the SSD fits into the bay and uses the correct interface for your motherboard.
Additionally, it’s important to choose an SSD that matches your desired storage capacity and performance needs. It’s crucial to research before you buy – there are many factors to consider, such as the brand, speed, and price. Skipping this step could cause compatibility issues, which can lead to lost data and a waste of time and money.
Therefore, taking the time to prepare for the purchase of a compatible SSD can save you a lot of hassle and ensure that your computer runs smoothly.
Prepare necessary tools
When it comes to any DIY project or task, the right preparation is key to success. This also holds true for any home improvement project, including electrical work. So before starting any electrical job, it is important to prepare the necessary tools.
Basic electrical tools include a voltage tester, wire stripper, pliers, screwdrivers, and a hammer. These tools will help you to safely and effectively complete your electrical project. It is important to make sure that all of the tools you are using are in good working condition, and that you know how to use them correctly.
By taking the time to prepare your tools before starting your project, you can avoid any surprises or setbacks and ensure that your work is completed accurately and safely. So take a few minutes and gather the necessary tools for your electrical project, and get ready to tackle your next DIY job like a pro!
Installation Process
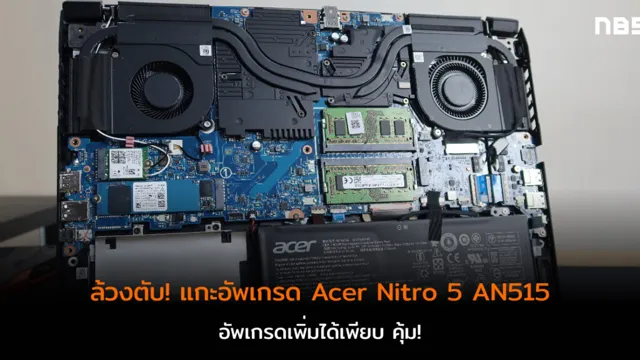
If you’re looking to upgrade your Acer Nitro 5’s storage capacity, you’re in luck – installing an SSD can improve your computer’s performance significantly. Here’s a quick guide on how to install an SSD onto your Acer Nitro 5: Turn off your laptop, unplug the power cable and remove the battery.
Locate the cover on the underside of your laptop. Remove the screws and lift off the cover.
Locate the existing hard drive and remove the screws that hold it in place.
Gently slide the hard drive out of its bay and disconnect the SATA connector. Remove the screws that hold the hard drive inside its cage and gently slide it out.
Slide your new SSD into the empty space and screw it in place.
Reconnect the SATA connector and screw the cage back into place. Reinstall the cover and its screws.
Shutdown and unplug laptop
If you’re planning to install new software or updates on your laptop, it’s essential to follow certain steps to ensure a smooth process. One of the crucial steps is shutting down and unplugging your laptop before starting the installation. This helps prevent any power fluctuations or unexpected shutdowns that may occur during the installation process and potentially damage your laptop.
It also helps to close any running programs and to save any necessary documents or files before shutting down. Once you’ve unplugged your laptop, make sure to wait for a few minutes to allow any residual power to be discharged from the device. These steps may seem simple, but following them can make a big difference in ensuring a successful installation process and keeping your laptop in optimal working condition.
Remove back cover and locate HDD
If you’re looking to upgrade your laptop’s storage space, then the first step is to remove the back cover of your device. This can be a little tricky, so it’s important to do it carefully in order to avoid damaging any components. Once the cover is off, you should be able to locate the HDD (hard disk drive).
It’s usually a small rectangular-shaped device that will be secured in place with a few screws. Before you remove the HDD, it’s a good idea to make sure you have a replacement drive at hand. You’ll also need the appropriate screwdriver to remove the screws that are holding the HDD in place.
Once the drive is removed, you can replace it with the new one and secure it in place with the screws. Don’t forget to replace the cover and test your device to make sure everything is working as it should. With this simple process, you can easily upgrade your laptop’s storage space and enjoy smoother performance.
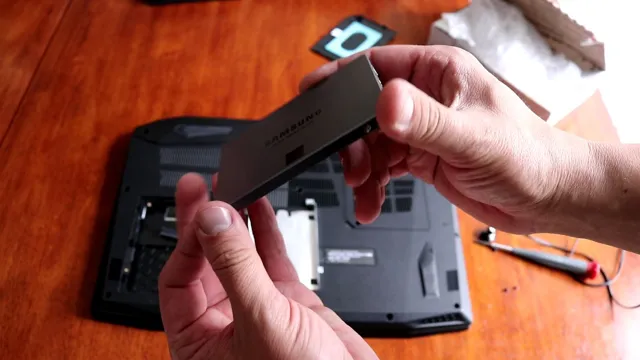
Disconnect HDD and insert SSD
So you’ve decided to upgrade your computer’s hard drive from an HDD to an SSD, but you’re not sure where to start? Don’t worry, the installation process is easier than you think! First, make sure your computer is turned off and unplugged. Then, open the case and locate the HDD. Disconnect it from the motherboard and power supply.
Next, insert the SSD into the same slot and connect it to the appropriate cables, making sure it’s securely in place. Once everything is connected, close the case and plug in your computer. You’re ready to go! The process is straightforward, but it’s important to be careful when handling the drives and cables.
With your new SSD installed, you’ll enjoy faster boot times and improved performance, making your computer feel like new again. It’s definitely worth the effort!
Connect SSD and reassemble laptop
Now that you have your SSD, it’s time to install it in your laptop. First, power off and unplug your laptop. Locate the hard drive compartment, which is usually on the bottom of the laptop, and remove the cover.
Carefully disconnect the cables and screws that attach the old hard drive to the laptop and remove it. Next, attach the SSD to the same cables and screw it into place. Replace the cover, plug in your laptop, and power it on.
You will need to partition and format the SSD before you can use it. Consult your laptop’s user manual or online resources to walk you through this process. Once your SSD is ready to go, you will notice a significant improvement in your laptop’s performance and speed.
It’s like upgrading from a bicycle to a sports car!
Final Steps
So you’ve decided to upgrade your Acer Nitro 5 by installing an SSD, good choice! First, you’ll need to gather your tools – a Philips screwdriver and an M.2 SSD compatible with your Nitro Next, power off your laptop and unplug it from any power source.
Now, locate the M.2 slot under the bottom panel of your Nitro 5 – it should be near the battery. Carefully unscrew the panel and set it aside.
You should see the M.2 slot – it’ll usually be covered by a small metal bracket. Remove the bracket by unscrewing it and carefully inserting your SSD into the slot at an angle.
Tighten the screw back onto the bracket to secure the SSD in place. Replace the back panel, power on your Nitro 5, and voila! Your Acer Nitro 5 now has blazing fast speeds thanks to your new SSD.
Power on and access BIOS settings
The final step in building your PC is to power it on and access BIOS settings. This may seem like a daunting task, but it’s actually a simple process. The first thing you’ll want to do is ensure that all of your components are securely plugged in, and that your graphics card is properly seated in its slot.
Once this is done, push the power button on your computer and wait for it to boot up. As it starts to load, look for a screen that tells you which button to press to access BIOS settings. This is typically F2, F10, or Delete, but it may vary depending on your motherboard.
Once you’ve accessed BIOS, you can adjust settings such as fan speed and overclocking, if desired. Remember to save any changes you make before exiting BIOS, or your changes will not be applied. With your BIOS settings configured, you’ll be ready to start using your new PC!
Confirm SSD installation and adjust boot priority
With your SSD physically installed and everything hooked up, it’s time to confirm that your computer recognizes the new drive and then adjust your boot priority. First, you’ll need to reboot your computer and enter the BIOS setup, which is typically accessed by pressing a key like F2 or Delete during startup. Once in the BIOS, navigate to the “Boot” section and verify that your SSD is listed as a bootable drive.
If it’s not, you’ll need to double-check that it’s properly connected and try again. Once you’ve confirmed that your SSD is a bootable device, you’ll need to adjust the boot order to ensure that your computer boots from the SSD first. This will help ensure that you’re taking full advantage of the benefits of your new SSD, such as faster boot times and improved overall performance.
Make sure to save changes before exiting the BIOS, and you should be good to go!
Install operating system and transfer data
After assembling your new computer, the next steps are to install the operating system and transfer your data from your old computer to the new one. When it comes to choosing an operating system, you have many options, including Windows, macOS, and Linux. If you’ve purchased a pre-built computer, it will likely come with an operating system already installed, but if you’re building a computer from scratch, you’ll need to install one.
Once your operating system is installed, you can then begin transferring your data. Depending on the amount of data you have, this process can take some time. One option is to transfer your data via an external hard drive or USB drive, but there are also cloud-based services available, such as Google Drive, Dropbox, or Microsoft OneDrive, which can make transferring your data easier.
By following these final steps, you’ll be able to complete the setup of your new computer and transfer your data without any complications.
Conclusion
In conclusion, installing an SSD into your Acer Nitro 5 is like giving your laptop a performance boost and a spa day all at once. With its increased speed and improved storage capabilities, your Acer Nitro 5 will be ready to take on any challenge with style and ease. So don’t wait, follow these easy steps and elevate your gaming experience today!”
FAQs
What is the process for installing an SSD in Acer Nitro 5 laptops?
To install an SSD in Acer Nitro 5, you need to remove the back cover, locate the HDD slot, and install the SSD in the designated slot. Once installed, you can install the operating system and transfer data to the new drive.
What type of SSD is compatible with Acer Nitro 5?
Acer Nitro 5 supports 2.5-inch SATA III SSDs that can fit in the HDD caddy. You can also use M.2 SATA SSDs that are compatible with the M.2 slot on the motherboard.
Can I clone my existing HDD to the new SSD in Acer Nitro 5?
Yes, you can use a cloning software like Acronis True Image or Clonezilla to clone your existing HDD to the new SSD. This will transfer all your data, applications, and settings to the new drive without any data loss.
Do I need to reinstall the operating system after installing an SSD on Acer Nitro 5?
It is not necessary to reinstall the operating system if you clone your existing HDD to the new SSD. However, if you perform a clean install of the operating system, you will need to download and install all the necessary drivers and software.