Are you looking to speed up your Acer Aspire A515-51G? Adding an SSD could be just the upgrade you need. By replacing your traditional hard drive with a faster, more efficient SSD, you can enjoy faster boot times, quicker program launches, and improved overall system performance. Upgrading your laptop’s hard drive to an SSD may seem daunting, especially if you’re not familiar with the process.
But don’t worry, it’s a straightforward process. With a few tools and the right instructions, you can have your new SSD installed in no time. In this guide, we will walk you through the step-by-step process of adding an SSD to your Acer Aspire A515-51G.
We will cover everything from choosing the right SSD to migrating your data and installing the new drive. By the end of this guide, you’ll be able to upgrade your Acer Aspire A515-51G with ease. So, let’s get started!
Prepare Your System
If you want to upgrade your Acer Aspire A515-51G with an SSD, you’ll need to know how to put the new drive in. Before you start, remember to turn off your laptop and unplug it from the charger. You’ll also need a Phillips head screwdriver and your new SSD.
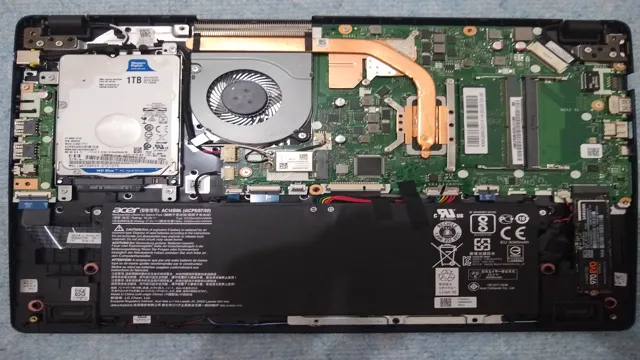
Once you’re ready to begin, locate the two screws on the bottom of your laptop that hold the access panel in place. Remove these screws and gently lift off the panel. You should see the current hard drive and the slot where the new SSD will go.
Before installing the SSD, carefully remove the brackets from the old drive and attach them to the new SSD. Now, slide the SSD into the slot and use the screws to securely fasten it in. Once that’s done, replace the access panel and the screws you removed earlier.
Turn on your laptop and go to your BIOS settings to make sure your computer can recognize the new drive. Your Acer Aspire A515-51G is now ready to use with your new SSD. Happy computing!
Check Compatibility
Before installing new software or hardware, it’s important to check its compatibility with your current system. This can prevent frustrating crashes and errors down the line. To prepare your system for compatibility checks, ensure that you have up-to-date drivers and software installed.
It’s also a good idea to check your system requirements and compare them to the requirements of the software or hardware you plan to install. This will ensure that your system has the necessary resources to run it efficiently. Don’t forget to also check for any potential conflicts with other software or hardware on your system.
By taking these steps to prepare your system, you can ensure that your new software or hardware will integrate seamlessly with your current setup.
Gather Necessary Tools
Before diving into any computer system task, it is essential to gather the necessary tools to ensure a streamlined and successful process. Preparing your system requires a checklist to fulfill all the needed requirements and equipment. You might need specific hardware or software for the intended task, so be sure to research ahead of time.
Your essential tools might require a power supply unit, screwdriver set, pliers, thermal paste, and your chosen operating system installation disk. The last thing you need is to start the process and pause midway, realizing you don’t have the necessary tools. By gathering all the required tools before starting, you will eliminate unnecessary delays and complete the task promptly.
Don’t forget to gather the needed knowledge either – read up on the task at hand, watch tutorials, take notes, and ask for expert recommendations. With all your tools and knowledge on hand, you can dive into any system task with confidence and ease.
Install the SSD
If you’re looking to speed up your Acer Aspire A515-51G, one of the best things you can do is install an SSD (solid-state drive). Not only will it give you more storage space for your documents, music, and photos, but it will also make your laptop run faster and be more responsive. To put an SSD into your Acer Aspire A515-51G, you’ll need to open up the laptop’s back panel, remove the hard drive, and install the new SSD in its place.
You may also need to clone your existing hard drive onto the SSD if you want to keep all your programs, documents, and settings. It’s a fairly straightforward process, but if you’re not confident doing it yourself, it’s always best to consult a professional. Once you’ve installed your new SSD, you’ll notice a significant improvement in your laptop’s performance, making it feel like a brand new machine.
So don’t put up with slow load times and sluggish performance any longer – install an SSD today and experience the difference for yourself!
Power Off Your Computer
If you’re ready to enhance your computer’s speed and performance, installing an SSD is a simple but effective solution. Before you begin, it’s important to power off your computer completely. Leaving it on can cause data loss or even damage to the components.
Once it’s turned off, locate the hard drive bay on your computer and remove the existing hard drive. It’s typically held in place with screws or clips. Then, carefully insert the SSD into the bay and secure it in place.
Finally, reconnect any cables or screws that you removed during the installation process. With your SSD properly installed, you’ll notice faster boot times, quicker application launches, and improved overall performance. With just a few simple steps, you can easily upgrade your computer’s performance and see a noticeable difference in speed and functionality.
Remove Bottom Panel
If you want to install an SSD in your computer, the first step is to remove the bottom panel. This may seem daunting, especially if you’re not comfortable with tinkering with your computer, but it’s actually a simple process. All you need is a screwdriver and a bit of patience.
Start by locating the screws that hold the bottom panel in place. They are usually marked with small icons or arrows. Once you’ve found them, unscrew them carefully and set them aside.
You should then be able to remove the bottom panel easily. With the bottom panel removed, you’ll have access to the inner workings of your computer, including the hard drive and other components. This will make it easier for you to install your new SSD.
Just be sure to follow the manufacturer’s instructions carefully to avoid damaging your computer or the SSD. Good luck!
Install the SSD
Alright, let’s get this SSD installed! First things first, make sure you have everything you need. You’ll need your new SSD of course, but also a screwdriver and possibly some mounting brackets depending on your computer. Once you have everything, shut down your computer and unplug it to avoid any electrical mishaps.
Next, locate the hard drive bays in your computer. They may be towards the front or back of the computer, but they should be easy to spot. Take out the screws holding the current hard drive in place, then gently remove it and set it aside.
Take your new SSD and line it up in the same spot, using the same screws to secure it in place. Finally, reconnect any cables you may have removed and plug your computer back in. Turn it on and voila! You’ve successfully installed your new SSD.
Now sit back and enjoy the improved speed and performance of your computer.
Configure BIOS Settings
If you’re looking to upgrade the storage of your Acer Aspire A515-51G by adding an SSD, you’ll need to configure your BIOS settings first. The BIOS, or Basic Input/Output System, is responsible for controlling the hardware of your computer and loading the operating system. To access your BIOS settings, you’ll need to restart your computer and press the designated key during the boot process.
This key varies depending on your computer model, but it’s usually F2, F10, or Del. Once you’re in the BIOS menu, look for a setting called “SATA Mode,” “Drive Configuration,” or something similar. Change this setting to “AHCI” or “RAID” (depending on your SSD), then save your changes and exit the BIOS.
After that, you can proceed with installing your new SSD and transferring your data to it. Remember, properly configuring your BIOS settings is crucial to ensure the smooth functioning of your computer.
Enter BIOS
If you’re looking to configure the BIOS settings on your computer, the first step is to enter the BIOS itself. You can usually do this by pressing a specific key during bootup, such as F2 or Delete. Once you’re in the BIOS, you’ll see a variety of settings that you can adjust to customize your computer’s behavior.
For example, you might want to adjust the boot sequence to prioritize certain devices or change the amount of RAM that’s allocated to the integrated graphics. It’s important to be careful when adjusting these settings, as making the wrong changes could potentially cause your computer to stop working properly. That said, with some careful tweaking, you can often improve your computer’s performance or customize it to better suit your needs.
Just be sure to follow any instructions or recommendations provided by the manufacturer to avoid making any costly mistakes.
Change Boot Order
Changing the boot order is an important BIOS setting that can significantly affect your computer’s performance. By default, computers are usually configured to boot from the hard drive. However, there are times when you may need to boot from an external device such as a USB drive or a CD-ROM.
To change the boot order, you need to enter the BIOS setup utility during system startup. Depending on your BIOS manufacturer, you may access the utility by pressing F2, F10, or ESC during startup. Once you enter the BIOS setup utility, you can navigate to the boot settings.
Here, you can change the boot order by rearranging the devices in the menu. You can also disable certain boot devices that you do not want the computer to boot from. By configuring the boot order, you can ensure that your computer boots up quickly and seamlessly every time.
Reboot and Enjoy!
If you’re looking to breathe new life into your Acer Aspire A515-51G, one of the best ways to do so is to put an SSD into it. SSDs are faster and more reliable than traditional hard drives, which can help your computer run more smoothly and quickly. The first step in putting an SSD into your Acer Aspire A515-51G is to make sure you have the correct tools and materials.
You’ll need to purchase an SSD that’s compatible with your computer, as well as a screwdriver and a plastic pry tool. Once you have everything you need, you can open up your computer and install the new SSD. From there, you can transfer your files and data onto the new drive and enjoy a faster, smoother computing experience.
With just a little bit of effort and investment, you can make your Acer Aspire A515-51G feel like a brand new machine.
Conclusion
In conclusion, upgrading your Acer Aspire A515-51G with an SSD is a brilliant move that will improve your computer’s performance and speed. To put an SSD in your laptop, follow these steps: 1) back up all of your important files, 2) purchase an SSD that is compatible with your laptop and either an external enclosure or a cloning cable, 3) remove the back cover of your laptop, 4) locate the hard drive, 5) remove the hard drive and replace it with the SSD, 6) reinstall the back cover and power on the computer, 7) transfer your files onto the new SSD and enjoy the lightning-fast speeds! With this upgrade, your Acer Aspire will be the envy of all your techie friends and remind you of the old adage, “Out with the old, in with the SSD!”
FAQs
What are the benefits of adding an SSD to Acer Aspire A515-51G?
Adding an SSD to your Acer Aspire A515-51G can significantly improve the speed and performance of your laptop. It can also help to reduce the booting time and enhance the overall user experience.
Can I install an SSD on my Acer Aspire A515-51G laptop?
Yes, you can install an SSD on your Acer Aspire A515-51G laptop. The laptop has an M.2 slot that supports SSD installation.
What type of SSD is compatible with Acer Aspire A515-51G?
The Acer Aspire A515-51G supports M.2 SATA III SSD. You can use any M.2 SATA III SSD with a maximum capacity of 512 GB.
How do I install an SSD on Acer Aspire A515-51G?
First, you need to open the back cover of your laptop. Then, locate the M.2 slot and insert the SSD into it. Tighten the screw to secure the SSD in its place. Finally, put the back cover back and turn on your laptop to confirm if the SSD is working correctly.