Category: How to

How to

  • Unleash More Storage: Tips for Opening Up Space after Cloning Your SSD

    Have you recently cloned your SSD only to find that there is less space available than before? Cloning is a great way to transition to a new drive, but it can sometimes result in wasted space. Maximizing SSD space after cloning is important, as it can help you get the most out of your storage and improve your computer’s performance. In this blog, we’ll explore some tips and tricks for optimizing your newly cloned SSD, including deleting unnecessary files and programs, adjusting virtual memory settings, and managing your system restore points.

    With just a few adjustments, you can make the most of your SSD and enjoy a faster, more efficient computing experience. So, let’s dive in and get started!

    Check Usage Statistics

    If you’ve recently cloned your SSD, you may feel like your available space hasn’t increased as expected. The first step to resolving this issue is to check your usage statistics. You can easily do this on both Windows and Mac by accessing your system settings and searching for storage or disk usage.

    This will provide you with a breakdown of what is taking up space on your SSD, allowing you to identify any large files or programs you can delete or move to an external drive. Additionally, you can use third-party software such as WinDirStat or DaisyDisk to get a more visual representation of your disk usage. Ensuring your files are organized and removing any unnecessary data can free up valuable space on your SSD, improving its performance and longevity.

    By taking control of your usage statistics, you can make the most of your newly cloned SSD and streamline your computing experience.

    Use Windows in-built tools to check space utilization.

    Windows, utilization, tools, space, statistics. If you’re running low on space on your Windows computer, it’s important to understand how your hard drive is being utilized. Luckily, Windows provides some useful tools for checking space utilization and usage statistics.

    One of the first places to look is the Task Manager, which can show you how much of your CPU, memory, disk, and network resources are being used. You can also use the built-in Disk Cleanup tool to delete unnecessary files and free up space. This tool can be found by searching for “Disk Cleanup” in the Start menu.

    Another useful tool is the Storage Sense feature, which automatically frees up space by deleting temporary files and files that have been in the recycle bin for a certain amount of time. To turn on Storage Sense, go to Settings > System > Storage and toggle on the “Storage Sense” option. By using these Windows tools, you can better understand how your hard drive is being used and free up space to keep your computer running smoothly.
    after cloning ssd how to open space

    Identify space-hogging files and folders.

    One effective way to free up space on your computer is to identify which files and folders are taking up the most storage. Checking usage statistics is a simple yet helpful method in accomplishing this task. By taking a look at your computer’s storage settings, you can easily see which files and folders are utilizing the most space.

    From there, you can decide which ones to delete, transfer to an external hard drive, or move to cloud storage. Whether you’re looking to speed up your computer or simply free up some space, regularly monitoring your usage statistics can help keep your computer running smoothly. So don’t let space-hogging files weigh down your computer’s performance, take control with this easy method.

    Remove Unnecessary Programs

    If you’ve just cloned your SSD and are now looking for ways to open up some space, removing unnecessary programs is a great place to start. Over time, we all accumulate apps that we no longer use or need, and these can take up valuable real estate on your hard drive. To identify programs that you can safely uninstall, go to your Start Menu and open the Control Panel.

    From there, click on “Programs and Features” and take a look at the list of installed apps. If you see anything that you don’t use, or that you don’t recognize, you can go ahead and uninstall it. Just be careful not to remove anything important or necessary for your system to run smoothly.

    By taking the time to clean up your program list, you can free up a significant amount of space on your SSD and help it run more efficiently.

    Uninstall unused applications.

    Uninstalling unused applications is a simple yet effective practice that can significantly improve the performance of your device. If you have a habit of installing programs that you rarely use, chances are they are taking up valuable space on your hard drive and slowing down your system. Removing unnecessary programs from your computer not only frees up space but also reduces the load on your CPU and RAM, resulting in a faster and more responsive system.

    You can easily identify the applications that are of no use to you by looking at your installed programs list in the control panel. Uninstalling unused programs regularly is a good practice that can keep your computer running smoothly and efficiently. So, why hold on to those unused applications when you can remove them and improve your device’s performance?

    Delete temporary files and download folders.

    When it comes to keeping our computers running smoothly, removing unnecessary programs should be at the top of our to-do list. Over time, we tend to accumulate a lot of software that we rarely use, and this can take up valuable space on our hard drives and slow down our system. To avoid this, we should periodically review our installed programs and uninstall any that we no longer need.

    This will not only free up space but also reduce the chance of conflicts between different programs. Removing unnecessary programs is a simple task and can be done through the Control Panel or using a third-party uninstaller program. So, go ahead and declutter your system to experience a more efficient and responsive computer.

    Move Files and Folders to External Drives

    So you’ve just cloned your SSD to make sure all your data is safe and secure, but now you’re left with little storage space. Don’t worry, there’s a solution! One option is to move files and folders to external drives. This can help free up space on your computer and allow you to keep your files organized in one place.

    Start by connecting your external drive to your computer and then locate the files and folders you want to move. Simply drag and drop the items onto your external drive or copy and paste them. You can also create folders on your external drive to help keep things organized.

    Once you’ve moved the files and folders, make sure to double-check that everything has been copied over correctly before deleting them from your SSD. By moving files and folders to external drives, you can open up space on your computer and keep your data easily accessible in one place.

    Offload rarely used or large files to an external drive.

    If your computer or laptop is running low on storage space, one of the best ways to free up some space is to move rarely used or large files to an external drive. External drives such as USB dongles and external hard drives are widely available and can be easily connected to your computer. Once connected, you can transfer large files like videos, music, and high-resolution images to free up some space on your computer’s internal drive.

    With external drives now offering larger storage capacity than before, you can rest assured that your files will be safe and secure, even when disconnected from the computer. By doing this, your computer will run faster, and you’ll have more space for future downloads. Don’t forget to label your external drive, so you can find the files you need quickly and easily.

    This simple yet effective tip can help extend the lifespan of your device and improve your overall computing experience.

    Use cloud storage to backup important files.

    If you are looking for a reliable way to backup important files and ensure their safety, cloud storage is a great option. By storing your files on a remote server, you can access them from any device, anywhere, and at any time. However, sometimes you may need to backup files even more securely.

    In this case, moving files and folders to external drives is a great solution. External drives come in different shapes and sizes, from portable USB drives to large external hard drives. You can choose the one that suits your needs and budget.

    Once you have transferred the files, make sure to keep the external drive in a safe place where it won’t get lost or damaged. By using a combination of cloud storage and external drives, you can ensure that your important files and data are always safe and secure. So if you haven’t already, start backing up your files today and protect your important data.

    Disable Hibernation

    If you’ve just cloned your SSD and are wondering how to open up some space, one easy solution is to disable hibernation. Hibernation is a power-saving feature in Windows that writes the contents of your RAM to your hard drive when you shut down your computer, allowing you to resume exactly where you left off when you turn it back on. While this feature can be convenient, it can also take up a significant amount of disk space.

    Disabling hibernation is a simple process that involves running a few commands in the Command Prompt. By doing this, you can free up gigabytes of space on your SSD, allowing you to store more files and programs. So if you’re strapped for space, give hibernation a rest and enjoy the newfound room on your SSD.

    Disable hibernation to free up space on your SSD.

    If you’re looking to free up some space on your SSD, disabling hibernation is a quick and easy solution. Hibernation is a feature that saves your current system state to your hard drive before shutting down, allowing you to resume your work later. However, this feature takes up a significant amount of space on your SSD.

    Disabling hibernation can free up a considerable amount of space, especially if you have a smaller SSD. It’s easy to disable hibernation, all you need to do is open Command Prompt with administrator privileges and type “powercfg.exe /hibernate off.

    ” This will disable hibernation and free up the space it was previously using. Keep in mind that you won’t be able to use the hibernation feature after disabling it, but this shouldn’t be a significant inconvenience since resume times are usually faster from sleep mode anyway. Overall, disabling hibernation is a great way to free up space on your SSD and optimize your system’s performance.

    Conclusion

    Congratulations, you’ve successfully cloned your SSD! But now you’re faced with the dilemma of limited space. Fear not, for the solution is simple – it’s time to purge those old cat videos and embarrassing selfies. Or, if that’s too painful, consider investing in an external hard drive for all your extra files.

    Trust us, your SSD (and your future self) will thank you.”

    FAQs

    What is SSD cloning?
    SSD cloning is the process of transferring all the data from one solid-state drive (SSD) to another. It creates a duplicate of the original drive, including the operating system, installed programs, and data files.

    Why would someone want to clone an SSD?
    There are several reasons why someone might want to clone an SSD. One common reason is to upgrade to a larger SSD without losing any data or having to reinstall everything from scratch. Another reason is to make a backup of the SSD in case of hardware failure or data loss.

    How do I open up space after cloning my SSD?
    After cloning your SSD, you may find that you have less free space than before. In this case, you can try deleting any unnecessary files or programs, clearing your browser cache, and running a disk cleanup utility. You can also consider upgrading to a larger SSD if you need more space.

    Can I clone a damaged SSD?
    It is not recommended to clone a damaged SSD, as this can cause further issues and data loss. If your SSD is damaged, it is best to consult a professional data recovery service to recover your important files.

    Is it possible to clone an SSD without a cloning software?
    Yes, it is possible to clone an SSD manually using backup and restore tools built into Windows, but it can be more complicated and time-consuming than using a dedicated cloning software. Cloning software is specifically designed to make the process quick and easy, and it often includes additional features like automatic partition alignment and optimization.
  • Optimize Your Office Experience: Find Out How Big Your SSD Needs to Be!

    Are you someone who uses Microsoft Office frequently? Whether for work or personal use, Office has become an essential tool for many of us. But have you ever wondered what size SSD you need for running Office? Solid State Drives (SSDs) have quickly become the go-to storage choice for many in recent years. Known for their speed and reliability, SSDs make tasks such as opening documents and launching applications quicker and smoother.

    So, it’s natural to want to ensure that your device has the right size SSD to run Office seamlessly. In this blog, we’ll dive into the factors that determine the necessary SSD size for running Office. By the end of it, you’ll have a better idea of what SSD size may be best for your needs.

    Understanding SSDs

    If you’re wondering how big an SSD needs to be to run Office, the answer really depends on how much storage you need. Microsoft Office itself is not particularly storage-intensive, so you can easily get away with a smaller SSD if you’re only storing your Office files. However, if you also plan on storing other files, like music, videos, or high-resolution images, you may want to consider getting a larger SSD.

    As a general rule of thumb, 128GB should be enough for most people who only need Office and a few other basic programs. However, if you plan on using your computer for more intensive programs or tasks, like video editing or gaming, you may want to consider a larger SSD. Ultimately, the size of your SSD will depend on your specific needs and usage.

    Comparison of SSDs with HDDs

    When it comes to data storage, SSDs and HDDs are the two most popular options on the market. SSDs, or solid-state drives, are a newer technology that utilize flash memory to store data. Unlike HDDs, which have spinning disks and mechanical parts, SSDs have no moving parts, making them more reliable and durable.

    SSDs also offer much faster read and write speeds, which makes them ideal for tasks like gaming and video editing. However, SSDs can be more expensive than HDDs, and their storage capacities may not be as large. It’s worth considering your specific needs when deciding between the two options; if you’re looking for speed and performance, an SSD may be best for you, but if you need lots of storage at a lower cost, an HDD may be the better choice.

    Ultimately, both SSDs and HDDs have their own unique advantages and disadvantages, and the right choice will depend on your individual needs.

    how big does ssd need to be to run office

    System Requirements for Office

    If you’re wondering how much space you need on your SSD to run Office, the answer may vary depending on your specific needs. Microsoft recommends a minimum of 4GB of available disk space for the installation, but that doesn’t account for the size of any files or documents you create within the Office suite. If you plan on creating multiple large documents or files, it may be wise to opt for a larger SSD to ensure smooth operation and avoid any potential hiccups.

    Additionally, consider the other programs and files you will be running on your computer to determine the overall capacity you’ll need. The key takeaway is to have a realistic understanding of your usage habits and choose a SSD that provides enough storage space to meet those needs. So, to answer the question: How big does an SSD need to be to run Office? The answer is: it depends.

    Specs for Office 365 and Office 2019

    As technology evolves, it’s important to ensure that your computer system meets the necessary requirements to run the latest software. This is especially true when it comes to Microsoft Office. Office 365 and Office 2019 both have specific system requirements that must be met in order to use these programs to their full potential.

    For Office 365, a reliable internet connection is essential, as this version is primarily cloud-based. Additionally, you’ll need a computer running Windows 10, and for Mac users, macOS 13 or later.

    For Office 2019, a bit more flexibility is offered. Windows users can utilize Windows 10 or Windows Server 2019, while Mac users can use macOS 12 or later.

    Regardless of the version you choose, it’s important to make sure your system meets the necessary requirements so you can take full advantage of the features and capabilities these programs offer.

    How much storage space does Office need?

    When it comes to running Office on your computer, it’s important to consider how much storage space you’ll need. The size of your SSD will depend on a few factors, such as the version of Office you’re running and the amount of data you need to store. If you’re using the most recent version of Office, you’ll need around 5GB of free disk space.

    This includes space for the application itself, as well as for temporary files and any documents you create. However, it’s worth noting that if you use email regularly or work with large files, you may need more space. As a general rule of thumb, it’s a good idea to have at least 10GB of free disk space available to ensure your computer runs smoothly and you have enough room to work.

    So, if you’re wondering how big your SSD needs to be to run Office, aim for a minimum of 10GB and factor in your individual needs for storage space.

    Storage requirements for different Office tools

    If you are wondering how much storage space is needed for different Office tools, the answer can vary. The amount of storage depends on the specific application and the size of the files you are working with. Microsoft Word generally needs less storage space compared to applications like PowerPoint or Excel.

    Typically, Word files are smaller in size and require less storage capacity. On the other hand, Excel files can become quite large, especially if they contain a lot of data and graphics. PowerPoint, with its multimedia capabilities, can also take up significant space.

    To ensure you have enough room for all your Office tools, it’s best to check the system requirements and plan accordingly. As a general rule, it’s always better to have more storage space than you think you’ll need.

    Choosing the Right SSD

    When it comes to running Office applications, the size of the SSD is not the determining factor. Rather, it’s the speed of the SSD that matters. Office applications such as Word and Excel are not particularly demanding when it comes to storage space.

    You could easily run them on a smaller SSD, such as a 128GB or 256GB model. However, if you want to ensure that your Office applications load quickly and run smoothly, then it’s best to opt for an SSD with quick read and write speeds. This will not only benefit your Office applications but also your overall computer performance.

    So, while a larger capacity SSD might be desirable for other reasons, for Office use, the determining factor is the speed of the SSD.

    Considerations for SSD capacity

    When choosing the right SSD, one of the most important factors to consider is capacity. While SSDs generally offer lower capacities than traditional hard drives, they make up for it with faster data transfer speeds and smaller form factors. It’s important to consider your specific needs when making a decision about SSD capacity.

    For example, if you’re a content creator or gamer who works with large files, a larger SSD may be necessary to accommodate all of your data. On the other hand, if you’re a casual user who stores mostly documents and photos, a smaller capacity may suffice. It’s also worth considering future growth and needs.

    While a smaller SSD may be sufficient now, it may not be enough in a year or two. Ultimately, it’s important to take a holistic approach and consider all of your needs when choosing the right SSD capacity for you.

    Tips for Buying an SSD

    When looking to buy an SSD, it is important to choose the right one for your needs. One of the most important factors to consider is the size and capacity of the SSD. This will depend on how much data you plan on storing and what types of applications you will be running.

    It is also important to choose an SSD with a high read and write speed, as this will greatly affect the overall performance of your computer. Another factor to consider is the interface of the SSD, with SATA and PCIe being the most common options. Additionally, some SSDs come with built-in features such as encryption and caching, which can provide added benefits.

    Don’t forget to also consider the reliability and warranty of the SSD you choose. Overall, choosing the right SSD can greatly enhance the performance of your computer and provide a more seamless experience.

    Conclusion

    In conclusion, the size of the SSD needed to run office depends on the size of your work and the amount of data you need to store. If you are a minimalist that just needs word and excel, a smaller SSD should suffice. However, if you are a data hoarder and a multi-tasker looking to run multiple applications simultaneously, you may need a larger SSD.

    At the end of the day, it’s not the size of the SSD that counts, but how efficiently you use it to run your office tasks!”

    FAQs

    What is the minimum size requirement for an SSD to run Office applications smoothly?
    A 128GB SSD is sufficient for running basic Office applications like Word, Excel and PowerPoint.

    Can I run Office on a smaller SSD?
    Yes, you can run Office on an SSD with lower storage capacity, but it may affect the overall performance of your computer.

    Can I install other applications on the same SSD along with Office?
    Yes, you can install other applications on the same SSD, but you need to ensure that you have enough storage space available.

    Is there any advantage to having a larger SSD for running Office?
    Yes, having a larger SSD will not only provide better performance for Office applications, but will also offer more storage space for other files and applications.

    What happens if I run out of space on my SSD while running Office?
    If you run out of space, your SSD may become slow and unresponsive. It’s recommended to free up space by deleting unnecessary files or upgrading to a larger SSD.

  • Maximize Your Storage: A Comprehensive Guide on How to Use 2 SSD at the Same Time

    Are you looking to optimize your computer’s performance with 2 SSDs? Look no further! This guide will provide you with the knowledge needed to use 2 SSDs in your system, ultimately boosting your computer’s speed and responsiveness. Think of SSDs as the race cars of the storage world. With their lightning-fast read and write speeds, they offer unparalleled performance compared to traditional hard drives.

    When two SSDs are used together, they can work in tandem, further increasing speed and efficiency. But where do you even begin? Don’t worry, we’ve got you covered. This guide will walk you through the process of setting up your 2 SSDs, from installation to configuration.

    We’ll also cover RAID setups, so you can choose the best option for your needs. So buckle up and get ready to turbocharge your computer’s performance with 2 SSDs. It’s time to leave slow load times and sluggish applications in the rearview mirror.

    Why Use 2 SSDs?

    Are you wondering how to use 2 SSD’s at the same time? Well, there are several benefits to doing so. Firstly, using two SSD’s is an excellent way of increasing the total storage capacity of your computer while also improving its speed. It’s also a great way of separating your operating system and your files/apps onto different drives, providing added security and better data management.

    Additionally, using dual SSD’s can significantly reduce loading times for games and application, leading to a more efficient and seamless experience. Overall, using 2 SSD’s can be a game-changer for your computing experience and is well worth the investment. So, go ahead and take the plunge – your computer will thank you later!

    Improved Performance

    If you’re looking to improve your computer’s performance, using two SSDs can make a significant difference. SSDs, or solid-state drives, offer faster read and write speeds than traditional hard drives, allowing your computer to access and transfer data more quickly. By utilizing two SSDs, you can increase the speed and efficiency of your system even further.

    One reason to use two SSDs is to separate your operating system and applications from your personal files and data. By installing your operating system and applications on one SSD and storing your personal files on another, you can prevent your system from becoming bogged down and slow. This can also make it easier to maintain and backup your data, as you won’t have to worry about accidentally deleting important files while performing routine maintenance on your computer.

    Another benefit of using two SSDs is increased reliability. By spreading your data across two drives, you reduce the risk of data loss in the event of a hardware failure or other issue. You can also set up a RAID configuration with two SSDs, which can provide even more redundancy and protection against data loss.

    Overall, using two SSDs can greatly improve the performance, reliability, and efficiency of your computer. If you’re looking to upgrade your system, consider investing in two SSDs to take your computing experience to the next level.

    how to use 2 ssd at the same time

    Better Reliability & Backup

    If you’re someone who relies heavily on their computer for work or personal use, then you know how important it is to have a reliable and secure storage system. That’s why using two SSDs can provide better reliability and backup for your data. By having a backup SSD, you can rest assured knowing that your data is safe in case your primary SSD fails or becomes damaged.

    Additionally, using two SSDs in a mirrored setup can provide redundancy and can help prevent data loss due to drive failure. Imagine it as having a spare tire in your car – it’s always good to have a backup plan. So, don’t wait until it’s too late to invest in better reliability and backup.

    Two SSDs may be exactly what you need to ensure the safety and security of your important data.

    Increased Storage Capacity

    When you require the utmost storage capacity in your system, utilizing two SSDs is an excellent option. Gone are the days when we had to compromise on the quantity of data we could store because of a lack of storage options. By combining two SSDs, you can achieve an unprecedented level of storage capacity that will provide you with ample space for all your data and programs.

    There are several advantages to using two SSDs over one, which include faster transfer speeds, seamless functioning, and the ability to balance workloads between the two drives, improving overall efficiency. By combining two fast SSDs, you can significantly increase the speed at which your files are accessed and save a lot of time in the process. The biggest benefit of using two SSDs is the amount of storage you can have at your disposal.

    The combined capacity of the two drives can eclipse that of a single unit, allowing you to store even more data without sacrificing performance. If you have a lot of work to do or need a lot of space for your personal files, you should consider using two SSDs because it is a cost-effective way to expand your storage without limiting performance.

    Step-by-Step Guide

    Are you confused about how to use 2 SSDs at the same time? Don’t worry, it’s a common misconception that setting up multiple SSDs can be overly complicated. The first step is to identify your computer’s motherboard and check if it has multiple M.2 or SATA ports available for installation.

    Once you have confirmed that, the next step is to insert the SSDs into the ports, either M.2 or SATA, and screw them in place. After that, you can proceed to install the operating system on one of the SSDs and create partitions on the other SSD if required.

    Don’t forget to also check the BIOS settings to ensure that both drives are recognized and configured correctly. With these simple steps, you can easily use 2 SSDs simultaneously.

    Check Your System Compatibility

    Before you start using any system, it’s important to check if it’s compatible with your computer. A system that doesn’t work properly on your computer could lead to frustration and wasted time. The first step is to check the system requirements, which are usually listed on the manufacturer’s website or on the packaging.

    You should also make sure your operating system is up to date and that you have enough storage space. Another important factor is the graphics card, which is responsible for displaying images and videos. If your graphics card is outdated, you may not be able to run the system at all or you may experience glitches and lag.

    Don’t worry if you’re not tech-savvy, most systems come with a compatibility checker that will scan your computer and let you know if everything is good to go. By taking the time to check your system compatibility, you’ll save yourself a lot of headaches down the road.

    Connect the SSDs to Your Motherboard

    When it comes to connecting SSDs to your motherboard, it may seem a bit daunting at first, but with the right steps, it can be a breeze. The first thing to do is to ensure that your motherboard has the necessary ports to connect your SSDs. Most modern motherboards have SATA ports to connect your SATA SSDs, while M.

    2 SSDs require a slot on your motherboard that supports NVMe or SATA. Once you have identified the right ports, you can begin the physical installation of your SSDs. For SATA SSDs, connect one end of the SATA cable to the motherboard’s SATA port and the other end to your SSD.

    For M.2 SSDs, insert the SSD into the slot on your motherboard, ensuring that it clicks into place. Once you have connected the SSDs, it’s time to check if your motherboard has detected them.

    Go to the BIOS settings, and under the storage section, check if your SSDs are listed. If everything looks good, then you’re ready to use your SSDs. Connecting SSDs to your motherboard is a simple process that anyone can do, and it’s worth the effort as it can give your system a significant speed boost.

    Configure RAID Settings (Optional)

    When setting up a storage system, the use of RAID settings can provide an extra level of data protection. RAID stands for Redundant Array of Independent Disks, and it allows for data to be spread across multiple disks in a way that provides redundancy in case of data loss. There are different RAID configurations that offer varying levels of protection, such as RAID 0, RAID 1, RAID 5, and RAID

    When configuring RAID settings, it’s important to consider the level of protection needed, the number of disks available, and the performance impact of the configuration. While configuring RAID settings is optional, it’s a wise decision for those looking to increase data reliability.

    Tips for Optimal Performance

    Do you want to know how to use 2 SSDs at the same time? Using multiple solid state drives (SSDs) can be a great way to increase the storage and speed of your computer. However, setting up multiple SSDs can be a bit more complicated than just plugging in one. To start, you’ll need a motherboard that supports RAID (Redundant Array of Independent Disks), which makes it possible to combine multiple drives into a single logical unit.

    Next, you’ll need to decide on the RAID configuration that works best for your needs. For example, RAID 0 will give you the best performance, but it also provides no data redundancy, so if one drive fails, you will lose all your data. RAID 1, on the other hand, provides data redundancy by mirroring all your data to both drives, but it won’t give you as much performance as RAID 0.

    Ultimately, the choice of RAID configuration will depend on what you plan to use your computer for. With a bit of research and setup, using 2 SSDs at the same time can provide a significant boost in speed and storage capacity for your computer.

    Use Matching SSDs

    If you want to maximize the performance of your SSD setup, it’s important to use matching SSDs. This means using drives with the same brand, model, capacity, and firmware version. Using mismatched drives can lead to complications such as reduced performance, data loss, and even system crashes.

    Matching SSDs is important because it ensures that the drives are able to work together optimally. When using mismatched drives, one may have a higher write speed than the other, which can lead to uneven wear and tear. Additionally, different firmware versions can cause compatibility issues that can negatively impact performance.

    To avoid these issues, be sure to do your research and purchase matching SSDs. This will provide the best chance for consistent, optimized performance and reliability. While it may be tempting to mix and match drives to save money, the potential costs associated with reduced performance and data loss far outweigh the potential savings.

    Invest in matching SSDs for the best possible results.

    Enable AHCI Mode

    AHCI Mode If you’re looking to optimize your computer’s performance, one crucial step is to enable AHCI mode in your BIOS settings. AHCI (Advanced Host Controller Interface) is a newer technology that allows your computer to communicate more efficiently with your hard drive. By enabling AHCI mode, you’ll benefit from faster data transfer rates, quicker boot times, and improved stability overall.

    To enable AHCI mode, you’ll need to reboot your computer and enter the BIOS setup menu. From there, you’ll need to locate the SATA Controller settings and change the mode from IDE to AHCI. Keep in mind that you may need to install drivers for AHCI mode to work properly, but once you’ve got everything set up, you’ll likely notice a significant improvement in your computer’s performance.

    So if you’re looking to get the most out of your machine, don’t forget to enable AHCI mode!

    Allocate Storage Wisely

    When it comes to allocating storage for your computer, it’s important to do it wisely. One of the best things you can do is to have a clear understanding of how much space you need versus how much you have available. This will help you avoid overloading your machine or running out of space, which can lead to performance issues.

    Another tip is to prioritize the storage of your most important files and applications. This means keeping frequently used items on your main drive and less important ones on external storage or the cloud. Additionally, regularly cleaning out unnecessary files and programs can help keep your storage organized and running smoothly.

    By following these tips, you can optimize your computer’s performance and avoid frustrating slowdowns.

    Conclusion

    In conclusion, using 2 SSDs at the same time is like having two Genies in a bottle. You get double the speed, double the storage, and double the power. With the right hardware and software configurations, you can unleash the full potential of your computer and enjoy lightning-fast performance.

    So, don’t settle for just one SSD, go ahead and indulge yourself with two. Trust us, your computer will thank you.”

    FAQs

    Can I install two SSDs in my computer at the same time?
    Yes, you can install two SSDs in your computer at the same time. You just need to make sure that your motherboard supports multiple SSDs and you have the necessary cables to connect them.

    How do I set up my computer to use two SSDs?
    To set up your computer to use two SSDs, you need to connect both SSDs to your motherboard using the appropriate cables. Then, you need to configure your computer’s storage settings to recognize both SSDs.

    Can I use two SSDs in a RAID configuration?
    Yes, you can use two SSDs in a RAID configuration to improve data read and write speeds. However, setting up a RAID configuration can be complex and should only be done by experienced users.

    What benefits can I expect from using two SSDs?
    Using two SSDs can improve your computer’s overall performance by providing more storage capacity and faster data transfer rates. This can result in faster boot times, faster application load times, and improved system responsiveness.

  • Maximize your Performance: A Guide to Choosing the Primary Cloned SSD

    When it comes to building a new PC or upgrading your existing one, choosing the primary drive is one of the most important decisions you can make. The primary drive is where your operating system and most frequently used programs are stored, so it’s crucial that you choose the right one to ensure optimal performance. With so many options available, the decision can be overwhelming.

    Do you go for a traditional hard disk drive or opt for a solid-state drive? How much storage space do you need? And what about the price? In this blog post, we’ll walk you through everything you need to know to make an informed decision and choose the primary drive that’s perfect for your needs. So sit back, relax, and let us guide you through the process.

    Understanding Cloned SSDs

    When it comes to cloned SSDs, one important aspect to consider is choosing the primary drive. This is the drive that your computer will automatically boot from, and ideally, it should be the one with the faster read and write speeds. But how do you determine which drive is faster? One way is to check the specs of both drives and compare their read and write speeds.

    Another way is to use benchmarking software to run tests on both drives and see which one performs better. Ultimately, the best approach will depend on your specific needs and preferences. But by taking the time to choose the right primary drive, you can ensure that your computer is running at maximum speed and efficiency.

    What is a Cloned SSD?

    A cloned SSD is essentially a copy of an existing SSD drive. It is created by duplicating all the data and information stored on the original SSD and transferring it onto a new SSD. This process is often used when upgrading to a larger or faster SSD, or when replacing a failing or corrupted SSD.

    Cloning an SSD can also be beneficial if you want to transfer all your files and data from one computer to another without having to manually re-install all your programs and applications. Essentially, a cloned SSD is an exact replica of the original, but with all the benefits of a fresh install. By cloning an SSD, you can enjoy faster boot times, improved performance, and increased storage capacity, all without having to start from scratch.

    Whether you’re a professional or a casual user, a cloned SSD can be a powerful tool that can help you get more out of your computing experience.

    cloned ssd how to choose primary

    Advantages of Cloning SSDs

    Cloning SSDs can be an incredibly beneficial process in computer maintenance. An SSD clone is an exact copy of an existing SSD, meaning that all the data, configurations, and settings from the original drive are copied over to the clone. There are several advantages to cloning SSDs, including quicker data transfer speeds, improved system performance, and increased data protection.

    When cloning SSDs, the new drive can be easily swapped with the old drive, allowing for a seamless transition without the need for reinstallation or system configuration. Additionally, cloning an SSD also allows for easy backup and recovery, as the cloned drive can serve as a backup in case the original drive malfunctions or fails. Overall, understanding cloned SSDs can help computer users increase their device’s overall lifespan, prevent data loss, and improve system performance.

    Factors to Consider in Choosing Primary Drive

    If you’ve cloned your SSD and need to choose a primary drive, there are some factors to consider. Firstly, you’ll want to look at the size and capacity of the drives. You want to ensure that your primary drive has enough space to handle your operating system and essential applications without running out of space quickly.

    The next thing to consider is the speed of the drive. An SSD is much faster than a traditional hard drive, but you’ll want to ensure that you’re choosing the fastest SSD within your budget. Finally, you’ll want to think about reliability.

    It’s essential to choose a drive from a reputable brand with a good track record to ensure that your data will be safe and secure. By taking these factors into consideration, you can select the perfect primary drive for your cloned SSD that will provide the performance you need and the reliability you can trust. So, when choosing a primary drive, always remember to look at the size, speed, and reliability to ensure that you’re making the best decision for your needs.

    User Needs and Preferences

    When it comes to choosing a primary drive for your computer, there are several factors to consider. First and foremost, you need to think about your user needs and preferences. If you are a casual user who mostly uses their computer for browsing the internet and doing basic tasks, then a solid-state drive (SSD) would be a good option for you.

    An SSD is faster and more reliable than a traditional hard drive, making it ideal for everyday use. On the other hand, if you are an avid gamer or a professional who requires a lot of storage space and wants to run programs quickly, then a hard disk drive (HDD) might be a better choice. HDDs have larger capacities and are better suited for heavy-duty tasks.

    It’s important to think about your computing needs and choose the type of drive that best fits your requirements.

    Disk and Partition Configuration

    When choosing a primary drive, there are several factors that should be taken into consideration. The first is the amount of storage space needed. It’s important to choose a drive that has enough space for all of your files and applications, as running out of space can cause performance issues.

    The type of drive is also a consideration, as solid-state drives (SSDs) are faster and more reliable than traditional hard drives. Additionally, the interface used by the drive can affect performance, with SATA being slower than newer interfaces like NVMe. Finally, it’s important to consider the manufacturer and any warranty or support offered, as this can impact the longevity and reliability of the drive.

    By carefully considering these factors and choosing a high-quality primary drive, you can ensure that your system runs smoothly and reliably.

    Boot Order and BIOS Settings

    When it comes to choosing the primary drive for your system, there are several factors to consider. One important consideration is the boot order and BIOS settings. The BIOS, or Basic Input/Output System, is a software built into your computer’s motherboard.

    It helps control several crucial aspects of your computer’s hardware, including the boot order. The boot order determines which device your system boots from first. For instance, you can set it to boot from your hard disk drive (HDD), solid-state drive (SSD), USB drive or optical drive.

    To prioritize the device you’re using as your primary drive, follow these steps: Restart your computer and enter the BIOS. Look for the boot order settings and adjust accordingly. The primary drive should be set to the device with the operating system installed on it to ensure your computer boots properly.

    Remember to save your changes before exiting the BIOS. Doing so will ensure that your system boots from your primary drive first, so you can access your files and applications quickly.

    How to Choose Primary Drive

    When cloning an SSD, selecting the primary drive can be crucial to ensuring the smooth operation of your system. First, it’s essential to ensure that the SSD you are choosing as your primary drive has sufficient capacity to store all the necessary data and applications. You should also consider the speed of the SSD when choosing your primary drive.

    A faster SSD can drastically improve the performance of your system. Another factor to consider is the reliability of the SSD. Look for reputable brands and models with good reviews to ensure that your primary drive will last for years to come.

    Ultimately, choosing the right primary drive comes down to identifying your needs, whether it’s speed, storage capacity, or reliability. By evaluating these factors, you can select the perfect drive to ensure that your system remains running smoothly.

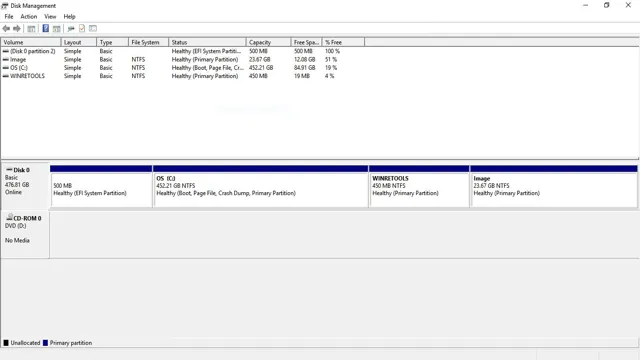
    Using Disks Management Tool

    When it comes to choosing a primary drive for your computer, it’s important to consider a few different factors. The primary drive is where your operating system and important files will be stored, so you want to make sure it’s reliable and has enough space to accommodate all of your needs. One way to choose a primary drive is to look at the speed and capacity of different options.

    Solid state drives (SSDs) are typically faster than traditional hard disk drives (HDDs), but they also tend to be more expensive for the same amount of storage. HDDs may be a better option if you need a lot of storage space on a budget. You should also consider the interface that your motherboard supports.

    For example, if your motherboard only supports SATA drives, then you won’t be able to use an NVMe SSD, which may be faster. Ultimately, the best primary drive for you will depend on your specific needs and budget.

    Changing Boot Order in BIOS

    Changing the boot order in BIOS can be a crucial step when you are starting up your computer. If you have multiple drives installed, it is essential to choose the primary drive from which to boot. First, you’ll need to enter BIOS mode, which is typically done by pressing a key (such as F2 or Delete) during boot-up before the operating system is loaded.

    Once you are in BIOS, navigate to the Boot Options menu, where you can choose the primary drive from the list of available options. It is important to ensure that the chosen drive is set to the top of the boot priority list, so that it will be the first drive to be accessed when you turn on your computer. This can help to ensure that your computer starts up quickly and reliably every time.

    By changing the boot order in BIOS, you’ll have greater control over how your computer operates, allowing you to customize it to your specific needs and preferences.

    Conclusion

    In conclusion, choosing a primary cloned SSD is not a decision to be taken lightly. It’s like picking a partner – you want to make sure it can handle your workload and won’t crash under pressure. You should do your research, read reviews, and maybe even go on a few dates (i.

    e. test runs) before committing to one. With the right cloned SSD as your primary, you’ll enjoy faster speeds, smoother performance, and a brighter future together.

    FAQs

    What is a cloned SSD?
    A cloned SSD is a duplicate copy of an existing SSD that includes all of its data and settings.

    How do I choose a primary SSD?
    To choose a primary SSD, you should consider factors such as capacity, speed, and reliability. Look for an SSD with enough capacity to store your operating system and important applications, fast read and write speeds, and a proven track record for reliability.

    What are the benefits of using a cloned SSD?
    Using a cloned SSD can save you time and effort by transferring your existing system and files to the new drive quickly and easily. It can also provide better performance and reliability compared to a traditional hard drive.

    Can I clone an SSD to a smaller drive?
    It is possible to clone an SSD to a smaller drive, but you will need to make sure that the data on the original drive will fit within the capacity of the new drive. You may also need to manually select which files and folders to transfer to the new drive.

  • Unlocking Acer’s Ultimate Potential: A Guide to Effortlessly Changing Your SSD

    Changing SSD on Acer laptops can be a daunting task for those who haven’t done it before. However, upgrading your storage device is an excellent way to boost performance and speed up your computer. If you’re tired of waiting for your computer to start up, load programs, or transfer files, then it’s time to replace your current SSD with a faster and more robust one.

    In this article, we’ll walk you through the steps you need to know to get the job done. Whether you’re a tech novice or an experienced user, we’ll provide the guidance and tips you’ll need to successfully replace your SSD. So let’s get started!

    Step 1: Gather necessary tools

    If you’re looking to change the SSD on your Acer laptop, the first step is to gather the necessary tools. Depending on your specific model, you may need a screwdriver, a plastic pry tool, and an external enclosure for your old SSD. It’s important to have the correct tools to avoid damaging your device during the process.

    It’s also a good idea to back up any important data before beginning. Once you have everything you need, you can move on to the next steps of the process. By taking the time to gather the right tools, you’ll ensure a smoother and more successful SSD replacement.

    So, grab your tools and get ready to give your Acer laptop a boost!

    Locate and purchase SSD and screwdriver set

    If you’re planning to upgrade your computer’s storage system by installing an SSD, the first step is to gather the necessary tools before you begin. You’ll need to locate and purchase an SSD and a screwdriver set. Finding an SSD shouldn’t be too difficult, as they’re readily available online and in most tech stores.

    You’ll want to make sure to choose an SSD that’s compatible with your computer and has enough storage capacity to suit your needs. Look for high-quality SSDs from reputable brands with good reviews to ensure you’re getting a reliable product. When it comes to screwdrivers, you’ll want to make sure you have both a Phillips head and a flathead screwdriver in your set.

    This will allow you to remove and install screws of different types and sizes during the installation process. Once you’ve gathered your tools, you’ll be ready to get started on the installation process. Properly preparing beforehand can save you time and frustration in the long run, so be sure to take the time to gather everything you need before beginning the installation process.

    acer how to change ssd

    Step 2: Shut down and unplug Acer

    If you’re ready to upgrade your Acer laptop’s storage to an SSD, the first step is to shut down and unplug the device. This is an essential safety measure that prevents any damage to both the computer and the new component. Shutting down the Acer correctly will preserve the integrity of the data and the operating system while reducing the risk of data loss.

    Unplugging the Acer eliminates the risk of electrical shock and ensures you have an unobstructed view of the laptop’s components. After unplugging, keep the Acer on a flat surface and wait for a few minutes to let it cool down properly. Changing a laptop’s storage is an involved process that could take some time, so it’s best to have patience and follow the instructions diligently.

    By following these steps, you can get started on the process of changing your Acer laptop’s storage to an SSD and experience better performance.

    Ensure all data is backed up

    When it comes to keeping your Acer computer safe and secure, backing up all your data should be a top priority. You never know when your device may crash or experience a technical issue that could potentially erase all your important files and information. That’s why step 2 in ensuring your Acer’s safety is to shut down and unplug the device before backing up all data to an external hard drive or cloud storage service.

    This will not only protect your data but also give you peace of mind knowing that you have a backup copy in case anything goes wrong. Remember, it’s always better to be safe than sorry when it comes to safeguarding your personal and professional information, so take this step seriously and make sure all your data is backed up before moving on to the next step of securing your Acer.

    Step 3: Remove bottom panel

    Now that you have successfully removed the back cover, it’s time to take the next step in changing your Acer SSD. The third step is to remove the bottom panel of your Acer laptop carefully. You will need to unscrew all the screws that are holding the panel in place.

    Make sure you keep the screws safe so that you don’t lose them. Keep in mind that some models may have clips holding the panel in place, so you will need to use a flat tool to carefully remove the panel. Once you have removed the panel, you will have access to the inside of your laptop, where the SSD is located.

    Before removing the old SSD, make sure you follow the manufacturer’s instructions carefully to avoid causing any damage to other components. Once you have replaced the SSD with a new one, you can reassemble your Acer laptop by following the reverse order of these instructions. Overall, changing your Acer SSD isn’t a very complex process, but it does require some caution and attention to detail to avoid damaging other components.

    Locate and unscrew bottom panel

    Removing the bottom panel is the third step in fixing your appliance. To do this, locate the screws that secure the panel to the machine’s base. These screws are usually located towards the back of the appliance and are either Phillips or Torx.

    Once you have determined the type of screws, use the appropriate tool to unscrew them. Take caution as some appliances may have clips or other fasteners designed to keep the panel in place and these clips may require additional pressure to release. After all the screws and fasteners have been removed, gently lift the panel off to expose the machine’s interior.

    It is essential to remember that the panel’s placement may vary from one appliance model to another, and you should consult your owner’s manual for precise instructions. With this step complete, you are ready to proceed with the next step towards fixing your appliance. The key to success in this step is to pay close attention to the fasteners’ placement while unscrewing them to prevent damaging the panel or the appliance’s interior.

    Step 4: Remove old SSD

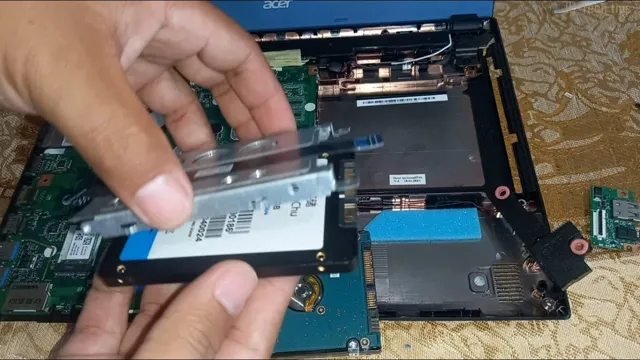
    Now that you’ve successfully cloned your current SSD onto the new one, it’s time to remove the old SSD. First, shut down your Acer laptop and unplug it from the power source. Then, carefully remove the back cover of your laptop using a screwdriver.

    Locate the old SSD and gently remove it by pulling the connector away from the socket. You may need to unscrew any brackets or clips holding the SSD in place. Be sure to handle the old SSD with care and avoid touching the gold connectors.

    Once removed, you can either keep it as a backup or recycle it appropriately. With the old SSD removed, you can now proceed to install the new one. Don’t forget to secure it properly in place before reattaching the back cover.

    Congratulations, you’ve successfully upgraded your Acer laptop’s storage!

    Locate and unscrew old SSD

    Removing the old SSD is an important step in replacing it with a new one. Before you start with the replacement process, make sure to locate and unscrew the old SSD carefully. It is usually placed in a cage or a slot, and you might need to remove any bays or covers that are in the way.

    When locating the old SSD, be mindful of the cables that are connected to it. Gently disconnect any cables or connectors from the old SSD, and then unscrew it from its place. Once you have successfully removed the old SSD, gently place it aside.

    It is essential to exercising caution while unscrewing the old SSD to prevent any damage to the SSD or the cables. By following this process carefully, you can easily remove the old SSD and move on to installing the new one.

    Step 5: Insert new SSD

    Once you have removed the old SSD, it’s time to insert the new one. Make sure that you line up the connectors on the new SSD properly with the slot on your Acer laptop. Once lined up, gently slide the new SSD into place and secure it using the screws that you had removed previously.

    Be careful not to overtighten the screws as this can cause damage to the new SSD. Once the new SSD is secured in place, you can reattach the back panel of your Acer laptop by reversing the previous steps. Congratulations, you have successfully changed your old SSD to a new one and your Acer laptop is now ready to perform at its best.

    Insert new SSD into slot and screw it in

    One of the final steps in upgrading your computer’s storage capacity is inserting the new SSD into the appropriate slot. First, locate your computer’s SSD slot and ensure it’s compatible with your new SSD. Then, carefully insert the SSD into the slot, making sure it’s properly aligned.

    Next, use the screws provided with your new SSD to secure it in place. Don’t overtighten the screws, just ensure they’re snug enough to keep the SSD firmly in its slot. Once the SSD is securely installed, you can move on to installing your operating system and transferring your files.

    By following these steps, you can easily upgrade your computer’s storage capacity and increase its performance.

    Step 6: Replace bottom panel and power on Acer

    Now that we’ve successfully installed our new SSD into our Acer laptop, we can start wrapping things up. The next step is to carefully replace the bottom panel of the laptop. Remember to tighten all the screws to ensure a secure fit.

    And finally, it’s time to power on our Acer and see if everything’s working as it should. If you did everything correctly, your Acer should boot up faster than ever before, and you’ll be able to enjoy a faster and more responsive computing experience. Congratulations, you’ve successfully changed the SSD on your Acer!

    Conclusion

    In conclusion, swapping out your existing SSD with a new one from Acer is a wise move if you’re looking to boost your computer’s performance and storage. With just a few simple steps, you can easily upgrade your laptop or desktop and enjoy lightning-fast processing speeds and ample storage space to store all of your important files and applications. So go ahead and give your computer a little TLC – after all, a happy Acer means a happy you!”

    FAQs

    What are the minimum system requirements for changing the SSD on an Acer laptop?
    The minimum system requirements for changing the SSD on an Acer laptop are a screwdriver, an SSD compatible with the laptop model, and basic knowledge of computer hardware.

    How do I know if my Acer laptop’s warranty will be affected by changing the SSD?
    Changing the SSD on an Acer laptop may or may not affect the laptop’s warranty depending on the terms and conditions set by the manufacturer. It is recommended to check with Acer customer support for clarification.

    Is it possible to clone the existing data on my Acer laptop to the new SSD after installation?
    Yes, it is possible to clone the existing data on your Acer laptop to the new SSD after installation. There are several third-party software tools available for this purpose.

    Do I need to reinstall the operating system after changing the SSD on my Acer laptop?
    It is not necessary to reinstall the operating system after changing the SSD on an Acer laptop if you cloned the old data on the new SSD. However, a fresh installation is recommended for optimal performance.

  • SSD vs HD – Unveiling the Truth About Gigabytes and Performance

    Are you in the market for a new computer or laptop but unsure about the difference between an SSD and an HD? Don’t worry, you’re not alone. With so many options and technical jargon, it can be overwhelming to choose the right device for your needs. In this blog post, we’ll compare SSDs and HDs from Gigabyte, a well-respected brand in the industry.

    We’ll explore the advantages and disadvantages of each storage device, helping you make an informed decision for your next purchase. So, let’s dive in and discover which one is best for you!

    What is an SSD?

    When it comes to comparing the gigabytes of an SSD to an HD, it’s important to understand what an SSD is in the first place. An SSD stands for Solid State Drive, which is essentially a faster, more efficient replacement for the traditional hard drive (HD). Whereas an HD uses spinning disks and a read/write head to access data, an SSD uses flash memory to store and retrieve information quickly.

    This means that while HDs can provide larger capacities (often up to several terabytes), SSDs offer faster read and write speeds, making them ideal for tasks like booting up your computer quickly, launching applications instantly, and transferring files more efficiently. So when it comes to comparing gigabytes, it’s important to consider your specific needs. If you need a lot of storage space, an HD may be the way to go, but if you want speed and efficiency, an SSD is likely the better choice.

    Explanation of Solid State Drives

    An SSD or a solid-state drive is a storage device that uses flash memory to store data. Unlike traditional hard disk drives (HDD), SSDs do not have any moving parts and operate silently. Not only are SSDs faster and more reliable than HDDs, but they also consume less power, making them more environmentally friendly.

    With SSDs, data can be accessed almost instantly, allowing for faster boot-up times and quicker application load times. Think of an SSD as a high-speed train that can transport data much faster than a traditional car, which represents an HDD. The popularity of SSDs has risen rapidly in recent years, and they are now commonly used in laptops, desktops, and even in gaming consoles.

    SSDs are undoubtedly the future of computer storage, and with their speed, reliability, and efficiency, it’s not hard to see why.

    how gigabytes from ssd compare to hd

    What is a HD?

    When comparing the gigabytes (GB) of storage on a solid-state drive (SSD) versus a hard drive (HD), it’s important to understand what exactly an HD is. Essentially, an HD is a mechanical device that uses magnetism to store data on a rotating platter. The platter spins while a read/write head accesses the data, similar to a record player.

    In contrast, an SSD is an electronic device that uses flash memory to store data. This means that an SSD has no moving parts, making it faster and more durable than an HD. However, the downside is that SSDs tend to be more expensive per GB than HDs.

    So, when deciding which storage option to choose, it comes down to balancing speed, durability, and cost. Ultimately, the decision depends on how much storage you need and what kind of work you’ll be doing on your device. But in terms of raw numbers, SSDs generally offer higher GB capacities than HDs, making them a better option for those who need more storage space.

    Explanation of Hard Drives

    A hard drive, or HD for short, is a device that stores digital data for long-term use. You can think of it as a massive digital filing cabinet that houses all of the files and programs on your computer. These drives come in different shapes and sizes, but the most common types are the traditional spinning hard disk drives (HDD) and the newer solid-state drives (SSD).

    HDDs work by using spinning disks that read and write data to a magnetic surface, while SSDs use a series of interconnected memory chips to store data. HDDs may be slower and noisier, but they offer higher storage capacity at an affordable price. Meanwhile, SSDs are faster, quieter, and more durable than HDDs, but they are also more expensive and have a smaller storage capacity.

    Overall, HDs are an essential component of any computer or digital device. Knowing the differences between the types of HDs can help you choose the best one for your needs, whether you want a high-performance drive for gaming or a high-capacity drive for storing media files.

    Gigabytes on SSD vs HD

    When it comes to comparing the storage capacity of SSDs and HDs, there are a few things you need to keep in mind. First, SSDs come in smaller sizes than HDs, typically ranging from 128 GB to 2 TB, while HDs can offer as much as 14 TB of storage capacity. However, SSDs are much faster and more reliable than HDs, making them a better choice for many people.

    Plus, with the high prices of SSDs coming down, it’s becoming more cost-effective to choose an SSD with a larger capacity. So, how many gigabytes can you fit on an SSD compared to an HD? It really depends on the specific models you’re comparing, but in general, you’ll likely be able to fit more gigabytes onto an HD than an SSD of the same size. That being said, the speed and reliability of SSDs make them a great choice for those who want fast, efficient storage.

    Comparison of Storage Space

    When comparing the storage space on a solid-state drive (SSD) versus a traditional hard disk drive (HDD), it’s important to consider the amount of gigabytes each can hold. While HDDs have traditionally had higher storage capacity, SSDs are quickly catching up. The latest SSDs are available with up to 4TB of storage space, which is more than enough for most users.

    However, if you are someone who needs even more space, hard disk drives can still offer up to 16TB of storage. Ultimately, the choice between an SSD and an HDD will depend on your specific needs and budget. But it’s clear that SSDs are becoming more competitive in terms of storage space, and offer many other benefits like faster read/write speeds and improved durability.

    Speed and Performance

    Are you wondering just how much faster a solid-state drive (SSD) is compared to a traditional hard drive (HD)? Well, the answer is, a lot! In terms of gigabytes, SSDs and HDs can both offer the same amount of storage space, but SSDs offer much faster read and write speeds. This means that your computer will be able to start up quicker, your applications will open faster, and your files will copy and save much more quickly. SSDs also have no moving parts, which means they are less susceptible to damage and wear-and-tear.

    Overall, if you’re looking for a storage solution that offers both speed and reliability, you may want to consider upgrading to an SSD.

    Comparison of Read/Write Speeds

    When it comes to data storage, one of the most important factors to consider is speed and performance. The read and write speeds of a device can greatly impact its usability and efficiency. Generally speaking, faster read/write speeds mean that data can be retrieved and stored more quickly, allowing for faster transfer rates and improved overall performance.

    When comparing different storage options, it’s important to consider the specific needs of your organization or project to determine which option will provide the most optimal speed and performance. Solid-state drives (SSDs) are known for their fast read and write speeds, making them an excellent choice for tasks that require quick and reliable access to large files. In contrast, hard disk drives (HDDs) typically have slower read and write speeds, but may be preferable for certain applications where cost is a primary concern.

    Ultimately, it’s important to weigh the pros and cons of each option before making a decision on what type of storage solution to use.

    Which is Best for You?

    If you’re in the market for a new computer, one of the important decisions you’ll have to make is whether you want a traditional hard drive (HD) or a solid-state drive (SSD). While HDs have been the standard for decades, SSDs have gained popularity in recent years due to their faster speeds and greater reliability. But when it comes to gigabyte capacity, how do the two compare? Generally, SSDs tend to have a lower storage capacity than HDs, especially in terms of the amount of storage you get per dollar.

    However, as SSD technology continues to improve and become more popular, prices are starting to come down and you can now find drives that offer several terabytes of storage. Ultimately, the choice between an HD and an SSD depends on your individual needs and budget. If you need more space for storing large files or documents and have a limited budget, an HD might be the better choice for you.

    On the other hand, if speed and reliability are more important to you and you’re willing to pay a little more for it, an SSD might be the way to go.

    Factors to Consider

    When it comes to choosing between a laptop and a desktop computer, there is no one-size-fits-all answer. The decision ultimately depends on your specific needs and preferences. Laptops offer the convenience of portability, which is great for people who travel often or need to work on-the-go.

    Desktops, on the other hand, tend to be more powerful and offer more upgradability options, making them ideal for heavy-duty tasks such as gaming or video editing. Additionally, laptops tend to be more expensive than desktops of similar specifications, so budget is an important factor to consider. Finally, consider your space constraints.

    Desktops are larger and require more desk space, while laptops can be used virtually anywhere. Ultimately, it’s important to weigh the pros and cons of each option and determine which one best fits your individual needs.

    Conclusion

    In the battle of gigabytes, SSD reigns supreme over HD. With lightning-fast read and write speeds, an SSD is the sports car of storage devices while an HD is more akin to a bicycle. With an SSD, you can zip through files and programs in the blink of an eye, while an HD will leave you twiddling your thumbs waiting for it to catch up.

    So, if you’re tired of waiting for your computer to keep up, trade in your HD for an SSD and enjoy the speed and efficiency of modern computing.”

    FAQs

    What is the storage capacity difference between an SSD and an HD in terms of gigabytes?
    SSDs generally have smaller storage capacities compared to HDs, with top-tier SSDs offering up to 4TB of storage while HDs can offer up to 18TB.

    Which is faster in terms of read and write speed: SSD or HD?
    SSDs are faster than HDs in terms of read and write speed. They can read and write data far more quickly because they have no moving parts, unlike HDs.

    Are SSDs more expensive than HDs?
    Yes, SSDs are more expensive compared to HDs. However, their price has been gradually decreasing over the past few years, making them more affordable to consumers.

    Can an SSD be used as a replacement for an HD?
    Yes, an SSD can be used as a replacement for an HD in a computer. In fact, many modern computers and laptops are now equipped with SSDs instead of HDs for faster boot and load times.

  • Boost Your Gaming Speed: Step-by-Step Guide on Transferring Games to an SSD

    Do you constantly find yourself struggling with slow loading times and lagging games? It’s a frustrating feeling, especially when you’ve invested in a high-end gaming setup. But fear not, transferring your games to an SSD can make all the difference. An SSD, or solid-state drive, is a much faster storage option than a traditional hard drive, meaning that your games will load quicker and run smoother.

    In this blog post, we’ll give you a step-by-step guide on how to transfer your games to an SSD, so you can start enjoying faster gaming experiences right away. So sit back, grab a cup of coffee, and let’s get started!

    What You Need

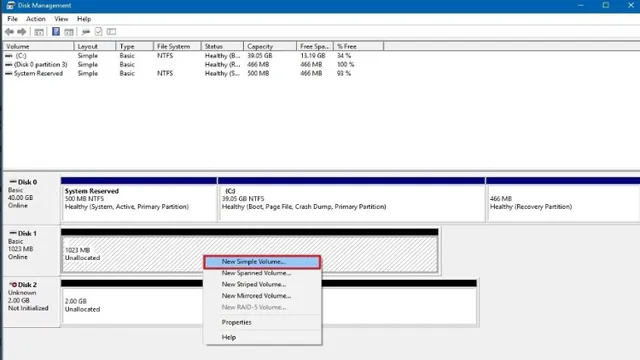
    Transferring games to an SSD can significantly improve your gaming experience by reducing load times and increasing overall system speed. To transfer games to an SSD, you’ll need to first ensure that your SSD has enough storage space for the games you want to transfer. You’ll then need to create a partition on your SSD and assign it a drive letter.

    Next, you can use a file transfer program such as Robocopy or Teracopy to move your games from your existing hard drive to the new SSD partition. Once the transfer is complete, you can create a shortcut to the game on your desktop or start menu to access it quickly. It’s important to note that not all games are transferrable, so it’s crucial to check with the game’s publisher or read the game’s system requirements before attempting to transfer it.

    With a little effort, transferring games to an SSD will undoubtedly improve your gaming experience.

    SSD and Game Files

    SSD When it comes to gaming, having a fast and reliable storage solution is crucial. This is where SSDs come in. SSD stands for solid-state drive and it’s a type of storage device that doesn’t use moving parts like traditional hard drives, which means they can access data much faster.

    If you want to improve your game performance, an SSD is a must-have accessory. Not only will it speed up the booting and loading times of your games or software, but it will also make sure that important game files are accessed quickly and efficiently. With an SSD, you’ll be able to quickly access your game files and load maps faster, resulting in improved game performance and reduced load times.

    So, if you’re looking to take your gaming experience to the next level, an SSD is the way to go!

    how do you transfer games to an ssd

    SATA to USB Adapter

    If you want to connect a SATA hard drive to your computer or laptop using a USB port, you’ll need an SATA to USB adapter. These adapters are a great way to extract data from an old hard drive or to recover important files that are no longer accessible through a computer’s internal hard drive. They’re also handy when you need to test a new hard drive before installing it internally.

    To use an SATA to USB adapter, you’ll need a few things. First, you’ll need the adapter itself, which can be purchased at most computer stores or online. You’ll also need a SATA hard drive, a USB cable, and a power supply or AC adapter, depending on the type of adapter you’re using.

    With these items, you’ll be able to easily connect your SATA hard drive to your computer or laptop and access all of your important files. Plus, you won’t have to worry about purchasing an expensive external hard drive to store your data.

    Step 1: Connect SSD to Computer

    So, you’ve finally decided to speed up your games by transferring them to your new SSD, but you’re not sure where to start? Don’t worry. It’s pretty simple. The first step is to connect the SSD to your computer.

    You need to make sure that your computer has a compatible port to fit the SSD, and you also need a SATA cable to connect it. Once the SSD is properly connected, you’ll need to install the appropriate software to prepare it for game transfers. One important point to keep in mind is that you should check the capacity of your SSD before transferring games.

    If it doesn’t have enough space, you’ll need to consider upgrading to a larger SSD or making space by deleting any unwanted data. Once you have ensured enough space, follow the prompts provided by the software to transfer your games to the SSD. With these simple steps, you’ll be able to enjoy faster game loading times and improved overall gaming experience.

    Using SATA to USB Adapter

    To use a SATA to USB adapter, the first step is to connect your SSD to your computer. This process is pretty straightforward; simply plug one end of the adapter into the SSD drive and the other end into your computer’s USB port. Once you’ve connected the adapter, you should see the drive appear on your computer, just like any other external drive.

    From here, you can format and partition the drive, transfer files to and from it, or use it as a backup storage solution. Keep in mind to use the proper cables and ensure your computer’s operating system supports the adapter for optimal performance. By following these steps, you can easily transform your internal SSD into an external drive and reap the benefits of increased storage space.

    Formatting SSD

    When it comes to formatting an SSD, the first step is to connect it to your computer. This can be done via SATA or USB, depending on the type of SSD you have. Once connected, your computer should recognize the new device and prompt you to initialize it.

    This involves selecting the type of partition scheme you want to use and formatting the drive. It’s important to note that formatting an SSD will erase all data on the drive, so be sure to back up any important files before starting the process. Some common partition schemes include MBR and GPT, and your choice will depend on the operating system you’re using and the size of your SSD.

    Overall, connecting your SSD to your computer is the first step in formatting it and getting it ready for use.

    Step 2: Moving Game Files to SSD

    When it comes to transferring games to an SSD, there are a few simple steps you can take to streamline the process. First, you’ll want to make sure that your SSD is properly installed and recognized by your system. Once you’ve confirmed that your setup is working correctly, you can begin the transfer process by locating the game files you want to move.

    Depending on the game, these files may be located in different folders on your system. Once you’ve found the files you want to transfer, simply copy and paste them onto your SSD. You may need to create a new folder on the SSD specifically for your games.

    Keep in mind that the transfer speed may vary depending on the size of the files and the speed of your system. Overall, transferring games to an SSD can speed up load times and improve overall game performance, so it’s definitely worth the effort!

    Locate Game Files

    Once you have identified the game files that you want to move to your SSD, it’s time to actually transfer them over. This is a relatively simple process that can be done manually, but it does require a bit of technical know-how. The first step is to locate the game files within your computer’s file system.

    This can vary depending on the game and where you initially installed it, but typically the game files will be located in the “Program Files” or “Program Files (x86)” folder in the C: drive. Once you’ve located the game files, simply copy and paste them to the desired location on your SSD. It’s important to note that some games may require additional files or folders to be moved in order for them to work properly, so be sure to do your research beforehand to avoid any complications.

    With that said, moving your game files over to an SSD can be a game-changer, greatly reducing load times and improving overall performance.

    Copy and Paste

    Moving game files to SSD can greatly improve the speed and performance of your gaming experience. If you’ve already installed your games on your computer’s HDD, transferring them to your SSD is a simple process. The first step is to locate the game folder on your HDD, which will typically be under the “Program Files” folder.

    Copy the entire folder and paste it onto your SSD, either directly onto the drive or in a new folder created for your games. It’s important to note that copying large game files may take some time, so be patient during the process. Once the files have transferred over, you may need to adjust the game’s settings to ensure it is using the SSD for storage rather than the HDD.

    Overall, moving game files to SSD is a simple and effective way to improve your gaming experience, and can make a noticeable difference in load times and performance.

    Step 3: Launch Game from SSD

    If you’re wondering how to transfer games to an SSD, you’re in luck because it’s a simple process. Once you’ve installed your SSD into your computer and cloned your operating system onto it, the next step is to move your games over. The easiest way to do this is to locate the game’s folder on your current hard drive and copy and paste it onto your SSD.

    Once the transfer is complete, simply launch the game from your SSD, and you’ll notice a significant increase in speed and performance. Remember to change the installation directory in your game settings to ensure that all future downloads and updates go straight to your SSD. With your games now running off an SSD, you’ll experience faster loading times and snappier performance, making for an all-around better gaming experience.

    Creating Desktop Shortcut

    Now that you have successfully installed your game onto your SSD and created a desktop shortcut, it’s time to launch the game and enjoy the benefits of faster load times and improved performance. Simply double-click on the desktop shortcut icon to open the game and start playing. Depending on the game, you may need to adjust the game settings to ensure it is using the SSD as its primary storage device.

    This can typically be done in the game’s settings menu. With your game now running and loading faster than ever, you can sit back, relax, and enjoy an enhanced gaming experience. Happy gaming!

    Changing Game Settings

    If you want to enjoy a smooth gaming experience, it’s essential to optimize your game settings. One simple step you can take is launching your game from your SSD. This process can significantly reduce your game’s loading time, allowing you to jump right into gameplay without any delay.

    By launching your games from SSD, you can also expect to experience less stuttering and frame drops in-game. This is because SSDs are much faster in data transfer than traditional hard drives, which means they can handle more intense gaming requirements. So, if you’re looking to level up your gaming experience, consider changing your game’s launch location to your SSD and enjoy faster loading times and smoother gameplay.

    In Conclusion

    In conclusion, transferring games to an SSD is like upgrading from a bicycle to a Ferrari. It takes some initial effort to get everything set up, but once you’re sailing down the road at lightning speeds, you’ll wonder how you ever managed without it. So go ahead, take the plunge and transfer those games over.

    Your load times (and possibly your overall quality of life) will thank you.”

    FAQs

    What are the benefits of transferring games to an SSD?
    Transferring games to an SSD can significantly improve loading times and overall game performance. It also frees up space on your hard drive for other files.

    Can all games be transferred to an SSD?
    Yes, all games can be transferred to an SSD as long as you have enough storage space on the SSD and your operating system supports it.

    How do you transfer games to an SSD?
    First, you need to make sure the SSD is properly installed and initialized. Then, you can either use built-in features like Steam’s “Move Install Folder” option or manually move game files from your hard drive to the SSD.

    Do you need to reinstall games after transferring them to an SSD?
    No, you do not need to reinstall games after transferring them to an SSD. However, you may need to update the game’s settings to reflect the new storage location.

    Can transferring games to an SSD cause any issues or data loss?
    If done correctly, transferring games to an SSD should not cause any issues or data loss. However, it is always recommended to backup your data before making any changes to your system.

  • SSD Formatting: How Long Does It Take To Get Your Drive Up To Speed?

    Ready to upgrade your PC with a new SSD or simply want to wipe out all your old data? Formatting an SSD might seem like a daunting task, especially if you’ve never done it before. However, it’s an essential process that ensures your drive is optimized for smooth performance and serves as a preventive measure against potential data corruption and cyber threats. If you’re wondering how long it takes to format an SSD, the answer is, it depends.

    But don’t worry, we’ve got you covered. In this blog post, we’ll explore everything you need to know about formatting an SSD, including the factors that influence the process’s duration and tips to help you do it quickly and efficiently. By the end of this post, you’ll be confident in your ability to format an SSD like a pro and optimize your storage device for optimal performance.

    So, let’s dig in!

    Understanding SSD Formatting Time

    SSD formatting time can vary depending on several factors such as the size of the drive, the type of formatting being used, and the speed of the computer. Generally, it takes anywhere from a few minutes to several hours to format an SSD. However, it’s important to note that a quick format takes less time than a full format.

    A quick format only erases the file system, while a full format not only erases the file system but also checks for bad sectors on the drive. The time it takes to format an SSD can also be affected by the speed of the computer’s processor and the amount of RAM available. It’s important to be patient and allow the formatting process to finish before using the drive.

    In summary, how long to format SSD depends on several factors, but it is worth the wait to ensure that the drive is clean and ready for use.

    Factors Affecting Formatting Time

    Formatting time is an important consideration when using solid-state drives (SSDs). Several factors can affect the time it takes to format an SSD, including the capacity of the drive, the type of file system being used, the speed of the SSD, and the overall health of the drive. When formatting a larger SSD, it may take longer due to the increased amount of data being processed.

    Using a more complex file system, such as NTFS, may also increase formatting time. Additionally, if an SSD is near its full capacity, formatting time may take longer as more data needs to be processed. It’s important to keep in mind the health of the drive when formatting, as an SSD with more used space or a larger number of bad sectors may take longer to format.

    Overall, understanding the various factors that can affect SSD formatting time can help users manage their storage more effectively.

    how long to format ssd

    Average Time Taken for SSD Formatting

    SSD formatting time When it comes to formatting an SSD, the duration can vary, depending on different factors. The average time taken for SSD formatting could range from several minutes to an hour. The process is quicker than traditional hard drives because there’s no need to low-level format, and SSDs don’t require time to check for bad sectors.

    However, the time taken still depends on the size, speed, and health of the SSD. If your SSD already has data on it, the time required for formatting could be considerably longer because the drive needs to erase the existing data first. Therefore, it’s important to back up all essential data before beginning the formatting process.

    Nevertheless, once the formatting is complete, your SSD will be ready to use – and it’ll deliver faster performance than a traditional hard drive.

    Quick vs Full Format

    When it comes to formatting an SSD, you have two options: quick format or full format. Quick formatting can be completed in a matter of seconds, but it only erases the file system, not the entire drive. This means that some files may still remain on the SSD, which can cause performance issues in the future.

    On the other hand, a full format erases everything on the drive and checks for any bad sectors. This takes significantly longer, depending on the size of the SSD, but ensures that the drive is free of any data or malware. So, how long does a full format take? It really depends on the size of the SSD and the speed of your hardware.

    On average, a full format of a 1TB SSD can take anywhere from an hour to several hours to complete. It may seem like a long time, but it’s worth it to ensure the best performance and security for your SSD.

    Pros and Cons of Quick Format

    When it comes to formatting storage devices such as hard drives or USB flash drives, the two options that come to mind are Quick Format and Full Format. A Quick Format takes significantly less time than a Full Format but simply deletes the files on the device and prepares it for new data storage. On the other hand, a Full Format not only deletes the files but also checks the storage device for bad sectors and marks them so that they are not utilized in the future.

    The main advantage of Quick Format is that it is faster and takes only a few seconds to complete, making it convenient for users who want to erase data from a drive quickly. However, Quick Format does not completely erase the data and leaves traces behind. Therefore, a possible disadvantage of Quick Format is that sensitive data can be recovered using data recovery software.

    In contrast, Full Format is a more thorough option and ensures complete data erasure, making it a better choice for those who require a higher level of security. Moreover, Full Format checks for bad sectors and repairs them, resulting in improved disk performance. However, Full Format takes significantly more time to complete than Quick Format, and may not be practical when time is a concern.

    In summary, the decision to use Quick Format or Full Format depends on the user’s requirements. While Quick Format is convenient, if you want to ensure complete data erasure, or if you encounter any disk errors, Full Format may be the better option for you.

    Pros and Cons of Full Format

    When it comes to formatting a storage device, two common options are quick format and full format. A quick format is faster and simply deletes the file directory, while a full format takes longer as it overwrites the entire drive with zeroes. The main advantage of a full format is that it will identify and mark bad sectors in the drive, preventing data loss in the future.

    However, it can take several hours to complete and is not necessary for routine maintenance. On the other hand, a quick format is suitable for erasing data or preparing a new drive for use. However, it does not check for bad sectors and can leave sensitive data vulnerable to recovery.

    Ultimately, it depends on your needs and the condition of your storage device, but it is recommended to perform a full format at least once a year to ensure optimal performance and data safety.

    Formatting Time Comparison

    Formatting time can be a pain, but it’s an important step to ensure your computer is running smoothly. There are two types of formatting methods – Quick and Full format. Quick format is the faster option as it only erases the file system and doesn’t scan the entire disk for bad sectors.

    This type of formatting can be useful if you’re in a hurry or need to erase personal data quickly. On the other hand, full format takes much longer as it checks the entire disk for bad sectors and marks them as unusable. This is a more thorough method and is recommended if you’re having issues with your computer or changing the file system.

    However, keep in mind that full formatting will erase all data on your disk, so make sure to back up any important files before starting the process. So, whether you choose quick or full formatting depends on your specific needs and time constraints.

    How to Speed Up SSD Formatting

    Formatting an SSD can take longer than expected but there are ways to speed up the process. One way to do this is by using a quick format option which cuts down on the time it takes to prepare the drive for use. Keep in mind that this option doesn’t fully erase the data on the drive but it does make it available for future data writing.

    Another way to speed up the formatting process is by connecting the SSD directly to your device instead of using a USB hub which can slow down the data transfer rate. Additionally, closing any unnecessary programs and applications can also free up processing power which can help speed up the formatting process. By taking these steps you can significantly reduce the time it takes to format your SSD and get back to using it for your data storage needs.

    Tips to Reduce Formatting Time

    If you want to speed up SSD formatting, there are a few tips that can save you time and effort. The first step is to make sure you have the latest firmware updates for your SSD. This can improve performance and reduce formatting time.

    You should also make sure your SSD is properly connected and configured in your system. Another way to speed up formatting is to use the “Quick Format” option instead of the “Full Format” option. This will only erase the file allocation table (FAT) and not the entire disk, which can save you a lot of time.

    Lastly, you can also try using a formatting tool specifically designed for SSDs. These tools can optimize the formatting process for better performance and efficiency. By following these tips, you can quickly and easily format your SSD without spending too much time on the process.

    So why wait? Give it a go and see how much time you can save!

    Tools to Speed Up SSD Formatting

    SSD formatting can be a time-consuming task, especially when dealing with large drives. Luckily, there are several tools available that can speed up the process. One such tool is the HP USB Disk Storage Format tool, which can format USB drives and SD cards quickly and efficiently.

    Another useful tool is the Windows Disk Management utility, which allows you to format your SSDs and manage partitions. Additionally, third-party programs such as MiniTool Partition Wizard and EaseUS Partition Master can help to expedite the formatting process. These programs offer advanced features such as resizing partitions, converting file systems, and cloning disks.

    By utilizing these tools, you can save plenty of time and ensure that your SSDs are formatted correctly for optimal performance.

    Conclusion

    In the search for the answer to the age-old question of “how long does it take to format an SSD?” we discover that, like many things in life, the answer is not black and white. It depends on a variety of factors, including the size and speed of the SSD, the method of formatting chosen, and the overall performance of the computer. So the next time someone asks you how long it takes to format an SSD, you can simply tell them, “It’s like asking how long is a piece of string – it all depends on the context!”

    FAQs

    What is SSD?
    SSD stands for Solid State Drive. It is a type of storage device that uses NAND-based flash memory to store data.

    How long does it take to format an SSD?
    The time it takes to format an SSD depends on the size and type of the SSD, as well as the hardware and software used for the format. In general, formatting an SSD can take anywhere from a few minutes to several hours.

    Do I need to format my SSD?
    If you are installing a new SSD, you will need to format it before you can use it. If you are reusing an existing SSD, you may not need to format it unless you want to erase all the data on it.

    Can I format my SSD using Windows?
    Yes, you can format your SSD using Windows built-in formatting tool. To do so, open the Disk Management tool, select your SSD, right-click on it, and click on Format.

  • Unlocking Lightning-Fast Storage: A Step-by-Step Guide on How to Use Two SSDs Simultaneously

    Unlocking Lightning-Fast Storage: A Step-by-Step Guide on How to Use Two SSDs Simultaneously

    Are you looking to boost your computer’s performance using 2 SSDs at once? If yes, then you have come to the right place! Using multiple SSDs is a great way to supercharge your device and increase its speed, storage capacity, and overall performance. But wait, how do you actually use 2 SSDs at the same time on your device? Well, it’s not as complicated as it sounds. You can use a RAID (Redundant Array of Inexpensive Disks) configuration that allows you to combine both SSDs into a single logical unit for maximum performance.

    There are also other options like moving specific files to the second SSD like games and large media files. By using multiple SSDs, you can get faster boot times, speedy file transfers, and an overall better computing experience. Another advantage of using SSDs is that they’re less prone to hardware malfunction and data loss, so it’s a reliable solution.

    So, whether you’re a gamer, a creative professional, or anyone who requires high performance from their device, incorporating multiple SSDs into your setup is an excellent way to enhance your computing experience. Keep reading to find out how it’s done!

    What You Need

    If you want to know how to use 2 SSDs at the same time, you may think it’s a complicated process, but it’s actually quite simple. The first thing you need is a motherboard that has two M.2 slots or two SATA ports.

    Next, make sure you have a power supply unit that has enough power to support two SSDs. Once you have these components in place, you can connect the SSDs to the appropriate ports on your motherboard. Then, you’ll need to go into your computer’s BIOS and make sure that both SSDs are recognized.

    Finally, you can format and partition the drives to suit your needs and start using them. Overall, using 2 SSDs at the same time can significantly improve your computer’s performance and make it easier for you to manage and store your data.

    Two SSDs

    If you’re considering using two SSDs in your system, there are a few things you need to keep in mind. First and foremost, you need to make sure that your motherboard has two available M.2 slots or SATA ports.

    It’s also important to consider the overall capacity you’ll need. If you’re planning on using two smaller SSDs, you’ll need to set up the system to combine their capacities, which is known as RAID. However, if you’re using two larger SSDs, you can simply use them as separate drives.

    Another consideration is the type of SSD you choose. There are several different types of SSDs, including SATA, PCIe, and NVMe. SATA is the most common and affordable option, while PCIe provides faster transfer speeds.

    NVMe is the fastest type of SSD and is ideal for high-performance applications. However, it’s also the most expensive option. When it comes to setting up your system, you’ll need to make sure that you have the necessary cables and mounting hardware.

    Installing an SSD is relatively simple, but it’s important to ensure that it’s properly mounted and connected to the motherboard. Overall, using two SSDs can provide several benefits, including increased storage capacity and faster read/write speeds. However, it’s important to consider your system’s requirements and choose the right type of SSD to meet your needs.

    With the right setup and configuration, using two SSDs can help you achieve optimal performance and efficiency in your system.

    how to use 2 ssd at the same time

    A device with two M.2 slots or a SATA SSD slot

    If you’re looking to build a powerful computer, you might be wondering whether to choose a device with two M.2 slots or a SATA SSD slot. The answer depends on your specific needs, but both options have their advantages.

    A device with two M.2 slots will allow you to install two high-speed NVMe SSDs, which can significantly boost your system’s performance. On the other hand, if you have an existing SATA SSD, a device with a SATA SSD slot will allow you to transfer its data to your new computer and continue using it.

    When deciding between the two options, consider your budget and the type of storage you need. M.2 SSDs tend to be more expensive than SATA SSDs, but they offer faster read and write speeds.

    SATA SSDs are more affordable and still provide fast performance, but they might not be as speedy as M.2 SSDs. Another aspect to consider is the number of PCIe lanes available in your system.

    M.2 SSDs require PCIe lanes to function at their maximum speeds. If your system has limited PCIe lanes, it might be better to choose a device with a SATA SSD slot.

    In conclusion, a device with two M.2 slots or a SATA SSD slot can both be excellent options, depending on what you need. M.

    Step by Step Guide

    If you’re looking to use two SSDs at the same time, you’ll need to make sure your computer is equipped to handle it. One option is to use RAID (Redundant Array of Independent Disks) technology, which allows you to combine the two SSDs into one logical drive. To begin, make sure your computer has multiple drive bays and supports RAID configuration.

    Then, physically install the two SSDs into the appropriate bays. Next, access your computer’s BIOS and set up your RAID configuration, selecting the appropriate RAID level. Once your configuration is set, you’ll need to initialize your new logical drive, and then format it so it’s ready to use.

    With that complete, you can then start saving data to your new, larger storage space. With the right equipment and configuration, using two SSDs at once can give you a significant boost in both speed and storage capacity.

    Step 1: Insert the first SSD into the first M.2 slot or the SATA SSD slot

    When it comes to upgrading or building your PC, adding an SSD can significantly improve your system’s performance. If you’re looking for a step-by-step guide on how to install your SSD, you’re in the right place. To start, ensure your PC is turned off and disconnected from any power source.

    Then locate either the first M.2 slot or the SATA SSD slot, depending on the type of SSD you have. Carefully insert the SSD into the designated slot, while being cautious not to touch the connectors on the bottom.

    Make sure the SSD is properly secured to avoid any potential damage. Now, you’re ready to move onto the next step in the installation process. Remember to take your time and be patient, as installing components in your PC requires precision to ensure everything runs smoothly.

    Step 2: Go to the Device Manager and check if the SSD is detected

    After installing your new SSD, the next step is to check if your device recognizes it. The easiest way to do this is by going to the Device Manager. To access this feature, right-click on the Windows logo on your taskbar, and select “Device Manager.

    ” Once you’re in the Device Manager, scroll down the list until you find “Disk Drives.” Click the arrow to expand the category and look for your SSD. If your SSD is recognized, it will be listed here.

    However, if it’s not, you may need to troubleshoot further to determine why your computer is not recognizing the SSD. This can involve making sure all cables are securely connected, updating drivers, or checking the BIOS settings. By ensuring your SSD is detected, you can begin the process of transferring data and improving your device’s performance.

    So go ahead and check now to see if your new SSD is up and running!

    Step 3: Insert the second SSD into the second M.2 slot

    Now that you have successfully installed the first SSD into your computer’s M.2 slot, it’s time to move on to the second SSD. Don’t worry; the process is similar to the first one and just as easy! Firstly, locate the second M.

    2 slot on your motherboard. Each motherboard is unique, so refer to your motherboard manual if you are unsure where to find it. Once you have located the second M.

    2 slot, carefully insert the second SSD into it. Make sure that the pins on the SSD are aligned with the slot before you push it down. Don’t apply too much pressure; it should slide in smoothly.

    Once you hear the click sound, it means that the SSD is firmly secured in place. Now you have two SSDs in your computer, and you’re ready to enjoy faster operating speeds, smoother multitasking and more capacity for your files!

    Step 4: Open the BIOS and confirm that both SSDs are detected

    After physically installing the second SSD in your computer, the next step is to confirm that both SSDs are detected by the BIOS. To do this, restart your computer and press the key that appears in the screen to access the BIOS setup utility. The key to access BIOS may vary depending on your computer’s manufacturer.

    Once you’re in the BIOS, navigate to the section that shows the list of connected drives. If both SSDs are detected, you should see them listed as separate entries. If you can’t find the second SSD on the list, there might be an issue with either the installation or the configuration.

    In this case, you may need to double-check the connections and settings or consult a technician for assistance. Checking the BIOS is an important step in ensuring that your computer recognizes both SSDs and that they’re ready for use. Overall, this step is crucial in the journey towards having a faster, more efficient computer.

    Step 5: Configure the SSDs in RAID, if desired

    After installing the SSDs and initializing them, you may want to consider configuring them in RAID. RAID, or Redundant Array of Independent Disks, is a storage technology that combines multiple drives into one logical unit. This enables better performance, reliability, and fault tolerance.

    To do this, you need to access the BIOS or UEFI firmware on your computer and enable the RAID mode. Then, you need to select the type of RAID you want to use, such as RAID 0, RAID 1, or RAID 5, depending on your needs and preferences. RAID 0, for example, stripes the data across the drives for faster read and write speeds, but has no redundancy or data protection.

    RAID 1, on the other hand, mirrors the data across the drives for higher reliability and backup, but sacrifices storage capacity. RAID 5, meanwhile, combines striping and parity for both speed and protection, but requires at least 3 SSDs and more configuration. Keep in mind that configuring RAID may require you to reinstall the operating system and all applications on the new logical drive.

    Therefore, make sure you have a backup of all your important data before proceeding.

    Step 6: Install your operating system or clone your current one to the SSDs

    Once you have your SSDs installed and connected properly, it’s time to install your operating system or clone your current one to the SSDs. This step can vastly improve the overall speed and performance of your computer. If you’re starting fresh with a new operating system installation, you’ll need to have the installation media on a USB drive or DVD.

    Insert the media into your computer and boot from it. Follow the installation prompts and make sure to select your SSD as the installation destination. On the other hand, if you want to clone your current operating system, you can do so using cloning software such as Acronis True Image or Macrium Reflect.

    Cloning your current operating system will transfer all of your programs, files, and settings to the SSD, creating an exact copy of your existing system but with better performance thanks to the SSDs. Whichever method you choose, make sure to backup your important files and data before proceeding. Once the installation or cloning process is complete, you’ll be able to enjoy a much faster and smoother computing experience on your newly upgraded SSD-run system.

    Benefits of Using Two SSDs

    If you are wondering how to use 2 SSD at the same time, there are several benefits to doing so. One major advantage is increased storage capacity. By using two SSDs, you can effectively double your storage space and easily store large files such as videos, music, and high-resolution images.

    Another benefit is improved performance. With two SSDs, you can set them up in a RAID configuration to improve read and write speeds, making your computer run faster overall. Additionally, using two SSDs can provide better system reliability and protection against data loss in case one drive fails.

    By installing your operating system, applications, and frequently accessed files on one SSD while using the other for backups, you can ensure that your data is always protected and easily retrievable. Overall, using two SSDs can significantly enhance your computer’s storage capacity, speed, and reliability, making it a smart investment for any computer user.

    Increased speed and performance

    Using two SSDs in your computer not only increases the storage capacity but also provides significant speed and performance benefits. One of the most significant advantages of having two SSDs is the reduction in load times. With two SSDs, all your applications and files can store on different drives, allowing the system to access them faster.

    You will notice a considerable improvement in the boot-up time and application launch time. Not only this but if you are into gaming, then loading times are one of the most significant things that come in the way of an immersive gaming experience. Two SSDs can allow you to store the game files separately from the system files, resulting in faster load times, reduced game stutter, and improved frame rates.

    In summary, using two SSDs can provide a massive improvement in the performance of your computer and make all your computing tasks snappier and more efficient.

    Redundancy and data protection

    When it comes to data protection and redundancy, using two SSDs can offer numerous benefits. By having two SSDs in a redundant configuration, you can ensure that if one drive fails, you have a backup in place. This means that your data will be safe and you won’t suffer any data loss.

    Additionally, using two SSDs can provide faster read and write speeds, which is especially useful if you’re working with large files and need to access them quickly. Another benefit of using two SSDs is the increased capacity. By combining the storage capacities of two SSDs, you can have a larger storage solution that can meet your needs.

    Overall, using two SSDs in a redundant configuration can provide better data protection and faster performance, making it a smart choice for individuals and businesses alike.

    Conclusion:

    In conclusion, using two SSDs at the same time can be a game-changer for your computer’s performance. It’s like having two superheroes teaming up to save the day. With the right setup and configuration, you can enjoy faster boot times, smoother multitasking, and seamless storage management.

    Just remember, while it might take a little extra effort to set up, the rewards are well worth it. So, don’t be afraid to harness the power of two SSDs and take your computer to the next level!”

    Using two SSDs at the same time on your device is a simple process that can significantly elevate the performance and data storage capacity of your device.

    Using two SSDs on a device can be a game-changer. The benefits are numerous, with the most significant being the increase in performance and storage capacity. One SSD can handle the operating system and applications, while the other can store personal files and media.

    This allows for faster boot and load times, making the user experience smoother and more efficient. Additionally, having two SSDs can safeguard your data. If one drive fails, the other still has all of your valuable files and information.

    It’s like having a backup in place without the added hassle. Overall, using two SSDs is a simple yet effective way to take your device’s performance and storage capabilities to the next level.

    FAQs

    Can I connect 2 SSDs to my motherboard at the same time?
    Yes, most modern motherboards support multiple PCIe or SATA ports, allowing you to connect and use 2 SSDs simultaneously.

    How do I set up RAID with 2 SSDs?
    You can set up RAID (Redundant Array of Independent Disks) with 2 SSDs by using your motherboard’s RAID controller or a software RAID tool. This will allow you to combine the capacity and performance of both SSDs for improved speed and data redundancy.

    What’s the advantage of using 2 SSDs instead of 1?
    Using 2 SSDs can offer several benefits, including faster read/write speeds (especially if set up in RAID), increased storage capacity, improved data redundancy, and better multitasking performance.

    How do I transfer data from one SSD to another?
    You can transfer data between 2 SSDs by using a cloning tool like Clonezilla or Macrium Reflect. Alternatively, you can manually copy and paste files between the drives. Just make sure to format or erase the destination SSD beforehand to avoid conflicts.

  • Upgrade Your Mac’s Performance with Ease: A Step-by-Step Guide to Replacing Fusion Drive with SSD

    Upgrade Your Mac’s Performance with Ease: A Step-by-Step Guide to Replacing Fusion Drive with SSD

    If you’re tired of your Mac’s slow performance, there’s a solution – replacing your Fusion Drive with an SSD. This upgrade can greatly improve your computer’s speed and responsiveness, making your daily tasks a breeze. But what exactly is a Fusion Drive, and why should you consider swapping it out? A Fusion Drive is a combination of a traditional hard drive and an SSD, designed to give you the best of both worlds.

    However, its performance can still lag behind a dedicated SSD. In this blog post, we’ll explore the benefits of replacing your Fusion Drive with an SSD and take you through each step of the process. So grab a cup of coffee and let’s dive in!

    Introduction to Fusion Drive and SSD

    If you’re looking to boost the performance of your Apple computer, you may be wondering about the process of replacing a Fusion Drive with an SSD. The good news is that it’s relatively easy to do so, even if you don’t have extensive technical skills. First, you’ll need to obtain the appropriate SSD for your computer model and backup your data.

    Next, you’ll need to open up your computer and locate the Fusion Drive’s flash storage, as well as the hard drive. You can then disconnect the hard drive and replace it with the SSD, making sure to securely attach it in place. Once everything is reconnected, you can restore your data and enjoy the significantly faster performance and storage capacity of your new SSD.

    By taking this simple step, you can transform your computer into a high-performing machine that’s capable of handling even the most demanding applications.

    What is a Fusion Drive?

    If you’re looking to upgrade your computer’s performance, a Fusion Drive might be just what you need. A Fusion Drive is a hybrid storage solution that combines a traditional hard drive and a solid-state drive (SSD) into one cohesive system. The SSD acts as a cache for frequently accessed files, while the hard drive provides more space for less frequently accessed files.

    This combination provides the best of both worlds, giving a computer the speed of an SSD with the storage capacity of a traditional hard drive. Think of it like having a fast car that can also carry a lot of cargo. The best part is that you don’t need to manage the Fusion Drive yourself – the operating system automatically manages the data between the SSD and hard drive.

    So if you’re looking for a faster and more efficient computing experience, consider upgrading to a Fusion Drive.

    how easy to replace fusion drive with ssd

    What is an SSD?

    An SSD, or Solid-State Drive, is a storage device that utilizes flash memory to store data digitally. Unlike traditional hard disk drives (HDDs) that use spinning platters to read and write data, SSDs have no moving parts, which makes them faster, more durable, and energy-efficient. Fusion Drive, on the other hand, is a hybrid storage solution that combines both SSD and HDD technologies for better performance and storage capacity.

    By using SSD as a cache to frequently accessed files, Fusion Drive provides a faster boot-up time, smoother application launches, and improved overall system performance. The keyword for this topic is “SSD,” which is crucial to understand the difference between SSDs and HDDs, as well as hybrid storage solutions like Fusion Drive. Choosing the right type of drive can improve your computer’s performance, speed, and reliability, which makes it worth considering when purchasing or upgrading your system.

    9 Simple Steps to Replace Fusion Drive with SSD

    Replacing a Fusion Drive with an SSD may seem daunting, but it’s actually quite simple if you follow these nine steps. First, back up all your important data to an external drive or cloud storage. Then, shut down your Mac and unplug all cables.

    Next, remove the screws on the back cover and carefully lift it off. Locate the Fusion Drive and unscrew it from the logic board. Replace the Fusion Drive with the SSD and secure it in place.

    Reattach the back cover and screws, plug in all cables, and boot up your Mac. Finally, use a cloning tool or a fresh install of macOS to transfer your data onto the new SSD. With these steps, you can enjoy faster performance and storage on your Mac in no time!

    Step 1: Back up Your Data

    Replacing a fusion drive with an SSD can enhance your Mac’s performance significantly. Before beginning the replacement process, it is crucial to back up your important data first. You can use Time Machine or any other backup software to create a copy of all your files, images, and documents.

    The backup will eliminate any risk of losing data during the replacement process. Additionally, disconnect the Mac from any external devices such as printers, scanners, and hard drives to avoid any potential damage. Make sure the backup process is complete, and the files are readily accessible before proceeding with the replacement process.

    The initial step is vital for safeguarding your data and ensuring smooth replacement of the fusion drive with an SSD.

    Step 2: Shut Down Your Mac

    When it comes to upgrading your Mac’s storage from a fusion drive to an SSD, the first step is to back up all your important data. Once you’ve ensured that your data is safe, the next step is to shut down your Mac completely. This is essential as it allows you to disconnect all cables and peripherals from your Mac and ensures that no electrical power is flowing through it.

    Shutting down your Mac can be a bit tricky, especially if you’re not used to it. But it’s straightforward – you can either use the “Shut Down” option from the Apple menu or hold down the power button until your Mac turns off completely. Once shut down, it’s important not to rush into the next step.

    Allow your Mac to sit for a few minutes to cool down before you start removing hardware. This will help prevent any damage to your Mac’s internal components. With your Mac safely shut down, you’re now ready to move on to the next step in upgrading your Mac’s storage from fusion drive to SSD.

    Step 3: Open the Mac Case

    In step 3 of replacing a Fusion Drive with an SSD in a Mac, it’s time to crack open the case. Before attempting any further steps, ensure you have all the necessary tools and precautions in place. First of all, shut down your Mac and unplug it from the power source.

    Then, detach all the external connections such as keyboard, mouse, and monitor. Once you’re certain no power is running through the system, use a T6 Torx driver to unscrew the ten screws from the back of the case. Carefully remove the back cover and put it aside.

    You’ll see the fans, logic board, and other components immediately. As you begin working on your Mac, take note of any standalone screws that may be holding the drive down, remove them gently. Keep your screws and components organized, so you know where they fit once the job is completed.

    Now that the drive is exposed, it’s time to move to the next step.

    Step 4: Remove the Fusion Drive

    After backing up your data and removing the logic board, it’s finally time to remove the Fusion Drive. This process involves unscrewing four screws on the drive bracket and unplugging the drive cable from the logic board. Once the Fusion Drive is removed, set it aside and replace it with your new SSD.

    Make sure the SSD is properly seated in the drive bracket and connected securely to the logic board. We recommend double-checking all connections before reassembling your Mac. Installing an SSD in place of a Fusion Drive is an excellent way to significantly boost the speed and performance of your Mac.

    So make sure you take your time with this process and enjoy the benefits of a faster, more efficient computer.

    Step 5: Prepare the SSD

    Now that we have removed the Fusion Drive and installed the new SSD, it’s time to prepare it for use. Follow these simple steps to ensure a smooth transition: Connect your SSD to your Mac using an enclosure or adapter.

    Open Disk Utility from the Applications folder.

    Locate your SSD in the left-hand sidebar and select it. Click on the Erase tab at the top of the window.

    Choose APFS or macOS Extended (Journaled) as the format.

    Name your SSD whatever you’d like, but avoid using special characters or spaces in the name. Check that the scheme is GUID Partition Map.

    Press Erase to format the drive.

    Step 6: Connect the SSD to the Mac

    Once you have removed the old Fusion Drive and installed the new SSD in your Mac, it’s time to connect everything. The first step is to locate the SATA data cable and connect it to the SSD. Then, you need to connect the power cable to the SSD, making sure it’s firmly in place.

    Once you’ve done that, it’s time to secure the SSD to the Mac using the screws provided in the kit. Before you close up your Mac, make sure everything is connected securely and stored in the appropriate place. Once you’re sure everything is in place and secure, you can close up your Mac and power it on.

    Congratulations, you’ve successfully replaced your Fusion Drive with a powerful new SSD! Sit back, relax, and enjoy the improved speed and performance of your Mac.

    Step 7: Install MacOS on the SSD

    Once you’ve successfully partitioned and formatted your SSD, the final step is to install MacOS onto it. To do this, restart your Mac and hold down the Command and R keys until the Apple logo appears. This will start your Mac in Recovery mode, which will allow you to download and install a fresh copy of MacOS onto your SSD.

    Once you’ve connected to a stable internet connection, select “Reinstall MacOS” and follow the on-screen instructions. Be sure to select your SSD as the destination for the installation, and sit back while your Mac does its thing. Depending on the speed of your internet connection, this process can take anywhere from 30 minutes to an hour or more.

    Once the installation is complete, your Mac will restart automatically and you’ll be ready to enjoy lightning-fast performance on your newly-installed SSD!

    Step 8: Transfer Data from Backup

    As we reach step 8 of replacing your Fusion Drive with an SSD, it’s time to transfer your data from your backup onto the new drive. This is where all the preparation work you’ve done up until now comes into play. First, ensure that your backup is fully updated and includes all relevant files and programs.

    Then, connect your backup drive to your computer and navigate to the migration tool. This tool will guide you through the process of copying your data from the backup onto your new SSD. The transfer may take some time, depending on the amount of data you have, but once it’s done, you can disconnect your backup and start using your new SSD.

    Remember, always have a backup of your important data, just in case. With this step complete, you’re almost ready to enjoy the increased speed and performance of your new SSD.

    Step 9: Enjoy Your New SSD!

    Congratulations, you have successfully completed all the essential steps to replace your Fusion Drive with an SSD! Now it’s time to sit back and enjoy the benefits of a faster, more responsive computer. The speed improvements and increased performance will be noticeable from the moment you boot up your system. In addition to faster load times, you’ll also experience smoother multitasking capabilities and improved overall efficiency.

    Whether you use your computer for work or play, you’ll find that the upgrade to an SSD was well worth the investment. So go ahead, enjoy the perks of your new SSD, and get ready to take your computing experience to the next level!

    Why You Should Replace Fusion Drive with SSD

    Replacing your Mac’s Fusion Drive with an SSD can greatly enhance its overall performance. Though it may sound intimidating, the process is actually fairly straightforward and can be done with the right tools and a bit of patience. SSDs are quicker, more efficient and reliable than traditional hard drives, meaning you can boot faster, launch apps in seconds and access files in the blink of an eye.

    Furthermore, SSDs generate less heat, consume less power, and produce less noise than fusion drives, all while lasting much longer. If you are looking to boost the speed and efficiency of your Mac, replacing its Fusion Drive with an SSD is a smart move to make. All you need is an SSD, a set of screwdrivers, and a guide to help you along the way.

    Faster Performance

    If you want faster performance from your Mac, it’s time to ditch your Fusion Drive and replace it with an SSD. While Apple’s fusion drive technology combines a traditional hard drive with a small amount of flash storage, an SSD offers faster access speeds and much-improved performance. With an SSD, you’ll enjoy snappier boot times, faster app launches, and lightning-fast file transfers.

    Plus, an SSD is more reliable, since it doesn’t have moving parts that can wear out over time. Upgrading to an SSD is an investment in your Mac’s performance – and your productivity. So why settle for slow performance when you can get the speed you need? Upgrade your Mac with an SSD today.

    Improved Reliability

    If you’re still using a Fusion Drive in your Mac, it might be time to upgrade to an SSD. While Fusion Drives combine a traditional hard drive with a smaller solid-state drive to improve performance, they can be prone to reliability issues. SSDs, on the other hand, are known for their durability and speed.

    By replacing your Fusion Drive with an SSD, you’ll experience faster boot times, improved application loading, and better overall performance. Plus, you’ll have the peace of mind that comes with using a reliable storage solution. So, if you’re looking for a more stable and efficient storage option, consider upgrading to an SSD.

    Better Energy Efficiency

    Are you looking to improve your computer’s energy efficiency? If so, one simple change you can make is switching out your traditional hard drive for a solid-state drive (SSD). Unlike traditional hard drives with spinning disks, SSDs use flash memory to store information. This means that they consume significantly less power than their older counterparts.

    In fact, studies have shown that SSDs can reduce energy consumption by up to 80%. Not only will this save you money on your electricity bill, but it will also help reduce your carbon footprint. So if you’re looking for a quick and easy way to make your computer more eco-friendly, consider upgrading to an SSD today.

    Conclusion

    In conclusion, replacing a fusion drive with an SSD is easier than convincing your cat to use the litter box. With the right tools and a little bit of know-how, swapping out your hard drive for a solid-state drive can be as simple as a walk in the park. So if you’re looking to speed up your computer and enjoy lightning-fast performance, don’t be afraid to give it a try – your tech-savvy friends will be impressed, and your computer will thank you for it!”

    FAQs

    What are the benefits of replacing a fusion drive with an SSD?
    Replacing a fusion drive with an SSD can significantly improve the speed and performance of your computer. It allows for faster boot-up times, quicker application launches, and smoother overall experience.

    Is it difficult to replace a fusion drive with an SSD?
    The difficulty level varies depending on your computer model, but it can be done relatively easily with the right tools and some technical knowledge. It’s recommended to seek professional help if you’re unsure about the process.

    Can you keep your data when replacing a fusion drive with an SSD?
    Yes, you can transfer your data from the fusion drive to the new SSD. However, it’s important to back up your data before starting the replacement process to avoid the risk of data loss.

    How much does it cost to replace a fusion drive with an SSD?
    The cost of replacing a fusion drive with an SSD varies depending on the type of SSD you choose and if you do it yourself or hire a professional. On average, it can cost anywhere from $150-$500.