Category: How to

How to

  • Step-by-Step Guide: Hassle-free Transfer of Windows to a New SSD

    Upgrading to a new SSD can bring a new life to your old computer. But, transferring your Windows operating system to a new SSD can be a daunting task, especially if you’re not tech-savvy. If you’re wondering how to transfer Windows to a new SSD, don’t worry, it’s easier than you might think.

    In this blog, we’ll guide you through the process of transferring your Windows OS to a new SSD, step by step. Think of it like moving to a new house, sure it can be a hassle, but it’s worth it in the end once you settle in and enjoy the upgrade. Grab your toolbox and let’s get started on bringing new life to your old computer.

    Check SSD Compatibility

    If you’re looking to transfer Windows to a new SSD, it’s essential to check the compatibility of your new drive. Not all SSDs are created equal, and not all of them will work with your specific device. One common issue can arise if your current PC is running on an old BIOS system, in which case the new SSD may not function correctly without a firmware update.

    To ensure a smooth transfer, always make sure your new drive is compatible with your PC and the software you’ll be running. You can also consider using a cloning software tool to transfer your current Windows operating system, files, and applications to the new SSD quickly. Ultimately, with a little preparation, you can enjoy faster boot times and improved performance by upgrading to an SSD.

    Research your computer and SSD compatibility

    If you’re contemplating upgrading your computer’s storage, it’s essential to research your computer and SSD compatibility. Different computers have different systems and interfaces that determine whether a particular SSD is compatible or not. Before purchasing an SSD, first, check the existing hard drive’s interface to get an idea of what type of SSD will work with the computer.

    Commonly used interfaces include SATA, NVMe, and PCIe. SATA is the most popular interface for SSDs, while NVMe and PCIe interfaces are more advanced and offer faster speeds. Consider your computer’s motherboard as well, since it determines the number and type of drives you can install.

    Check the manual or manufacturer’s website for specifications and compatibility information. Upgrading to an SSD can significantly improve your computer’s performance, but it’s important to ensure compatibility before making a purchase.

    how do i transfer windows to a new ssd

    Ensure your SSD is large enough for all files on current drive

    When upgrading to a new SSD, it’s important to ensure that it has enough storage capacity to hold all the files from your current drive. It may be tempting to go for a smaller SSD to save some money, but running out of space can be frustrating and cause performance issues. Before you make a purchase, check the compatibility of the SSD with your computer’s motherboard to ensure that it will work properly.

    Additionally, consider the amount of data that you currently have on your old drive, including operating system files, applications, and personal files. This will give you an idea of the minimum capacity that you need for your new SSD. It’s always better to invest in a larger size if you can, as this will allow you to store more files and ensure optimal performance.

    By taking the time to check your SSD’s compatibility and choosing the right size, you’ll be able to enjoy faster speeds and more storage space for all of your files!

    Create a System Image

    If you’re planning to upgrade your computer’s hard drive or simply want to transfer Windows to a new SSD, creating a system image is the way to go. Creating a system image is a process of creating a backup copy of your entire operating system, including all installed programs, settings, and files. To create a system image, you’ll need an external hard drive with enough space to store your system image.

    Once you have that, follow these steps. First, go to the Control Panel, select System and Security, and then go to Backup and Restore. From there, you can select Create a System Image.

    Follow the prompts to select the target drive where you’ll save the system image. After the image is created, you need to create a bootable USB or DVD with the system recovery files. Insert the bootable USB or DVD into the computer and restart it.

    Select the boot device from BIOS to boot from the USB or DVD, and then follow the prompts to restore the system image. Overall, creating a system image is a straightforward process that can save you a lot of trouble in case something goes wrong during the transfer. With a system image, you’ll have peace of mind knowing you have a complete backup of your computer’s operating system, enabling you to get back up and running in no time.

    Back up your current system with a system image

    Creating a system image is an important step in backing up your current system. A system image is a snapshot of your entire system, including the operating system, installed programs, and files. It allows you to restore your entire system to a previous state if something goes wrong or if you want to revert to a previous configuration.

    To create a system image, go to the Control Panel and navigate to Backup and Restore. From there, click on Create a system image and select the location where you want to save the image, such as an external hard drive or a network location. It’s important to keep in mind that creating a system image can take some time, depending on the size of your system and the speed of your computer.

    Additionally, it’s recommended to create a system image regularly as part of your backup strategy to ensure that you always have a recent snapshot of your system to restore from in case of emergencies. By creating a system image, you can have peace of mind knowing that your system is backed up and easily recoverable.

    Save image to external hard drive or cloud storage

    If you’re looking to safeguard your computer data, it’s important to create a system image and store it on an external hard drive or cloud storage. A system image is an exact copy of your entire computer system, including your operating system, programs, and files. This image can be used to restore your computer back to its previous state in case of system failures, viruses, or other catastrophic events.

    To create a system image, you’ll need to go to the Control Panel on your Windows computer, select System and Security, and click on Backup and Restore. From there, you can select Create a System Image, choose the location for the image, and start the backup process. Once the backup is complete, you can save the image to an external hard drive or upload it to a cloud storage service for safekeeping.

    By creating a system image, you can ensure that you never lose important files or data, even in the event of a system crash.

    Install SSD

    If you’re looking to upgrade your computer’s speed, installing an SSD is a great start. However, if you want to transfer your Windows operating system to the new SSD, there are a few steps you need to follow. First, you’ll need to back up all of your important files and programs to an external hard drive or cloud storage.

    Next, you’ll need to download and install cloning software, such as EaseUS Todo Backup, to transfer all of your data to the new SSD. Once you’ve installed the new SSD and launched the cloning software, simply select the new SSD as the destination drive and let the software transfer all of your operating system and data files. After the transfer is complete, you’ll need to restart your computer and enter the BIOS to change the boot order to the new SSD.

    Voila – your computer should now be running on the new, faster SSD with all of your data intact!

    Install SSD into computer

    Installing an SSD is a simple and effective way to upgrade your computer’s performance. The first step is to determine whether your computer has an available SATA port. If so, turn off your computer and remove the cover to access the internal components.

    Locate the old hard drive and disconnect it from both the power and data cables. Then, install the SSD in the available slot and securely connect the power and data cables. Finally, replace the cover and turn on your computer.

    You may need to format the SSD before use, but once completed, you’ll enjoy faster boot times and improved overall performance. Don’t let a slow computer hold you back any longer, upgrade to an SSD today.

    Ensure SSD is properly recognized in BIOS

    If you’ve recently installed an SSD into your computer but it isn’t being recognized in your BIOS, don’t fret. There are a few key steps you can take to ensure that your SSD is properly recognized and functioning as it should be. First and foremost, make sure that your SSD is properly installed and connected to your motherboard.

    If it’s not, your BIOS won’t be able to recognize it. Once you’ve verified that your SSD is properly installed, head into your BIOS settings and ensure that your SATA controller is set to AHCI mode. This will allow your system to properly communicate with your SSD and ensure that it’s recognized and running at its full potential.

    By taking these simple steps, you can ensure that your new SSD is running smoothly and efficiently, giving you the best possible performance and speed from your system.

    Restore System Image

    Wondering how to transfer Windows to a new SSD? One of the best ways is to create a system image of your current SSD and restore it onto the new one. This will ensure that all your data, settings, and programs are transferred over without any loss or corruption. To begin, connect the new SSD to your computer and make sure it is recognized by Windows.

    Download a free software like Macrium Reflect or Acronis True Image to create a system image of your current SSD. Follow the software’s instructions to create the image and save it on an external hard drive or USB flash drive. Once the image is created, remove the old SSD and install the new one in its place.

    Boot up your computer with the external hard drive or USB flash drive that contains the system image and follow the software’s instructions to restore the image onto the new SSD. This process may take some time, but once it’s finished, you’ll have a fully functional Windows system on your new SSD. Just remember to keep the old SSD as a backup in case anything goes wrong during the transfer process.

    Boot from system image to restore to new SSD

    Restoring your system to a new SSD can be a daunting task, but it doesn’t have to be. With the right tools and a bit of know-how, you can quickly and easily get your new SSD up and running with all of your files, programs, and settings intact. One of the best ways to do this is by booting from a system image.

    A system image is essentially a snapshot of your entire hard drive, including all of your files, applications, and system settings. By booting from a system image, you can easily restore your system to its previous state, without having to manually reinstall all of your programs or reconfigure your settings. To create a system image and boot from it, you’ll need a few things: a blank USB drive or DVD, a backup software program, and of course your system image.

    Most backup software programs will allow you to create a system image, and many also offer the ability to create a bootable USB drive or DVD. Once you have your system image and bootable media ready, simply plug in the USB drive or insert the DVD and restart your computer. Once you’ve booted from the system image, you’ll be prompted to restore your system.

    Follow the on-screen instructions carefully, making sure to select the correct destination drive. This is important, as restoring your system to the wrong drive can cause serious problems. Once the restore process is complete, you should be able to boot up your computer and have everything just as it was before.

    This includes your files, programs, and all of your personalized settings. It’s like you never left! In conclusion, restoring your system to a new SSD is a straightforward process as long as you have the right tools and follow the necessary steps carefully. By booting from a system image, you can save yourself a lot of time and hassle, and get your new SSD up and running in no time.

    Just be sure to create your system image and bootable media ahead of time, and back up your important files regularly to avoid losing anything important.

    Change boot order to boot from SSD

    If you’re looking to speed up your computer’s boot time, one effective solution is to boot from a solid-state drive (SSD) instead of a traditional hard drive. To do this, you’ll need to change the boot order in your computer’s BIOS settings. This may sound daunting, but it’s actually a fairly simple process.

    First, access your BIOS settings by pressing the designated key during startup (usually F2 or Delete). Then, navigate to the Boot tab and prioritize the SSD as the first boot device. Save your changes and exit the BIOS.

    Your computer should now boot from the SSD. But what if you’ve already installed the operating system and all your programs on the hard drive and don’t want to start from scratch on the SSD? In this case, you can restore a system image to the new drive. This will transfer all your data, including the operating system and installed programs, to the new drive.

    Make sure to backup all your important files before attempting this process, as it can potentially overwrite your existing data. Overall, switching to an SSD and restoring a system image is a simple, yet effective way to speed up your computer’s boot process and overall performance.

    Update Drivers and Clean Up

    If you’ve recently upgraded to a new SSD, you might be wondering how to transfer your Windows operating system onto it. The good news is that it’s not as complicated as it may seem! One of the first things you’ll want to do is update all of your drivers, both for your old hard drive and your new SSD. This will ensure that everything is running smoothly and that your system is up to date.

    Once you’ve done that, it’s time to clean up your old hard drive. This means getting rid of any files or programs that you don’t need anymore, as well as running a disk cleanup and defragmentation. This will free up space and make the transfer process smoother.

    Now, it’s time to transfer your Windows operating system to the new SSD. You can do this using cloning software like Macrium Reflect or EaseUS Todo Backup. Once it’s transferred, make sure to set your new SSD as the boot drive in BIOS.

    And that’s it! You’ve successfully transferred your Windows operating system to your new SSD.

    Update drivers for new hardware

    When you get new hardware for your computer, such as a new graphics card or printer, it’s important to update your drivers. Drivers are software programs that allow your hardware to communicate with your operating system. Outdated drivers can cause glitches and performance issues.

    Updating your drivers will ensure that your new hardware works properly and efficiently. In addition, it’s a good idea to clean up your computer while you’re at it. Remove any old or unused programs and files to free up valuable disk space and improve overall performance.

    It’s like clearing out the clutter in your house – it makes everything run smoother and easier to navigate. Keeping your drivers updated and your computer clean will help you get the most out of your hardware and maintain optimal performance.

    Clean up old drive after transfer is complete

    Once you’ve completed transferring all of your important files and data to a new drive, it’s important to take a few extra steps to ensure that your computer is running as smoothly as possible. One of the most crucial steps is updating your drivers. Outdated drivers can cause a variety of issues, including compatibility problems and performance slowdowns.

    Make sure to check for any available updates for all of your drivers, including your graphics card, network adapter, and sound card. In addition to updating your drivers, it’s a good idea to clean up your old drive to free up space and prevent clutter. Delete any unnecessary files, uninstall any programs you no longer use, and run a disk cleanup utility to clear out temporary files and system files that are no longer needed.

    By taking these extra steps, you can ensure that your computer is running at peak performance and that you have plenty of space for new files and programs.

    Conclusion

    In conclusion, transferring Windows to a new SSD is like moving to a new house – it can be daunting and overwhelming, but with the right tools and knowledge, it is a smooth process that ultimately makes you feel right at home. With a bit of patience and some tech-savviness, you can easily transfer your operating system to a new SSD and enjoy faster speeds and better performance. So go ahead and upgrade your storage, your computer will thank you!”

    FAQs

    What is the process for transferring Windows to a new SSD?
    The process involves creating a system image backup of your current Windows installation, installing the new SSD, and restoring the system image backup onto the new SSD.

    Do I need any special software to transfer Windows to a new SSD?
    No, you can use the built-in Windows Backup and Restore feature to create a system image backup and restore it onto the new SSD.

    Will transferring Windows to a new SSD affect my personal files and data?
    No, transferring Windows to a new SSD should not affect your personal files and data as long as you properly backup and restore your system image.

    Can I transfer Windows to a new SSD without reinstalling all of my programs and applications?
    Yes, by creating a system image backup and restoring it onto the new SSD, all of your programs and applications should transfer over as well. However, it may still be a good idea to reinstall any drivers or software that came with your new SSD.
  • Step-by-Step Guide to Easily Connect SSD to Motherboard like a Pro

    Welcome to the ultimate beginner’s guide to connecting an SSD to your motherboard. Whether you’re building your own computer or simply upgrading your storage capabilities, you probably have some questions about how to successfully connect an SSD to your motherboard. Luckily, we’ve got you covered.

    In this guide, we’ll break down everything you need to know about connecting an SSD to your motherboard in simple, easy-to-understand terms. From the basics of SSDs to the different types of connections, we’ll answer all your burning questions and give you the confidence to tackle this task on your own. So, let’s dive in and get started.

    What you’ll need

    If you’re looking to improve your computer’s performance, you may be considering adding a solid-state drive, or SSD. But before you can start enjoying the benefits of faster boot times and application load speeds, you’ll need to connect your new SSD to your motherboard. To do this, you’ll need a few things: an SSD, a screwdriver, and a SATA cable.

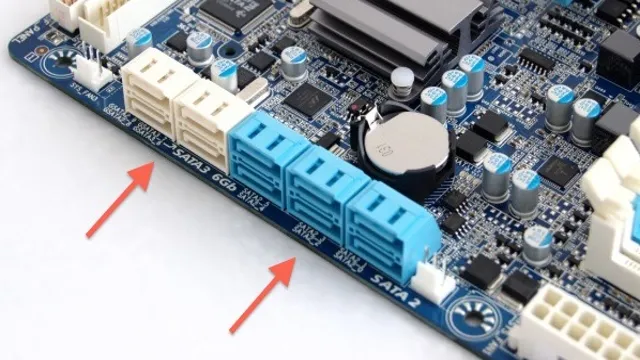
    Firstly, locate the SATA ports on your motherboard and plug one end of the SATA cable into the port labeled “SATA.” Next, plug the other end of the cable into your SSD. Be sure to align the cable’s L-shaped notch with the SSD’s matching notch to avoid any damage.

    Finally, use your screwdriver to secure the SSD to your case with the provided screws. With a properly connected SSD, you’ll be able to quickly and efficiently access the storage you need for your work and entertainment needs.

    SSD and motherboard specifications

    When it comes to setting up your computer with an SSD, it’s important to make sure that your motherboard is compatible with the drive. You’ll need to check the specifications of your motherboard to ensure that it has the appropriate SATA ports to support an SSD. Most modern motherboards have SATA III ports, which are necessary for optimal performance with an SSD.

    Additionally, you’ll want to consider the form factor of your SSD. Many motherboards have M.2 slots for modern NVMe SSDs, but some models may require an adapter if you’re using a traditional SATA SSD.

    By ensuring that your motherboard has the necessary specifications to support your SSD, you can enjoy the faster boot times and application launch speeds that solid-state storage can provide.

    how connect ssd to motherboard

    Locating the SSD and motherboard ports

    Connecting an SSD to a motherboard can be a bit intimidating if you’re not familiar with the inside of a computer. Before you start, you’ll need to locate the SSD and motherboard ports. The SSD is a small rectangular device that fits into a specific slot on your motherboard.

    These slots are sometimes labeled as “SATA” or “M.2” ports, so look for those labels to ensure you’re plugging your SSD into the right place. You’ll want to consult your motherboard’s manual for specific instructions on how to install your SSD, but usually, you’ll need to gently slide the SSD into the port until it clicks into place.

    Once your SSD is firmly in place, you’ll need to connect it to your power supply and data cables to ensure it can communicate with your computer’s processor. With all the cables connected, you’re ready to power up your computer and start using your new SSD. It’s that simple!

    Internal and external SSD connections

    When it comes to using a solid-state drive (SSD), it’s important to know where to locate both the SSD and motherboard ports. Internal SSDs are located inside your computer tower and often connect directly to the motherboard via SATA cables. You’ll need to open up your tower, locate an empty drive bay, mount the SSD and connect it to the motherboard.

    External SSDs, on the other hand, connect to your computer via USB, Thunderbolt or other ports. These are useful if you want to carry your data with you or need to share it between multiple computers. Understanding the differences and knowing where to look will help you get started with using an SSD efficiently.

    Connecting the SSD

    Connecting an SSD to your motherboard is a simple task that can greatly enhance your computer’s performance. To get started, you’ll need to locate the SATA ports on your motherboard, which are typically labeled as SATA0, SATA1, etc. Next, you’ll want to connect one end of a SATA cable to the SSD and the other end to one of the SATA ports on the motherboard.

    It’s important to note that if you have more than one SSD or hard drive, you’ll need to use a separate SATA cable for each device. Once you’ve connected the cable, you’ll need to find a spare power cable from your power supply unit and connect it to the SSD. This will supply power to the SSD and allow it to function properly.

    Once everything is connected, you can start up your computer and ensure that the SSD is recognized by your operating system. With a little bit of effort and know-how, you can easily connect an SSD to your motherboard and enjoy faster boot and load times.

    Step-by-step guide for SATA connection

    If you’re adding a new SSD to your computer, the first step is to physically connect it to your system. To do this, you’ll need to open your computer case and locate the SATA ports on your motherboard. Once you’ve found these, you can connect your SSD by attaching one end of a SATA data cable to the port on your motherboard and the other end to the SATA connector on your SSD.

    Additionally, you’ll need to connect your SSD to a power source by attaching a SATA power cable to the corresponding connector on your motherboard. Once you’ve done this, you can close up your computer case, turn it back on, and begin setting up your new SSD. By following these steps, you’ll be able to easily connect your SSD to your computer and start enjoying faster load times and better performance.

    Step-by-step guide for M.2 connection

    M.2 SSD, connection, step-by-step guide If you’re looking to upgrade your computer’s storage, an M.2 SSD is an excellent choice.

    Not only do they offer faster read and write speeds than traditional hard drives, but they also take up less space on your motherboard. Here’s a step-by-step guide on how to connect your new M.2 SSD.

    First, ensure that your motherboard has an M.2 slot. Next, gently insert the M.

    2 SSD into the slot, being careful not to touch the gold connectors on the bottom. Use the provided screw to secure the SSD in place, tightening it until it’s snug. Finally, in your BIOS settings, set your M.

    2 slot to boot up first, which will allow your computer to recognize the new SSD. With these simple steps, you’ll be able to enjoy faster speeds and more storage space on your computer.

    BIOS and driver configuration

    If you want to upgrade your computer’s storage system, connecting a solid state drive (SSD) to your motherboard is a smart move. But before you do that, make sure to check if your motherboard has the necessary connections to support a SSD. You can use either a SATA III or an M.

    2 slot, so determine which one your SSD is compatible with. Once you know that, it’s time to physically connect the SSD to the motherboard. After installation, the next step is to configure your BIOS and drivers to recognize the new drive.

    Your BIOS settings will vary depending on your motherboard manufacturer, but the general steps usually involve selecting the boot order to prioritize your SSD and enabling AHCI mode for faster performance. Finally, download and install the necessary drivers for your new drive to ensure that it operates smoothly without any issues. Overall, connecting a SSD to your motherboard might seem intimidating, but with a bit of research and the right connections, it’s a fairly straightforward process.

    Setting up the BIOS for SSD boot

    Setting up the BIOS for SSD boot is a crucial step in maximizing the performance of your computer. The BIOS, or basic input/output system, controls the hardware components of your computer and is responsible for configuring them to work together. To set up the BIOS for SSD boot, you need to make sure that the SATA controller mode is set to AHCI (Advanced Host Controller Interface).

    This mode allows the SSD to perform at its maximum speed and enables features such as NCQ (Native Command Queuing) and TRIM (used for cleaning up blocks of data that are no longer needed). You may also need to update your BIOS version to the latest one to ensure compatibility with the SSD. Additionally, it’s essential to install the latest drivers for your SSD to ensure it runs smoothly and efficiently.

    With the correct BIOS and driver configuration, your SSD will deliver fast boot times, improved system responsiveness, and faster application load times, making your computing experience a lot more enjoyable.

    Installing SSD drivers on your computer

    When installing an SSD on your computer, it’s essential to ensure both the BIOS and drivers are correctly configured. In the BIOS settings, you’ll need to enable AHCI (Advanced Host Controller Interface) mode, which allows the SSD to operate at maximum speeds. Afterward, you can proceed to install the drivers for your SSD.

    It’s important to choose the right driver version that suits your operating system. These drivers help your computer to recognize and take full advantage of the SSD’s capabilities for better performance. Installing the right drivers means that you’ll be able to avoid any issues such as slow booting, poor performance, and even system errors.

    Taking the necessary time to properly install both the BIOS and drivers for your SSD ensures its smooth operation and longevity.

    Final checks and troubleshooting

    Connecting an SSD to a motherboard is a relatively straightforward process but requires some careful steps to ensure that everything is set up correctly. Firstly, before doing anything, make sure that you have grounded yourself to prevent any static electricity from damaging the parts. Once grounded, locate the SATA port on your motherboard that you wish to use for your SSD and plug in the SATA cable.

    Also, plug in the power cable from your power supply to the SSD. Finally, turn on your computer and check whether the SSD is detected in the BIOS. If it isn’t, ensure that the SATA port is enabled in the BIOS settings.

    Troubleshooting issues can be daunting but is essential to ensure that everything is functioning correctly. If you are experiencing issues, double-check the cable connections and check that your SSD is compatible with your motherboard. With these quick steps, you should be able to connect your SSD to your motherboard and start enjoying the fast boot times and program load speeds that come with it.

    Verifying the SSD connection and storage capacity

    When you’re installing a new SSD drive into your computer, it’s essential to check that everything is functioning correctly. One of the first steps is to verify that you’ve connected your SSD to the correct SATA port on your motherboard. This is an easy mistake to make, especially if you’ve previously had another storage device installed.

    Double-checking your connection can save you a lot of time and effort in the long run, and it’s the best way to eliminate any potential connectivity problems. Once you’ve confirmed that your SSD is connected correctly, it’s time to verify the storage capacity. You can do this by checking your computer’s BIOS or system information.

    If your SSD isn’t showing up as expected, it could mean that it’s not compatible with your motherboard or that it’s been damaged in transit. In either case, troubleshooting the issue and seeking expert advice is the next step. By thoroughly checking everything is connected and working as it should, you can be sure that your new SSD is ready to go.

    Troubleshooting common connection issues

    When troubleshooting common connection issues, it’s important to make sure you’ve checked everything before giving up. First and foremost, ensure that your device is connected to the WiFi network and that you’ve entered the correct password. If that’s not the issue, you can try restarting your router and/or modem.

    Sometimes, a simple reset can fix the problem. If that doesn’t work, it’s always worth checking to see if other devices on the network are having the same issue. If they are, then it’s likely a problem with the router itself, and you may need to contact your internet service provider for assistance.

    Finally, if none of these steps work, you may need to consider resetting your device to its factory settings, although this should only be done as a last resort. By following these steps, you can hopefully solve most common connection issues and ensure that you’re never left without internet access.

    Optimizing SSD performance for your system

    When it comes to optimizing SSD performance for your system, it’s important to perform some final checks and troubleshooting before calling it a job well done. Start by checking your system’s BIOS settings to ensure that the SSD is running in AHCI mode and that the boot priority is set to the SSD. Next, ensure that your operating system is properly installed and updated with the latest drivers and firmware.

    Finally, run benchmark tests to ensure that your SSD is performing at its best. If you are experiencing any issues, such as slow boot times or system crashes, make sure to troubleshoot the issue before assuming it’s a problem with your SSD. Consider consulting your system’s manufacturer or a professional technician if the problem persists.

    By following these simple steps, you can ensure that your SSD is performing optimally and providing you with the speed and performance you need to get the job done!

    Conclusion

    In conclusion, connecting an SSD to a motherboard can seem intimidating at first, like trying to fit a square peg into a round hole. But with the right tools and a bit of know-how, it’s actually quite simple. Think of it like connecting two puzzle pieces together – once you know where everything goes, it all falls into place.

    So don’t be scared to give it a go, because with an SSD and a motherboard, you and your computer will be coasting on the fast lane!”

    FAQs

    What type of slot do I need to connect my SSD to the motherboard?
    You will need an M.2 slot or a SATA port on your motherboard to connect your SSD.

    Can I connect my SSD to any motherboard?
    No, the type of connector on your SSD must match the type of slot or port on your motherboard. Check your motherboard’s manual to confirm compatibility.

    Do I need to install drivers for my SSD to work with my motherboard?
    In most cases, no. Your motherboard’s BIOS should be able to recognize your SSD and allow you to use it as a storage device without additional drivers.

    What should I do if my SSD is not being detected by my motherboard?
    First, make sure that the connections are securely in place. If that doesn’t work, try updating your motherboard’s BIOS. If the problem persists, your SSD or motherboard may be defective and require replacement or repair.

    Can I connect multiple SSDs to my motherboard?
    Yes, most motherboards have multiple M.2 slots or SATA ports to allow you to connect multiple SSDs for increased storage capacity or faster access speeds.

  • Unveiling the Mystery: How Many GB in 1TB SSD? Everything You Need to Know

    If you’re wondering how much space you’ll get with a 1TB SSD, you’re not alone. The abbreviation “TB” stands for terabyte, and it’s not always clear how many gigabytes (GB) are in a terabyte. A 1TB SSD is enough space for most people’s needs, but it’s important to know exactly how much room you’re getting when you purchase one.

    In this blog, we’ll explore how many GB are in a terabyte and what that means for your storage needs. So, let’s dive in and clear up any confusion!

    Understanding Capacity Measurement

    If you’re wondering “1tb SSD equal to how many GB?”, then the answer is 1000 GB. SSDs, or Solid State Drives, are becoming more popular than traditional hard drives due to their faster speed, durability, and reliability. But it can be confusing to understand capacity measurements when it comes to storage devices.

    For example, you may have heard of “bit”, “byte”, “kilobyte”, “megabyte”, “gigabyte”, and “terabyte”. A bit is the smallest unit of data, which is either a 0 or A byte is made up of 8 bits, and is therefore the basic unit of memory.

    It takes 1024 bytes to make up a kilobyte, 1024 kilobytes to make up a megabyte, 1024 megabytes to make up a gigabyte, and finally 1024 gigabytes to make up a terabyte. So when you have a 1TB SSD, you have a storage device that can hold 1000 gigabytes of data.

    Terabyte (TB) vs. Gigabyte (GB)

    When it comes to measuring storage capacity, it can be confusing to differentiate between terabytes (TB) and gigabytes (GB). Essentially, a terabyte is equal to 1,000 GB. This means that a TB can hold 1,000 times more data than a GB.

    However, it’s important to keep in mind that the actual amount of storage space may vary depending on the device or provider. For example, a solid-state drive (SSD) with a capacity of 1 TB may only have about 930 GB of available storage due to formatting and other factors. It’s always a good idea to double-check the actual storage space before making any assumptions.

    Overall, knowing the difference between TB and GB is important for making informed decisions when it comes to purchasing storage devices or choosing a cloud storage provider.

    1tb ssd equal to how many gb

    Why SSD Capacity is Stated in TB?

    Have you ever wondered why SSD capacity is stated in TB? Well, it’s because of the way storage capacity is measured. In the technology world, we use a system of numbers and prefixes to measure storage. For example, a KB is a kilobyte, while a GB is a gigabyte.

    Similarly, a TB is a terabyte, which is a unit of digital information storage that represents one trillion bytes. Since SSDs can store large amounts of data, their capacity is measured in terabytes. This means that the higher the number of terabytes, the more data the SSD can hold.

    So if you’re in need of more storage capacity, simply look for an SSD with a higher TB rating. It’s that simple!

    Calculating SSD Capacity in GB

    When it comes to SSD capacity, it can be confusing to understand the different measurements used. One common question is “1TB SSD equal to how many GB?” The answer is simple: 1 terabyte (TB) of SSD storage capacity is equal to 1000 gigabytes (GB). This means that if you have a 1TB SSD, you have 1000GB of storage space available for your files and applications.

    It’s important to keep in mind that the actual amount of storage space may vary slightly depending on the formatting and type of SSD you have. Additionally, it’s always advisable to leave some free space on your SSD to ensure optimal performance. Overall, understanding SSD capacity and measurements is important for ensuring you have enough storage space for your needs.

    Conversion Formula

    Calculating SSD capacity in GB can be a little bit confusing, especially if you’re unfamiliar with the math involved. Fortunately, there’s a simple formula you can use to figure it out. First, calculate the total number of NAND gates in the SSD.

    This can be done by multiplying the number of die by the number of planes per die by the number of blocks per plane by the number of pages per block by the number of NAND gates per page. Once you have the total number of NAND gates, you can calculate the total capacity by multiplying it by the NAND gate size. For example, if you have 1 billion NAND gates and the NAND gate size is 16GB, then the total SSD capacity would be 16 terabytes (1 billion x 16GB).

    It’s important to note that this formula doesn’t take into account other factors that can impact the actual usable capacity of an SSD, such as over-provisioning and firmware. But it’s a good starting point to help you get a general idea of how much storage space you can expect from your SSD.

    Examples of 1TB SSD Conversion to GB

    Calculating SSD Capacity in GB. When it comes to calculating the capacity of an SSD, most manufacturers advertise their products in terms of TB (Terabytes), making it confusing for some users to understand the exact capacity in GB (Gigabytes). In fact, a 1TB SSD can be translated to not only 1000GB but also 1024GB, depending on how it’s calculated.

    To understand this, it’s essential to comprehend the binary nature of computers that use base 2 calculations instead of base 10 used in the metric system. This means that 1KB is equal to 1024 bytes, 1MB is equal to 1024KB, 1GB equals to 1024MB, and so on. So, to convert 1TB (Terabyte) into GB (Gigabytes), all you need to do is multiply 1024 (because there are 1024GB in 1TB), which results in 1024GB.

    However, some manufacturers use the metric system, which implies one TB equals 1000GB. Therefore, ensure to cross-check with the manufacturer’s website or specifications to avoid any confusion. Ultimately, when it comes to calculating the capacity of an SSD, knowing how to convert TB to GB is crucial, especially for users who need accurate figures to estimate the amount of data they can store or work with.

    Factors Affecting Actual Capacity

    When it comes to calculating the actual capacity of a SSD, there are several factors to consider. One of the most important is the overhead that is present in the SSD itself. This overhead can include things like spare blocks, bad block management, and wear leveling.

    When you factor in these overheads, you could end up losing as much as 10% or more of your SSD’s capacity. Another factor to consider is the formatting of the drive. Since SSDs are formatted differently than traditional hard drives, you’ll find that the actual capacity can be lower than what is advertised.

    This is because the formatting process requires some space to be reserved, thus lowering the actual capacity. Other factors that can impact the actual capacity of an SSD include the manufacturing process, the firmware of the drive, and even something as simple as how much data you have stored on it. By keeping these factors in mind, you can more accurately calculate the actual capacity of your SSD and make the most of your available storage space.

    Conclusion

    In conclusion, one could say that a 1TB SSD is equal to a whopping 1,000GB – that’s enough storage space to hold all your memes, cat videos, and family photos, with plenty of room to spare for whatever digital wonders the future holds. So if you’re in the market for a new hard drive, go big or go home and opt for the 1TB SSD. Your computer (and your inner data hoarder) will thank you.

    FAQs

    1. How many 1GB files can be stored in a 1TB SSD? A: A 1TB SSD can store up to 1,000 1GB files. 2. Is a 1TB SSD better than a 500GB SSD? A: Yes, a 1TB SSD is better than a 500GB SSD as it offers double the storage capacity. 3. Can I upgrade my laptop hard drive to a 1TB SSD? A: Yes, you can upgrade your laptop hard drive to a 1TB SSD if your laptop supports an SSD. 4. How long does a 1TB SSD last? A: The lifespan of a 1TB SSD depends on various factors, but it can last up to 10 years with normal usage.

  • Unlock the Ultimate Data Security: Learn How to Mirror Your Crucial SSD Drive with Ease

    Have you ever lost precious files due to a hard drive failure or simply wanted an exact copy of your data on another drive? Well, the good news is that mirroring a drive with a Crucial SSD is a simple and efficient solution to avoid such issues. Solid-state drives (SSDs) are known for their high performance, reliability, and durability compared to traditional hard disk drives (HDDs). If you are looking to duplicate your data or back up your files, cloning your drive with a Crucial SSD is an excellent choice that can save you time, money, and hassle in the long run.

    In this blog post, we will guide you through the steps of how to mirror your drive with a Crucial SSD, ensuring that your data is safe and secure while maintaining its quality and speed.

    Understanding Drive Mirroring

    Crucial SSDs are reliable solid-state drives used to store important data on computers. However, sometimes you need to ensure that your data is safe in case of any hardware failure or data loss. That’s when drive mirroring comes in handy.

    Drive mirroring, also known as RAID 1, is the process of creating an exact copy of your data on another drive. If one drive fails, your data remains safe on the mirrored drive. To set up drive mirroring, you need two identical drives, and your system should support RAID

    Then, you configure the RAID array, and the operating system does the rest of the work. By mirroring your drive, you can protect your important data from hardware failures, data corruption, and unexpected data deletions. With Crucial SSDs, you can ensure that your data is always secure by setting up drive mirroring.

    What is drive mirroring and why is it important?

    Drive mirroring is a technique used to create an identical copy of a storage drive in real-time. Essentially, it’s a backup that ensures you won’t lose critical data or files if one of your drives fails. Drive mirroring works through software applications or hardware devices that copy data from one drive to another.

    The copies are normally created in pairs, meaning that there are two identical sets of data on separate drives. This redundancy enables a quick swap if the primary drive fails. Drive mirroring is an essential process for businesses, especially those that depend on data processing.

    It’s also important for personal use, as it provides peace of mind, knowing that your important files and documents are well-protected. Drive mirroring is also essential for those who rely on their computer systems continuously, as it can reduce downtime and increase productivity.

    crucial ssd how to mirror a drive

    RAID vs. Drive Mirroring: What’s the difference?

    Drive mirroring, also known as disk mirroring, is a data protection technique used to create a duplicate copy of data on two or more separate drives. Disk mirroring is different from RAID, which can spread data across multiple drives for increased speed or redundancy. The main purpose of drive mirroring is to provide redundancy and improve data availability in the event of a disk failure.

    If one of the mirrored drives fails, the data can still be accessed from the other drive without any disruption to operations. Drive mirroring is often used in mission-critical applications where data loss or downtime can have severe consequences. Drive mirroring can be implemented using hardware or software, and it can be applied to both internal and external drives.

    However, drive mirroring only offers protection against disk failure and does not protect against other types of data loss, such as accidental deletion or malware attacks. Overall, drive mirroring is a simple and effective way to protect data and ensure high availability.

    How to Mirror a Drive with Crucial SSD

    If you’re looking to mirror a hard drive with Crucial SSD, it’s a fairly simple process that can offer you peace of mind and extra storage space. Firstly, you’ll want to ensure that your Crucial SSD is compatible with your device. Once you’ve established this, you can use a third-party software such as EaseUS Todo Backup or Acronis True Image to perform the drive mirroring process.

    With this software, you can create an exact copy of your original hard drive on your Crucial SSD, including the operating system, software, and personal data. By doing this, you can ensure that if your original hard drive fails, you have a duplicate copy of everything on your Crucial SSD. It’s important to note that drive mirroring is not the same as backing up your data, but it does offer added security and reliability.

    With a few simple steps, you can have your own mirrored drive setup with Crucial SSD and feel more at ease knowing your data is safe.

    Step-by-Step Guide to Mirroring a Drive with Crucial SSD

    If you’re planning on upgrading your computer’s storage capacity, it’s advisable to mirror your old drive. This ensures that your data is backed-up in case of any mishap, and you don’t end up losing any files. One way to do this is by using a Crucial SSD alongside software like Acronis.

    First, install the software and connect the Crucial SSD to the computer. Then follow the Acronis prompts which will guide you in selecting the source drive to copy. Next, select the destination drive where the cloned data will be stored.

    You can then select the clone settings and begin the process. It’s vital that you don’t disconnect the SSD or shut down the computer while this process is ongoing. Once completed, shut down the computer, remove the old drive, and plug in the Crucial SSD drive.

    Restart your computer and verify that everything runs as expected. With these simple steps, you can effectively mirror your old drive with a Crucial SSD, ensuring your data is fully backed up.

    Configuring the Crucial SSD for Mirroring

    Configuring the Crucial SSD for mirroring allows users to create an exact copy of their data for redundancy and backup purposes. To mirror a drive with the Crucial SSD, users should first ensure they have two identical drives and a motherboard with RAID capabilities. Then, they need to access their system’s BIOS and set the SATA controller to RAID mode.

    Once in RAID mode, users can follow the software’s instructions to set up a mirrored array. The process may take some time, but it is worth it for the peace of mind that comes with knowing your data is duplicated in case of drive failure. With Crucial SSD, users can securely store and protect their data, giving them more time to focus on what matters most–creating, innovating, and achieving their goals.

    Setting Up Mirroring in Windows or Mac OS

    Setting up mirroring in Windows or Mac OS can be a straightforward process with Crucial SSD. Mirroring your drive is a great way to protect your data in case of drive failure. With Crucial SSD, you can use software like Acronis True Image or Carbon Copy Cloner to mirror your drive.

    This software makes it easy to create a backup of your drive and keep it in sync with your primary drive. It is a simple and efficient way to ensure that your data doesn’t get lost even if your primary drive fails. Moreover, the process is not complex, you can easily set up the mirroring process with step-by-step instructions.

    All you need to do is connect your Crucial SSD to your computer, install the software, and follow the instructions. With the mirroring process, you can have a peace of mind knowing your data is safe and secure.

    Benefits of Drive Mirroring with Crucial SSD

    Crucial SSDs come with many benefits for those who need to mirror their drives. When you mirror a drive, you create a backup of everything on that drive in real-time. This means that you always have a backup copy of all your important data, which can be crucial for those who use their computers for work.

    With a Crucial SSD, mirroring is easy to set up and can be done quickly and efficiently without any data loss. This feature is especially important for those who work with large or important files, as it reduces the risk of losing everything due to a hard drive failure. Additionally, the Crucial SSDs are reliable and offer fast read and write speeds, making them ideal for anyone who needs to process large amounts of data quickly.

    So, if you’re looking for a reliable, high-performance SSD that is easy to use and set up, then the Crucial SSD is the perfect choice!

    Improved Data Protection and Backup

    Data protection and backup are essential for any computer system, whether it’s for personal or business use. One of the best ways to achieve this is by using drive mirroring, which creates an exact replica of your entire hard drive or SSD. With Crucial SSD, you can easily perform drive mirroring, which offers several benefits.

    First, it provides an extra layer of protection against data loss due to hardware failure or viruses. In case the primary drive fails, the mirrored drive automatically kicks in, ensuring that your data and system are up and running without any downtime. Additionally, it’s an excellent way to backup your data, files, and operating system.

    You don’t have to worry about manually copying your files to an external drive, which can be time-consuming and prone to user errors. With drive mirroring, it’s effortless, and you can schedule it to run automatically and at regular intervals for complete peace of mind. Overall, drive mirroring is an essential feature that anyone who wants to keep their data safe and avoid any downtime should consider using, especially with the high-quality SSD drives offered by Crucial.

    Enhanced Performance and Speed

    Drive mirroring with Crucial SSD can enhance your computer’s performance and speed. By setting up a mirrored drive, also known as RAID 1, you can create an exact copy of your primary drive. If the primary drive fails, the mirrored drive can take over seamlessly, preventing any data loss or downtime.

    However, using a traditional hard drive for drive mirroring can result in decreased speed due to the time it takes to update the mirrored drive. With a Crucial SSD, you benefit from faster read and write speeds, reducing the lag time and ensuring that your mirrored drive is always up-to-date. This means that if your primary drive fails, you can switch to the mirrored drive without any noticeable delay.

    Plus, since data is stored on two drives simultaneously, you can access it faster, enhancing your overall computer performance. With Crucial SSD, you can enjoy peace of mind knowing that your data is protected while also benefitting from faster speeds.

    Conclusion and Final Thoughts

    In conclusion, mirroring your Crucial SSD drive is not just a good idea – it’s crucial (no pun intended). By creating a duplicate of your primary drive, you not only gain an extra layer of data protection, but you also ensure seamless continuity in the event of any technical difficulties. So, don’t wait until your drive crashes – mirror it now and ensure the safety, security and reliability of your important data.

    After all, a mirrored drive is better than a shattered drive any day!”

    FAQs

    What is a crucial SSD?
    A crucial SSD is a solid-state drive manufactured by Crucial, a brand of Micron Technology. SSDs are faster, more reliable, and use less power than traditional hard drives.

    How do I mirror a drive using a crucial SSD?
    To mirror a drive using a Crucial SSD, you can use built-in software like Windows 10 Storage Spaces or third-party software like Macrium Reflect. Simply connect the Crucial SSD and follow the software’s instructions to create a mirrored drive.

    What are the benefits of mirroring a drive with a crucial SSD?
    Mirroring a drive with a Crucial SSD provides several benefits, such as improved data redundancy and protection against drive failure. In case one drive fails, you can still access your data from the mirrored drive.

    How do I install a Crucial SSD?
    To install a Crucial SSD, you should first back up your data, shut down your computer, and disconnect the power cable. Then, locate your current hard drive, remove it, and replace it with the Crucial SSD. Lastly, turn on your computer, and follow the prompts to install the necessary drivers and software.

  • Boost Your Computer’s Performance: A Step-by-Step Guide on How to Use SSD and HDD Together

    Have you ever wondered if it’s possible to use an SSD and HDD together? Many people think that they have to choose between the two storage devices, but the truth is, they can be used together to create a high-performance storage system. Combining the speed of SSD and the storage capacity of an HDD can be the best solution for those who need both speed and storage for their data. In this blog post, we’ll discuss how to use an SSD and HDD together, the benefits of this setup, and some important things to consider before setting up your own hybrid storage system.

    So, let’s dive in and explore this innovative storage option!

    Understanding the Difference

    Are you wondering how to use SSD and HDD together to optimize your computer’s performance? It may seem like a daunting task, but it’s actually quite simple. The key is to use the strengths of each type of drive. SSDs, or solid-state drives, are faster and more reliable than HDDs, or hard disk drives, but they are also more expensive and have smaller storage capacities.

    HDDs, on the other hand, are slower and less reliable, but they are much cheaper and have larger storage capacities. The best way to use SSD and HDD together is to use the SSD as your primary drive for the operating system and the applications that require the highest speeds, such as your web browser or your word processor. The HDD can then be used for storage, such as music, videos, and photos.

    By doing so, you can take advantage of the fast boot and load times of the SSD while still having plenty of storage space on your HDD. In conclusion, using SSD and HDD together is a great way to get the best of both worlds. By understanding the strengths and weaknesses of each type of drive and using them accordingly, you can optimize your computer’s performance without breaking the bank.

    So if you’re looking for a way to speed up your computer and increase your storage capacity at the same time, consider using SSD and HDD together.

    SSDs vs. HDDs

    When it comes to storage for your computer or laptop, you may have heard the terms SSD and HDD thrown around. But what’s the difference? Let’s break it down. SSD stands for solid-state drive, while HDD stands for hard disk drive.

    The primary difference between the two is how they function. HDDs have spinning disks that store and read data, while SSDs use flash memory to quickly store and retrieve data. An analogy would be like an HDD is like a record player, spinning to find and play music, while an SSD is like a cassette player, quickly accessing data without any moving parts.

    SSDs are generally faster and more reliable than HDDs and are often preferred for gaming or heavy data storage. However, they can also be more expensive. On the other hand, HDDs are typically more affordable and have larger storage capacities, making them ideal for storing large files such as photos or videos.

    Ultimately, the choice between SSDs and HDDs will depend on your needs and budget.

    how to use ssd and hdd together

    Benefits of Using SSDs and HDDs Together

    When it comes to computer storage, there are two options available: solid-state drives (SSDs) and hard disk drives (HDDs). SSDs are faster and more expensive, while HDDs are slower but more affordable. But why choose one when you can use both? Combining SSDs and HDDs can give you the best of both worlds.

    You can store your frequently used programs and files on the SSDs for quick loading times and use the HDDs for bulk storage. This way, you can maximize your computer’s speed and storage space. Imagine it like having a sports car for quick, frequent trips, and a pickup truck for hauling heavy loads.

    By utilizing both, you can optimize your computer’s performance and storage capacity. So why limit yourself to just one type of drive when you can use a combination of SSDs and HDDs?

    Deciding on Data Placement

    When it comes to efficiently using both SSD and HDD in tandem, deciding on the best data placement can be a game-changer. HDD’s high storage capacity makes it perfect for storing large files, whereas an SSD’s faster read and write speeds are ideal for holding frequently accessed data. A great way to maximize the benefits of both is to use the SSD as a cache for frequently used files.

    This way, data is quickly accessed from the SSD, while everything else is stored on the HDD. Another approach is to partition the drives, where the operating system and frequently used programs and files are stored on the SSD, leaving the HDD for less frequently accessed data. Overall, it’s essential to consider your specific needs and usage patterns when deciding on data placement to optimize performance and efficiency when using both SSD and HDD together.

    Choosing the Right Drive for the Job

    When it comes to choosing the right drive for the job, deciding on data placement is crucial. It’s important to consider how you will be using the data and where it needs to be stored for optimal performance. For example, if you frequently access large files or run intensive applications, an SSD may be the best choice as it has fast read and write speeds, allowing for quick access to data.

    On the other hand, if you need to store large amounts of data and don’t require fast speeds, a HDD may be more appropriate as it has a higher storage capacity and is more cost-effective. It’s important to note that there are also hybrid drives that combine the best of both worlds, providing both high storage capacity and fast speeds. Ultimately, the key is to carefully assess your needs and determine which type of drive will best suit your specific requirements.

    With the right drive in place, you can ensure that your data is stored properly and easily accessible whenever you need it.

    Configuring Your System for Optimal Performance

    When configuring your system for optimal performance, one key consideration is deciding on data placement. This involves determining where certain types of data will be stored within the system, such as on a high-speed solid-state drive (SSD) or a larger but slower hard disk drive (HDD). One approach is to prioritize frequently accessed or critical data for SSD placement, as this can result in faster overall system performance.

    However, it’s important to also consider how bursty your data usage is. Burstiness refers to the variance in data access over time, and if your data usage is highly bursty, you may benefit more from a larger, slower HDD as it can better handle sudden spikes in data traffic. Ultimately, the decision of where to place your data should be based on your specific usage patterns and needs to ensure optimal system performance.

    Setting Up Your Storage System

    If you’re wondering how to use SSD and HDD together, the key is to understand the strengths of each storage option and how they can complement each other. SSDs are faster and more reliable, but they can be more expensive per GB of storage. HDDs, on the other hand, are slower but provide larger amounts of storage at a more affordable price.

    A common setup is to use an SSD for your operating system and frequently used programs or files, while using the HDD for less frequently accessed files, backups, or larger media files. By doing so, you get the best of both worlds – lightning-fast performance where you need it, and ample storage space at a reasonable cost. So, whether you’re building a new PC or upgrading an existing one, consider using SSD and HDD together to create an optimal storage system.

    Creating Partitions and Volumes

    When it comes to setting up a storage system, creating partitions and volumes is an essential step. A partition is a logical division of a physical drive, and it behaves like a separate drive on your computer. You can create multiple partitions on a single drive to organize your data or install different operating systems.

    On the other hand, a volume is a storage area that belongs to a partition. You can format a partition to create a volume and assign it a drive letter or mount point. This process allows you to store your files and folders in a specific location and access them easily.

    By creating partitions and volumes, you can customize your storage system according to your needs and preferences. For example, you can allocate more space to a particular drive or protect your data by creating a separate backup partition. Setting up partitions and volumes may seem complex, but it’s a vital step in optimizing your storage system’s performance and efficiency.

    Establishing Storage Hierarchy

    When it comes to setting up your storage system, it’s important to establish a storage hierarchy that takes into account the varying needs and priorities of your data. A storage hierarchy can help ensure that the most frequently accessed data is readily available while also freeing up space for less frequently accessed data. The first step in establishing a storage hierarchy is to identify the types of data you’ll be working with and determine which types require the fastest access times.

    This might include frequently used applications or critical business data. Once you’ve identified these high-priority data types, you’ll want to ensure they’re stored on the fastest and most reliable storage media available, such as solid-state drives or high-performance hard drives. For less critical data, such as archives or backups, slower and less expensive storage options like magnetic disks or tape drives may be sufficient.

    By setting up your storage system with a hierarchy in mind, you can ensure that your data is stored effectively and efficiently, and remains easily accessible whenever you need it.

    Optimizing Your Workflow

    Are you looking to optimize your workflow by combining an SSD and an HDD? Using these two types of storage drives together can offer some impressive benefits. SSDs are incredibly fast, allowing for quick boot times and speedy application launches. Meanwhile, HDDs offer much larger storage capacities, making them ideal for storing files and documents that don’t need to be accessed as frequently.

    By utilizing both an SSD and an HDD, you can enjoy the best of both worlds – fast performance and ample storage. One way to do this is by installing your operating system and frequently used applications on your SSD while keeping bulk files on your HDD. This way, you’ll be able to quickly access your frequently used programs without sacrificing storage space for your larger files.

    Additionally, you can use special software to automatically move frequently accessed files to the SSD for even faster access times. By using an SSD and an HDD together, you can greatly improve your workflow efficiency and enjoy a seamless computing experience.

    Maximizing File Transfer Speeds

    When it comes to file transfers, speed is key. But how can you ensure that you are maximizing your transfer speeds? First and foremost, it’s important to have a strong understanding of your network’s capabilities. Knowing the bandwidth and latency of your network can help you make informed decisions about the optimal time to transfer files.

    Additionally, utilizing compression and encryption technologies can help increase transfer speeds. It’s also important to consider the size and type of file you are transferring, as larger files may require different transfer methods than smaller ones. By optimizing your workflow and utilizing these strategies, you can ensure that you are enhancing your file transfer speeds and improving your efficiency.

    Storage Maintenance and Troubleshooting Tips

    When it comes to storage maintenance and troubleshooting, there are a few things you can do to optimize your workflow and keep everything running smoothly. First, regularly clean out your storage space and get rid of any unnecessary files or programs. This can free up space and make it easier to find what you need when you need it.

    You should also make sure to update your software and operating system, as these updates often come with bug fixes and performance enhancements. Another pro tip is to defragment your hard drive, which can help improve the overall speed and efficiency of your storage. If you encounter any issues or errors, try restarting your computer or using a diagnostic tool to pinpoint the problem.

    By taking these steps, you can ensure that your storage is always in top shape and ready to help you get your work done efficiently.

    Conclusion

    In conclusion, if you want the best of both worlds, the key is to use your SSD as the primary drive for your operating system and frequently used programs. Then, use your HDD as a secondary drive for bulk storage of files and applications that don’t require as much speed. Think of it like a well-organized pantry – keep your frequently used spices and ingredients within easy reach, while still having plenty of storage space in the back for those less frequently used items.

    With a little planning and organization, you can set up your SSD and HDD to work together seamlessly, giving you the best performance and storage capacity.”

    FAQs

    What is the benefit of using both SSD and HDD together?
    By using both SSD and HDD together, you can enjoy the benefits of both worlds. SSD can provide faster boot and load times while HDD can give you more storage space.

    How can I install both an SSD and HDD in my computer?
    You can install both SSD and HDD in your computer by connecting them to the motherboard using the SATA cables. You need to configure your BIOS to recognize the drives and install the operating system on the SSD.

    Can I use an SSD as a cache for my HDD?
    Yes, you can use an SSD as a cache for your HDD. This is done by using a software like Intel Rapid Storage Technology (RST) which automatically moves frequently used files from the HDD to the SSD, improving the overall performance of your system.

    How can I store files on both my SSD and HDD?
    You can store files on both your SSD and HDD by manually transferring them from one drive to the other. Alternatively, you can configure your system to automatically store certain files on the SSD and others on the HDD, using a software like Steam Mover.

  • Unlock Superior Performance: Step-by-Step Guide to Crucial SSD Firmware Update

    Did you know that performing crucial firmware updates on your SSD (solid-state drive) can significantly enhance its performance and stability? Firmware updates are essential to ensure that your device is running on the latest version of its operating system and to fix bugs, security vulnerabilities, and other issues that can interfere with your computer’s performance. In this blog, we’ll guide you through everything you need to know to perform crucial SSD firmware updates, from why they’re necessary to how to do them yourself. So grab a cup of coffee, sit back, and prepare to unleash the full potential of your device!

    Why Update SSD Firmware?

    If you own a Crucial SSD, it’s important to update the firmware regularly. Firmware is essentially the software that runs a specific hardware device, and updating it can improve the SSD’s performance, fix bugs and glitches, and provide better overall compatibility with your computer’s hardware and software. To update your Crucial SSD firmware, start by visiting the Crucial website and downloading the appropriate firmware update file.

    Then, follow the instructions provided by Crucial to install the update on your SSD. This will vary depending on which specific model of SSD you have, but generally involves creating a bootable USB drive, connecting the SSD to your computer, and running the update process. It’s important to follow these instructions carefully to avoid damaging your SSD or losing your data.

    By updating your Crucial SSD firmware, you can ensure that your drive is running at its best and avoid any potential issues down the line.

    Benefits of Updating SSD Firmware

    Updating the firmware of your SSD drive can provide several benefits, making it an essential task for anyone using this type of storage device. One significant advantage is that firmware updates can help improve the overall performance of your SSD. Manufacturers often release updates that optimize the way data is processed, which can result in faster read and write speeds and more efficient use of the drive.

    Additionally, SSD firmware updates can also help address any bugs or glitches in the system, enhancing its stability and reliability. By updating your SSD firmware regularly, you can ensure that your drive is functioning at its best, boosting its lifespan in the process. Overall, investing a few minutes in updating your SSD’s firmware can go a long way towards improving its performance and durability.

    crucial ssd firmware update how to

    Risks of Not Updating SSD Firmware

    SSD Firmware Update Updating SSD firmware may seem like a minor task, but it can have significant implications for the health and performance of your Solid State Drive. The risks of not updating SSD firmware include data loss, decreased speed, and even complete drive failure. Firmware updates often address bugs, improve compatibility with new hardware/software, and enhance security features.

    Without these updates, your SSD may struggle to function properly, and data stored on the drive can become corrupted or lost. It’s like neglecting to maintain your car – eventually, it will break down. To avoid these risks, it’s important to regularly check for firmware updates and install them promptly when available.

    This way, you can enjoy the full benefits of your SSD and ensure that your valuable data is safe and secure. So, don’t delay! Take a few minutes to check for firmware updates today.

    Preparing for the Firmware Update

    Preparing for the crucial SSD firmware update can be a bit overwhelming, especially if you’re not tech-savvy. However, it’s essential to keep your SSD running smoothly and avoid any potential issues. Before starting the update process, make sure to back up all your data to an external drive, just to be safe.

    Then, download the updated firmware from the official manufacturer’s website and check the version you currently have installed. This will help ensure that you’re updating to the correct version. Next, make sure that your laptop or computer is fully charged or plugged in during the update process to avoid any interruptions or power failures.

    Finally, close any open applications and disable any antivirus software or firewalls temporarily, as they can interfere with the update process. Once you’ve completed these steps, you’re ready to move on to the firmware installation process.

    Check Compatibility with Your Drive Model

    Before proceeding with the firmware update, it’s essential to check compatibility with your drive model. This step is crucial to avoiding any compatibility issues that may arise from hardware mismatch. You can check the model number and firmware version of your drive by either consulting the user manual or looking it up on the manufacturer’s website.

    Once you have identified the model number and firmware version, you should check if they are compatible with the firmware update you wish to install. If the firmware is incompatible, it’s not recommended to proceed with the update as it may cause irreversible damage to your drive. Therefore, take the time to prepare for the firmware update by checking compatibility with your drive model to avoid any potential issues down the road.

    Backup Your Data

    Backing up your data is an essential step to take before performing a firmware update on your device. Firmware updates can sometimes go wrong and render your device unusable. That’s why it’s important to keep a copy of your important files and documents somewhere safe before commencing the update.

    You can backup your data using an external hard drive, cloud storage, or a USB flash drive. The process is straightforward and can save you from losing your valuable data. Imagine losing all your files, photos, and music because you didn’t backup your data before performing a firmware update.

    It’s not a pleasant experience, and that’s why it’s crucial to take this precautionary step. So, if you’re planning on updating your device firmware, take the time to backup your data beforehand. It’s a simple step that would save you a lot of stress and headaches in the long run.

    Updating Crucial SSD Firmware

    If you’re running a Crucial SSD, it’s important to keep the firmware up to date. Updating the firmware will fix bugs, improve performance, and increase compatibility with your system. Fortunately, updating the firmware is a fairly simple process.

    First, go to the Crucial website and download the latest firmware for your SSD. Next, create a bootable USB drive or CD that contains the firmware update. Boot your computer from the USB drive or CD and follow the instructions on the screen to install the firmware update.

    It’s important to note that you should back up all your data before attempting to update the firmware, as there’s always a chance that something could go wrong. Once the update is complete, restart your computer and check to make sure everything is working properly. If you’re unsure about how to update the firmware, consult your system or motherboard manual or seek the assistance of a professional in the field.

    Keeping your SSD firmware up to date can help ensure that your SSD is running at peak performance and reduce the chances of data loss. Don’t ignore firmware updates, they’re important!

    Download and Install Crucial Storage Executive

    If you’re using a Crucial SSD, it’s essential to keep the firmware updated to ensure optimal performance and stability. Updating Crucial SSD firmware is easy with Crucial Storage Executive software, which you can download from the Crucial website for free. Once installed, simply follow the prompts to update the firmware.

    It’s important to note that updating firmware can result in data loss, so be sure to backup your important files before proceeding. Additionally, make sure you have a stable power source during the update process to avoid any potential complications. With Crucial Storage Executive, updating your Crucial SSD firmware has never been easier.

    Check for Available Firmware Updates

    If you own a Crucial SSD, it’s crucial to check for available firmware updates. These updates can improve the performance of your SSD and resolve any issues with compatibility or stability. Updating the firmware is a straightforward process, but you’ll want to make sure you have a backup of your data just in case.

    To check for updates, you can use the Crucial Storage Executive tool, which will automatically detect any firmware updates available for your specific SSD model. Once the update is detected, simply follow the instructions to download and install it. It’s important to note that you should never interrupt the update process, as this can cause irreversible damage to your SSD.

    With regular firmware updates, you can keep your Crucial SSD running smoothly and efficiently, ensuring that it performs at its best for years to come.

    Download and Apply the Firmware Update

    If you’re experiencing issues with your Crucial SSD (solid state drive), updating the firmware may be a solution. First, go to the Crucial website and download the latest firmware update for your specific drive model. Once you’ve downloaded the update, follow the instructions in the accompanying readme file to apply the firmware update.

    It’s important to note that applying a firmware update can sometimes result in data loss, so ensure that you’ve backed up all important files before proceeding. Additionally, make sure your computer is plugged in and has a stable internet connection during the update process. With the firmware update applied, you may notice a boost in performance and an improvement in any issues you were experiencing beforehand.

    Keep in mind that updating the firmware is just one of the ways to maintain your Crucial SSD’s performance, so be sure to consistently check for firmware updates and backup important files regularly.

    Post-Update Checks

    If you recently performed a crucial SSD firmware update, it’s important to run a few post-update checks to ensure everything went smoothly. First and foremost, make sure your device is recognizing the SSD and that the firmware version matches the latest update. It’s also a good idea to check the device’s performance and run a benchmark test to ensure the SSD is working at its optimal speed.

    Additionally, check for any BIOS settings that may need to be adjusted to accommodate the new firmware. Overall, taking a few moments to run these post-update checks can save you from any potential issues down the line and ensure your SSD is performing at its best. So, don’t skip this crucial step after a firmware update!

    Confirm Successful Update

    After updating your website or software, it is essential to perform post-update checks to confirm that the update was successful. One of the first things you should do is check if all the features of your software or website work correctly. You can manually test each feature or use automated testing tools to make your life easier.

    It’s also crucial to check if any bugs or errors occurred during the update process. You can use error tracking tools or ask your users for feedback. Another important check to perform is website speed testing.

    The update could inadvertently slow your website down, which could negatively impact your user experience. Regularly checking your website’s speed can help you catch any issues early, allowing you to fix them quickly. By performing these post-update checks, you can ensure that your software or website is functioning correctly and providing the best experience for your users.

    Restore Data from Backup

    One of the crucial post-update checks that webmasters must perform is restoring data from a backup. Updating a website can often result in unexpected errors and data loss, which is why having a reliable backup plan is vital. Restoring data from a backup can help you recover lost information, such as customer data, website files, and other critical assets in case something goes wrong.

    Before restoring data, it’s necessary to identify the backup files that contain the relevant data and ensure that the backup is the most recent one. It’s essential to test the backup copy, verify the integrity, and ensure that it adequately contains all the data needed. Also, it’s a good practice to keep multiple backups and maintain them in different locations.

    Without adequate backups, restoring the website’s lost data after an update can be a significant problem that might cause severe damage to the business. So, it’s imperative to check and restore the data from a backup after every update.

    Conclusion

    So there you have it, folks! Updating your SSD firmware may seem like a daunting task, but it is crucial for ensuring the smooth functioning of your device. Remember, failure to update can lead to a whole host of problems, including data loss and reduced performance. But now armed with this guide, you can confidently update your SSD firmware and unleash the full potential of your device.

    So go ahead, get those firmware updates done, and watch your SSD soar!”

    FAQs

    What is a crucial SSD firmware update?
    A crucial SSD firmware update is a software update that updates the firmware of the SSD, which controls various aspects of the drive such as its performance, stability, and compatibility.

    Why is a crucial SSD firmware update important?
    A crucial SSD firmware update is important because it can improve the performance, stability, and compatibility of the SSD. It can also fix potential security vulnerabilities and bugs that may affect the SSD’s performance.

    How do I check if there is a crucial SSD firmware update available for my SSD?
    You can check if there is a crucial SSD firmware update available for your SSD by visiting the official website of the manufacturer and downloading their software update tool. This tool will automatically scan and detect any available firmware updates for your SSD.

    How do I perform a crucial SSD firmware update?
    To perform a crucial SSD firmware update, you first need to download the firmware update tool from the official website of the manufacturer. Next, you need to connect your SSD to your computer and run the software update tool. The tool will guide you through the process of updating the firmware of your SSD. It is important to follow the instructions carefully and not interrupt the process to avoid any potential damage to your SSD.

  • Effortlessly Transfer Programs from a Second HDD to SSD: A Step-by-Step Guide

    Are you looking to upgrade your PC’s performance by transferring programs from an HDD to an SSD? If so, you’re in the right place. Copying programs from an HDD to an SSD can significantly boost your computer’s overall performance and speed. Imagine no more waiting for programs to load or for your computer to start up; transferring programs to an SSD can make that a reality.

    The process of transferring programs may seem daunting, but it doesn’t have to be. With a bit of patience and the right tools, you can complete the process yourself, without the need for expensive software or technical expertise. This blog post will provide you with step-by-step instructions on how to transfer programs from your HDD to an SSD, so you can enjoy a faster and more efficient computer in no time.

    When it comes to transferring your programs, remember that not all programs need to be transferred. Some programs, like operating systems, should remain on the HDD. Other programs, like games, will benefit from being on the SSD.

    By transferring the right programs, you can optimize your computer’s performance and maximize the benefits of your new SSD. So, let’s get started. Below, we’ve outlined some of the steps involved in copying programs from an HDD to an SSD.

    We’ll cover everything from preparing your hardware to transferring your software. By the end of this post, you’ll have a faster, more efficient computer – and the know-how to upgrade your device in the future.

    Step 1: Connect the HDD and SSD

    If you’re looking to transfer individual programs from your second HDD to your SSD, the first step is to connect both storage devices to your computer. Make sure that your computer has enough SATA ports to connect both devices directly. You can also use a SATA-to-USB adapter to connect the HDD and SSD externally.

    Once connected, you’ll need to identify the drive letters assigned to each device. You can do this by opening File Explorer and looking under This PC. The HDD and SSD should be listed as separate drives with their own letters.

    Now that you’ve connected both drives and identified the drive letters, you can move on to copying the individual programs you want to transfer. One way to do this is to use the Windows Easy Transfer feature. This allows you to transfer data between two Windows computers, or between a Windows 7 and Windows 10 computer.

    You’ll need to download and install the Easy Transfer software from the Microsoft website. Once installed, follow the on-screen instructions to select the programs you want to transfer and choose the target drive (in this case, your SSD). Another option is to manually copy and paste the program files from the HDD to the SSD.

    To do this, you’ll need to navigate to the program files folder on your HDD (usually located in the C drive) and find the folder containing the program you want to transfer. Right-click on the folder and select Copy. Then navigate to the program files folder on your SSD and right-click on an empty area.

    Select Paste and wait for the files to be copied over. Keep in mind that some programs may not work properly if you simply copy and paste the files, as they may have other dependencies or registry entries that need to be transferred as well. In summary, transferring individual programs from your second HDD to your SSD involves connecting both devices to your computer and identifying the drive letters.

    Connect both drives to your computer with SATA cables.

    To get started on setting up your HDD and SSD, the first step is to connect both drives to your computer with SATA cables. This simple yet essential step is needed to ensure that both drives are properly identified by your system. SATA cables are the standard interface used to connect storage devices to motherboards.

    To connect both your HDD and SSD, locate the SATA ports on your computer’s motherboard and connect the cables, making sure to push them in all the way to ensure a secure connection. Once your drives are connected, your computer should automatically recognize them and provide access to their storage capabilities. With this step done, you’re now ready to move on to the next steps of setting up your drives for use as a primary and secondary data storage in your system.

    Remember to handle your drives with care and always ground yourself before touching them to prevent static discharge, which can damage sensitive electronics.

    how do i copy individual programs.from second hdd.to.ssd

    Step 2: Open Disk Management

    To copy individual programs from a secondary HDD to an SSD, you’ll need to open Disk Management, which is the built-in Windows utility used to manage drives and storage devices connected to your system. You can access Disk Management by right-clicking on the Start menu and selecting Disk Management from the list of available options. Once opened, you’ll see a list of all your available drives and their corresponding partitions.

    From here, you can identify the programs you want to copy by locating them on the secondary HDD. You can then choose to copy, drag, and drop them onto the SSD partition. Be sure to check that there’s enough space on the SSD before copying the files as some programs can be large and could take up significant storage space.

    By using Disk Management to copy individual programs to your SSD, you’ll experience faster load times and improved system performance.

    Press Windows key + X and select Disk Management.

    If you need to access your computer’s hard drive partitions or manage storage devices, the Disk Management tool is the perfect solution. To open Disk Management, press the Windows key + X on your keyboard, and select “Disk Management” from the menu that appears. This action will take you to a new window that lists all connected storage devices, including external hard drives, USB flash drives, and SD cards.

    You can customize, format, and resize partitions easily using the Disk Management tool. It can also aid in identifying and troubleshooting any disk-related issues you might be experiencing, whether it’s a corrupted file system or a faulty drive. With the Disk Management tool, managing your computer’s storage devices has never been easier, so give it a try if you haven’t already.

    Step 3: Assign a letter to the HDD

    If you’re wondering how to copy individual programs from a second HDD to an SSD, one of the first steps you’ll need to take is assigning a letter to the HDD. This is important because it will make it easier to locate and access the files you want to copy. To do this, you can open up the Disk Management tool on your computer and right-click the HDD you want to assign a letter to.

    Click “Change Drive Letter and Paths” and then “Add.” From there, you can select a new letter for the drive and save the changes. Once this is done, you can begin the process of copying individual programs over to your SSD.

    Keep in mind that this process may take some time depending on the size of the programs you are copying, but it is a great way to improve the performance of your computer and ensure that your files are safe and secure.

    Right-click the HDD and select Change Drive Letter and Paths.

    When it comes to using an external hard drive, assigning a letter to it is crucial in being able to access and manage your files. In order to do this, the third step is to right-click on the HDD and select Change Drive Letter and Paths. This will bring up a window where you can select Add and choose a letter to assign to your external hard drive.

    It’s important to choose a letter that won’t conflict with any other drives on your computer. Think of your hard drive as a personal locker in a big room filled with lockers. In order to access your things, you need to know which locker is yours and have the key to open it.

    Assigning a letter to your external hard drive is like putting a label on your locker, making it easy to find and access your files. Once you’ve assigned a letter, you can easily open your external hard drive and manage your files like you would with any other folder on your computer. In summary, don’t forget to assign a letter to your external hard drive in order to access and manage your files.

    It’s a necessary step that can make your life a lot easier in the long run. Remember to choose a letter that doesn’t conflict with any other drives on your computer and think of your external hard drive as your personal locker in a big room full of lockers.

    Assign a letter to the HDD and click OK.

    When adding a new hard disk drive (HDD) to your computer, it is important to assign it a letter. This will allow you to easily access and manage its files and folders. To assign a letter, follow these easy steps.

    First, right-click on the Windows Start button and select Disk Management from the menu. This will open the Disk Management Utility window. Next, find the newly added HDD in the list of disks displayed in the bottom half of the window.

    It should be labeled as “Unallocated” or “Raw”. Right-click on it and select “New Simple Volume”. Follow the prompts in the wizard to specify the partition size, file system, and volume label.

    Finally, assign a letter to the HDD and click OK. You can choose any available letter from the dropdown list, but it is recommended to use letters towards the end of the alphabet (such as X, Y, or Z) to avoid potential conflicts with already assigned letters. Once you have completed these steps, the new HDD will be visible in File Explorer and ready to use! So, remember to assign a letter to your HDD to avoid confusion and have seamless access to your files.

    Step 4: Create a disk image of the HDD

    If you’re looking to copy individual programs from a second HDD to an SSD, the first step is to create a disk image of the HDD. This will allow you to copy everything over to the SSD, including any programs you want to keep. Creating a disk image is a relatively straightforward process that involves using software like Clonezilla or Macrium Reflect.

    Simply connect both the HDD and SSD to your computer, open the disk imaging software, select the HDD as the source and the SSD as the destination, and let the software do its thing. Once the disk image is created, you can easily copy over individual programs from the second HDD to the SSD without having to reinstall everything from scratch. Just make sure to double check that everything transferred over successfully before deleting any files from the original HDD.

    With a little bit of patience and some basic know-how, transferring your programs from one HDD to another can be a seamless process.

    Right-click the HDD and select Create a System Image.

    Creating a disk image of your HDD is an essential step in maintaining your computer’s health and ensuring data backup. To begin this process, right-click the HDD and select “Create a System Image.” What this does is create a snapshot of your entire hard drive, including all installed programs, operating system, and personal files.

    This can be a time-consuming process depending on the size of your hard drive, but it is a critical step in safeguarding your data and ensuring that your computer can be restored to an earlier state in the event of hardware failure or other issues. Think of it as a safety net for your digital life. It’s always better to have a backup of your important files and programs rather than trying to recover them after something goes wrong.

    With a disk image, you can rest assured that all your important data is safe and secure. So don’t delay, create a disk image today and protect the work you’ve put so much effort into.

    Choose the SSD as the destination drive and create the image.

    Now that you have connected your new SSD and made sure it is initialized, it is time to create a disk image of your HDD. This image will contain all the data from your old hard drive so that you can easily transfer it to your new SSD. To create a disk image, you will need imaging software such as Clonezilla or Macrium Reflect.

    Once you have opened the software, select the source drive, which is your old HDD, and then choose the SSD as the destination drive. This will ensure that all your files and programs are transferred to the new drive without any data loss. After selecting the drives, follow the instructions on the software to create the image.

    Depending on the size of your HDD, this process can take some time, so be patient. Once the image is created, you will be able to transfer it to your new SSD and enjoy the benefits of faster speeds and better performance. By creating a disk image of your HDD, you have secured your data and made the process of transferring it to your new drive effortless.

    Step 5: Mount the disk image

    If you’re looking to copy individual programs from a secondary hard drive to your SSD, one way to do it is to create a disk image of the second hard drive and mount it on the SSD. First, connect both the second hard drive and the SSD to your computer. Then, use a disk imaging software to create an exact copy of the second hard drive.

    Make sure to include the programs you want to copy in the image. Once the image is created, you can mount it on your SSD using disk management tools in your operating system. From there, you can access the programs and files just as if they were installed on your SSD.

    This method can be particularly useful if you want to transfer files and programs from an older computer to a newer one with a faster SSD. Just remember to double-check compatibility and file formats before transferring.

    Open Disk Management, right-click the SSD, and select Change Drive Letter and Paths.

    After successfully creating a disk image, the next step is to mount it. Mounting a disk image is like opening up a virtual hard drive where the files and folders inside the image can be accessed. To do this, open up Disk Management – simply search for it in the Windows search bar.

    Once you’ve opened it, locate your SSD, right-click on it, and select “Change Drive Letter and Paths”. From there, click on the “Add” button, and select “Mount in the following empty NTFS folder”. Choose or create a folder where you want to mount the disk image, and then click “OK” to save the changes.

    Once the disk image has been mounted, you can access its contents just like you would with a physical hard drive. It’s important to remember to unmount the disk image when you’re done using it to ensure the safe removal of the image. Overall, mounting a disk image is a quick and beneficial way to access data that has been backed up or copied to a file.

    Click Add and select the .vhd file created in step 4.

    In step 5 of the process for creating a disk image in Windows operating systems, we’ll be mounting the disk image. This involves clicking on “Add” and selecting the .vhd file that we created in step

    The disk image will then be mounted as a virtual disk drive, allowing us to access the data and files stored within it. This can be especially useful for situations where we want to transfer files or data between different systems, or if we need to access data from a disk image for forensic investigation or analysis. The process of mounting a disk image is relatively straightforward and can be completed in just a few steps.

    However, it’s important to ensure that the image file is properly selected and mounted before attempting to access any of the data stored within it. This will help to avoid any potential data corruption or loss, and ensure that we can access the data we need quickly and easily. In summary, mounting a disk image is an essential step in the process of working with disk images in Windows operating systems.

    By following the steps outlined in this guide, we can ensure that we are able to access our data quickly, easily, and safely. So whether you’re a forensic analyst, an IT professional, or just someone looking to transfer data between different systems, mounting a disk image is an important skill to have in your toolkit.

    Step 6: Copy individual programs

    So, you’ve successfully cloned your second hard drive onto your new SSD. Now, it’s time to copy individual programs from your second HDD to your SSD. This process is straightforward.

    First, create a folder on the desktop of your SSD and name it “Programs.” Then, navigate to the corresponding folder on your second HDD where your desired program is installed. Right-click on the program and select “Copy.

    ” Go back to the “Programs” folder you created on your SSD, right-click, and select “Paste.” Wait for the program to finish copying before moving onto the next. Once you’ve successfully copied all the programs you want, you can delete them from your second HDD to free up space.

    Happy computing!

    Open the mounted disk image and copy the programs you want to transfer.

    Once you have successfully mounted the disk image containing the programs you wish to transfer, it’s time to start copying them over to your desired location. This process is quite simple and involves opening the mounted disk image and selecting the programs you want to copy. You can do this by either dragging and dropping the individual programs from the disk image to your destination folder or by manually copying and pasting them.

    One thing to keep in mind while copying programs is to ensure that you copy all the necessary files associated with it, such as support files and related libraries. Failure to do so might result in the program malfunctioning or not working altogether. Overall, copying programs from a mounted disk image is a simple and straightforward process that anyone can do.

    So, go ahead and start transferring those programs!

    Paste the programs to the SSD.

    After completing the previous steps of preparing the SSD for use, it’s time to move on to the next step: copying individual programs to the SSD. This step is crucial because it ensures that your programs run smoothly and efficiently on your new SSD. To begin, you’ll need to select and copy the programs that you want to transfer to your SSD.

    This can be done by locating the program files on your computer’s hard drive and transferring them to the SSD. Be sure to copy all files associated with the program, including installation files and any additional components or drivers. It’s important to note that some programs may require a fresh install on the SSD to ensure optimal performance, so check with the program’s manufacturer to ensure that you’re following the correct procedure.

    Also, be sure to keep track of any license keys or activation codes you may need to reactivate your programs on the new drive. In addition, it may be a good idea to prioritize which programs you transfer to the SSD based on your usage habits. Programs that are frequently used or require fast load times, such as games or video editing software, should be prioritized over less frequently used programs.

    This will help optimize the SSD’s speed and efficiency. In essence, copying individual programs to the SSD is a critical step in the process of upgrading your computer’s storage. It can help improve the overall speed and performance of your computer, and enable you to work more efficiently.

    With careful consideration and attention to detail, this step can be an easy and efficient process.

    Step 7: Remove the HDD

    If you’re looking to transfer specific programs from a second hard drive to your SSD, you’ll need to begin by removing the HDD from your computer. This can take a bit of effort, as you’ll need to locate the hard drive bay, unscrew it, and disconnect the cables. Once you’ve done this, carefully extract the HDD from the bay and set it aside.

    Make sure to handle it gently, as hard drives are delicate and prone to damage. With the HDD removed, you’ll be ready to install your new SSD and begin the process of copying your desired programs over. Remember that this is a delicate process, and it’s important to handle your components with care.

    With a bit of patience and attention to detail, you’ll be able to successfully transfer your programs onto your new SSD in no time, and enjoy faster, more efficient performance from your computer.

    In Disk Management, right-click the HDD and select Remove Drive Letter and Paths.

    When you’re ready to remove your external hard drive (HDD), there are a few steps you need to take to ensure it’s done safely and correctly. One important step is to remove the drive letter and paths in Disk Management. This will detach the drive from your system, disallow any further access to the files, and prevent any damage or data loss that could occur.

    To do this, simply right-click on the HDD in Disk Management and select “Remove Drive Letter and Paths”. It’s that easy! Just remember to make sure any important files are backed up before disconnecting the drive, as removing the drive letter and paths will make it more difficult to access the data in the future. By taking these simple steps, you can ensure that your HDD is safely removed without any repercussions or long-lasting damage to your system.

    Confirm and disconnect the HDD.

    Once you have confirmed that all the data has been migrated and backed up to your new HDD, it’s time to disconnect the old one. Don’t worry; it’s a simple process! Firstly, turn off the computer and remove any cords or cables that are plugged in. Then, unscrew the HDD from its mounting bracket or bay, being careful not to damage any parts.

    Once it’s free from its mounting, gently remove the SATA connector from the drive and disconnect the power cable. You can then safely remove the old HDD from your computer. Always handle your hard drive with care, as they are delicate pieces of equipment.

    Remember to dispose of the old hardware properly and securely to protect your privacy. With this step complete, you’re now ready to start using your new HDD and enjoy its faster performance.

    Conclusion

    In conclusion, copying individual programs from a second HDD to an SSD can be done easily with a few simple steps. And just like transferring items from your old closet to your new one, it’s all about knowing what you want to keep and making sure it fits in the new space. So whether you’re upgrading your computer or refreshing your wardrobe, it’s all about keeping the things you love close and letting go of the ones you no longer need.

    Happy copying, and happy decluttering!”

    FAQs

    What is the process to copy individual programs from a second HDD to an SSD?
    First, connect both HDD and SSD to the computer. Then, select the individual programs you want to copy from the second HDD and paste them into the SSD.

    Can you copy the entire second HDD to an SSD?
    Yes, you can copy the entire second HDD to an SSD using cloning software like Acronis True Image or Macrium Reflect.

    Is it necessary to reinstall programs after copying from a second HDD to an SSD?
    No, it is not necessary to reinstall programs after copying from a second HDD to an SSD, but you may need to update their paths.

    How do you update the paths of programs after copying to an SSD?
    You can update the paths of programs on the SSD using registry editing or by creating symbolic links to the files on the SSD.

  • Unlock the Secrets: A Comprehensive Guide to Choosing the Perfect SSD for Your Desktop

    When it comes to boosting your desktop’s performance, upgrading your hard drive to a solid-state drive (SSD) is a popular choice. But with so many SSD options available, how do you choose the right one for your needs? It can be overwhelming to navigate through the technical jargon and specifications, but fear not! In this article, we will walk you through everything you need to know to choose the right SSD for your desktop. Think of it as finding the perfect pair of shoes – you need to consider a few important factors, such as size, style, and durability, to ensure a comfortable and long-lasting fit.

    Similarly, choosing the right SSD involves weighing factors such as capacity, speed, and endurance to find the perfect fit for your desktop needs. So let’s get started on finding your desktop’s “sole” mate, shall we?

    Understand Your Desktop’s Compatibility

    If you’re wondering how to know which SSD to buy for your desktop, the first thing you need to determine is your desktop’s compatibility. Not all desktop computers are created equal, so it’s important to know the specifications of your machine before making any purchases. Check if your desktop supports a SATA or PCI Express interface, as some SSDs only work with a specific interface.

    You should also take into consideration the form factor of your desktop and the available space for the SSD. This will help you choose an SSD that fits snugly into your desktop without any issues. Once you have determined the compatibility of your desktop, you can then proceed to look for SSDs that meet your performance and storage needs.

    It’s important to research the best SSD brands available and read reviews before making a final decision. With the right SSD, your desktop computer can experience significant performance improvements, so it’s definitely worth the effort to find the right one.

    Check the Motherboard’s Compatibility

    Your motherboard is one of the most crucial components of your desktop computer. It is essential to ensure that it is compatible with your system before making any upgrades or changes. Check the specifications of your motherboard before making any purchases to avoid compatibility issues.

    Look for the type of sockets, the form factor, and the chipset that your motherboard supports to ensure that your new components match. For instance, suppose you want to upgrade your graphics card or memory. In that case, you need to make sure that your motherboard has the necessary slots to accommodate them.

    Make sure to read reviews and gather information from credible sources to avoid any accidents or mistakes while upgrading your system. Understanding your desktop’s compatibility with its motherboard is crucial to ensure the smooth functioning of your system.

    how do i know which ssd to buy for desktop

    Identify the Interface Supported

    When it comes to choosing the right desktop for your needs, it’s important to understand the interface supported by your device. This not only ensures compatibility with your other devices but also determines the types of peripherals you can use. Common interfaces include USB, HDMI, VGA, Thunderbolt, and Ethernet.

    While most devices today support multiple interfaces, it’s important to check their compatibility before making a purchase. For example, if you plan on using a dual-monitor setup, you may need a desktop with a graphics card that supports dual HDMI or DisplayPort connections. Understanding the interface supported by your device can save you time and money in the long run, as you won’t have to purchase additional hardware or adapters to make everything work together seamlessly.

    Consider the SSD’s Performance

    When shopping for an SSD for your desktop, one important factor to consider is the SSD’s performance. Different SSDs may have different read and write speeds, and you’ll want to find one that can keep up with your workflow demands. To know which SSD to buy, consider your storage needs and usage patterns.

    If you’re a gamer or graphic designer who needs to store and access large files quickly, you may want to look for an SSD with high sequential read and write speeds. However, if you’re a casual user who needs an SSD for everyday tasks like web browsing and email, a lower-end SSD may suffice. But no matter what, make sure the SSD you choose is compatible with your desktop’s form factor and interface, and verify if the size is adequate for your needs.

    Ultimately, choosing an SSD with high performance and compatibility with your system will ensure that you get the most out of your investment.

    Look at the Read and Write Speeds

    When choosing an SSD, it’s important to consider its performance, particularly in terms of read and write speeds. The speed at which an SSD can transfer data directly impacts its ability to handle heavy workloads and run applications smoothly. Look for an SSD with a high read and write speed, as this will significantly improve your computer’s overall performance.

    An SSD’s performance can also be affected by its controller, which manages data flow to and from the drive. A high-quality controller can help maximize the speed and efficiency of your SSD. Don’t overlook the importance of performance when selecting an SSD, as it could make all the difference in how well your computer operates.

    Check the TBW Rating

    When it comes to SSDs, performance is a critical consideration for many users. This is where the TBW (terabytes written) rating comes into play. The TBW rating indicates how much data can be written to an SSD over its lifetime before it starts to fail.

    Higher TBW ratings mean that the SSD can handle more write cycles and will last longer overall. Additionally, SSDs with higher TBW ratings tend to offer better overall performance. If you’re someone who frequently writes data to your computer, such as a video editor or high-end gamer, you should definitely consider an SSD with a high TBW rating.

    It’s also worth noting that some manufacturers offer warranties based on the TBW ratings of their SSDs, which can provide additional peace of mind for users. Overall, when considering an SSD, it’s crucial to take its TBW rating into account to ensure that you get the best performance and longevity possible.

    Consider the Cache Size

    When it comes to choosing an SSD, it’s important to consider the cache size. The cache size refers to the amount of temporary storage on the SSD, and it can impact the overall performance of the drive. A larger cache size allows for faster access to frequently used files, which can lead to faster boot and load times.

    However, a smaller cache size may be sufficient for some users who don’t need lightning fast speeds. When considering cache size, it’s important to also consider the SSD’s performance. The performance of an SSD can be measured in terms of read and write speeds, as well as input/output operations per second (IOPS).

    A higher performing SSD can handle more intense workloads and can be beneficial for gamers, video editors, and other power users. So, when shopping for an SSD, consider both the cache size and performance to ensure you get the right drive for your needs.

    Evaluate the Capacity You Need

    If you’re trying to figure out which SSD to buy for your desktop, the first thing to consider is the capacity you need. This will depend on how much data you plan to store on your computer, as well as how many applications you’ll be running at once. If you tend to have a lot of large files, such as photos or videos, you’ll want a larger capacity SSD.

    On the other hand, if you mostly use your computer for web browsing and basic office tasks, a smaller capacity SSD may be sufficient. It’s also important to consider the read and write speeds of the SSD, as this will impact how quickly your computer can access data. When in doubt, it’s always better to go for an SSD with more capacity and faster speeds than you might need, to future-proof your computer and ensure optimal performance for years to come.

    Assess Your Storage Needs

    When it comes to assessing your storage needs, the first step is to evaluate the capacity you require. This involves considering both your current storage needs and any future growth you anticipate. It’s important to choose a storage solution that can accommodate your increasing demands while also providing room for flexibility.

    To evaluate your capacity needs, you can begin by taking an inventory of your data and assessing its size and growth metrics. You can also consider the types of data and their accessibility requirements. This will help you choose a storage solution that is appropriate and cost-effective.

    So, are you ready to assess your storage needs? Take a deep dive into your current and future data needs, and choose a solution that meets them to ensure your data remains organized, accessible, and secure.

    Consider Future Storage Needs

    When it comes to evaluating future storage needs, it’s important to consider the capacity you need. This means thinking beyond just the present and anticipating how much space you may require in the future. One way to do this is by looking at the current data trends in your industry and projecting those into the future.

    Additionally, it’s important to consider any projected growth in your organization and how that may impact your storage needs. It’s better to plan ahead and have more storage capacity than to be caught off guard and be forced to constantly upgrade. So, take the time to evaluate your future needs and ensure that you have the right capacity for your organization’s data.

    Factors to Keep in Mind

    When it comes to choosing the right SSD for your desktop, there are several factors to keep in mind. Firstly, you need to consider the storage capacity you require for your needs. If you use your desktop for basic tasks such as browsing the web, then 250GB of storage might suffice.

    However, if you are a gamer or work with large multimedia files, then you may need a larger storage capacity of 500GB or more. It’s also important to consider the speed of the SSD, which is measured in read and write speeds. A faster SSD will offer better performance, so it’s worth investing in a faster model if speed is important to you.

    Additionally, you should look for a reputable brand that offers good support and warranty coverage. Lastly, consider the budget you have for a new SSD, as prices can vary significantly depending on the brand and capacity. By keeping these factors in mind, you can make an informed decision on which SSD to buy that meets your needs and budget.

    Budget Constraints

    Budget constraints can be a major headache for anyone trying to make financial decisions. It’s important to keep in mind the various factors that could impact these constraints and plan ahead accordingly. One thing to consider is the cost of living in your area, which can greatly impact your budget.

    Think about the cost of housing, food, transportation, and other expenses that may be higher or lower depending on where you live. Another factor is the seasonality of certain expenses, such as utilities or holiday gifts, which can fluctuate throughout the year. Additionally, unexpected expenses can arise at any time, so it’s wise to always have some sort of emergency fund set aside.

    By taking these factors into account, you can be better prepared and make wiser financial decisions that will help you stay within your budget.

    Brand Reputation and Warranty

    When it comes to brand reputation and warranty, it’s important to keep a few key factors in mind. First and foremost, your reputation is everything. It’s the foundation on which your company is built and can make or break your success.

    So, always be honest in your marketing efforts, stand behind your products and services, and consistently deliver on your promises. Secondly, warranties can either enhance or harm your reputation. Make sure your warranty is realistic and offers value to your customers.

    A good warranty can build trust in your brand, while a poor one can lead to negative reviews and damage your reputation. Lastly, be proactive. Keep an eye on social media to monitor what people are saying about your brand and respond quickly to any negative feedback.

    By keeping these factors in mind, you can build a strong reputation and offer a valuable warranty that enhances your brand.

    Read Reviews and Benchmarks

    When it comes to choosing a product, reading reviews and benchmarks can be a valuable tool. However, it’s important to keep a few factors in mind when doing so. Firstly, consider the source of the review or benchmark.

    Is it from a reputable website or individual? Are they knowledgeable about the product? Secondly, keep in mind the specific needs or requirements you have for the product. Just because a product received a glowing review or benchmark doesn’t necessarily mean it will meet your specific needs. Finally, take into account the age of the review or benchmark.

    Technology and products can quickly evolve, so it’s important to ensure that any information you’re relying on is still current. By keeping these factors in mind, you can make a more informed decision and be confident in your purchase.

    Consider Your Usage Needs

    When it comes to choosing a suitable internet plan, it’s essential to consider your usage needs. To make an informed decision, various factors must be kept in mind. The first is the type of activities you perform online.

    If you’re primarily using the internet for light browsing, social media, and emailing, a basic plan with lower bandwidth can suffice. However, if you frequently stream videos, engage in online gaming, or work from home, you’ll need a high-speed connection with unlimited data. Another crucial factor is the number of devices that need to be connected to the internet.

    If you live in a household with multiple users and devices, you’ll need a plan that can handle the traffic without slowing down. Keep these factors in mind to choose the perfect internet plan that suits your specific usage needs.

    Making the Final Decision

    If you’re looking to upgrade the storage on your desktop computer with an SSD, you may be wondering how to choose the right one. First, consider the capacity you need – how many documents, photos, videos, and games you plan to store on your computer. Additionally, pay attention to the read/write speeds of the SSD, as this can greatly impact your computer’s performance.

    Another factor to consider is the form factor of the SSD, as some may not fit in your computer’s case or may require additional equipment to install. Finally, take a look at reviews from other customers to see if they had any issues with reliability or compatibility. By taking these factors into account, you can make an informed decision on which SSD to buy for your desktop.

    And don’t worry, it’s not as complicated as it may seem!

    Conclusion

    In conclusion, choosing the right SSD for your desktop requires a bit of research and consideration of your specific needs and preferences. Do you prioritize speed and performance or storage capacity? Are you a serious gamer or content creator? Are you on a budget or willing to splurge? By taking the time to evaluate your priorities and doing your due diligence on reputable brands and user reviews, you can find the perfect SSD that will elevate your computing experience to the next level. So don’t settle for a sluggish hard drive or an underwhelming SSD – invest in the right one and never look back.

    FAQs

    What factors should I consider while choosing an SSD for my desktop?
    You should consider the storage capacity, read and write speed, compatibility with your desktop’s motherboard, and budget while choosing an SSD for your desktop.

    Is it better to choose a SATA or NVMe SSD for my desktop?
    NVMe SSDs are faster and more expensive than SATA SSDs, but SATA SSDs are still a good option for most users. Ultimately, the choice depends on your needs and budget.

    Can I add an SSD to my desktop if it already has a hard drive?
    Yes, you can add an SSD to your desktop even if it already has a hard drive. You will need to connect the SSD to an available SATA or NVMe port on your motherboard.

    Is it worth investing in a high-end SSD for my desktop?
    If you regularly use your desktop for tasks that require a lot of data transfer, such as video editing or gaming, investing in a high-end SSD can significantly improve your performance. However, if you use your desktop for basic tasks like web browsing and email, a lower-end SSD will suffice.

  • Effortlessly Transfer Select Files to Your SSD: A Comprehensive Guide

    Do you ever get frustrated with the sluggish performance of your computer? Do you find yourself waiting endless seconds for your files to load, or for the applications to respond to your commands? This can be a common problem for computer users, and the reason for this is often slow-performing hard drives. Luckily, there is a solution: transferring some files to an SSD can significantly boost your computer’s performance, and it’s easier than you might think. In this blog post, we’ll discuss what SSDs are, why they’re better than traditional hard drives, and how to transfer your files to one.

    So sit back, relax, and get ready to give your computer a much-needed upgrade.

    Check SSD Storage Capacity

    If you’re wondering how to transfer only specific files to your SSD drive, it’s actually quite simple. First, check how much storage capacity your SSD has, so you know how many files you can transfer. Once you have done that, you can start the process of selecting the files you want to transfer.

    In most cases, you can just drag and drop the files onto your SSD, or copy and paste them. However, if the files are large, it may take some time for the transfer to complete, so patience is key. Another option would be to use file transfer software like GoodSync or Carbon Copy Cloner to automate the process.

    By following these simple steps you can easily transfer only the files that you need to your SSD. This helps to ensure you’re not wasting valuable space on your drive and that your computer is running efficiently.

    Determine Necessary Files to Transfer

    When transferring files from one storage device to another, it’s important to determine which files are necessary to transfer to avoid wasting time and space on unnecessary data. One way to do this is to check the SSD storage capacity. SSDs have become increasingly popular due to their speed and efficiency, but they tend to have smaller storage capacities compared to HDDs.

    It’s important to make sure that there is enough space on the new device for all necessary files before starting the transfer process. If the SSD does not have enough space, it may be necessary to transfer only the most important files, or consider upgrading to a larger SSD before beginning the transfer process. By checking the SSD storage capacity beforehand, you can ensure a smooth and efficient transfer of files without encountering any unexpected issues.

    how do i transfer only some files to my ssd

    Identify Transfer Method

    If you’re looking to transfer only some files to your SSD, there are a few transfer methods you can consider. One option is to manually select and copy/paste the files you want to transfer onto your SSD. This method is simple but can be time-consuming if you have a large number of files to transfer.

    Another option is to use specialized software designed for file transfers, such as Windows Easy Transfer or Mac’s Migration Assistant. These programs can make the transfer process quicker and more efficient. Finally, if your SSD is a secondary drive, you can also use symbolic links to redirect certain files or folders to your SSD while leaving the rest on your primary drive.

    Whichever method you choose, make sure you backup your files beforehand and double-check the transfer process before deleting anything from your original source. With these tips, you’ll be able to easily transfer only the necessary files to your SSD without any hassle.

    Manually Transfer Selected Files

    If you need to transfer selected files from one device to another, it’s important to identify the best transfer method for your needs. One option is to manually transfer the files using a USB drive or an external hard drive. This method is useful when you only need to transfer a few files or when you don’t have access to the internet.

    However, it can be time-consuming and requires you to physically move the storage device from one device to another. Additionally, you may need to ensure that the storage device is compatible with both devices. Overall, manually transferring selected files can be a great solution for small-scale transfers, but may not be the best option for larger file transfers or frequent file transfers.

    Utilize Backup and Sync Tools

    When it comes to transferring your important files and data, utilizing backup and sync tools is crucial. However, before choosing a tool, it’s important to identify the transfer method that will work best for you. For example, cloud-based tools such as Dropbox, Google Drive, and iCloud are great options for those who need easy access to their files on multiple devices.

    On the other hand, physical backup tools such as external hard drives or USB flash drives are better suited for those who don’t need constant access to their files and have concerns about privacy and security. Whatever transfer method you choose, make sure to back up your files regularly and keep your data safe from unexpected loss or damage. By incorporating a reliable backup and sync tool into your workflow, you’ll have peace of mind knowing that your files are securely stored and easily accessible whenever you need them.

    Monitor File Transfer Progress

    If you’re transferring files to your SSD, you may want to transfer only specific files rather than transferring everything from your old hard drive. The process is simple, and there are a few things to keep in mind. First, you’ll need to connect both your old hard drive and your SSD to your computer.

    Then, select the files you want to transfer and drag them or copy and paste them into the SSD folder. It’s also a good idea to monitor the file transfer progress to ensure everything is going smoothly. You can do this by opening the transfer window and checking the progress bar or transfer rate.

    By doing so, you’ll be able to make sure that your crucial files are transferred successfully without any errors or data loss.

    Use File Transfer Manager Software

    As business operations continue to become more complex, managing data transfers becomes a daunting task. File Transfer Manager software comes in handy to make the process as efficient as possible. This robust software can monitor file transfer progress, giving real-time feedback on the status of transfers.

    Whether uploading or downloading files, the software provides detailed information on the amount of data transferred, time elapsed and time left to complete the operation. The software makes it easy to manage multiple transfers at once, giving you the freedom to focus on other tasks. With its friendly user interface, you don’t need to have any technical expertise to use it, making it an indispensable tool for businesses.

    By integrating File Transfer Manager software, businesses can streamline their operations and enhance productivity. Its time you ditched the laborious and clumsy manual file transfer methods and embraced the efficiency of this software.

    Verify Correct File Transfer

    If you’re looking to transfer only specific files to your SSD, it’s important to verify that everything transferred correctly before moving on. One way to do this is to use a file verification tool. These tools compare the checksum or digital fingerprint of the original file with the transferred file to ensure they’re identical.

    This can help catch any mistakes or corruption in the transfer process. Another way to verify the transfer is to manually check each file’s size and compare it to the original size. If there are discrepancies, it’s a sign that something went wrong during the transfer.

    Remember to always double-check your transfers, particularly when dealing with important files. By taking the extra time to verify your transfers, you can avoid loss or corruption of your data and ensure a seamless transfer to your SSD.

    Check SSD for Transferred Files

    When transferring files from one device to another, it’s essential to double-check that every file was completely transferred and saved in the correct location. One of the ways to ensure that is by checking your solid-state drive or SSD. Verifying the correct file transfer significantly reduces the risk of losing precious files, especially if you are dealing with important documents, photos, or videos.

    An SSD usually has faster speeds of data transfer compared to a regular hard disk drive, which makes it an ideal storage choice for quickly transferring large files. After completing your file transfer process, you should check the SSD to ensure that all files are transferred successfully without any errors. To avoid losing your files, it’s highly recommended to perform this step regularly to maintain good storage health and avoid unexpected damage to your data.

    Conclusion

    Well, my dear reader, transferring only some files to your SSD is like packing for a trip. You don’t want to lug your entire wardrobe with you, but rather choose only the essentials that you know you’ll need. Similarly, you don’t want to clutter up your SSD with unnecessary files.

    Select only the most important ones and make sure they have a safe and speedy journey to their new home. Bon voyage, my friend!”

    FAQs

    What is the best way to transfer files to an SSD?
    The best way to transfer files to an SSD is to use a file transfer software or tool specifically designed for SSDs, as opposed to copying and pasting files. This will ensure that the files are transferred in the most efficient and effective way possible.

    Can I transfer only certain files to my SSD?
    Yes, you can transfer only certain files to your SSD. When transferring files, simply select the files you want to transfer and exclude any files you do not want to transfer.

    What type of files should I transfer to my SSD?
    You should transfer files that you use frequently to your SSD, such as your operating system, programs, and frequently used documents or media files. This will allow for faster access to these files and improved overall performance.

    How do I ensure that my files are transferred properly to my SSD?
    To ensure that your files are transferred properly to your SSD, it is important to check that the files are not corrupted or damaged during the transfer process. Make sure to use a reliable file transfer tool, and keep backups of important files in case of any issues.

  • Upgrade Your System with Ease: A Complete Guide on How to Replace Your Adata M2 SSD

    Upgrading your SSD storage space is a great way to boost your computer’s performance, allowing you to store more data without slowing down your system. One of our favorite SSD brands is ADATA, known for its high-quality and reliable products. However, there comes a time when even the most reliable SSDs need to be replaced.

    If you’re looking to replace your ADATA M2 SSD, then you’ve come to the right place. In this step-by-step guide, we’ll show you how to replace your ADATA M2 SSD and get your computer up and running again in no time. So, whether you’re a tech-savvy enthusiast or just looking to upgrade your storage, let’s dive in and get started on our journey towards more storage space.

    Preparation

    If you’re looking to replace your ADATA M.2 SSD, there are some things you’ll need to prepare ahead of time. First, you’ll want to make sure you have the proper tools to open your laptop or PC and access the M.

    2 slot. This usually involves a small screwdriver and some patience. You’ll also want to have a new M.

    2 SSD ready to go, with the same or greater capacity as your old one. It’s important to back up any important files or data on your old SSD before replacing it, so you don’t lose anything important. You can do this by transferring files to an external hard drive or using a cloud storage service.

    Once you have all of these things ready, you’re almost ready to replace your ADATA M.2 SSD and enjoy faster speeds and better performance. Don’t forget to power down your device and discharge any static electricity before handling your new SSD.

    Check your laptop or desktop computer specifications

    When it comes to preparing for buying a new laptop or desktop computer, it’s important to check the specifications before making your final decision. These specifications will give you a clear idea of what the computer is capable of and whether it will meet your needs. Some of the key specifications to look at include the processor, RAM, storage, and graphics card.

    For example, if you plan on using your computer for gaming or video editing, you’ll want to make sure you have a powerful processor and high-end graphics card. On the other hand, if you just need a computer for browsing the web and checking emails, a less powerful processor and graphics card may be sufficient. By understanding your own needs and checking the specifications of the computers you’re considering, you’ll be able to make an informed decision and get the most value for your money.

    adata m2 ssd how to replace

    Shut down and unplug your computer or laptop

    “computer shutdown” When it comes to shutting down your computer or laptop, it’s important to take a few steps to ensure everything is properly prepared. First, save any important documents or files you’re working on and close all open programs. This will prevent any potential data loss or corruption during the shutdown process.

    Next, make sure any peripherals such as printers or external hard drives are also safely disconnected. Once everything is properly saved and disconnected, it’s time to shut down your computer. Click on the Start menu and select the Shutdown option, or if you’re using a laptop, press the power button until the device turns off.

    Additionally, don’t forget to unplug your computer or laptop if you’re not planning to use it for an extended period. This can help prevent potential power surges or other electrical issues. By taking these simple steps, you can ensure your computer remains in good working condition and is always ready for your next use.

    So always remember to prepare and take the extra steps to safely shut down your computer.

    Installation

    If you’re looking to upgrade your computer’s storage with an ADATA M.2 SSD, the process is fairly straightforward. First, you’ll need to make sure your computer is turned off and unplugged from any power source.

    You’ll then need to locate the M.2 slot on your motherboard, which is typically located near the CPU and labeled as such. Once you’ve found it, carefully remove the screw or clip holding the existing M.

    2 drive in place, then gently slide it out of the slot. From there, simply slide your new ADATA M.2 SSD into the slot, then secure it in place with the screw or clip you removed earlier.

    Finally, plug your computer back in and turn it on, and your new M.2 SSD should be detected automatically. Overall, the process should only take a few minutes and can greatly improve the speed and performance of your computer.

    Remove the Old ADATA M2 SSD

    If you’re looking to upgrade your computer’s storage capacity, one of the first steps is to remove the old ADATA M2 SSD. This is a simple process, but it’s important to handle the SSD carefully to avoid damaging it or other components in your device. Before starting, you’ll want to ensure that your computer is turned off and disconnected from any power sources.

    You’ll then need to locate the M2 slot on your motherboard and unscrew any fastenings that are holding your SSD in place. Gently remove the old SSD, being careful not to bend any pins or damage the slot. With the old SSD removed, you can now install your new SSD and enjoy increased storage and performance on your computer.

    Install the New ADATA M2 SSD

    Installing the new ADATA M2 SSD is a quick and easy process that can significantly boost the performance of your computer. First, you need to locate the M.2 slot on your motherboard and make sure it’s compatible with the size of your SSD.

    Then, remove any preexisting SSD or hard drive from the slot and carefully align the ADATA M2 SSD with the slot until it is snugly in place. Finally, secure the SSD with the included screw and you’re ready to start enjoying faster boot times and improved application loading speeds. With the ADATA M2 SSD, you can easily upgrade your computer’s storage and performance without having to go through the hassle of transferring data to an external drive or reinstalling your operating system.

    So why wait? Upgrade your computer today and experience the benefits of lightning-fast storage with the ADATA M2 SSD.

    Post-installation

    Replacing an ADATA M.2 SSD can seem like an intimidating task, but it is actually quite simple and straightforward. The first step is to shut down your computer and unplug it from the power source.

    Once you have done that, locate the M.2 slot on your motherboard. Carefully remove the existing SSD from the slot by gently pushing down on the retention clip and sliding the drive out.

    Slide the new ADATA M.2 SSD into the slot, making sure it is aligned correctly, and tighten the screw to secure it in place. Once it is secure, replace the back cover of your computer and power it back up.

    You will need to go into the BIOS and select the new SSD as your boot device. Congratulations, you have successfully replaced your ADATA M.2 SSD!

    Turn on your computer and check if the new ADATA M2 SSD is detected

    Now that you’ve installed your new ADATA M2 SSD, it’s time to make sure everything is working as it should be. The first step is to turn on your computer and check if the SSD is detected. This is an important step because if the SSD isn’t detected, then it won’t be usable.

    Fortunately, the detection process is usually automatic, so you should see the SSD listed in your computer’s BIOS. If you don’t see it, then there might be a problem with the installation or with the SSD itself. It’s important to troubleshoot the problem at this stage so that you don’t waste any more time.

    Once the SSD is detected, you can start to use it to store your files, install applications, and run your operating system. With the ADATA M2 SSD, you’ll enjoy faster boot times, faster application load times, and overall better performance from your computer. So take the time to make sure everything is working as it should be, and enjoy the benefits of your new investment.

    Verify the Storage Capacity of the New ADATA M2 SSD

    After installing your new ADATA M2 SSD, it’s important to verify the storage capacity to ensure you’ve received what you paid for. To do this, you can check your computer’s settings or use a disk usage analysis tool. It’s possible that your computer may recognize a slightly smaller capacity due to the way storage is measured, but this should only be a small difference.

    If you do notice a significant discrepancy in your storage capacity, you should contact the manufacturer or vendor to see if there’s a problem with the device. Remember, the capacity of an M2 SSD is important to consider when looking for a fast and reliable storage solution, so it’s worth taking the time to verify it post-installation.

    Conclusion

    Replacing your old hard drive with a new ADATA M2 SSD is like upgrading from a bicycle to a sports car. It’s faster, more efficient, and will give your computer a new lease on life. With its easy installation process, you’ll be able to get up and running in no time, and your computer will thank you for it.

    So say goodbye to slow boot times and storage limitations, and hello to the turbocharged performance of an ADATA M2 SSD.”

    FAQs

    What is an ADATA M.2 SSD?
    An ADATA M.2 SSD is a high-speed storage device that uses the M.2 interface, which is a small, compact form factor designed for use in devices with limited space.

    How do I know if my computer is compatible with an ADATA M.2 SSD?
    You can check your computer’s specifications to see if it has an M.2 slot and whether it supports the type of SSD you are considering. You can also check the motherboard manual to see if it lists compatible devices.

    Can I replace my old hard drive with an ADATA M.2 SSD?
    If your computer has an M.2 slot and your old hard drive uses the same interface, then you can replace it with an ADATA M.2 SSD. However, you may need to transfer your data using a cloning tool or reinstall your operating system.

    How do I install an ADATA M.2 SSD in my computer?
    The installation process for an ADATA M.2 SSD may vary depending on your computer’s hardware configuration. Generally, you will need to open your computer’s case, locate the M.2 slot, insert the SSD, and secure it with screws. You may also need to configure your BIOS settings to recognize the new device.