Author: David L. Lynn

  • Unlocking the Mystery: How Long Does It Really Take to Receive SSD Benefits?

    Unlocking the Mystery: How Long Does It Really Take to Receive SSD Benefits?

    Waiting for disability benefits can feel like an endless, frustrating process. If you’re applying for Social Security Disability benefits, you may be wondering when you can expect to receive them. How long does it take to get SSD benefits? Unfortunately, there’s no one-size-fits-all answer to this question.

    The length of time it takes to receive SSD benefits varies from case to case. A range of factors, including the complexity of your case and the current backlog of applications at your regional Social Security Administration (SSA) office, can impact the timeline for receiving your benefits. In this blog post, we’ll explore some of the factors that can influence the time it takes to get SSD benefits and what you can do to expedite the process.

    SSD application process timeframe

    If you’re considering applying for SSD benefits, you may be wondering how long the process will take. The answer isn’t a simple one, unfortunately. The timeframe for getting approved for SSD benefits can vary widely depending on a variety of factors, including the complexity of your case, how many applicants there are, and which state you live in.

    In general, the application process can take anywhere from three to five months just to get a decision on your initial application. If you’re denied benefits at that stage, you can appeal the decision, which can take even longer. It’s important to be patient and persistent during this process, and to seek the guidance of an experienced attorney who can help you navigate the often-complicated world of SSD benefits.

    Keep in mind that while the process can be frustrating, in the end, it’s worth it to secure the financial support you need to manage your disability.

    Initial application timeline

    The SSD application process can be overwhelming, and it’s important to understand the timeframe involved. The initial application timeline takes around three to four months and includes several crucial steps. Firstly, you’ll need to gather all relevant medical records and documentation that support your disability claim.

    This could take anywhere from a few days up to several weeks, depending on the complexity of your medical history. Once you’ve compiled all the necessary documentation, you’ll need to fill out the application form, which can take several hours to complete. It’s important to note that the form is quite detailed, so be prepared to provide specific information about your disability and how it affects your daily life.

    After submitting the application, it typically takes two to four weeks for the Social Security Administration (SSA) to review and process your claim. The SSA may request additional documentation or a consultative exam with a medical professional before making a decision on your claim. Overall, the SSD application process can be lengthy, but with patience and persistence, you can increase your chances of success.

    how long does it take to get ssd benefits

    Reconsideration appeal timeline

    When applying for Social Security Disability (SSD) benefits, it’s important to understand the timeline of the application process. After submitting an initial application, it can take anywhere from three to five months to receive a decision from the Social Security Administration (SSA). If the initial application is denied, there is a 60-day window to file a request for reconsideration appeal.

    The SSA will typically take another three to five months to make a decision on the reconsideration appeal. If the appeal is denied, the next step is to request a hearing with an administrative law judge, which can take an additional 12 to 18 months. It’s important to understand the timeline involved in the SSD application process and to be prepared for potential delays.

    Applying with the help of an experienced SSD attorney can help ensure that the application is filed accurately and efficiently, potentially speeding up the overall process.

    Factors affecting SSD timeline

    If you’re in the process of applying for social security disability benefits, you may be wondering how long it will take to actually start receiving them. The timeline for receiving SSD benefits can vary greatly depending on a few factors. First and foremost, the nature of your disability and your ability to provide supporting medical documentation can impact the length of time it takes to get approved.

    Additionally, the backlog of claims in your area may cause delays in processing time. On average, it takes about three to five months for an initial application to be processed, and another two to three months for a decision to be made. However, this can be accelerated if you have a condition that qualifies for the Compassionate Allowances program.

    Finally, if your initial application is denied and you decide to appeal the decision, the appeals process can take up to two years to fully resolve. It’s important to be patient and persistent throughout this process and work closely with an experienced attorney if you find yourself facing a denial.

    Application completeness

    When it comes to applying for Social Security Disability (SSD), the completeness of your application can play a significant role in the timeline of your case. Factors such as missing or incomplete medical records, improper documentation, or incomplete information can cause delays in the processing of your claim. It’s essential to have all necessary documents and information ready when applying for SSD to avoid these delays.

    Additionally, hiring an experienced attorney can help ensure your application is complete and accurate, reducing the likelihood of errors or omissions that could potentially delay your case. Remember, the more complete and accurate your application is, the more likely you are to receive a favorable decision in a timely fashion.

    Medical evidence availability

    When it comes to applying for Social Security Disability (SSD) benefits, medical evidence is a crucial factor in determining eligibility. However, the availability and completeness of this evidence can significantly impact the timeline for receiving benefits. For instance, if medical records are incomplete or unavailable, the Social Security Administration (SSA) may ask for additional evidence, leading to potential delays in the decision-making process.

    Moreover, if a claimant requires additional testing or specialist consultations to further verify their condition, this can also lengthen the timeline. On the other hand, having thorough and complete medical evidence ready at the time of application can expedite the review process, potentially resulting in faster approval and receipt of benefits. Thus, it’s critical for claimants to work with their healthcare providers to ensure their medical evidence is detailed and up-to-date to ensure the best chance of success.

    SSA case backlog

    The Social Security Administration (SSA) has been working to decrease the number of pending disability cases, but there are several factors that can affect the timeline for processing SSD claims. One major factor is the complexity of an individual’s case, as some conditions may require more extensive medical evaluations. Additionally, the volume of cases at any given time can cause delays, as SSA examiners may have a large workload to manage.

    Moreover, incomplete or inaccurate applications can also lead to longer processing times because additional documentation or medical records may need to be collected. It’s important to keep in mind that while the SSA is working to improve efficiency, there are several variables that can affect the timeline for receiving disability benefits.

    Expedited SSD claim options

    How long does it take to get SSD benefits? That’s a common question many people have when filing for disability benefits. The answer varies based on several factors, such as the completeness of your application and the nature of your disability. On average, it takes about three to five months for your claim to be processed and evaluated.

    However, if you need urgent financial assistance because your disability prevents you from working, you may be eligible for expedited SSD claim options. These options include compassionate allowances, which gives priority processing to those with severe and life-threatening disabilities, and the quick disability determination program, which uses predictive modeling technology to expedite claims that are likely to be approved. Keep in mind that not everyone will qualify for these programs, but they can be helpful if you need financial support as soon as possible.

    Compassionate Allowance program

    The Compassionate Allowance program is an option to expedite the approval of Social Security disability claims for individuals with severe medical conditions. This program was initiated in 2008 to ensure that people with urgent medical needs receive the financial assistance they require quickly. The program fast-tracks applications for disabilities such as ALS, pancreatic cancer, and other terminal illnesses that leave people unable to work.

    If the Social Security Administration (SSA) determines that an applicant’s condition meets the eligibility requirements, they can receive benefits in a matter of weeks instead of waiting the typical six months or more for a decision. Applying for the Compassionate Allowance program requires the same process as a regular SSD claim, but it is crucial to provide complete medical records at the outset to avoid delays or complications. We understand that the SSD application process can be overwhelming, especially for individuals who are already dealing with serious medical conditions.

    That’s why we’re here to help. Our team can assist you with your SSD claim and help you navigate the process, ensuring you receive the benefits you need as quickly and efficiently as possible.

    Terminal illness application

    If you’ve recently been diagnosed with a terminal illness, you may feel overwhelmed and uncertain about what your future holds. In addition to the emotional toll, you may also have financial concerns, especially if you’re unable to work due to your illness. Thankfully, the Social Security Administration (SSA) offers an expedited process for individuals with terminal illnesses who are applying for Social Security Disability (SSD) benefits.

    This process is known as the Compassionate Allowances (CAL) program and can significantly speed up the application review and approval process. CAL allows the SSA to quickly identify applications where the applicant’s medical condition is so severe that it automatically meets the SSA’s requirements for disability benefits. This means that you won’t have to wait as long to receive the financial assistance that you need during this difficult time.

    Don’t hesitate to reach out to the SSA for assistance. Remember, they’re there to help you in your time of need.

    Conclusion and tips for timely benefits

    In summary, the process of getting SSD benefits can feel like a never-ending odyssey. It’s like waiting for a pot of water to boil – you keep looking at the clock, but it seems like time has slowed down to a crawl. However, with the right legal help and a lot of patience, your benefits will come through like a ray of light shining down on you.

    Remember, good things come to those who wait…but it never hurts to have a good attorney on your side!”

    FAQs

    Who is eligible for SSD benefits?
    To be eligible for SSD benefits, an individual must have a qualifying disability that prevents them from working and earning a substantial income. They must also have worked and paid into the Social Security system for a certain amount of time, typically 10 years or more.

    How long does it take to get approved for SSD benefits?
    The processing time for SSD benefits can vary depending on a variety of factors, such as the complexity of the case and the backlog of claims at the Social Security Administration. On average, it can take around three to six months to receive a decision on your initial application.

    Can I work and still receive SSD benefits?
    Yes, it is possible to work and still receive SSD benefits, but there are strict limitations on how much you can earn. If you earn more than a certain amount, your benefits may be reduced or stopped altogether. It is important to report any income to the Social Security Administration to avoid penalties.

    What happens if my SSD application is denied?
    If your initial application for SSD benefits is denied, you have the right to appeal the decision. The first step in the appeal process is to request a reconsideration of your case. If your case is still denied, you can request a hearing before an administrative law judge. It is important to have strong documentation and legal representation at each stage of the appeals process.

  • Data Recovery 101: Resurrecting Your Dead SSD – Practical Tips and Tricks

    Data Recovery 101: Resurrecting Your Dead SSD – Practical Tips and Tricks

    Did your heart drop when your SSD suddenly died on you? Losing all of your precious data can feel devastating, but don’t panic just yet. There’s still hope in recovering data from a dead SSD. In this blog, we will dive into the different methods you can try to retrieve your lost files, from utilizing professional data recovery services to DIY options that you can attempt at home.

    We know how important your data is to you, and we’re here to guide you through the process of getting it back. So, let’s get started!

    Diagnosing the Issue

    If you are experiencing issues with a dead SSD, the first step to recovering data is to diagnose the problem. There are a few possible reasons why your SSD may be nonfunctional, such as a damaged circuit board, controller chip, or firmware issue. You can check for physical damage by inspecting the exterior of your SSD, while firmware problems may require specialized software.

    Another cause could be a faulty connector, which may need replacing. Additionally, if your computer’s BIOS is not detecting the SSD, it could be a compatibility issue or an outdated BIOS. Diagnosing the issue is crucial in determining the next steps you should take in recovering your data.

    Be sure to backup any important files before attempting any repairs or recovery methods. In the next section, we’ll discuss some methods for recovering data from a dead SSD.

    Checking connections

    As technology advances, we have become increasingly dependent on electronic devices to connect us to the world. However, sometimes these devices can malfunction, leaving us with a feeling of frustration and helplessness. One of the most common problems is a poor connection, which can manifest in a variety of ways, such as slow internet speed, dropped calls, or an inability to connect to a network.

    Fortunately, there are a few simple ways to diagnose and fix connection issues. Firstly, ensure that all cables and wires are securely and correctly plugged in. Secondly, try resetting the device or modem to refresh the connection.

    Thirdly, check for any updates or software patches that may resolve the issue. By using these methods, you can quickly and effectively troubleshoot any connection problems and get back to enjoying seamless connectivity.

    how to recover data from a dead ssd

    Software diagnostics

    When encountering issues with software, it can be frustrating to determine the root cause of the problem. However, there are several steps one can take to effectively diagnose the issue. First, it’s important to gather all available information about the problem, including any error messages or symptoms.

    From there, research the issue to see if others have experienced similar problems and if there are any known solutions. If there are no clear solutions, look at the system’s hardware and software configurations to see if there are any conflicts or compatibility issues. It’s also helpful to perform a system scan for viruses or malware that could be causing the problem.

    If all else fails, seeking out the assistance of a technical support team or consulting online forums can provide additional guidance. By taking these steps, diagnosing software issues can become a more manageable and efficient process.

    Data Recovery Tools

    If you’ve ever experienced a dead SSD, you understand the frustration and despair that comes along with potentially losing all of your data. However, there are data recovery tools available to help you recover that lost data. First, try using the manufacturer’s diagnostic software to see if it can detect the SSD and perform a repair.

    If that doesn’t work, try using a data recovery tool such as EaseUS Data Recovery Wizard or Recuva. These tools can scan your SSD and retrieve any recoverable files. It’s important to note that if your SSD is completely dead, it may not be possible to recover any data.

    In this case, it’s recommended to reach out to a professional data recovery service for assistance. Whether you’re a business owner or an individual, losing important data can be a devastating experience. With the use of data recovery tools, you may be able to retrieve that lost data and avoid a potentially catastrophic situation.

    Data recovery software

    Data recovery software is essential in cases where you accidentally lose important files or suffer from a hard drive crash. These tools are designed to salvage your data and restore them to their previous state. With the advancement of technology, there are a variety of data recovery tools available in the market today.

    Some of the most popular options include EaseUS Data Recovery Wizard, Recuva, and Disk Drill. These tools work by scanning your hard drive, identifying the missing files, and recovering them from the damaged sectors. With the right data recovery software, you can get back your lost files and documents without any hassle.

    One thing to keep in mind when selecting data recovery software is the type of storage media you are using. While some tools work with all types of storage media, others may only be designed for certain types of media, such as hard drives, solid-state drives, or memory cards. Additionally, some tools may be better suited for different file formats, such as documents, photos, or videos.

    It’s important to consider your specific needs and choose a tool that best matches them. Moreover, it’s also important to choose a data recovery tool that is user-friendly. Some tools can be quite complicated to use, making it difficult for users who aren’t tech-savvy.

    Opting for a tool that features an intuitive interface and clear instructions can make the data recovery process much simpler and less stressful. It’s also important to choose a reliable data recovery tool from a reputable vendor, to avoid the risk of further data loss or damage. To conclude, data recovery software is a must-have tool for anyone who wants to recover their lost data.

    With several options available, it’s essential to choose the right tool that matches your specific needs. Always ensure that the tool is user-friendly, reliable, and compatible with your storage media to avoid any inconvenience and frustration. So, the next time you lose important documents or files, data recovery software can save your day!

    Professional data recovery services

    If you’ve ever accidentally deleted important files or experienced a system crash, you know how important it is to have reliable data recovery tools. While many tools can be found online, they are often a hit or miss when it comes to effectiveness. Professional data recovery services, on the other hand, use the latest and most advanced tools to ensure your data is recovered properly.

    These tools are specifically designed to extract data from damaged or corrupted drives and can be used on a wide range of devices, from laptops to smartphones. Unlike free tools, professional data recovery services offer a higher likelihood of retrieving your data without causing further damage to your device. So, if you need to recover lost data, it’s always best to seek the help of an experienced data recovery service to ensure the best results.

    DIY methods

    DIY data recovery tools can be a lifesaver when it comes to restoring lost, deleted, or corrupted files. Whether you accidentally deleted a crucial document, or your hard drive failed without warning, data recovery software can help you retrieve your files and bring them back to life. These tools are affordable, user-friendly, and can save you hundreds of dollars that you would otherwise spend on professional data recovery services.

    However, it’s important to choose the right tool for the job, depending on the type of data loss you’re dealing with. Some popular options include Recuva, PhotoRec, and TestDisk, which are all free and widely used for a variety of purposes. Regardless of which tool you choose, keep in mind that DIY data recovery can be challenging and time-consuming, and there’s always a risk of further data loss if you don’t handle it correctly.

    Therefore, it’s essential to follow the instructions carefully, and don’t hesitate to seek professional help if you’re unsure or running into problems.

    Preventing Data Loss

    If you’ve ever experienced a dead SSD, you know that gut-wrenching feeling of losing all your important data. But, fear not! There are ways to recover data from a dead SSD. The first step is to check whether the issue is a physical or logical failure.

    If it’s physical, you can try repairing it by replacing the PCB board or performing a soldering reflow. If it’s logical, you can use data recovery software like EaseUS or Stellar to retrieve your data. It’s important to note that attempting to recover data on your own can be risky and may lead to further damage.

    It’s always best to seek the help of a professional if you’re unsure about anything. In the future, to prevent data loss, it’s advisable to regularly back up your data on an external hard drive or a cloud-based storage platform, and avoid overusing your SSD or exposing it to extreme heat or cold.

    Regular backups

    Regular backups are crucial in preventing data loss. One never knows when a disaster might happen. Maybe there’s a power outage, a hacker attack, or a technical glitch that wipes out your entire system.

    It’s important to have a backup that you can rely on. By regularly backing up your data, you can protect your business from losing invaluable information. While it can be a hassle to back up your data regularly, it’s a small price to pay in comparison to the repercussions of losing it all.

    When you have a secure backup system in place, you can rest assured that no matter what happens, your data is safe and sound. So, make sure you back up your data on a regular basis to avoid any potential data loss catastrophes.

    Avoiding physical damage

    When we talk about preventing data loss, we must include a discussion on avoiding physical damage. Physical damage to your hardware can be devastating and can result in the loss of all your data. The best way to prevent this is to handle your devices with care, make sure not to drop or mishandle them, and store them in a safe, dry place away from extreme temperatures or water.

    Investing in protective cases, like shockproof covers, can also help prevent damage. Another crucial aspect of avoiding physical damage is to back up your data religiously. Having a regular backup schedule ensures that even if something unexpected happens to your device, you can still retrieve your data without losing everything.

    Remember, prevention is always better than cure, so take the necessary measures to avoid physical damage to your devices and protect your valuable data.

    Conclusion

    Recovering data from a dead SSD may seem impossible, but fear not tech warriors! With the right tools, expertise, and patience, you can bring your precious data back to life. It’s like performing CPR on your hard drive – you need to act fast and be knowledgeable about the process. So don’t despair, there is hope for reviving your dead SSD, and you’ll be back to life and computing in no time!”

    FAQs

    What are the common causes of a dead SSD?
    There are several reasons why an SSD may die, such as power surges, physical damage, or firmware failure.

    Can data be recovered from a dead SSD?
    Yes, it’s possible to recover data from a dead SSD, but it may require professional data recovery services.

    How can I check if my SSD is dead?
    You can try connecting your SSD to another computer or using a bootable USB drive to see if your system recognizes it. If it doesn’t appear, it may be dead.

    Can I fix a dead SSD myself?
    Attempting to fix a dead SSD yourself can cause more harm than good. It’s recommended to seek professional help from data recovery specialists.

    How much does it cost to recover data from a dead SSD?
    The cost of data recovery from a dead SSD varies depending on the damage and the complexity of the recovery process. It’s best to contact a recovery specialist to get an estimate.

  • Heat Up Your Raspberry Pi Zero Performance with These Top Raspberry Pi Zero Heatsinks – A Comprehensive Guide

    Heat Up Your Raspberry Pi Zero Performance with These Top Raspberry Pi Zero Heatsinks – A Comprehensive Guide

    Are you looking to build your own Raspberry Pi Zero project? If so, you’ll want to invest in a heatsink to prevent your device from overheating and potentially causing damage. Raspberry Pi Zero is a powerful but compact computer that can easily heat up when running certain processes or intensive applications. The solution? A heatsink, which will absorb the excess heat generated by your device, making it run more smoothly and efficiently.

    But, why exactly are Raspberry Pi Zero heatsinks so important? Let’s dive in and explore the significance of this tiny but crucial accessory.

    What are Raspberry Pi Zero Heatsinks?

    Raspberry Pi Zero heatsinks are small metal pieces that attach to the processor of the Raspberry Pi Zero, which is a credit-card sized computer. They help dissipate the heat generated by the processor and prevent the device from overheating. Raspberry Pi Zero heatsinks are essential for those who plan on running intensive programs or applications that require a lot of processing power.

    When installing the heatsinks, it’s essential to ensure they make proper contact with the processor to maximize their effectiveness. Without heatsinks, the Raspberry Pi Zero can overheat, which leads to crashes and reduced performance. Therefore, it’s crucial to invest in a quality set of heatsinks to maintain the longevity of your Raspberry Pi and keep it running smoothly.

    Overall, raspberry pi zero heatsinks are a small but crucial investment for anyone seeking to maximize the performance of their Raspberry Pi Zero, especially if running intensive applications.

    Description and Functionality

    Raspberry Pi Zero heatsinks are small metallic devices designed to efficiently manage heat dissipation for the Raspberry Pi Zero computer. These tiny computers can generate a lot of heat due to their compact size and powerful processing capabilities. Heatsinks work by absorbing the excess heat produced by the Raspberry Pi Zero, dispersing it across the metallic surface area, and releasing it through convection and radiation.

    The Raspberry Pi heatsinks play a crucial role in safeguarding the device’s longevity, performance, and overall functionality. Without them, the device can overheat, leading to instability, reduced performance, and, in some cases, total device failure. As a Raspberry Pi Zero owner, investing in a heatsink is a smart move to keep your device running smoothly and ensure that it remains functional for longer.

    raspberry pi zero heatsink

    Benefits of Using Raspberry Pi Zero Heatsinks

    Raspberry Pi Zero is a popular and capable mini-computer that has proved its worth in numerous DIY projects. However, this tiny device is prone to overheating if pushed too hard. That’s where the Raspberry Pi Zero heatsinks come into play.

    By dissipating heat away from the device’s circuitry, these small but effective cooling components can improve its performance and longevity. Using a heatsink can help prevent crashes caused by overheating and can also extend the lifespan of your Raspberry Pi Zero. These heatsinks can easily mount onto the central processing unit (CPU) of your device and are available in different sizes, shapes, and materials, including aluminum, copper, and graphite.

    They’re an affordable and easy-to-use solution for extending the lifespan of your Raspberry Pi Zero while also optimizing its performance. Moreover, Raspberry Pi enthusiasts can customize their heatsinks by painting them, adding thermal paste, or engraving their logos on them, making them both functional and visually appealing. So, if you’re a Raspberry Pi Zero user and looking for solid performance gains and device protection, explore the variety of heatsinks to select the optimal one for your project.

    Prevent Overheating

    Prevent Overheating Benefits of Using Raspberry Pi Zero Heatsinks If you’re using a Raspberry Pi Zero and running multiple tasks, you may find that the device heats up quickly and gets too hot to handle. This can greatly affect the performance of your device and even cause it to shut down unexpectedly. To prevent this, many users have started using heatsinks – small, passive cooling devices that absorb and dissipate the heat generated by the Raspberry Pi.

    The benefits of using Raspberry Pi Zero heatsinks are numerous. Firstly, they can help to prevent overheating, which in turn leads to better performance and more stable operation. Additionally, heatsinks are inexpensive and easy to install, making them a great option for those who want to extend the life of their device without breaking the bank.

    So, if you’re looking for a simple and effective way to improve your Raspberry Pi Zero’s performance and prevent overheating, consider investing in a set of high-quality heatsinks. With just a few dollars and a few minutes of your time, you can greatly enhance the functionality and reliability of your device.

    Extend the Lifespan of Raspberry Pi Zero

    Are you looking to extend the lifespan of your Raspberry Pi Zero? One simple solution is to invest in heatsinks. These small metal components help dissipate the heat generated by the Raspberry Pi, preventing it from overheating and potentially causing damage. By keeping your Raspberry Pi cool with heatsinks, you can improve its longevity and overall performance.

    Additionally, heatsinks can also improve the stability of your Raspberry Pi by preventing crashes or errors caused by overheating. Overall, investing in heatsinks for your Raspberry Pi Zero is a simple and effective way to get more mileage out of your device.

    Factors to Consider When Purchasing Raspberry Pi Zero Heatsinks

    When it comes to purchasing Raspberry Pi Zero heatsinks, there are a few factors to consider. First and foremost, it’s important to understand what a heatsink is and what it does. Put simply, a heatsink is a device that helps dissipate heat away from electronic components, such as the processor on a Raspberry Pi Zero board.

    When considering a heatsink for your Pi Zero, you’ll want to look at factors such as size, compatibility with the Pi Zero board, and the material the heatsink is made from. Aluminum and copper are popular choices due to their conductivity and ability to efficiently transfer heat away from the processor. Additionally, you’ll want to ensure that the heatsink doesn’t interfere with any other components on the board and that it’s easy to install without causing damage.

    Overall, choosing the right Raspberry Pi Zero heatsink can help prolong the lifespan of your board and ensure that it operates at optimal performance.

    Size and Compatibility

    When purchasing heatsinks for your Raspberry Pi Zero, there are a few factors to consider to ensure compatibility and the right fit. Firstly, the size of the heatsinks should be appropriate for the Pi Zero board. Oversized heatsinks may not fit or cause blockages, while too small heatsinks may not provide enough thermal reduction.

    Additionally, the compatibility of the heatsinks should match your Pi Zero model and its processor, as different processors may require different types of cooling solutions. Furthermore, it’s important to check the adhesive material used on the heatsinks to ensure it’s strong enough to hold onto the tiny components on the board. By taking into account these factors, you can ensure an optimal cooling solution for your Pi Zero, keeping it functioning smoothly and reliably over extended periods of use.

    Material and Design

    Raspberry Pi Zero Heatsinks If you’re looking to purchase Raspberry Pi Zero heatsinks, there are several factors to consider. First and foremost, you’ll want to think about the material the heatsinks are made from. Copper and aluminum are both popular choices due to their thermal conductivity and durability.

    You’ll also want to consider the design of the heatsinks. A larger surface area will typically lead to better heat dissipation, so look for heatsinks with fins or other forms of protrusions. Additionally, think about how the heatsinks will fit onto your Raspberry Pi Zero.

    Some heatsinks come with adhesive strips that make installation simple, while others require more involved attachment methods. By considering all of these factors, you can ensure that the heatsinks you purchase will effectively cool your Raspberry Pi Zero and prolong its lifespan.

    How to Install Raspberry Pi Zero Heatsinks

    If you’re looking to keep your Raspberry Pi Zero running smoothly, adding a heatsink to dissipate heat is a great idea. Installing a heatsink is a straightforward process that can be done in a matter of minutes. You’ll need to gather your supplies, which include a heatsink, thermal adhesive, and rubbing alcohol.

    First, clean the surface of the Raspberry Pi Zero with rubbing alcohol to remove any dirt or dust. Then, apply a small amount of thermal adhesive to the back of the heatsink. Finally, position the heatsink over the CPU, ensuring it’s secure and making optimal contact.

    With proper installation, your Raspberry Pi Zero will be well-protected and functioning optimally, even during heavy usage. Don’t forget to confirm your Raspberry Pi Zero model before buying a heatsink to ensure compatibility!

    Step-by-Step Guide

    If you’re planning to install a Raspberry Pi Zero heatsink, you might be wondering where to start. Fortunately, the process is relatively simple and straightforward. First, you’ll need to gather all of the necessary materials, including the heatsink kit, thermal adhesive, and rubbing alcohol.

    Once you have all of the materials in hand, carefully clean the surface of the Raspberry Pi Zero with rubbing alcohol. Next, apply the thermal adhesive to the heatsink, making sure to cover the entire surface area. Then, carefully attach the heatsink to the surface of the Raspberry Pi Zero, making sure it is aligned properly.

    Finally, let the adhesive dry completely, and you should be all set. With a Raspberry Pi Zero heatsink installed, you can rest assured that your device will stay cool and perform at its best.

    Top Raspberry Pi Zero Heatsinks

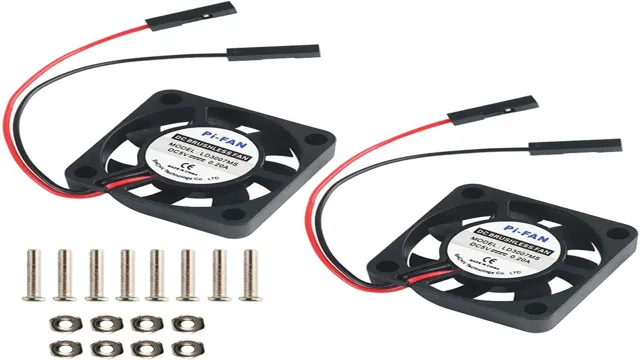
    If you’re looking for a way to prevent your Raspberry Pi Zero from overheating, you’ll want to consider getting a heatsink. These small, metallic add-ons are designed to absorb and disperse heat, keeping your Pi cool and increasing its longevity. But with so many options available, which heatsinks should you choose? Well, one popular choice is the Pimoroni Heatsink and Fan Combo.

    This option includes both a heatsink and a fan, providing active cooling and ensuring your Pi stays cool even during high-intensity tasks. Another option is the Raspberry Pi Zero W Heatsink, which is specifically designed for the Raspberry Pi Zero and is easy to install. Finally, for those looking for a more budget-friendly option, there’s the Raspberry Pi Zero Aluminum Heatsink, which is cheap and simple to install.

    Regardless of what option you choose, adding a heatsink to your Raspberry Pi Zero is a smart move if you want to keep your device running smoothly for years to come.

    Product Reviews and Comparison

    If you’re looking to overclock your Raspberry Pi Zero, then getting a heatsink is a must-have. Not only does it keep your Pi running cool, but it can also prevent it from overheating and potentially causing damage. That’s why we’ve compiled a list of the top Raspberry Pi Zero heatsinks on the market.

    One of the best options is the Raspberry Pi Zero Heatsink Kit from CanaKit. This kit includes three heatsinks that are specifically designed for the Raspberry Pi Zero. The heatsinks are made from high-quality aluminum and have an adhesive backing that makes them easy to install.

    Plus, they come in a variety of colors, so you can choose the one that best complements your Pi. Another great option is the Enokay Raspberry Pi Zero Heatsink Set. This set includes two copper heatsinks that are specially designed to fit the Raspberry Pi Zero.

    Copper is a great material for heatsinks because it has excellent thermal conductivity, which means that it can dissipate heat quickly and effectively. These heatsinks also feature an adhesive backing that makes them simple to install. If you’re looking for a more budget-friendly option, then the Raspberry Pi Zero Heatsink from GeeekPi is a great choice.

    This heatsink is made from aluminum and features a slim design that won’t add much bulk to your Pi. Despite its low price, the GeeekPi heatsink is still quite effective at dissipating heat and keeping your Pi running smooth. In conclusion, getting a heatsink is an important investment if you want to push your Raspberry Pi Zero to its limits.

    Whether you go with a high-end option or a budget-friendly one, any of the heatsinks on this list will help keep your Pi cool and running smoothly.

    Conclusion

    In conclusion, the Raspberry Pi Zero heatsink is like a little superhero for your mini-computer. It may seem small and unimportant, but it has the power to save your pi from overheating and ultimately, from certain doom. It’s like a tiny cape, protecting your technology from harm.

    Plus, it’s a great way to show off your DIY skills and impress your tech-savvy friends. So, don’t underestimate the power of the humble heatsink – it may just save the day (and your Raspberry Pi)!”

    FAQs

    What is a heatsink and how does it work with Raspberry Pi Zero?
    A heatsink is a passive cooling component that is used to dissipate heat generated by electronic devices. It works with Raspberry Pi Zero by absorbing the excess heat produced by the device and transferring it to the surrounding air.

    How can I install a heatsink on my Raspberry Pi Zero?
    To install a heatsink on your Raspberry Pi Zero, you can use a thermal adhesive to attach it on the chip or use screws if the heatsink has pre-drilled holes. Make sure to clean the chip surface before attaching the heatsink.

    Can a heatsink improve the performance of my Raspberry Pi Zero?
    Yes, a heatsink can improve the performance of your Raspberry Pi Zero by reducing the operating temperature of the device. Lower temperatures help prevent thermal throttling and ensure stable, reliable performance.

    Is a fan necessary with a heatsink on my Raspberry Pi Zero?
    A fan is not typically necessary with a heatsink on a Raspberry Pi Zero, but it can help further improve cooling performance. A fan can increase airflow over the heatsink, which can help dissipate heat more efficiently.

  • Unleash Lightning-Fast Speeds: Step-by-Step Guide on Installing Ultra M.2 SSD on ASRock Killer Z370

    Have you recently upgraded your PC with an ASRock Killer Z370 motherboard and are now looking to install an Ultra M.2 SSD? If so, you’re in luck because we’ve got you covered. Installing an SSD can greatly improve your computer’s performance and speed, and the process is relatively simple if you have the right tools and guidance.

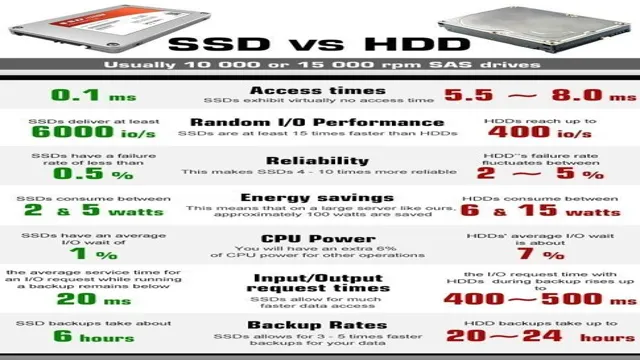
    Before we dive into the nitty-gritty of how to install an Ultra M.2 SSD on your ASRock Killer Z370 board, let’s take a moment to understand what an SSD is and why it’s beneficial. A solid-state drive (SSD) is a storage device that uses flash memory to store data, unlike the traditional hard disk drive (HDD) that uses spinning disks.

    SSDs are faster than HDDs, have no moving parts, and are much more durable. Thus, having an SSD on your PC can significantly reduce boot time, load applications and games much quicker, and improve overall system responsiveness. Now, back to the installation process.

    Installing an Ultra M.2 SSD on your ASRock Killer Z370 motherboard requires a few key steps, including identifying the correct M.2 slot, securing the SSD onto the motherboard with a screw, and connecting the SSD to the motherboard.

    It may seem daunting at first, but don’t worry, we’ll guide you through each step with detailed instructions and visuals. Are you ready to take your computer’s performance to the next level? Let’s get started on installing your Ultra M.2 SSD on your ASRock Killer Z370 motherboard!

    Check Compatibility

    Are you planning to install an ultra M.2 SSD on your ASRock Killer Z370 motherboard and unsure if they are compatible? It’s essential to confirm compatibility to ensure the smooth functioning of your computer system. The first thing to check is the type of M.

    2 SSD you have. The ASRock Killer Z370 supports M.2 PCIe NVMe SSDs, which provides high-speed data transfer rates and faster boot times.

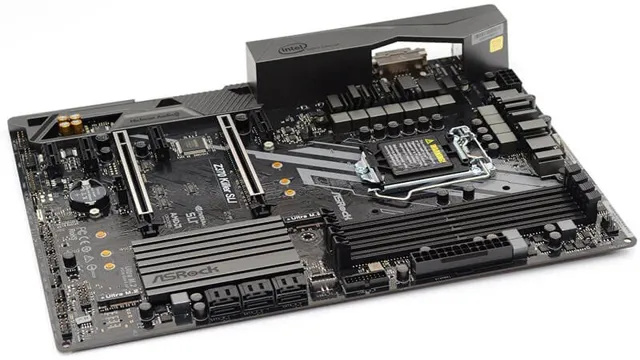
    Next, locate the M.2 slot on your motherboard, and it’s usually located between the PCIe slots. Additionally, check the length of your M.

    2 SSD as the ASRock Killer Z370 only accepts 80mm M.2 SSDs. Before installing your M.

    2 SSD, ensure that it’s firmly seated in the slot and secure it with a screw. After installation, ensure that the SSD is recognized by your system by checking the BIOS settings. If your ultra M.

    2 SSD doesn’t appear in the BIOS, check your motherboard manual for troubleshooting tips. In conclusion, the ASRock Killer Z370 motherboard is compatible with ultra M.2 PCIe NVMe SSDs.

    Verify if your ASRock Killer Z370 supports M.2 SSD and the size of the slot.

    If you’re looking to upgrade your computer’s storage with an M.2 SSD, it’s essential to ensure that your ASRock Killer Z370 motherboard supports it. Fortunately, ASRock Killer Z370 does support M.

    2 SSD, and it comes with an M.2 slot that supports both NVMe and SATA Gen3 x 4 mode. The size of the M.

    2 slot is determined by the form factor of the motherboard. The most common M.2 slot sizes are 2280 (22mm wide, 80mm long) and 2260 (22mm wide, 60mm long), but some motherboards may support different sizes like 2242 and 221

    To verify the size of the M.2 slot, consult your motherboard’s manual or go to the manufacturer’s website to find the specifications. Once you’ve confirmed that your ASRock Killer Z370 motherboard supports M.

    2 SSD, you can start looking for the most suitable M.2 SSD for your needs. Whether you’re looking for speed, capacity, or reliability, you’ll find plenty of options in the market.

    An M.2 SSD is an excellent way to significantly boost your computer’s performance, so make sure to take advantage of it if your system supports it.

    asrock killer z370 how to install ultra m.2 ssd

    Locate the M.2 Slot

    Installing an Ultra M.2 SSD on an ASRock Killer Z370 can be a bit tricky, but if you know where to look, it can be a breeze. First, locate the M.

    2 slot on your motherboard. The ASRock Killer Z370 has two M.2 slots, so make sure you choose the correct one.

    The M.2 slot is a small, rectangular slot located near the center of the motherboard. It’s important to note that the M.

    2 slot on the ASRock Killer Z370 supports both SATA and PCIe SSDs, so make sure you choose the appropriate type of SSD for your needs. Once you’ve found the M.2 slot, you’re ready to install your new Ultra M.

    2 SSD. Simply insert the SSD into the slot at an angle and gently push down until it clicks into place. Screw in the SSD with the provided screws, and you’re done.

    Congratulations, you’ve successfully installed an Ultra M.2 SSD on your ASRock Killer Z370 motherboard!

    Find the location of the M.2 slot on the motherboard.

    When it comes to locating the M.2 slot on your motherboard, it can be tricky if you’re not familiar with the layout. Typically, the M.

    2 slot is located near the edge of the motherboard, but the exact location can vary depending on the specific motherboard model. If you’re having trouble locating it, a quick scan of the manual or a Google search for your specific motherboard model should give you the information you need. Once you’ve found the M.

    2 slot, it’s important to note that there might be different lengths of M.2 drives, so you need to make sure that you have the right size for your slot. Additionally, make sure to handle the M.

    2 drive with care when inserting it into the slot to avoid damaging the delicate pins. With these tips in mind, you should have no problem finding and using the M.2 slot on your motherboard.

    Remove the Cover

    Before installing the ultra M.2 SSD on your ASRock Killer Z370 motherboard, you need to remove the cover first. To do this, you need to locate the M.

    2 slot on your motherboard and gently remove the cover. You can do this using your fingers or a small screwdriver, depending on the type of cover. Once the cover is removed, you will be able to see the M.

    2 slot, which is where you will insert your ultra M.2 SSD. It’s important to handle the cover and the SSD with care to avoid damaging them.

    With the cover removed, you can now proceed to install your ultra M.2 SSD and enjoy faster boot and load times for your system.

    Unscrew and remove the M.2 cover from the motherboard.

    To install an M.2 SSD, one must first unscrew and remove the M.2 cover from the motherboard.

    This process may seem daunting at first, but it is necessary to access the M.2 slot where the SSD will be installed. Start by locating the M.

    2 cover on your motherboard, which is typically located near the PCIe slots and labeled as “M.2”. Once you have found it, use a screwdriver to unscrew the cover and lift it off the motherboard.

    Be sure to set the cover and screws aside in a safe place so that they don’t get lost. At this point, you should be able to see the M.2 slot, which is a small, rectangular-shaped socket with a notch at one end.

    This is where you will install the M.2 SSD. Before installing the SSD, make sure that the notch on the SSD aligns with the notch on the slot and that the SSD is installed at the correct angle.

    Once you are sure of this, gently slide the SSD into the slot until it clicks into place. Then, replace the M.2 cover and screw it back into place.

    Insert the Ultra M.2 SSD

    If you’re looking to install a blazing-fast M.2 SSD on your ASRock Killer Z370 motherboard, you’re in luck! The ASRock Killer Z370 supports the latest NVMe M.2 SSDs, which can deliver up to five times the speed of a traditional SATA SSD.

    To install an ultra M.2 SSD, first, make sure your motherboard supports M.2 SSDs and ensure that the M.

    2 slot is enabled in the BIOS. Next, locate the M.2 slot on your motherboard, it is usually located between the CPU socket and first PCIe slot.

    Then, remove the screw or latch securing the M.2 slot cover and insert the M.2 SSD by angling it into the slot and securing it with the screw or latch.

    Once you’ve secured the drive, boot into your BIOS and make sure the drive is recognized. Finally, install your operating system and enjoy lightning-fast speeds! With your ASRock Killer Z370 and ultra M.2 SSD, you’ll experience lightning-fast load times and data transfer rates, allowing you to achieve peak performance in your applications and tasks.

    Gently insert the Ultra M.2 SSD into the slot.

    Insert Ultra M.2 SSD When installing an Ultra M.2 SSD, it’s important to be gentle and take your time during the process.

    First things first, make sure your computer is turned off and unplugged. Locate the M.2 slot on your motherboard – it’s usually found near the RAM slots.

    Make sure the socket is clear of any dust or debris, and remove the protective cover if necessary. Next, carefully insert the Ultra M.2 SSD into the slot, taking care not to force it in.

    It should slide in smoothly, and you’ll hear a click once it’s properly seated. If it doesn’t slot in easily, double-check that the orientation is correct – the notches on the SSD should line up with the key on the socket. Once the SSD is in place, secure it with the screw provided – this will keep it from shifting or coming loose over time.

    Finally, replace any covers or panels you removed earlier, and you’re good to go! By installing an Ultra M.2 SSD, you’ll enjoy lightning-fast boot times and data transfer speeds. And with the right installation process, you can ensure that your SSD will perform reliably for years to come.

    So take your time, follow the steps carefully, and soon you’ll be up and running with your new Ultra M.2 SSD.

    Secure with Screw

    The ASRock Killer Z370 is a popular motherboard that many gamers and PC enthusiasts rely on. If you want to install an ultra M.2 SSD, it’s important to do it properly to avoid damage to your hardware.

    The first step is to turn off your computer and unplug it from the power source. Once you’ve done that, locate the M.2 slot on the motherboard and remove the screw that is holding the cover in place.

    After that, you can carefully insert the ultra M.2 SSD into the slot, making sure that it is aligned correctly. Once it’s secure, you can screw the cover back into place and turn your computer back on.

    Congratulations, you’ve successfully installed an ultra M.2 SSD on your ASRock Killer Z370! With this new addition, you’ll experience faster boot times and improved overall performance.

    Secure the Ultra M.2 SSD in place using a screw.

    When it comes to installing an Ultra M.2 SSD, securing it in place is crucial to ensure it functions properly and doesn’t get damaged. The easiest way to secure the SSD is by using a screw.

    Most motherboards come with designated Ultra M.2 screw holes, which is where the screw should be placed. When screwing in the SSD, make sure not to overtighten the screw as this can damage the delicate components of the SSD.

    Likewise, don’t undertighten it, or the SSD might come loose, leading to errors and crashes. A secure Ultra M.2 SSD ensures that your computer performs at its best, and you can enjoy faster boot times and overall system performance.

    So when it’s time to install your Ultra M.2 SSD, be sure to secure it in place with a screw, so it stays put and delivers the best performance possible.

    Reattach Cover

    Installing an ultra-fast M.2 SSD on your ASRock Killer Z370 motherboard is a smart move for all your intense gaming and rendering needs. But before you can enjoy its benefits, you need to mount it properly on the M.

    2 slot, and reattach the cover. To do this, ensure you align the M.2 SSD properly onto the slot and apply gentle pressure to screw it securely in place.

    The cover removed earlier will fit like a glove, and can be screwed back on, covering up the little genie that powers up your computer’s performance. Ensure that the screws are securely tightened, and that there is no wiggle room for your M.2 SSD.

    Voila! You’ve just upgraded your computer with one of the fastest SSDs available in the market and improved your computer’s performance by leaps and bounds.

    Screw the M.2 cover back onto the motherboard.

    Now that you’ve installed your M.2 drive onto your motherboard, it’s time to reattach the cover. This step is often overlooked, but it’s important to prevent dust and other debris from getting inside your computer and potentially causing damage.

    To reattach the M.2 cover, simply align it with the screw holes and gently screw it back on to the motherboard. Make sure the cover is secure, but don’t over-tighten the screws as this can damage the cover or motherboard itself.

    With the M.2 cover back in place, your computer is ready to go!

    Test and Verify

    Installing an ultra M.2 SSD on an ASRock Killer Z370 is a simple process, but it’s always important to do a test and verify it before use. First, you’ll need to locate the M.

    2 slot. In the case of the ASRock Killer Z370, the ultra M.2 slot is located near the CPU socket.

    Once you’ve found it, remove the screw or retention clip, and then insert the M.2 SSD into the slot at a 30-degree angle. Make sure that the notch in the SSD lines up with the slot in the M.

    2 slot and then apply gentle pressure to push it down. Tighten the screw or retention clip back in place, and then reboot your system. If the system doesn’t detect the SSD, check the BIOS settings to make sure that the M.

    2 slot is enabled, and then check the manufacturer’s website to ensure that you have the latest firmware. With these steps, you can now test and verify your ASRock Killer Z370 ultra M.2 SSD installation.

    Restart the system and verify if the Ultra M.2 SSD is detected.

    After installing an Ultra M.2 SSD, the crucial next step is to test and verify if the system can detect it. The easiest way to do this is simply to restart the system and see if the M.

    2 SSD is detected during the boot process. If it is, you can proceed with configuring the BIOS settings to ensure the system is set up to use the M.2 SSD as the primary drive.

    If not, there are several troubleshooting steps you can take to identify and resolve the issue. One of the first steps is to verify that the SSD is properly seated in its slot. You can also try updating the system BIOS or checking for any conflicts with other hardware or software.

    With a bit of patience and persistence, you should be able to get your Ultra M.2 SSD up and running smoothly, providing fast and reliable storage for all your important data. Don’t forget to back up your data regularly, just in case!

    Conclusion

    Installing an ultra-fast M.2 SSD on your ASRock Killer Z370 is now a breeze! With the proper hardware and a little bit of technical know-how, you can easily boost your system’s storage and speed to new heights. And with the Killer Z370’s killer performance and advanced features, you’ll be able to tackle even the most demanding tasks with ease.

    So go ahead, take the plunge and upgrade your system – your computer will thank you!”

    FAQs

    What is the Asrock Killer Z370 motherboard?
    The Asrock Killer Z370 is a high-end motherboard designed for Intel 8th and 9th generation processors.

    What is an ultra M.2 SSD?
    An ultra M.2 SSD is a type of Solid State Drive that uses the M.2 form factor, but with a faster interface, allowing for faster data transfer speeds and improved performance.

    Is the Asrock Killer Z370 compatible with ultra M.2 SSDs?
    Yes, the Asrock Killer Z370 supports ultra M.2 SSDs, making it a great choice for those looking for a high-performance system.

    How do I install an ultra M.2 SSD on the Asrock Killer Z370 motherboard?
    To install an ultra M.2 SSD on the Asrock Killer Z370, first, locate the M.2 slot on the motherboard. Insert the SSD into the slot, making sure to secure it with the screw provided. Then, connect the SSD to the motherboard using the provided M.2 screw and standoffs. Finally, boot up your system and configure the BIOS settings to recognize the new drive.

  • Upgrade Your System with Ease: A Guide to Switching from HDD to SSD

    Upgrade Your System with Ease: A Guide to Switching from HDD to SSD

    Are you tired of your computer taking forever to boot up or load a program? Maybe it’s time to switch from a traditional hard disk drive (HDD) to a solid-state drive (SSD). Not only do SSDs offer faster performance and improved reliability, but they are becoming more affordable and accessible than ever before. In this step-by-step guide, we will walk you through the process of switching from HDD to SSD, including how to choose the right SSD for your needs, how to clone your data over to the new drive, and tips for optimizing your SSD for peak performance.

    So sit back, grab a cup of coffee, and let’s get started on transforming your computer’s speed and performance today!

    Gathering the Required Tools and Software

    If you plan to switch over your HDD to SSD, there are a few tools and software you need to gather first. The most important item on your list is the SSD itself, of course. You’ll also need a screwdriver, ideally a Phillips head, to open the case of your computer.

    Some SSDs come with migration software, which will help you transfer everything from your old drive to the new one. If yours doesn’t, you can download migration software online or use the built-in software on your operating system. Another useful tool is an external drive enclosure, which allows you to connect your old hard drive to your new computer externally.

    This makes it easier to transfer files without having to open up your old computer again. Don’t forget to back up your important data before you start transferring everything over, just in case something goes wrong. With the right tools and software and some patience, you’ll be able to switch over to an SSD and enjoy faster speeds and better performance in no time.

    What You’ll Need

    When it comes to creating anything, having the right tools is essential. The same can be said for programming, which requires specific software and hardware. To begin, you’ll need a computer or laptop that can handle the software requirements, with a stable internet connection to download necessary tools.

    The tool you’ll need next is an Integrated Development Environment (IDE). An IDE is a software suite that aims to combine different software tools into one program. Some popular IDEs include Eclipse, Visual Studio Code, and PyCharm, which offers several features such as syntax highlighting, debugging tools, and code completion.

    To use the chosen IDE, you’ll also need to download the appropriate programming language’s compiler. Don’t forget that having a good text editor is also an essential tool for programmers, and Notepad++, Sublime Text, and Atom are all popular options. Finally, when it comes to version control of your work, git is the go-to version control system.

    Having these tools and software in place will make your programming journey smoother and more efficient.

    how do switch over hdd to ssd

    Deciding on Cloning or Fresh Install

    When it comes to deciding whether to clone or perform a fresh install on your computer, gathering the necessary tools and software is the first step. For cloning, you’ll need cloning software such as EaseUS Todo Backup, AOMEI Backupper, or Macrium Reflect. These programs make it easy to copy everything from your old hard drive to a new one.

    However, if you choose to do a fresh install, you’ll need a bootable installation media such as a USB drive or DVD, as well as a valid product key, and the latest version of the operating system you plan to install. Fresh installations are great for those who want a clean slate and opt for a new installation, but cloning can be less time-consuming. Ultimately, the decision comes down to your preferences and needs.

    Creating a Backup of Your Existing HDD

    If you want to switch over from an HDD to an SSD, the first step is to create a backup of your existing hard drive. This is important to make sure you don’t lose any files or data during the migration process. There are a few different ways you can create a backup, but one popular method is to use a cloning tool like Acronis True Image or Macrium Reflect.

    These tools make it easy to create a complete copy of your hard drive, including your operating system, applications, and files. Once you’ve created the backup, you can then use it to migrate your data to the new SSD. It’s important to note that the size of your SSD should be equal to or larger than the size of your HDD to ensure that you can transfer all of your existing data.

    Overall, creating a backup is an essential step in the process of switching over from an HDD to an SSD, and there are many tools available to help make the process as smooth as possible.

    Transferring Your Data to an External Drive

    If you want to ensure that your important files and data are safe from loss or damage, creating a backup of your existing HDD and transferring it to an external drive is essential. The process is quite simple and can be done with just a few clicks. Start by selecting the files you want to back up and then connect your external drive to your computer.

    Once the drive is recognized, navigate to the location where you want to backup your files and create a new folder for your backup. Then, drag and drop the files you want to backup into the folder on your external drive. This will copy the files from your computer to the external drive and ensure they are safe from system crashes, viruses, and other unforeseen events.

    By following these simple steps, you can rest assured that your data is backed up and secure.

    Installing and Configuring Your New SSD

    Are you ready to switch from an HDD to an SSD? The process can be intimidating, but it’s worth it for the improved speed and performance. First, you’ll need to physically install the SSD into your computer. Make sure it’s connected properly and securely.

    Once it’s installed, you’ll need to transfer your data from the old HDD to the new SSD. You can do this by cloning your HDD, which creates an exact copy of the data and transfers it to the SSD. Alternatively, you can manually transfer your important files and programs over to the SSD.

    Keep in mind that your operating system will need to be installed on the SSD for it to be your primary drive. After completing the initial setup, you’ll want to configure your SSD for optimal performance. This includes enabling TRIM, which helps to maintain the drive’s longevity, and changing your storage settings to take advantage of the SSD’s speed.

    With these steps complete, you’ll be enjoying lightning-fast load times and improved performance. So, don’t wait any longer and make the switch to an SSD today!

    Physically Installing Your SSD

    If you’re looking to give your computer a speed boost, upgrading to a Solid State Drive (SSD) is one of the best options available. Once you have your new SSD, the first step is to physically install it in your computer. The process will vary based on your specific computer and hardware setup, but in general, you’ll need to open up your computer’s case, identify the available drive bays, and secure your SSD in place using screws or brackets.

    This may also involve moving cables and connectors around to ensure everything is properly connected. Once your SSD is installed, you’ll need to configure it to work with your operating system, which typically involves partitioning the drive and formatting it. This will ensure that your computer recognizes the drive and can use it to store data and run applications.

    With your new SSD up and running, you should notice significant improvements in boot times, application launch times, and overall system performance. So go ahead and take the plunge – your computer (and your productivity) will thank you!

    Preparing Your SSD for Installation

    Before you can start using your new SSD, there are a few things you need to do to prepare it for installation. First, you should back up all of the data from your old hard drive onto an external drive or cloud storage. This ensures that you don’t lose any important files during the process.

    Next, you’ll need to physically install the SSD into your computer, which involves opening up the case and locating the appropriate slot. Once the SSD is properly installed, you’ll need to configure it for use as your primary storage device. This involves formatting the drive and transferring your operating system and other important software onto the SSD.

    With these steps complete, your new SSD will be ready to use, providing faster boot times and improved overall performance. Don’t forget to keep your old hard drive as a backup, just in case.

    Migrating Your Data to Your New SSD

    If you’ve bought a new SSD and are wondering how to switch over your HDD to SSD, don’t fret; it’s a relatively straightforward process. The best way to migrate your data is to use cloning software, which replicates everything on your HDD and transfers it to your SSD. Firstly, you need to download cloning software and connect your SSD to your computer.

    Next, you’ll need to run the cloning software and select your HDD as the source and your SSD as the target destination. Once everything is set up, the cloning software will copy your data from your HDD to your SSD. After the process is complete, you can disconnect your HDD and start using your new SSD.

    Cloning your HDD ensures all your files, applications, and settings are transferred to your new SSD seamlessly, saving you a lot of time and hassle.

    Cloning Your HDD to Your SSD

    Migrating your data from your old HDD to a new SSD can be a daunting task, but it doesn’t have to be. Cloning your HDD to your SSD is a straightforward and efficient method that ensures all your data is transferred seamlessly. First, ensure that your SSD has enough space to accommodate all the data from your HDD.

    Then, using cloning software, you can easily transfer all your data, including your operating system, applications, and personal files, without losing any data. One popular cloning software option is EaseUS Todo Backup, which offers a step-by-step process. Once the cloning is complete, you can effortlessly switch to your new SSD and enjoy the speed and efficiency of your new drive.

    Say goodbye to long load times and hello to lightning-fast speeds!

    Installing a Fresh OS on Your SSD

    Migrating your data to a new SSD can be a bit overwhelming, but with a little effort, you can easily transfer all your files. Before migrating your data, it is important to create a backup of your files to avoid any data loss. Once you have created the backup, you can then begin the process of migrating your data to your new SSD.

    There are several ways you can do this, such as using a cloning tool or manually transferring your files. However, using a cloning tool can be the easiest and most efficient option. It allows you to clone your entire hard drive to your new SSD, including all your files, settings, and programs.

    This ensures that your system runs smoothly and avoids the need for reinstalling your system software and applications. With this method, you can seamlessly continue your work without any interruptions.

    Optimizing Your SSD for Peak Performance

    Switching over from HDD to SSD can give your system a performance boost. However, to optimize your SSD for peak performance, a few adjustments need to be made. Firstly, enable TRIM command to keep your SSD’s performance in check.

    This command will make sure that deleted and modified files do not accumulate and slow down your system. Additionally, enable AHCI mode in your system’s BIOS to make the most out of your SSD’s speed. ACHI mode unlocks advanced features that enhance your SSD’s performance, such as Native Command Queuing and hot-swapping.

    Finally, disable disk defragmentation as it is not necessary for SSD drives and can harm their lifespan. With these few adjustments, you can experience high-speed and peak performance from your SSD.

    Conclusion

    In conclusion, making the switch from HDD to SSD is like trading in your old clunky station wagon for a sleek and speedy sports car. It may seem intimidating at first, but the upgrade is well worth it. By following a few simple steps like cloning your files and tweaking your system settings, you’ll be cruising at lightning speeds in no time.

    So, why settle for sluggish load times and frustrating lags? Make the switch to SSD and experience the smooth, speedy ride you deserve.”

    FAQs

    What is an HDD and an SSD?
    An HDD (Hard Disk Drive) and an SSD (Solid State Drive) are both types of storage devices used in computers.

    Why would I want to switch from an HDD to an SSD?
    Switching to an SSD from an HDD can bring significant performance benefits, including faster boot times, faster application load times, and faster file transfers.

    Can I switch out my HDD for an SSD on my own?
    Yes, you can switch out an HDD for an SSD on your own, but it requires some technical knowledge and an understanding of the installation process.

    What are some popular SSD brands to consider when switching over?
    Some popular SSD brands to consider when switching over are Samsung, Crucial, Western Digital, and Kingston.

  • Unlock the secrets: A step-by-step guide on how to make your windows recognize your new SSD

    Have you just upgraded to a new solid-state drive (SSD), but Windows doesn’t seem to recognize it? Don’t worry; you’re not alone. Many people face this issue right after installing a new SSD. You might have the latest hardware, but without the proper configuration, Windows won’t be able to utilize its full potential.

    In this blog post, we’ll give you some pointers to get Windows to recognize your new SSD and unleash its maximum capabilities. So, let’s dive right in and get your new SSD up and running in no time!

    Check Hardware Connections

    So you’ve just gotten a new SSD and you’re excited to use it, but Windows isn’t recognizing it? Don’t worry, there are a few things you can try before giving up and returning it. The first thing you should check is your hardware connections. Make sure the SSD is properly installed and connected to your motherboard.

    Sometimes a loose connection can be the issue and simply reseating it can solve the problem. If that doesn’t work, try a different SATA cable or port. It may also be worth checking your BIOS settings to ensure your SSD is configured as a boot device.

    By going through these steps, there’s a good chance that you can get Windows to finally recognize your new SSD and enjoy faster boot and load times.

    Open Computer Management

    When your computer starts acting up, the first thing you should do is check the hardware connections. It’s possible that a loose cable or disconnected device could be causing the issue. To check your connections, open up the Computer Management tool on your PC.

    This tool will give you a detailed report of all hardware devices connected to your computer, including printers, monitors, and network adapters. You can use this report to troubleshoot any connection issues that may be causing your computer to malfunction. Once you’ve determined the problem, you can fix it by reattaching or replacing the faulty component.

    By regularly checking your hardware connections, you can avoid more serious problems down the line and ensure your computer runs smoothly. So, next time you encounter an issue with your PC, be sure to check your hardware connections using the Computer Management tool.

    how do i get windows to recognize my new ssd

    Select Disk Management

    When it comes to troubleshooting issues with your computer’s hard drive, checking the hardware connections should be one of the first steps you take. A loose or faulty connection can cause a range of problems, from slow performance to outright data loss. Before attempting any software-based solutions, make sure that all cables are securely plugged in and that there are no physical defects with the hard drive, such as scratches or dents.

    Once you’ve ruled out any hardware-related issues, you can move on to using software tools to diagnose the problem. One such tool is disk management, which allows you to view and configure partitions, assign drive letters, and perform other basic operations on your hard drives. To access disk management, simply search for “disk management” in the Windows search bar or right-click on the Start menu and select it from the list.

    From there, you can start to delve into the specifics of your hard drive and hopefully find a solution to whatever issue you’re experiencing. Remember, though, that if you’re not confident in your ability to troubleshoot on your own, there are plenty of resources available, from tech support forums to professional repair services, that can help you get your computer back up and running smoothly.

    Locate Your SSD

    So, you’ve got yourself an SSD and you’re excited to put it to use. However, before you can start reaping the benefits of faster read and write speeds, you need to locate your SSD within your computer. The first thing you should do is check the hardware connections to ensure that everything is properly plugged in.

    Make sure that the SATA cable is connected to both the SSD and your motherboard. Also, check that the power cable is plugged in and securely attached to both the SSD and your power supply. Sometimes, a loose connection can prevent the SSD from being detected by your system.

    Once you’ve checked your connections, you can move on to checking your BIOS settings and operating system to ensure that your SSD is properly recognized. With a little bit of troubleshooting, you’ll be up and running with your SSD in no time, enjoying lightning-fast performance in everything from boot times to file transfers.

    Initialize the SSD

    So you just got your new SSD and can’t wait to start using it on your Windows computer? The first step is to initialize it so that Windows can recognize it. To do this, go to your Disk Management tool by typing “diskmgmt.msc” in the Run dialog box (press Win+R to access it).

    From the Disk Management screen, you should see the unallocated space of your new SSD. Right-click it and select “New Simple Volume.” This will start the Simple Volume Wizard, where you can assign a drive letter and format the SSD.

    Keep in mind that formatting will erase any data on the SSD, so back up any important files before proceeding. Once the formatting is complete, you can start using your new SSD on your Windows computer. See, it’s that simple!

    Right-Click the SSD

    When you purchase a new SSD, it is essential that you initialize it before you can start using it. To do this, you need to right-click on the SSD drive and select the option to initialize it. This is a straightforward process that can be completed in just a few clicks.

    Initializing the SSD tells the computer that there is a new storage device available, and it needs to be configured before it can be used. Once you have initialized the SSD, you can choose the partition style and disk format that you want to use. The partition style determines how the drive will be divided, and the disk format specifies how the data will be organized on the drive.

    It is important to note that initializing the SSD will erase all data on the drive, so make sure that you have backed up any important files before beginning the process. After initializing the SSD, you can then proceed to create partitions and format the drive for use. Overall, initializing an SSD is a crucial step that should not be overlooked.

    By following the simple steps outlined above, you can ensure that your new drive is ready for use and properly configured to meet your needs. So, don’t hesitate to right-click that SSD and get started!

    Select ‘Initialize Disk’

    When you purchase a new SSD, it needs to be initialized before you can start using it. One of the first steps in this process is selecting “Initialize Disk”. This can be done easily through your computer’s Disk Management utility.

    Simply right-click on the disk and select “Initialize Disk” from the menu that appears. This will bring up a dialog box where you can choose the type of partition style that you want to use. Generally, there are two options: MBR and GPT.

    MBR stands for Master Boot Record, and it is the older of the two partition styles. GPT stands for GUID Partition Table, and it is the newer partition style that is recommended for newer systems. Once you have selected the partition style, click OK to initialize the SSD.

    This will prepare it for use, and you can then create partitions and format it as needed. By initializing your SSD, you are ensuring that it is ready to perform at its full potential, giving you faster speeds and better performance overall. So, if you’ve recently purchased a new SSD, make sure to take the time to properly initialize it before you start using it.

    Choose Disk Partition Style

    Initializing an SSD requires choosing the correct disk partition style. There are two partition styles to select from: the Master Boot Record (MBR) and the GUID Partition Table (GPT). MBR has been around for decades and is used for traditional hard drives.

    GPT is the newer standard for PC UEFI or EFI booting. In essence, your drive’s total capacity determines which partition style you use. For MBR, the limit is 2TB, so if your SSD has more capacity than that, then you have to use GPT.

    To initialize the SSD, you’ll need to open the Disk Management utility in Windows and on the SSD, pick ‘New Simple Volume.’ Then choose the appropriate partition style that applies to your SSD. Be sure to be careful while carrying out this step as any errors during partitioning can lead to issues with data retrieval or upgrades.

    Format the SSD

    “How do I get Windows to recognize my new SSD?” is a common question among individuals who have recently installed an SSD in their system. One of the first things you should do is format the SSD so that it is recognized by Windows. To do this, go to your Windows search bar and type “Disk Management.

    ” Select the option that says “Create and format hard disk partitions.” This will open up a new window that displays all of your connected drives. Find the SSD you want to format and right-click on it.

    Then, select “New Simple Volume” and follow the prompts to format the SSD. Remember to assign a drive letter to the SSD to ensure it is recognized by your system. Once the formatting process is complete, your new SSD should be recognized by Windows and ready to use!

    Right-Click Unallocated Space

    If you’ve recently installed a new SSD in your computer, you’ll want to format it properly to get the best performance. To do this, you’ll need to find the unallocated space on your drive and right-click on it. From there, you can select the option to format the SSD.

    This will erase any existing data on the drive and prepare it for use. But why is formatting important? When you format your SSD, it sets up the file system and optimizes the disk for your specific computer. By doing so, you’ll see improved performance and stability.

    Plus, you’ll be able to start fresh with a clean slate and install the operating system and all your software without any issues. So if you’ve got a new SSD, don’t forget to format it right-clicking on the unallocated space and selecting the format option to get the most out of it.

    Select ‘New Simple Volume’

    Once you have installed your new SSD, the next important step is to format it appropriately, so it can function properly. The process is quite simple. All you have to do is select the drive letter assigned to the SSD from the Disk Management window.

    Right-click on it and select “New Simple Volume.” This will take you to the New Simple Volume Wizard, where you can specify the volume size, assign a drive letter, and choose the file system format. NTFS is typically the best file system for most users, as it supports larger file sizes and provides better security and speed.

    Once you have made your selections, the wizard will walk you through the rest of the process of formatting the SSD. After a few minutes, your SSD will be ready to use. It is important to note that formatting will erase all data on the SSD, so make sure you have backed everything up before proceeding.

    Follow Wizard’s Prompts

    When it comes to formatting your SSD, following the prompts provided by the wizard can make the task a breeze. SSDs, or solid-state drives, are an increasingly popular and efficient alternative to traditional hard disk drives. However, they do require formatting before they can be used.

    Fortunately, most operating systems come equipped with a built-in wizard that can guide you through the process step-by-step. Simply connect your SSD to your computer, open the wizard, and follow the prompts. Make sure to select the proper file system, as different operating systems may use different default formats.

    By following the prompts and carefully selecting the right options, you can easily format your SSD for optimal performance. So don’t stress, let the wizard guide you through the process and get your SSD up and running in no time.

    Update Drivers and BIOS

    If you’re having trouble getting your newly installed SSD to be recognized by Windows, it may be necessary to update your drivers and BIOS. This is because your computer may not have the necessary software to properly communicate with your new hardware. To update your drivers, you can go to your computer manufacturer’s website and search for the latest driver updates for your specific computer model.

    Updating your BIOS is a bit more tricky, and you’ll need to carefully follow the instructions provided by your computer manufacturer to ensure that it’s done safely and correctly. Once you’ve updated both your drivers and BIOS, your computer should be able to properly detect and use your new SSD. It’s important to note that this process is only necessary if your computer is not automatically recognizing your new SSD.

    If it already is, then you may not need to make any further changes.

    Visit Manufacturer’s Website

    If you’re experiencing issues with your computer’s performance or functionality, it may be time to update your drivers and BIOS. Visiting the manufacturer’s website is the best place to start, as they’ll have the most up-to-date drivers and BIOS available for download. Drivers are software programs that enable hardware devices to communicate with your computer’s operating system, while BIOS (Basic Input/Output System) is firmware that controls your computer’s initial boot process and hardware initialization.

    Outdated drivers and BIOS can cause compatibility issues, performance problems, and even security vulnerabilities, so it’s important to keep them updated. It’s a straightforward process to download and install the latest drivers and BIOS from the manufacturer’s website, but be sure to follow the instructions carefully to avoid any potential issues. Keep in mind that updating your BIOS carries some risk, so proceed with caution and only do so if necessary.

    Download and Install Updates

    When it comes to optimizing your computer’s performance, it’s important to regularly download and install updates for your drivers and BIOS. Updating your drivers ensures that your hardware is working efficiently and correctly. Without up-to-date drivers, your computer may experience glitches, crashes, or even security vulnerabilities.

    Similarly, updating your BIOS can improve system stability and fix bugs. It’s a good idea to check for updates at least once a month to ensure that your computer is running smoothly. Some manufacturers offer automatic update tools that make the process even easier.

    It’s worth noting, however, that updating your BIOS can be risky and should only be done if necessary. Be sure to follow the manufacturer’s instructions carefully, and if you’re unsure, seek professional help. By keeping your drivers and BIOS up-to-date, you’ll ensure that your computer is running at its best.

    Conclusion

    In conclusion, convincing Windows to recognize your new SSD may seem like a daunting task, but fear not – with a little bit of tech-savviness and some good old-fashioned perseverance, you’ll have your system up and running smoothly in no time! Remember, patience is key, and if all else fails, try giving your computer a stern talking-to – you’ll be surprised by how effective it can be!”

    FAQs

    What are the system requirements to make Windows recognize a new SSD?
    To make Windows recognize a new SSD, your computer should have at least Windows 7 or newer operating system, a valid SATA connection, and a motherboard that supports the SATA version of your SSD.

    How can I check if my new SSD is recognized by Windows?
    You can check if your new SSD is recognized by Windows by navigating to the ‘Disk Management’ utility and looking for the drive letter of your SSD. If your SSD is shown in the list of disks, it means that your computer recognizes it.

    What should I do if Windows doesn’t recognize my new SSD?
    If Windows doesn’t recognize your new SSD, try checking for loose connections or faulty cables. Updating your computer’s BIOS or storage controller firmware may also resolve the issue. You can also try connecting your SSD to a different computer to make sure the SSD is not faulty.

    Should I format my new SSD before using it with Windows?
    Yes, you should format your new SSD before using it with Windows. Go to the Disk Management utility, find the SSD, right-click on it and select the Format option. Make sure to choose the appropriate file system and allocation unit size based on your usage needs.

  • Unleashing the Power: JS300 vs JS600 – Which Leven Router Reigns Supreme?

    Unleashing the Power: JS300 vs JS600 – Which Leven Router Reigns Supreme?

    Are you in the market for a reliable and high-quality juicer? If so, you may have come across the Leven brand and its JS300 and JS600 models. With both options being popular among consumers, you may be left wondering which is better for your needs. Don’t worry – we’ve got you covered! In this post, we’ll compare the Leven JS300 and JS600 juicers, highlighting their features and benefits, to help you make an informed decision on which one is the best fit for your lifestyle.

    So, whether you’re a health nut looking to increase your daily fruit and vegetable intake or simply want to enjoy fresh juice at home, keep reading to find out more!

    Introduction

    Leven JS300 vs JS600 – which one is the better option? Deciding between two models can be quite tricky, especially when they come from the same brand and have similar features and functionalities. However, understanding the differences between the two can make the decision-making process easier. The Leven JS300 and JS600 are both solid-state drives (SSDs) that offer a high level of speed, storage capacity, and reliability.

    The key difference lies in their potential read and write speeds. The JS600 has a faster read and write speed than the JS300, making it ideal for large file transfers and demanding applications. Conversely, the JS300 offers a more budget-friendly option that excels in daily tasks.

    Ultimately, the choice between the two comes down to your specific needs and budget, so be sure to research thoroughly and read reviews from other users before making a purchase.

    Overview of Both Models

    Introduction: When it comes to choosing between the Dell XPS 13 and the MacBook Air, many people find themselves in a dilemma. Both models are excellent in their own ways but have different features and specifications. The MacBook Air is more affordable and has a longer battery life, while the Dell XPS 13 is more powerful and has a higher resolution display.

    In this overview, we will take a closer look at both models, examining their similarities, differences, and which one ultimately comes out on top. Keyword: Dell XPS 13, MacBook Air, overview

    leven js300 vs js600

    Design and Build Quality

    When it comes to any device, be it a phone or a laptop, the design and build quality play an essential role. They not only affect the overall look and feel of the product, but they also determine how durable and long-lasting the device will be. The design encompasses various aspects such as the shape, size, color, and materials used.

    A well-designed device not only looks visually appealing but also feels comfortable to use. The build quality, on the other hand, is the measure of the product’s physical robustness. This includes the strength and durability of the materials used, the quality of the assembly, and the overall sturdiness of the device.

    The design and build quality of a product can either make or break its overall user experience. They are crucial factors that must be carefully considered during the design and manufacturing process.

    Performance

    When comparing the Leven JS300 and JS600, performance is a crucial factor to consider. The JS300 is equipped with a 6 horsepower motor, while the JS600 boasts a more powerful

    9 horsepower motor. This additional power translates into faster and more efficient grinding, especially when processing tougher materials. Additionally, the JS600’s larger hopper size allows for more continuous grinding, reducing the need for frequent pauses to refill the hopper.

    However, it’s essential to note that performance isn’t the only factor that determines the overall quality of a meat grinder. Other features such as durability, ease-of-use, and maintenance requirements can also affect the grinder’s performance over time. Ultimately, determining which grinder is best for you will depend on your specific needs and preferences.

    Cutting Abilities

    When it comes to cutting abilities, performance is everything. From the sharpness of the blade to the quality of the materials used, performance is what sets a good knife apart from a great one. A high-performance knife should be able to make precise cuts with ease, regardless of what it’s being used for.

    This means that it should be able to handle tough jobs like carving through bone or slicing through thick cuts of meat just as easily as it can manage more delicate tasks like slicing tomatoes for a salad. A well-designed knife that’s been crafted with performance in mind will make all the difference in the kitchen, and is sure to become a go-to tool for any culinary task. So if you’re looking for a reliable cutting tool that won’t let you down, make sure you choose one that’s been designed with performance in mind.

    Battery Life

    When it comes to battery life, it’s no secret that performance is a key factor to consider. Your device’s processor, RAM, and even screen resolution can all impact how long your battery lasts. So, if you want to get the most out of your device, it’s important to choose one with a powerful processor and plenty of RAM.

    That being said, it’s also important to keep in mind that certain apps and activities can drain your battery faster than others. For example, streaming video, using GPS navigation, and playing graphics-intensive games all require a lot of power. On the other hand, simply scrolling through social media or reading an e-book will likely have less of an impact.

    By staying mindful of how you’re using your device and taking advantage of power-saving features when possible, you can extend your battery life and ensure that your device performs optimally throughout the day.

    Ease of Use and Comfort

    When it comes to performance, ease of use and comfort are two crucial factors to consider. A product may have exceptional features, but if using it is challenging or uncomfortable, it’s unlikely to become popular. A high-performing product should be intuitive and user-friendly, with features that streamline tasks and make them easy to complete.

    For example, a software program with a clear interface and straightforward navigation allows users to carry out tasks without feeling overwhelmed or frustrated. Similarly, products that are ergonomic and designed with user comfort in mind ensure that using them is not only efficient but also pleasurable. An analogy would be a comfortable pair of shoes that enable you to walk farther and with less strain.

    Therefore, to ensure high performance, product designers need to prioritize ease of use and comfort, enabling users to maximize their productivity and enjoy the experience simultaneously.

    Price and Value

    When it comes to purchasing a juicer, selecting the right model that fits both your budget and needs can be a bit confusing. Two of the most popular models from Leven, the JS300 and JS600, often come up in conversations. While both are great models, the JS600 is the more expensive option due to its superior features, such as its wider feeding chute, which allows you to add larger fruits and vegetables with ease, and its more powerful motor capable of handling even the toughest produce.

    However, the JS300 is still a great option for those on a budget who want an efficient juicer that can handle most fruits and vegetables. When choosing between the Leven JS300 and JS600, consider your needs and budget to determine which one is the best fit for you.

    Comparison of Prices

    Price and value are two distinct concepts that often confuse buyers. The price of a product may not always reflect its actual value. Sometimes a cheaper product can be of higher value than an expensive product.

    Therefore, it is necessary to evaluate the quality, durability, and features of a product before buying it. One way to achieve this is by comparing the prices of different products and matching them with their features. This method helps in making an informed decision and ensuring that you get the best value for your money.

    However, it is essential to keep in mind that the cheapest option might not always be the best one. It is important to consider both the price and value of a product before making a purchase.

    Which Model Offers Better Value?

    When it comes to choosing between different car models, price and value are some of the most important things to consider. Although a higher price tag may seem intimidating, it’s often an indicator of better quality and a more durable investment in the long run. On the other hand, a lower price doesn’t always mean a worse deal.

    It’s important to weigh the options and consider what each model has to offer. For example, one car may have a higher sticker price but come with more advanced safety features or a longer warranty period. Comparing different models side by side can help you understand what you’re getting for your money and make an informed decision about which one offers the best value for you.

    Ultimately, it’s all about finding the right balance between price and value and choosing the car that meets your needs and budget the best.

    Conclusion

    After analyzing the features and specifications, it is clear that the JS600 has a distinct advantage in terms of power, performance, and versatility. While the JS300 is a great entry-level option, the JS600 is the more sophisticated and robust choice for advanced users and professionals. It’s safe to say that the JS600 is the Beyoncé of jigsaw tools, while the JS300 is the Miley Cyrus – they both have their fans, but the JS600 reigns supreme in terms of talent and capability.

    FAQs

    What is the main difference between JS300 and JS600 by Leven?
    The main difference between JS300 and JS600 by Leven is the number of beams each model has. JS300 has three beams, while JS600 has six beams.

    Is the accuracy of JS600 better than JS300?
    Yes, JS600 has better accuracy than JS300 due to its additional beams.

    Can the JS300 and JS600 measure both horizontal and vertical distances?
    Yes, both JS300 and JS600 can measure both horizontal and vertical distances.

    What is the maximum range of measurement for the JS300 and JS600?
    The maximum range of measurement for JS300 is 100m, while JS600 has a maximum range of 120m.

    Do JS300 and JS600 come with a warranty?
    Yes, both JS300 and JS600 come with a 1-year warranty from Leven.

  • Revamp Your Laptop’s Performance: A Comprehensive Guide on Replacing Hard Drive with SSD

    Are you tired of the slow performance of your laptop’s HDD? Do you want to give your laptop a significant speed boost without investing in a completely new system? Then, it’s time to consider replacing your laptop’s hard drive with an SSD. Solid State Drives (SSD) use flash memory to store data, resulting in faster data access and reduced boot times. The process may seem daunting, but it’s relatively straightforward and doesn’t require any advanced technical knowledge.

    With this simplified guide, you can replace your laptop’s hard drive with an SSD seamlessly. In the end, you’ll enjoy a quicker and smoother performance, and your laptop will feel like a brand new machine. In this blog, we’ll guide you through the process of replacing your laptop’s hard drive with an SSD, step by step.

    We’ll also discuss the benefits of upgrading to an SSD and the precautions to take before starting the replacement process. So, whether you’re a tech-savvy enthusiast or a novice user, this blog will provide you with all the information you need to upgrade your laptop’s hard drive to an SSD. So, what are you waiting for? Let’s dive in!

    Preparation

    Replacing a laptop’s hard drive with an SSD may seem like a daunting task, but with proper preparation, it can be done with ease. Firstly, make sure you have the right tools such as screwdrivers, anti-static mat or strap, and an external hard drive for data transfer. Next, research your laptop manufacturer’s website for instructions on how to access and remove the hard drive.

    Take note of any additional steps needed for your specific laptop model. Once you’ve backed up your data and removed the old hard drive, it’s time to install the SSD. Carefully align the SSD to the slot, secure it, and then replace the screws and cover.

    Finally, connect the external hard drive and restore your data, making sure everything works correctly. While it may take some time to complete, the upgrade to an SSD is worth it for faster boot and load times. With proper preparation, replacing a laptop’s hard drive with an SSD is a manageable task even for beginners.

    Check the compatibility of your laptop and SSD

    Before installing an SSD in your laptop, it’s important to check if your laptop is compatible with it. The first thing you should do is check the specs of your laptop to see if it has a 5-inch drive bay or an M.

    2 slot. An SSD that fits in a 5-inch drive bay will be easier to install, but if your laptop only has an M.

    2 slot, you will need to make sure the SSD you choose is compatible with M. You should also check the interface of your laptop’s hard drive to ensure that the SSD you choose has a matching interface.

    SATA is the most common interface, but some laptops may require PCIe or NVMe. Once you have determined that your laptop is compatible with the SSD, you can move on to the installation process.

    how difficult to replace laptop hard drive with ssd

    Back up your important files and data

    If you’ve ever lost important files or data due to a computer malfunction or accidental deletion, you know how devastating it can be. Don’t wait until it’s too late to invest in a backup plan for your digital information. Start by creating a comprehensive list of all files and folders that need to be backed up, including any essential programs or applications.

    Consider using cloud-based storage services like Google Drive or Dropbox, which offer convenient and easily accessible backup solutions. External hard drives are also an excellent option, providing additional security and storage capacity for your files. Whether you choose cloud-based storage or an external hard drive, make sure to regularly update your backups to ensure that you always have access to the latest versions of your important data.

    By taking these steps to safeguard your files and data, you’ll be protecting yourself from potential data loss and saving yourself a lot of stress down the road.

    The Replacement Process

    Replacing a laptop hard drive with an SSD is indeed not a difficult process. However, you need to have some basic technical knowledge and the right tools to do it right. The first step is to get the right SSD that fits your laptop specifications and transfer all your data from the hard drive to an external storage device.

    Then, you will need to remove the old hard drive by opening the laptop’s casing and disconnecting any cables connected to it. Once the old hard drive is out, you can replace it with the SSD by inserting it into the hard drive slot and then connecting any necessary cables. Finally, you need to reinstall the operating system and all your applications, which will take some time.

    Overall, the process is not overly complicated and is well worth the improved performance and increased storage capacity that SSDs offer over traditional hard drives.

    Open your laptop and locate the hard drive

    When it comes to replacing the hard drive on your laptop, the process can seem daunting. But don’t worry, it’s not as complicated as it may initially seem. The first step is to locate the hard drive.

    Depending on your laptop, this can typically be found on the bottom of the device, secured by screws or a latch. Once you have located the hard drive, you can begin the replacement process. Make sure to back up all of your important data before proceeding.

    You’ll need to remove the hard drive, usually by unscrewing any screws holding it in place, and disconnecting any cables. Then, take your new hard drive and connect it to the same cables, screw it in place, and you’re ready to install your operating system and restore your data. With a little patience and attention to detail, you’ll have a new and improved hard drive in no time!

    Remove the hard drive from your laptop

    If you’re looking to replace the hard drive on your laptop, the first step is to remove the old one. This may sound daunting, but with a bit of patience and the right tools, it’s a simple enough process. First, make sure your laptop is turned off and unplugged from any power source.

    Then, locate the hard drive compartment on the bottom of your laptop. Depending on the make and model, this may be secured with screws or held in place with tabs. Once you’ve accessed the compartment, you’ll need to carefully disconnect the existing hard drive from the motherboard and any other components.

    This may involve removing screws, connectors, or other small pieces. Once the old hard drive is free, you can then slide it out of the compartment and set it aside. Just remember to handle it gently and avoid touching the exposed circuitry.

    With the old hard drive out of the way, you’re ready to install the replacement.

    Connect the SSD to your laptop

    When it comes to replacing your laptop’s old hard drive with a new solid-state drive (SSD), the first step is to connect the SSD to your laptop. This is a crucial step in the replacement process, and it’s important to do it correctly to avoid damaging your computer. To connect the SSD, you’ll need to first ensure that your laptop is turned off and unplugged.

    Then, you can remove the back cover or access panel of your laptop, which will expose the hard drive. Carefully disconnect the old hard drive by removing any screws or cables, and then insert the new SSD into the same slot, making sure it’s secured in place. Finally, reconnect any screws or cables that were removed earlier, replace the back cover or access panel, and turn your laptop back on.

    With the SSD successfully connected, you can enjoy faster transfer speeds and improved performance on your laptop.

    Install Operating System on your new SSD

    Installing an operating system on your new SSD can greatly enhance your computer’s speed and performance. But before you can do that, you need to replace your old hard drive with the new SSD. First, you need to back up all your important data to an external storage device or cloud-based service.

    Then, shut down your computer and unplug it from the power source. Open up your computer case and locate your old hard drive. Carefully remove it from its slot, taking care not to damage any cables or connectors.

    Now it’s time to install your new SSD. Connect it to the same cables and connectors as your old hard drive and secure it in place. Close up your computer case, plug it back in, and turn it on.

    Finally, insert your operating system installation media into your computer and follow the prompts to install the operating system on your new SSD. With a bit of time and effort, you can enjoy a faster and more reliable computing experience with your new SSD.

    Wrapping Up

    In conclusion, replacing a laptop hard drive with an SSD may seem like a daunting task, but it’s actually quite manageable. It’s important to do some research beforehand on the specific laptop model and SSD that you plan to use, to ensure compatibility. Additionally, having a backup of your data is crucial in case anything goes wrong during the installation process.

    Once you have the necessary tools and components, the actual installation of the SSD is relatively easy and can be done in just a few steps. The benefits of an SSD over a traditional hard drive make it well worth the effort, as you’ll notice improved performance and faster boot times. So don’t be afraid to swap out that old hard drive for a shiny new SSD – it’s a great way to breathe new life into your laptop!

    Test your newly installed SSD

    As a last step after installing your new SSD, it’s important to test it to ensure it’s running efficiently. One way to do this is by using a benchmarking tool to measure its performance. This can help you determine if your SSD is living up to its advertised read and write speeds, and if there are any issues that need to be addressed.

    It’s also a good idea to test your computer’s boot time and application load times, as these are areas where an SSD can really shine. Overall, taking the time to test your newly installed SSD can give you peace of mind and ensure that you’re getting the most out of your investment. So go ahead, put that SSD through its paces and enjoy the lightning-fast speeds it brings to your computing experience!

    Enjoy the benefits of SSD over a traditional Hard Drive!

    In conclusion, making the switch from a traditional hard drive to a solid-state drive can bring a lot of benefits to your computer’s performance. You can expect faster boot and load times, along with smoother overall operation. The SSD technology has come a long way in recent years, and nowadays, it’s very affordable.

    The benefits of an SSD far outweigh the cons, and it’s definitely worth considering if you’re looking to upgrade. So, next time you’re in the market for a storage solution, think SSD, and experience the difference for yourself.

    Conclusion

    In summary, replacing a laptop hard drive with an SSD may seem daunting to some, but with the right tools and guidance, it’s a fairly straightforward process. It’s like upgrading from a horse and buggy to a sports car – a little intimidating at first, but well worth the upgrade in the end. So, go ahead, give your old laptop a new lease on life with an SSD!”

    FAQs

    What are the benefits of replacing a laptop hard drive with an SSD?
    The benefits include faster boot-up and shutdown times, quicker application loading times, and increased overall performance.

    Is it difficult to replace a laptop hard drive with an SSD?
    It depends on the laptop model, but in general, it is a relatively straightforward process that can be done with basic knowledge of computer hardware and some simple tools.

    Can I transfer all my data from the old hard drive to the new SSD?
    Yes, most SSDs come with cloning software that allows you to transfer all your data, including the operating system, applications, and files, from the old hard drive to the new SSD.

    How much storage space do I need on an SSD?
    This depends on your needs and usage, but as a general rule, it is recommended to have at least 256GB of storage space on the SSD. If you need more space, you can opt for a larger capacity SSD or use an external hard drive for additional storage.

  • Revolutionize Your Data Storage with Our Top Picks for the Best 2TB SSD Drives in 2021

    Picture this: You’re staring at your computer screen, trying to decide whether to delete files to free up space or invest in an external hard drive that will likely slow down your computer. Sound familiar? It’s a problem that many of us encounter as we amass more data than our devices can handle. But what if I told you that there’s a better solution? Allow me to introduce you to the wonders of a 2TB SSD (solid-state drive) drive.

    Gone are the days of compromising between storage space and speed. With a 2TB SSD drive, you can have it all – ample space to store all your important files, while also enjoying lightning-fast performance. But that’s not all – there are plenty of other benefits to upgrading to an SSD drive.

    For starters, SSD drives are much more durable than traditional hard drives, which rely on spinning disks that are prone to physical damage. And because SSD drives have no moving parts, they’re also much quieter – a welcome relief for anyone who’s tired of the constant whirring of a hard drive. But perhaps one of the biggest advantages of an SSD drive is the sheer speed at which it operates.

    Because SSD drives use flash memory to store data, they can access files far more quickly than hard drives, resulting in faster boot times and shorter load times for applications. So why settle for a sluggish, unreliable hard drive when you can experience the benefits of a 2TB SSD drive? With one of these bad boys installed, you’ll be able to maximize your storage space without sacrificing performance. It’s the ultimate win-win.

    What is an SSD Drive?

    An SSD drive 2TB is a type of hard drive that uses solid-state memory instead of traditional rotating disks to store and access data. Unlike traditional hard drives, SSD drives have no moving parts, making them more durable and less prone to mechanical failures. This also makes them faster, as there is no physical read/write head that needs to seek and retrieve data from a specific sector.

    With the capacity to store up to 2TB of data, SSD drives are an excellent option for those who require a lot of storage space, such as avid gamers or media professionals. Plus, since they are more energy-efficient than traditional hard drives, they can help reduce power consumption and save users money on their energy bills. Overall, an SSD drive 2TB is an excellent option for those who prioritize speed, durability, and storage capacity for their computer or laptop.

    Speed and Efficiency

    Have you ever wondered what an SSD drive is? Put simply, SSD stands for Solid State Drive, which is a type of storage device for computers. Unlike traditional HDDs (Hard Disk Drives), which use mechanical parts to read and write data, SSDs use flash memory. This makes SSDs much faster and more efficient than their mechanical counterparts, as there is no lag time waiting for the disk to spin around and find the data.

    Instead, the data is retrieved instantly. Think about it like this – it’s like the difference between flipping through pages in a book versus scrolling through an electronic document. The speed and efficiency of SSDs make them ideal for tasks that require a lot of data handling, such as gaming or video editing.

    Plus, SSDs are more durable and less prone to physical damage since they have no moving parts. So if you’re looking to speed up your computer and increase its efficiency, consider upgrading to an SSD drive.

    ssd drive 2tb

    Durability and Reliability

    An SSD drive, or solid-state drive, is a type of hard drive that uses flash memory to store data. Unlike traditional hard drives that have moving parts, SSDs have no moving parts and are therefore more durable and reliable. They are also faster than traditional hard drives, with faster read and write speeds.

    This makes them great for use in laptops and other mobile devices where durability and speed are important factors. Additionally, SSDs use less power than traditional hard drives, which can help extend battery life in mobile devices. While SSDs are generally more expensive than traditional hard drives, their benefits in terms of durability, reliability, speed, and power consumption make them well worth the investment.

    If you are looking for a new hard drive for your computer or mobile device, consider investing in an SSD drive for a better user experience.

    Compatibility and Versatility

    An SSD drive, or Solid State Drive, is a type of data storage device that uses flash memory to store and retrieve data. Unlike traditional hard disk drives (HDDs), SSDs have no moving parts, which makes them much faster and more reliable. Because of their small size and lack of moving parts, SSDs are also more versatile and compatible with a wider range of devices and operating systems.

    They can be used in laptops, desktops, gaming consoles, and even smartphones and tablets. SSDs are ideal for gamers and professionals who need fast access to large amounts of data, as well as for everyday users who want a faster and more reliable computing experience. With SSDs becoming more affordable and widely available, they are quickly replacing traditional HDDs as the preferred method of data storage.

    So, if you’re looking to upgrade your computer or device, consider investing in an SSD drive for faster performance and greater versatility.

    Why Upgrade to 2TB?

    If you’re looking for an upgrade to boost the performance of your computer, an SSD drive with 2TB storage might be the way to go. With this larger storage capacity, you’ll have more space for all your critical files, programs, and even games. Plus, the faster read and write speeds of an SSD drive will improve the overall speed of your system.

    Imagine having lightning-fast boot times and applications that launch almost instantly. And since SSD drives have no moving parts, they’re more durable than traditional hard drives and less prone to failure. So, invest in a 2TB SSD drive, and you’ll give your machine the power and reliability it deserves.

    Extended Storage Capacity

    Upgrading to an extended storage capacity of 2TB is a smart move to make for several reasons. First, we all know how quickly digital files accumulate, especially when it comes to high-resolution photos, videos, and games. Having more storage space allows you to store more data without having to constantly transfer files to external hard drives or cloud services.

    Secondly, many modern applications require a lot of disk space to operate smoothly. For instance, video editing software, which is becoming increasingly popular among content creators, can take up a significant amount of space. Upgrading your storage capacity to 2TB ensures you have enough space to install and run resource-heavy apps without a glitch.

    Moreover, upgrading to 2TB storage space can significantly boost your computer’s performance. With more space to work with, your computer can cache more data, which means it can pull up frequently used files faster. This translates to improved processing speed, increased productivity, and reduced downtime.

    In conclusion, upgrading your storage capacity to 2TB is definitely worth considering, especially if you’re someone who works with large media files or runs multiple applications at the same time. It’s an investment that can save you time, improve performance, and give you more room to store data without worrying about space constraints. So, why not take that step today?

    Optimized Performance

    If you’re looking for optimized performance, it’s time to consider upgrading to a 2TB hard drive. With 2TB of storage capacity, you’ll have plenty of space for all your files, documents, photos, and videos without worrying about running out of space. Plus, an upgrade to a 2TB hard drive can significantly boost your computer’s overall speed and performance.

    You’ll enjoy faster file transfer speeds, quicker program loading times, and faster boot times. It’s like upgrading from a hatchback to a muscle car, allowing you to tackle even the most demanding tasks with ease. With a 2TB drive, you’ll have enough storage for everything you need while getting the benefits of fast, optimized performance.

    So why settle for less when you can upgrade to a 2TB hard drive and take your computing experience to the next level?

    Top SSD Drive Picks for 2TB Options

    If you’re in need of a high-capacity solid-state drive (SSD), there are some great options out there for 2TB options. One of the top picks is the Samsung 970 EVO Plus 2TB SSD, which offers lightning-fast read and write speeds thanks to its NVMe interface and PCIe 0 x4 connectivity.

    It’s also designed to operate at lower temperatures to maintain its performance over time. Another great option is the Crucial MX500 2TB SSD, which offers excellent reliability and endurance ratings, as well as great speeds for a more budget-friendly price. If you’re looking for a more premium option, the Western Digital Black SN750 2TB SSD is a great choice.

    It offers excellent read and write speeds, as well as an integrated heatsink for improved cooling and performance. Whatever your needs may be, these SSD drives provide excellent performance and capacity for demanding tasks and storage needs. So, if you’re searching for an SSD 2TB drive, these options are worth checking out.

    Samsung 970 EVO Plus 2TB

    When it comes to selecting the best SSD drive with 2TB options, the Samsung 970 EVO Plus is a top contender. Boasting lightning-fast speeds and reliable performance, this drive is a popular choice among gamers, content creators, and professionals alike. With its 2TB capacity, users can store large files and applications with ease and enjoy quick boot-up times and faster load speeds.

    Additionally, the drive is equipped with advanced security features such as hardware encryption and password protection, ensuring that all data remains safe and secure. If you’re looking for a powerful and efficient SSD drive that can handle your demanding workload, the Samsung 970 EVO Plus is definitely worth considering.

    Crucial MX500 2TB

    The Crucial MX500 2TB is a top pick for those looking for an SSD drive with ample storage options. With 2TB of space, you can store everything from your favorite movies and photos to important work documents. This SSD drive also boasts impressive read and write speeds, making it the ideal choice for users who need fast data transfer rates.

    Additionally, its advanced features such as AES 256-bit hardware-based encryption ensure the security of your data. Overall, the Crucial MX500 2TB SSD drive is a reliable, durable, and high-performing storage solution for all your needs. So, whether you’re a gamer, a content creator, or a professional, this SSD drive has got you covered.

    Don’t settle for less – choose the Crucial MX500 2TB for all your storage needs.

    Conclusion: The Best Way to Boost Your Storage

    In conclusion, a 2TB SSD drive is like having a spacious and luxurious apartment for your digital belongings. With lightning-fast speeds and a sleek design, it’s the perfect upgrade for anyone looking to elevate their computing experience to the next level. It’s the Rolls-Royce of storage and the perfect choice for those who demand the best.

    FAQs

    What is an SSD drive and how does it differ from a traditional hard drive?
    An SSD (solid-state drive) is a type of storage device that uses integrated circuits to store data. It differs from traditional hard drives in that it has no moving parts, which makes it faster and more durable.

    What is the storage capacity of a 2TB SSD drive?
    A 2TB SSD drive has a storage capacity of 2 terabytes, or 2,000 gigabytes, which is significantly larger than most traditional hard drives.

    What are the benefits of using an SSD drive?
    SSD drives offer several benefits over traditional hard drives, including faster read/write speeds, lower power consumption, and greater durability.

    Can I use a 2TB SSD drive with my existing computer or laptop?
    It depends on the type of interface used by your computer or laptop. If your computer has a SATA or PCIe interface, then you should be able to use a 2TB SSD drive. However, some older computers may not be compatible with newer SSD drives.

  • Unleash the Power of Storage with WD 2TB: Discover Ultimate Space and Performance!

    Welcome to the world of modern-day data storage where having enough space for your media files and important documents is crucial. But with so many external hard drives in the market today, how do you know which one is the best fit for you? Look no further than the WD 2TB external hard drive – the perfect solution for high-capacity data storage needs. The WD 2TB external hard drive is a perfect blend of capacity, performance, and reliability.

    Whether you are a photographer who needs ample space for RAW image files or a gamer who wants to keep their game library safe, this external hard drive can handle it all. With its massive storage capacity, you’ll never have to worry about running out of space again. But it’s not just the capacity that makes the WD 2TB external hard drive a top pick.

    It is also equipped with cutting-edge technology that offers lightning-fast transfer speeds and exceptional durability. The drive uses a USB 0 interface that allows for quick data transfers, and it also has a powerful 256-bit AES hardware encryption that safeguards your data against theft, loss or mishandling.

    In addition, the WD 2TB external hard drive is designed to withstand heavy use and tough environments. It features a rugged, shock-resistant exterior that can survive accidental drops and bumps. This means you can carry your important data with you everywhere you go and not have to worry about it getting damaged.

    If you are looking for a reliable and high-performance external hard drive that can store all your data in one place, the WD 2TB is the perfect solution. It’s an investment worth making for anyone who values their media and files and wants to keep them secure for the long term. So, why wait any longer? Get yourself the best external hard drive for high-capacity data storage today!

    What is WD 2TB

    If you’re curious about what WD 2TB means, you’re not alone! WD stands for Western Digital, a leading company in the technology and hardware space. When you see 2TB, that means two terabytes of storage capacity, which is quite a lot of space for storing files, pictures, videos, music, and more. In fact, it’s estimated that 2TB of space can hold around 400,000 photos or 500 hours of HD video, which is quite impressive! This amount of storage space is typically found in external hard drives or internal hard drives for computers.

    So, whether you’re a professional photographer, filmmaker, or just an average computer user, WD 2TB is a great option if you need to store and access large amounts of data easily and efficiently.

    Description of the product

    WD 2TB is a hard drive that provides ample storage space to its users. It is a popular product in the market and is widely used by individuals and businesses alike. The 2TB capacity can hold a significant amount of data, ranging from personal documents and media files to business records and databases.

    This product is known for its reliability and durability, ensuring that your data is safe and secure. The WD 2TB hard drive is designed to work with different operating systems and is compatible with most personal computers and laptops. Its compact design makes it easy to carry around, allowing you to have your data with you wherever you go.

    With its fast transfer rates, you can quickly back up your data and access it whenever you need it. In summary, WD 2TB is an excellent choice for anyone looking for a reliable and efficient hard drive that provides ample storage space.

    wd 2tb

    Benefits of using WD 2TB

    When it comes to storing large amounts of data, the WD 2TB external hard drive is a fantastic option. Its 2 terabyte capacity means that you can store a huge amount of documents, photos, videos, and other files without having to constantly free up space. In addition, the WD 2TB drive is incredibly reliable, so you can rest assured that your data will be safe.

    Its fast data transfer speeds also make it an efficient choice. Whether you’re using it for home, work, or school, the benefits of using a WD 2TB drive are numerous. So if you’re in need of a large-capacity storage solution, consider investing in a WD 2TB drive.

    High capacity storage

    When it comes to high capacity storage, WD 2TB is a popular choice among tech enthusiasts. There are many benefits to using this particular brand and model. For starters, with 2TB of storage space, you can store a ton of data, including photos, videos, music, and documents.

    Plus, the WD 2TB is reliable and durable, meaning you can trust it to keep your important files safe. Another great advantage of this drive is that it’s easy to use. You can simply plug it in and start transferring files right away.

    Additionally, the WD 2TB is compatible with both desktop and laptop computers, making it a versatile storage solution. So, if you’re in need of high-capacity storage that’s reliable, durable, and easy to use, the WD 2TB is definitely worth considering!

    Compatibility with most devices

    One of the top benefits of using the WD 2TB external hard drive is its compatibility with most devices. Whether you have a PC or a Mac, this technology works seamlessly with both operating systems. Additionally, it also works with various gaming consoles such as the PlayStation and Xbox, making it a great device to store and access your games, videos, and music.

    Its plug-and-play feature means that you don’t need to install special software or drivers, simplifying the process of using it across different devices. With a massive storage capacity of 2TB, the WD external hard drive ensures that you have enough space to store all your data without worrying about running out of it. Overall, the WD 2TB is an excellent investment for individuals and businesses alike who require quick and easy access to their data without the hassle of switching storage devices.

    Fast data transfer

    When it comes to data transfer, it’s hard to argue with the efficiency of using a WD 2TB device. With its lightning-fast speed and ample storage space, it makes transferring even large files a breeze. One of the biggest benefits of using WD 2TB is the reduced time it takes to complete large data transfers.

    This can be especially useful for businesses or individuals who need to quickly move large amounts of data without wasting precious time waiting for the transfer to complete. Plus, with so much storage space available on these devices, there’s no need to worry about running out of room anytime soon. So whether you’re a student, professional, or just someone who wants to store a lot of data without any hassle, the WD 2TB is definitely worth considering.

    How to use WD 2TB

    If you’re wondering how to use a WD 2TB external hard drive, you’ve come to the right place! This powerful storage device can hold up to 2 terabytes of data, making it an excellent choice for backing up large files or storing your media library. The first step to using your WD 2TB is to connect it to your computer or device using the included USB cable. Once connected, you can format the drive using your computer’s built-in tools or with software included by the manufacturer.

    Once formatted, you can begin transferring files to your WD 2TB, either manually or using backup software. You’ll also want to ensure that you safely eject your drive before disconnecting it to avoid any potential data loss. With some simple setup and maintenance, your WD 2TB can be an invaluable tool for storing and protecting your important files.

    Setting up the device

    Setting up a WD 2TB device can seem daunting at first, but it’s actually a straightforward process. Firstly, plug in the power adapter and connect the device to your computer via USB cable. You then need to format the hard drive, by opening Disk Management on a Windows PC or Disk Utility on a Mac.

    This will erase any existing data and configure the device for your system. Once this is set up, you can begin using your WD 2TB device to store and transfer large amounts of data, such as photos, music, videos, and important files. It’s important to note that data transfer speeds may vary depending on the device and connection used, so it’s best to connect via USB

    0 or higher for faster speeds. With proper setup, your WD 2TB device can be an essential tool for storing and organizing your digital life.

    Transferring files

    If you are looking for a reliable and efficient way to transfer files, the WD 2TB is an excellent option that can simplify the process significantly. To begin, connect the device to your computer through a USB cable, and the device will appear as an external hard drive. You can then drag and drop files and folders from your computer onto the WD 2TB or vice versa with ease.

    There is no need for complicated software or lengthy set-up processes. With a capacity of 2TB, you will have plenty of space to store all your essential files, including documents, pictures, videos, and music. Whether you are transferring files for work or leisure, the WD 2TB offers a practical and straightforward solution.

    So next time you need to transfer files, consider using the WD 2TB external hard drive and make the process a breeze.

    Reviews of WD 2TB

    Looking for a reliable and spacious storage solution for your digital needs? You can never go wrong with the WD 2TB external hard drive. This device boasts a high-speed USB 0 interface and accommodates huge amounts of data, from high-res photos and videos to music libraries and game collections.

    Many users have praised this product for its reliability and durability, with some reporting that it’s still going strong even after several years of use. The compact size and sleek design make it easy to carry around, whether for work or play. Plus, it’s compatible with both Windows and Mac operating systems, so you don’t have to worry about compatibility issues.

    Whether you’re a professional content creator, a gamer, or simply a data hoarder, the WD 2TB external hard drive is a great investment that won’t disappoint.

    Customer feedback on the product

    When it comes to reliable and high-capacity storage solutions, WD 2TB is a popular choice among consumers. Customers have raved about its fast transfer speeds and the ability to store large amounts of data without any issues. Many of the reviews also praised the compact and portable design of the device, making it easy to transport and use on the go.

    The backup software that comes with the WD 2TB also received positive feedback, as it provides an efficient and hassle-free way to back up data. Some reviewers did mention that the device can be a bit noisy at times, but overall, the consensus among customers is that the WD 2TB is a great product at a reasonable price. So, if you’re looking for a reliable and spacious storage solution, it’s definitely worth considering the WD 2TB.

    Conclusion

    After exploring the immense storage capacity of the WD 2TB hard drive, it’s clear that we’ve entered an era where our digital lives can now be stored in one convenient location. No longer do we have to sift through multiple external hard drives or rely on cloud storage with the potential for security breaches. With its sleek design and impressive performance, the WD 2TB is the perfect solution for anyone looking to store their entire digital world in one place.

    It’s safe to say, with this hard drive by your side, the possibilities are endless.”

    FAQs

    What is the storage capacity of WD 2TB external hard drive?
    The storage capacity of WD 2TB external hard drive is 2 terabytes.

    Can I use WD 2TB external hard drive with Mac OS?
    Yes, WD 2TB external hard drive is compatible with Mac OS. You may need to reformat the drive to work with the Mac operating system.

    Is it possible to partition WD 2TB external hard drive?
    Yes, you can partition WD 2TB external hard drive into multiple volumes using disk management tools in your operating system.

    What interfaces are available on WD 2TB external hard drive?
    WD 2TB external hard drive comes with USB 3.0 and USB 2.0 interfaces for faster data transfer speeds and backward compatibility with older systems.

    Does WD 2TB external hard drive come with any software or backup tools?
    Yes, WD includes backup software, WD Discovery software, and WD Security software with its external hard drives to make data backup and protection easier.