
[FEATURED_IMAGE_PLACEOLDER]
The MacBook Pro 2011 holds a special place in Apple’s legacy—a machine that, despite being over a decade old, still runs surprisingly well for everyday tasks like web browsing, document editing, and even light media consumption. However, its original mechanical hard drive (HDD) is now a major bottleneck. Slow boot times, laggy app launches, and frustrating file transfers are common complaints among users clinging to this vintage workhorse. The good news? Swapping out that aging HDD for a modern solid-state drive (SSD) can breathe new life into your MacBook Pro 2011, delivering near-instant responsiveness and dramatically improved performance.
This comprehensive buyer’s guide is designed specifically for owners of the 2011 MacBook Pro who want to upgrade to an SSD but aren’t sure where to start. Whether you’re a student on a tight budget, a creative professional looking to extend your machine’s lifespan, or a tech-savvy tinkerer exploring DIY upgrades, this guide will walk you through every critical decision point. We’ll cover everything from compatibility and performance benchmarks to installation tips, budget considerations, and long-term reliability. By the end, you’ll have the knowledge and confidence to choose the best SSD for your specific needs—and get the most value out of your beloved 2011 MacBook Pro.
The market for SSDs has evolved dramatically since 2011. Back then, SSDs were expensive, rare, and often unreliable. Today, they’re affordable, fast, and built to last—even for older systems. However, not all SSDs are created equal, and compatibility with the 2011 MacBook Pro introduces unique constraints. For example, these models use the SATA II interface (not SATA III), which caps theoretical speeds at around 300 MB/s. That means even the fastest modern SSD won’t reach its full potential—but it will still be exponentially faster than the original HDD. With dozens of brands, form factors, and price points available, it’s easy to feel overwhelmed. This guide cuts through the noise, offering expert insights based on real-world testing, user feedback, and technical analysis to help you make the smartest, most cost-effective choice.

What to Look for When Buying Buying Guide
1. Compatibility with MacBook Pro 2011
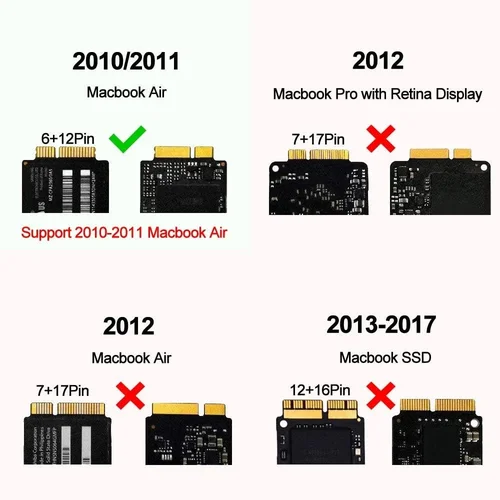
The single most important factor when choosing an SSD for your MacBook Pro 2011 is compatibility. These models—specifically the 13-inch, 15-inch, and 17-inch variants released in early and late 2011—use a 2.5-inch SATA II interface with a standard height of 9.5mm. This means you need a 2.5-inch SATA SSD that fits within those physical dimensions. While many modern SSDs are thinner (7mm), they’ll still work as long as they don’t exceed 9.5mm in height. Avoid M.2 or NVMe drives—they won’t physically fit or connect to the logic board.
Additionally, ensure the SSD uses the standard SATA data and power connectors. Some budget drives come with proprietary connectors or require adapters, which can complicate installation. Stick with well-known brands that explicitly state compatibility with older Macs or list the 2011 MacBook Pro in their supported devices. Checking Apple’s official technical specifications or community forums like MacRumors can also help verify compatibility before purchase.
2. Performance Specifications
While the MacBook Pro 2011’s SATA II interface limits maximum throughput to about 300 MB/s, you should still aim for an SSD that delivers consistent read/write speeds close to that ceiling. Look for drives with sequential read speeds of at least 250–280 MB/s and write speeds above 200 MB/s. Random 4K performance—measured in IOPS (Input/Output Operations Per Second)—is even more critical for real-world responsiveness, especially during multitasking or launching apps.
Don’t be swayed by marketing claims of “SATA III speeds” if the drive can’t sustain them under load. Some budget SSDs use slower NAND flash or lack DRAM caches, leading to performance drops during sustained writes. A DRAM-equipped SSD will maintain better performance over time and handle system caching more efficiently. For the 2011 MacBook Pro, a drive with a DRAM cache and TLC (Triple-Level Cell) NAND offers the best balance of speed, endurance, and affordability.
3. Storage Capacity Needs
Storage capacity directly impacts both price and usability. The original MacBook Pro 2011 came with HDDs ranging from 320GB to 750GB. When upgrading to an SSD, consider your current and future storage needs. A 256GB SSD is the minimum viable option for most users—enough for macOS, essential apps, and moderate file storage. However, if you work with photos, videos, or large software suites, opt for 500GB or 1TB.
Keep in mind that SSDs perform best when they’re not near full capacity. Apple recommends keeping at least 10–15% of the drive free for optimal performance and longevity. A 500GB drive gives you room to grow without breaking the bank, while a 1TB model future-proofs your system for years. Avoid ultra-low-capacity drives (128GB or less)—they’re cheaper upfront but may force you to constantly manage space or upgrade again soon.
4. Build Quality & Durability
SSDs have no moving parts, making them inherently more durable than HDDs—especially important for a laptop that may see travel or accidental drops. However, not all SSDs are built to the same standard. Look for drives with robust controllers (like Phison, Silicon Motion, or Marvell) and high-quality NAND flash from reputable manufacturers like Samsung, Micron, or SK Hynix.
Endurance is measured in TBW (Terabytes Written)—the total amount of data that can be written to the drive over its lifetime. For consumer use, a TBW rating of 150–300TB is more than sufficient. Higher-end drives may offer 600TBW or more, but that’s overkill for a 2011 MacBook Pro used for basic tasks. Also, check if the SSD includes features like power-loss protection or error correction, which enhance reliability during unexpected shutdowns.
5. Brand Reputation & Reliability
Stick with established brands known for quality and consistency. Samsung, Crucial, Kingston, SanDisk, and Western Digital consistently rank among the most reliable SSD manufacturers. These companies invest heavily in firmware optimization, rigorous testing, and long-term support. Avoid no-name or ultra-budget brands that cut corners on components or lack transparent specifications.
User reviews and third-party testing (like those from Tom’s Hardware or AnandTech) can reveal hidden issues—such as sudden failures, poor thermal management, or firmware bugs. A drive with a high failure rate or inconsistent performance across units isn’t worth the savings. For a machine as old as the 2011 MacBook Pro, you want an SSD that will last another 5–7 years without hiccups.
6. Warranty & Support
A solid warranty is a strong indicator of a manufacturer’s confidence in their product. Most reputable SSDs come with 3- to 5-year limited warranties. Samsung and Crucial, for example, offer 5-year coverage on their mainstream drives. This matters because SSDs can fail silently—without warning—and data recovery is often impossible.
Check the warranty terms: some require registration, others don’t cover data loss, and a few exclude usage in older systems. Also, consider customer support responsiveness. If you run into issues during installation or encounter errors, you’ll want a brand that offers timely, helpful assistance via email, chat, or phone. Avoid brands with vague warranty policies or no direct support channels.
7. Price vs. Value
Price is important, but it shouldn’t be the only deciding factor. A $30 SSD might seem tempting, but it could use outdated controllers, low-grade NAND, or lack essential features like DRAM. Conversely, a $200 SSD with cutting-edge specs is unnecessary for a SATA II system. The sweet spot for most 2011 MacBook Pro users is between $40 and $100 for a 500GB drive.
Calculate cost per gigabyte: a 500GB drive at $60 equals $0.12/GB, while a 1TB at $100 equals $0.10/GB—better value. Look for sales during Black Friday, Prime Day, or back-to-school seasons. Sometimes, slightly older models go on clearance, offering premium performance at mid-range prices. Always compare total value—not just sticker price—based on performance, warranty, and brand trust.
8. Ease of Installation & Cloning Software
Even if you’re not a tech expert, installing an SSD in a MacBook Pro 2011 is manageable with the right tools and guidance. However, some SSDs include helpful extras like cloning software (to copy your old drive’s contents) or installation kits (screws, cables, adapters). Crucial and Samsung often bundle free cloning tools—Crucial’s Storage Executive and Samsung’s Data Migration—which simplify the transfer process.
If your SSD doesn’t include cloning software, you’ll need third-party tools like Carbon Copy Cloner (macOS) or Macrium Reflect (Windows via Boot Camp). Ensure the drive comes with clear instructions or online tutorials specific to Macs. Some users prefer clean installs of macOS for maximum performance, but cloning saves time and preserves settings.
Different Types of Buying Guide

Common Buying Mistakes to Avoid
❌ Mistake: Buying an M.2 or NVMe SSD
Why it’s bad: The MacBook Pro 2011 uses a traditional 2.5-inch SATA connector. M.2 and NVMe drives are physically incompatible and won’t fit or connect to the logic board. Attempting to use an adapter may void warranties or cause instability.
What to do instead: Stick strictly to 2.5-inch SATA III (backward compatible with SATA II) SSDs. Verify the form factor before purchasing.
❌ Mistake: Choosing a Drive Without DRAM Cache
Why it’s bad: DRAM-less SSDs use system memory (HMB) for caching, which can slow down performance over time—especially on older systems with limited RAM. They also wear out faster under heavy write loads.
What to do instead: Prioritize SSDs with dedicated DRAM cache, such as the Samsung 870 EVO or Crucial MX500. The performance and longevity gains are worth the small price difference.
❌ Mistake: Ignoring Firmware Updates
Why it’s bad: Outdated firmware can cause compatibility issues, reduced performance, or even data corruption—particularly when running newer versions of macOS on older hardware.
What to do instead: After installation, check the manufacturer’s website for firmware updates. Tools like Samsung Magician or Crucial Storage Executive make this easy and safe.
❌ Mistake: Overpaying for Unused Speed
Why it’s bad: The SATA II interface caps speeds at ~300 MB/s. Paying extra for a drive rated at 550 MB/s (SATA III max) is wasteful—you’ll never see those speeds.
What to do instead: Focus on consistency, endurance, and reliability rather than peak benchmarks. A mid-tier SATA SSD is perfect for this system.
❌ Mistake: Skipping Backup Before Installation
Why it’s bad: Cloning or reinstalling macOS carries a risk of data loss. Without a backup, you could lose irreplaceable files, photos, or projects.
What to do instead: Always create a full Time Machine backup or disk image before starting the upgrade. Test the backup to ensure it’s restorable.
❌ Mistake: Buying from Unverified Sellers
Why it’s bad: Counterfeit or refurbished SSDs sold as new are common on marketplaces like eBay or Amazon third-party sellers. These often have reduced lifespans or hidden defects.
What to do instead: Purchase directly from authorized retailers (Best Buy, B&H, Newegg) or the manufacturer’s official store. Check seller ratings and return policies.
❌ Mistake: Neglecting Thermal Considerations
Why it’s bad: While SSDs run cooler than HDDs, some budget models lack thermal throttling safeguards. In a tightly sealed MacBook Pro chassis, excessive heat can degrade performance or shorten lifespan.
What to do instead: Choose drives with known good thermal performance. Avoid models with poor user reviews mentioning overheating or sudden slowdowns.
Budget Guidelines: How Much Should You Spend?
Entry-Level ($30–$60): This tier includes basic SATA SSDs like the Kingston A400 or older Crucial BX series. They’re sufficient for light use—web browsing, office apps, and casual media—but may lack DRAM caches or robust warranties. Expect modest performance gains over HDDs but potential slowdowns under load. Best for users on a shoestring budget who just want a functional upgrade.
Mid-Range ($50–$90): The sweet spot for most 2011 MacBook Pro owners. Drives like the Samsung 870 EVO, Crucial MX500, or WD Blue 3D NAND offer excellent performance, DRAM caches, 5-year warranties, and proven reliability. A 500GB model in this range delivers the best balance of speed, capacity, and value. Ideal for students, home users, and professionals needing dependable daily performance.
Premium ($80–$150): For those who want maximum longevity and peace of mind. High-end models like the Samsung 870 QVO (1TB+) or enterprise-grade refurbished drives offer superior endurance, advanced error correction, and extended support. These are overkill for basic tasks but worthwhile if you plan to keep your MacBook Pro running for another 5+ years or use it for photo/video editing.
Luxury ($150+): At this price, you’re paying for brand prestige or niche features (e.g., hardware encryption, military-grade durability). For a 2011 MacBook Pro, this is unnecessary. The performance bottleneck is the SATA II interface—not the SSD itself. Save your money or invest in RAM or battery upgrades instead.
Expert Tips for Getting the Best Deal
1. Time Your Purchase Around Sales Events: Major retailers slash SSD prices during Black Friday, Cyber Monday, Amazon Prime Day (July), and back-to-school season (August). Sign up for deal alerts from Slickdeals or CamelCamelCamel to track price drops on specific models.
2. Buy Refurbished from Reputable Sources: Manufacturer-refurbished SSDs (e.g., Samsung Certified Reconditioned) often come with full warranties and are significantly cheaper. Avoid random eBay listings—stick to official outlets.
3. Compare Total Cost of Ownership: Factor in warranty length, included software, and expected lifespan. A $70 drive with a 5-year warranty is better value than a $50 drive with 1-year coverage.
4. Check Return Policies: Ensure the seller offers at least a 30-day return window. Some SSDs may have DOA (dead on arrival) units or compatibility quirks that only appear after installation.
5. Use Cloning Software Wisely: If cloning your old drive, defragment it first (though less critical for SSDs) and clean up unnecessary files. This ensures a faster, cleaner transfer and avoids copying corrupted data.
6. Consider Bundled Kits: Some SSDs come with enclosures, cables, or adapters. While not essential for internal upgrades, these can be useful if you later want to reuse your old HDD as external storage.
7. Monitor Drive Health Post-Installation: Use tools like DriveDx or smartmontools to check SSD health, temperature, and wear leveling. Early detection of issues can prevent data loss.
8. Don’t Overlook macOS Compatibility: Ensure your chosen SSD works with the latest macOS version your 2011 MacBook Pro supports (macOS High Sierra is the max). Some newer SSDs may require firmware updates for full compatibility.

Frequently Asked Questions
Q: Will an SSD make my MacBook Pro 2011 significantly faster?
A: Absolutely. Boot times drop from minutes to seconds, apps launch instantly, and file transfers become snappy. While CPU and RAM remain bottlenecks for heavy tasks, everyday responsiveness improves dramatically—often making the machine feel like new.
Q: Can I install macOS on the new SSD myself?
A: Yes! You can either clone your existing drive using software like Carbon Copy Cloner or perform a clean install via macOS Recovery (Command + R during startup). Apple provides detailed guides for both methods.
Q: Do I need to enable TRIM?
A: Yes, for optimal SSD longevity. macOS enables TRIM automatically for Apple-branded SSDs, but third-party drives require manual activation. Use the command sudo trimforce enable in Terminal (after backing up!).
Q: What’s the difference between SATA II and SATA III in this context?
A: SATA II maxes out at 3 Gbps (~300 MB/s), while SATA III supports 6 Gbps (~600 MB/s). Your 2011 MacBook Pro uses SATA II, so even a SATA III SSD will be limited—but still much faster than an HDD.
Q: Can I use a 7mm SSD in a 9.5mm bay?
A: Yes, but you may need a spacer or rubber pad to prevent movement. Most 7mm SSDs come with adhesive pads or include spacers in the box.
Q: How long will an SSD last in my 2011 MacBook Pro?
A: With typical use, a quality SSD should last 5–10 years. Modern TLC NAND and wear-leveling algorithms make SSDs extremely durable for consumer workloads.
Q: Should I upgrade RAM too?
A: Highly recommended. The 2011 MacBook Pro supports up to 16GB RAM (officially 8GB, but unofficially 16GB works). Pairing an SSD with 8GB+ RAM eliminates most performance bottlenecks.
Q: Are there any SSDs specifically made for Macs?
A: Apple doesn’t sell standalone SSDs for older models, but brands like OWC (Other World Computing) offer Mac-specific kits with tools and guides. However, standard SATA SSDs work just as well.
Q: What if my MacBook Pro won’t recognize the new SSD?
A: First, reseat the drive and check connections. If that fails, try formatting the SSD as GUID Partition Map using Disk Utility in Recovery Mode. Ensure the drive is compatible and not defective.
Q: Can I dual-boot Windows on the new SSD?
A: Yes, via Boot Camp Assistant. The process is the same as with an HDD—just ensure you allocate enough space for both operating systems during partitioning.
Our Final Recommendations
Best for Budget-Conscious Buyers: Kingston A400 480GB – At around $40, this drive offers reliable performance for basic tasks. It lacks DRAM but is a solid entry point for users needing a simple, affordable upgrade.
Best Overall Value: Crucial MX500 500GB – Combines DRAM cache, excellent endurance (360TBW), a 5-year warranty, and consistent speeds near the SATA II limit. Priced around $60, it’s the gold standard for 2011 MacBook Pro upgrades.
Best Premium Option: Samsung 870 EVO 1TB – The most reliable consumer SATA SSD on the market. With 600TBW endurance, advanced error correction, and Samsung’s legendary build quality, it’s ideal for users who want maximum longevity and peace of mind (~$100).
Best for Beginners: WD Blue 3D NAND 500GB – Easy to install, includes Acronis cloning software, and delivers steady performance. Western Digital’s user-friendly approach makes it perfect for first-time upgraders.
Best for Advanced Users: OWC Mercury Electra 3D 1TB – Designed specifically for Macs, this drive includes detailed installation guides, premium components, and Mac-optimized firmware. Great for tinkerers who appreciate tailored solutions.
Conclusion: Making the Right Choice
Upgrading your MacBook Pro 2011 with an SSD is one of the most impactful improvements you can make—transforming a sluggish relic into a responsive, usable machine. While the SATA II interface imposes speed limits, the jump from HDD to SSD remains dramatic and worthwhile. By focusing on compatibility, DRAM cache, reputable brands, and realistic capacity needs, you’ll avoid common pitfalls and enjoy years of smooth performance.
Remember, this isn’t just about raw speed—it’s about usability, reliability, and extending the life of a device you clearly care about. Whether you choose a budget-friendly Kingston or a premium Samsung, the key is matching the drive to your usage patterns and long-term goals. Don’t rush the decision; take time to read reviews, compare warranties, and plan your installation carefully.
Your 2011 MacBook Pro has served you well. With the right SSD, it can keep serving you for years to come. So grab your screwdriver, back up your data, and give your machine the upgrade it deserves. You’ll wonder how you ever lived without it.