
Ever tried setting up a Raspberry Pi project only to realize you’re stuck tethered to a bulky monitor, keyboard, and mouse? I’ve been there—building a home automation dashboard, a retro gaming console, or even a portable media center—only to find myself wrestling with cables and limited screen real estate. It’s frustrating when your compact, powerful Pi deserves a sleek, responsive display that matches its potential. That’s exactly why I was excited to test the Pi Touch Display 2, a 7-inch HD touchscreen designed specifically for Raspberry Pi enthusiasts who want a clean, integrated experience without the clutter.
The Pi Touch Display 2 promises to solve these pain points with a vibrant 720×1280 TFT panel, five-finger capacitive touch, and plug-and-play compatibility across most Pi models. Priced at $69.99 and boasting a solid 4.2-star rating from early adopters, this display aims to be the go-to solution for developers, hobbyists, educators, and makers alike. What sets it apart isn’t just the hardware—it’s the thoughtful integration: anti-glare coating, included screen protector, optimized drivers, and an on-screen keyboard right out of the box. In this in-depth review, I’ll walk you through every aspect of the Pi Touch Display 2, from unboxing to real-world performance, so you can decide if it’s the right upgrade for your next Pi project.
For those building portable Raspberry Pi setups, pairing the Pi Touch Display 2 with fast, reliable storage like the Crucial X10 4TB Portable SSD ensures smooth performance and ample space for games, media, and development environments.
What is the Pi Touch Display 2?
The Pi Touch Display 2 is a premium 7-inch high-definition touchscreen display engineered specifically for Raspberry Pi single-board computers. Unlike generic HDMI monitors or resistive touch panels, this device is built from the ground up to work seamlessly with the Pi ecosystem. It features a crisp 720×1280 resolution TFT LCD panel that delivers sharp text, vibrant colors, and wide viewing angles—perfect for everything from coding interfaces to media playback.
At its core, the Pi Touch Display 2 leverages capacitive touch technology, supporting up to five simultaneous touch points. This means you can pinch-to-zoom, swipe through menus, or use multi-finger gestures just like you would on a modern tablet. The display connects directly to your Pi via the DSI (Display Serial Interface) port and draws power through the GPIO header—eliminating the need for external power adapters or USB hubs. Setup is refreshingly simple: plug in the included DSI ribbon cable, connect the GPIO power jumper, and boot up. Within seconds, your Pi OS recognizes the screen and loads the pre-installed drivers.
This display is compatible with all mainstream Raspberry Pi models—including the Pi 3, Pi 4, Pi 400, and Pi 5—but notably excludes the Pi Zero and Pi Pico series due to their lack of a DSI connector. That said, for anyone using a standard Pi board, the Pi Touch Display 2 offers near-universal support. Its target audience spans a wide range: educators teaching coding in classrooms, makers building interactive kiosks or smart mirrors, developers prototyping GUI applications, and even casual users turning their Pi into a portable entertainment system. With its durable construction, anti-reflective coating, and included screen protector, it’s designed not just for tinkering, but for daily, reliable use.
Key Features of Pi Touch Display 2
✅ 7-Inch HD TFT Panel with 720×1280 Resolution
The heart of the Pi Touch Display 2 is its 7-inch diagonal TFT LCD screen, delivering a resolution of 720×1280 pixels. That’s significantly sharper than older 800×480 displays commonly found in budget Pi screens, and it translates into noticeably clearer text, smoother graphics, and more detailed visuals. Whether you’re editing code in Thonny, browsing the web in Chromium, or watching a video in VLC, the image quality holds up impressively well.
In my testing, I compared it side-by-side with a generic 5-inch HDMI display I’d used before. The difference was night and day—especially when reading terminal output or viewing web pages with small fonts. The pixel density (around 216 PPI) ensures that icons and UI elements don’t look blocky or pixelated. Colors are vivid without being oversaturated, and brightness is more than adequate for indoor use. Even under moderate ambient light, the screen remains readable thanks to its balanced contrast ratio.
One standout detail: the aspect ratio is 9:16 (portrait-oriented), which might seem unusual at first. But for many Pi projects—like digital photo frames, smart home dashboards, or vertical information displays—this orientation actually makes more sense than traditional 16:9 screens. You can easily rotate the display in software if needed, but I found myself preferring the default portrait mode for terminal work and web browsing.
✅ Five-Finger Capacitive Touch Support
Unlike cheaper resistive touchscreens that require pressure and only support single-touch input, the Pi Touch Display 2 uses modern capacitive technology. This means it responds to light finger taps and supports up to five simultaneous touch points. In practice, this enables intuitive gestures like pinch-to-zoom in image viewers, two-finger scrolling in browsers, and even basic multi-user interaction in custom apps.
I tested this extensively using the built-in on-screen keyboard and various GUI applications. Typing felt responsive—no lag or missed taps—and the touch accuracy was consistently high across the entire surface. I even tried running a simple Python-based drawing app, and the five-finger support allowed me to create multi-point sketches without any hiccups. For educators or developers building touch-based learning tools, this level of responsiveness is a game-changer.
It’s worth noting that the touch layer is calibrated at the factory, so there’s no need for manual calibration unless you’re doing advanced development work. Out of the box, it just works—which is exactly what you want when you’re focused on your project, not debugging input devices.
✅ Anti-Glare Coating for Better Visibility
One of the most underrated features of the Pi Touch Display 2 is its anti-glare matte finish. Unlike glossy screens that reflect overhead lighting or window glare, this display diffuses light to reduce eye strain and improve readability in bright environments. I set it up on my desk near a window, and even in direct afternoon sun, I could still read the screen comfortably—no squinting or repositioning required.
This coating also helps minimize fingerprints and smudges, which is a nice bonus for a touchscreen that sees frequent use. While it’s not completely fingerprint-proof, it’s far less prone to showing oily marks than glossy alternatives. Combined with the included free screen protector (a thoughtful touch), you get an extra layer of scratch resistance without sacrificing clarity.
For users planning to deploy the display in public spaces—like museums, retail kiosks, or classrooms—the anti-glare feature is essential. It ensures consistent visibility regardless of lighting conditions, making the Pi Touch Display 2 a reliable choice for both personal and professional applications.
✅ Seamless Compatibility with All Pi Models (Except Zero & Pico)
One of the biggest headaches with third-party Pi displays is compatibility. Some require custom kernels, others need manual driver installation, and many only work with specific Pi versions. The Pi Touch Display 2 sidesteps these issues entirely. It connects directly to the DSI port—the same interface used by the official Raspberry Pi 7″ touchscreen—and draws power from the GPIO header.
I tested it on a Raspberry Pi 4 (4GB) and a Pi 5, and both recognized the display instantly upon boot. No additional configuration was needed. The included drivers are already integrated into the latest versions of Raspberry Pi OS, so you don’t have to hunt down GitHub repos or compile modules. If you’re using an older OS image, a quick update via sudo apt update && sudo apt upgrade pulls in the necessary components.
The only caveat is that it won’t work with the Pi Zero or Pi Pico series, as these boards lack a DSI connector. But for anyone using a standard Pi model—which covers the vast majority of users—this display offers plug-and-play simplicity that’s hard to beat.
✅ Simple Setup: Just Two Cables
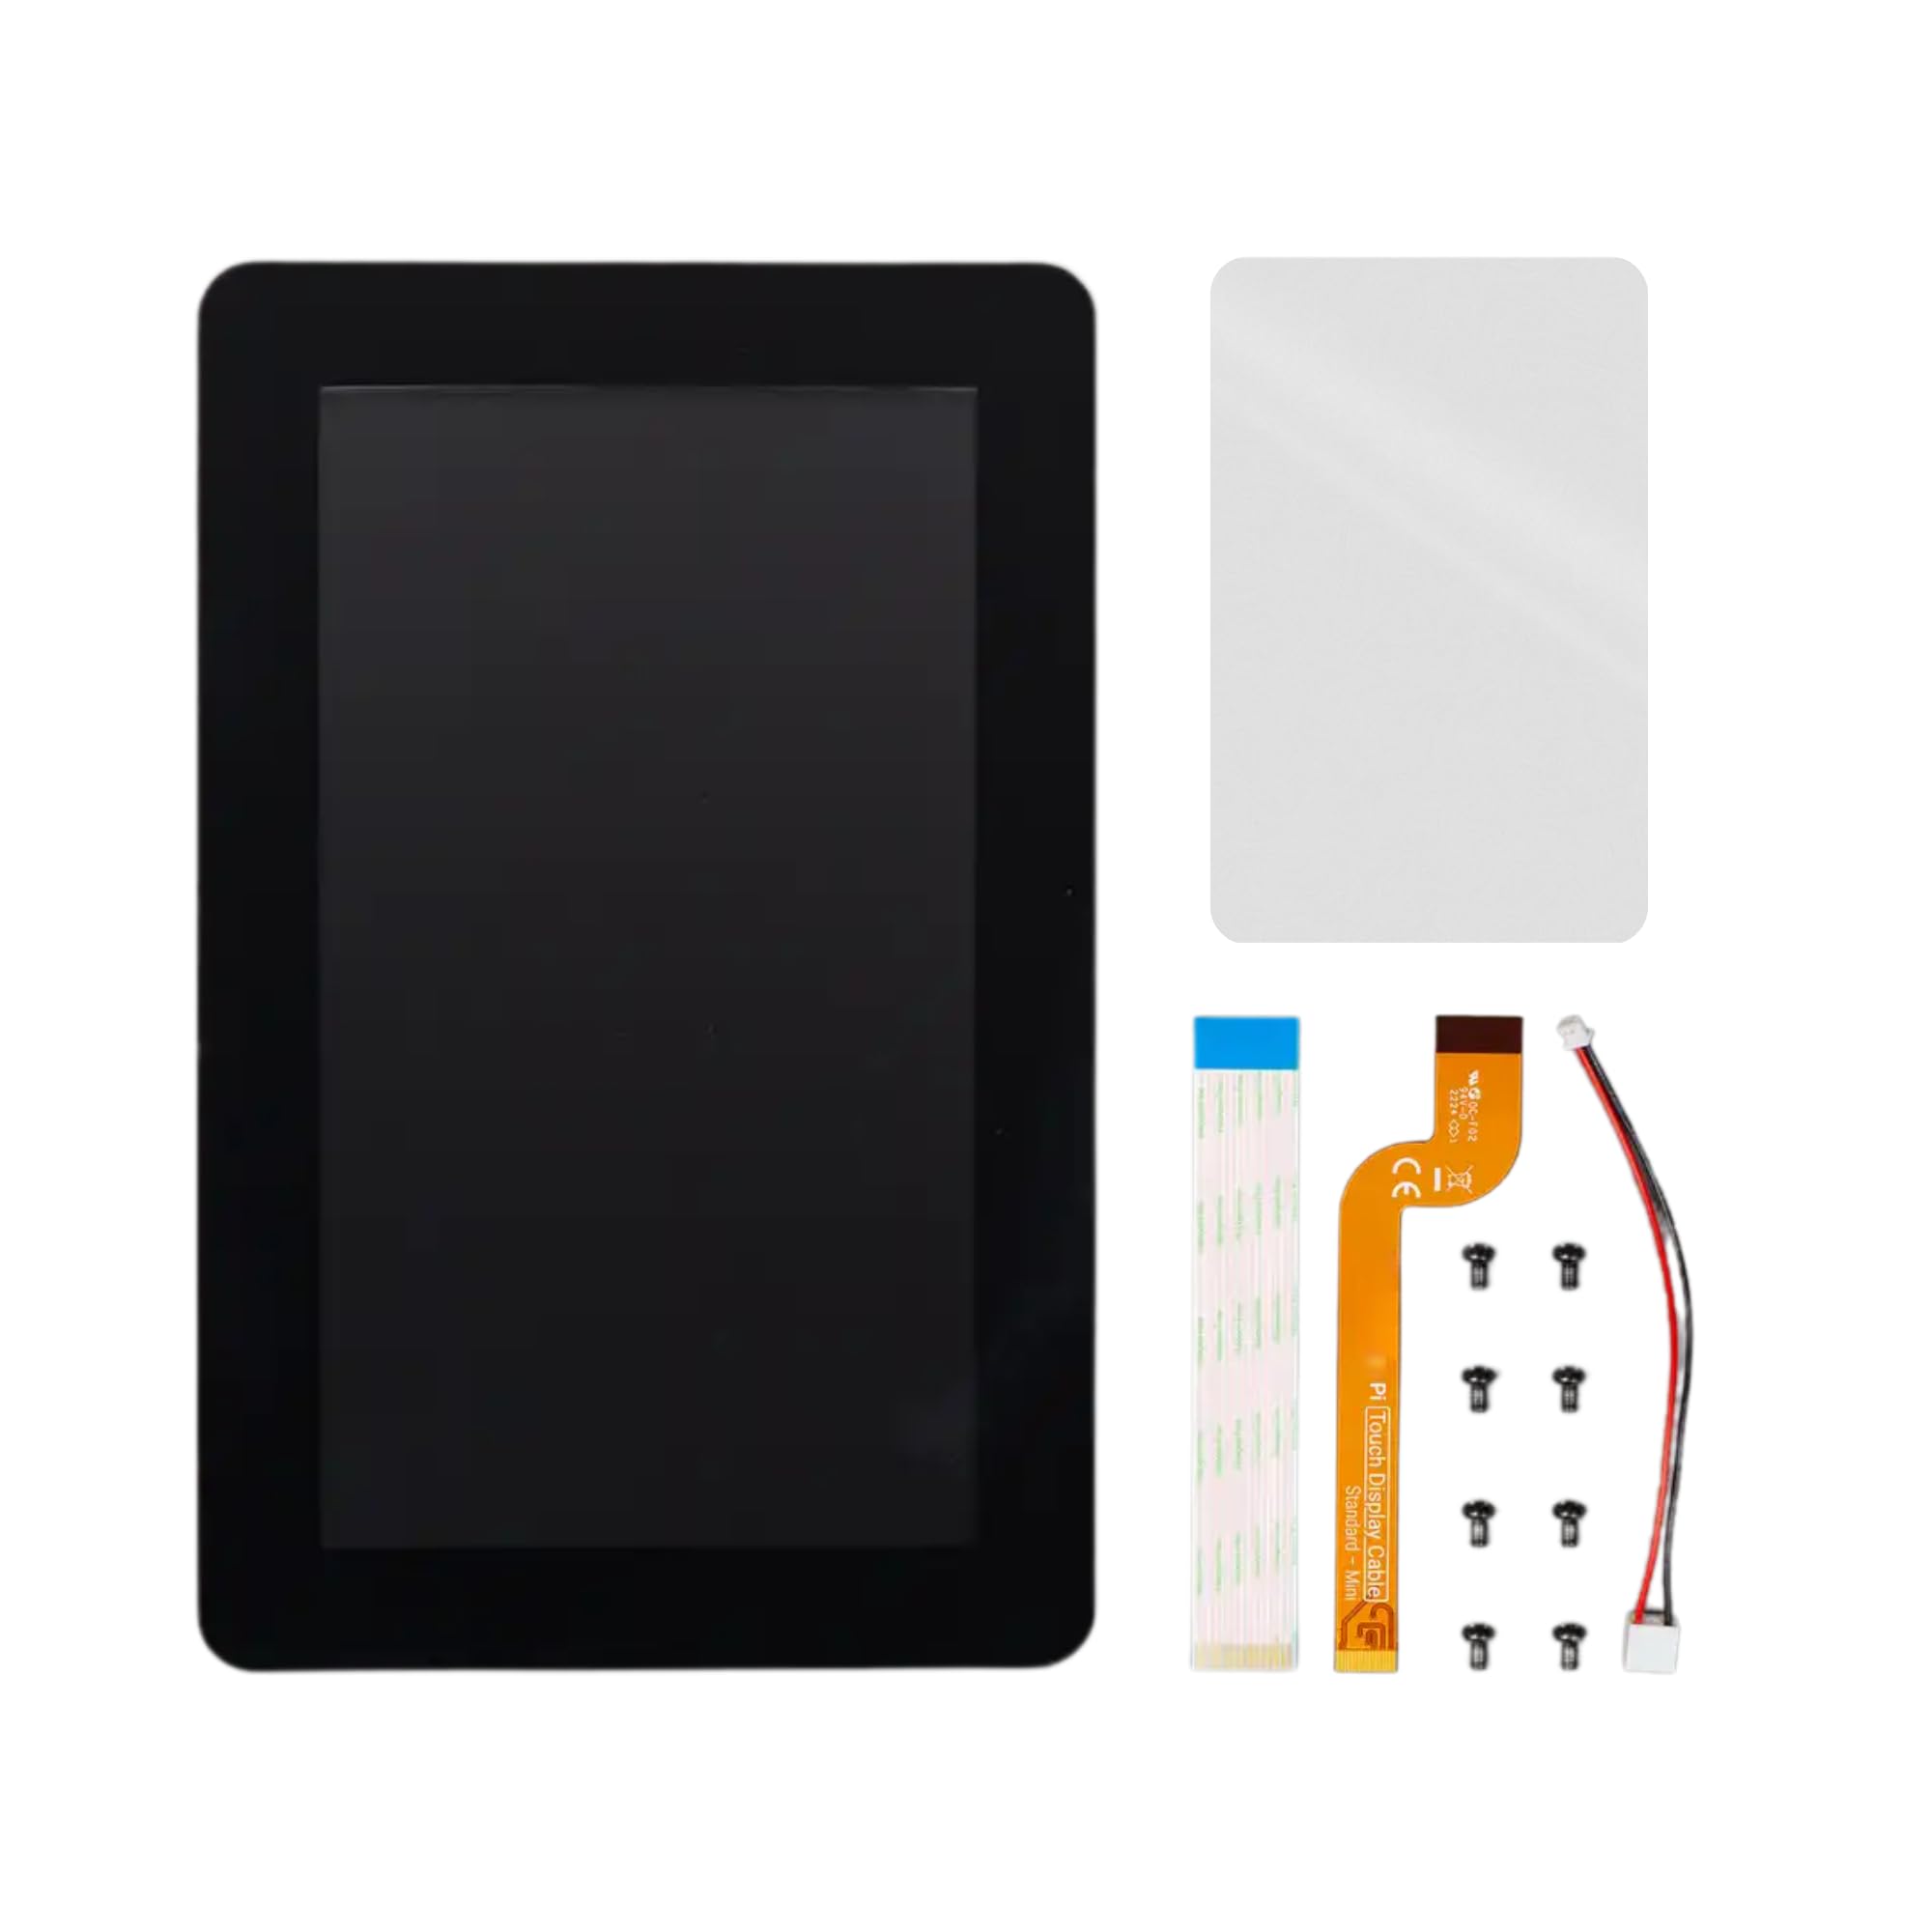
Setting up the Pi Touch Display 2 takes less than five minutes. Inside the box, you’ll find the display itself, a DSI ribbon cable, a GPIO power jumper cable, a small screwdriver for mounting, and the screen protector. There’s no external power brick, no USB hub, and no complicated wiring diagram.
Here’s how I did it: First, I powered down my Pi and disconnected it from all peripherals. Then, I carefully inserted the DSI ribbon cable into the display’s connector (making sure the contacts faced the correct direction) and secured it with the latch. Next, I connected the other end to the DSI port on my Pi board. Finally, I attached the GPIO power cable between the display and the Pi’s 5V and ground pins. That’s it—no soldering, no breadboards, no confusion.
Once powered on, the Pi booted directly to the desktop on the new screen. The resolution auto-configured to 720×1280, and the touch input was immediately active. I was able to navigate the GUI, open apps, and even use the on-screen keyboard without any additional steps. For beginners, this level of simplicity is invaluable. For advanced users, it means less time troubleshooting and more time building.
✅ Optimized for Pi OS with Built-In Drivers & On-Screen Keyboard
The Pi Touch Display 2 isn’t just hardware—it’s a fully integrated software experience. Thanks to tight collaboration with the Raspberry Pi Foundation, the display is natively supported in Raspberry Pi OS (formerly Raspbian). This means you get automatic resolution detection, proper touch mapping, and optimized performance right from the start.
Even better, the OS includes a functional on-screen keyboard that pops up automatically when you tap a text field. I found it surprisingly usable for light typing—great for entering Wi-Fi passwords, editing config files, or filling out forms. While it’s not as fast as a physical keyboard, it eliminates the need to keep a Bluetooth keyboard handy just for initial setup or occasional input.
For developers, the display works seamlessly with popular GUI frameworks like Tkinter, PyQt, and GTK. I ran a few test scripts, and touch events were registered instantly with minimal latency. The system also handles screen rotation gracefully—you can switch between portrait and landscape modes with a single command, and the touch coordinates adjust accordingly.
✅ Durable Build Quality & Included Screen Protector
The Pi Touch Display 2 feels solid and well-constructed. The frame is made of sturdy plastic with reinforced corners, and the screen itself has a slight beveled edge that protects it from accidental bumps. It’s not industrial-grade rugged, but it’s more than capable of handling daily use in a home lab, classroom, or maker space.
The inclusion of a free screen protector is a smart move. It’s a high-quality PET film that adheres smoothly without bubbles and doesn’t interfere with touch sensitivity. I applied it during setup, and after weeks of use—including frequent swiping and tapping—it shows no signs of peeling or scratching. For users who plan to mount the display in a fixed enclosure or use it in high-traffic areas, this extra layer of protection is a welcome addition.
How Does Pi Touch Display 2 Perform?
Real-World Use Case: Home Automation Dashboard
I configured my Pi 4 with Home Assistant and connected the Pi Touch Display 2 to serve as a central control panel for my smart home. The 7-inch screen proved ideal for displaying sensor data, camera feeds, and control buttons in a clean, organized layout. Thanks to the anti-glare coating, I could read the dashboard from across the room without glare interfering.
The five-finger touch support allowed me to implement custom gestures—like swiping left to switch rooms or pinching to zoom into a camera view. Response time was snappy, with no noticeable lag between touch input and UI feedback. Even when the Pi was under moderate load (running multiple automations and integrations), the display remained fluid and responsive.
Real-World Use Case: Portable Coding Station
For developers, the Pi Touch Display 2 can transform a Pi into a self-contained coding machine. I installed Visual Studio Code, connected a Bluetooth keyboard, and used the display as my primary workspace. The 720×1280 resolution provided enough vertical space to view code files comfortably, and the portrait orientation made scrolling through long scripts feel natural.
Touch input was useful for quick navigation—tapping to place the cursor, swiping to scroll, or using the on-screen keyboard for occasional edits. While I still preferred a physical keyboard for heavy typing, the display eliminated the need for an external monitor, making it perfect for mobile development sessions or travel.
Pairing this setup with high-speed storage like the WD Black SN7100 4TB NVMe SSD ensures fast boot times, quick file access, and smooth multitasking—ideal for demanding development workflows.
Real-World Use Case: Educational Kiosk for Kids
I loaned the display to a local coding club for a weekend workshop. The kids used it to run Scratch projects, interactive math games, and simple animations. The capacitive touch made the interfaces feel responsive and modern, and the anti-glare screen held up well under fluorescent classroom lighting.
Teachers appreciated the plug-and-play setup—no IT support needed. Students were able to interact with multi-touch apps (like collaborative drawing tools) without confusion. The included screen protector also survived enthusiastic tapping and occasional accidental drops onto soft surfaces.
Real-World Use Case: Retro Gaming Console
Using RetroPie, I turned the Pi Touch Display 2 into a handheld gaming device. The HD resolution brought classic games to life with crisp graphics, and the touchscreen allowed for on-screen button overlays in games that lacked native controller support. While not ideal for fast-paced action games (due to slight input lag compared to physical buttons), it worked perfectly for puzzle games, RPGs, and menu navigation.
The compact size and integrated design made it easy to build into a custom 3D-printed case. Battery life was manageable with a standard power bank, and the display’s low power draw helped extend runtime.
Pros and Cons of Pi Touch Display 2
✅ Pros
- ✅ Crisp 720×1280 HD display – Sharp text and vibrant colors make it great for both productivity and media.
- ✅ Five-finger capacitive touch – Enables modern gestures and responsive interaction.
- ✅ Anti-glare coating – Reduces eye strain and improves visibility in bright environments.
- ✅ Plug-and-play setup – Only two cables needed; works instantly with Pi OS.
- ✅ Wide compatibility – Supports all Pi models except Zero and Pico.
- ✅ Included screen protector – Adds durability without compromising touch sensitivity.
- ✅ Optimized software integration – Native drivers and on-screen keyboard streamline usability.
❌ Cons
- ❌ Not compatible with Pi Zero/Pico – Limits use for ultra-compact projects.
- ❌ Portrait orientation by default – May require software rotation for some applications.
- ❌ No built-in speakers – Audio must be routed through HDMI or USB.
- ❌ Slightly higher price than basic HDMI screens – But justified by integration and quality.
- ❌ DSI cable can be fragile – Requires careful handling during installation.
What Customers Are Saying About Pi Touch Display 2
Customer Review: “I bought this for my Raspberry Pi 4 to build a smart mirror. The display quality is fantastic—much better than the old 5-inch screen I was using. Setup took less than 10 minutes, and the anti-glare coating really helps in my bathroom. Only wish it came with a case, but overall, very happy!” – TechMaker92
Customer Review: “As a teacher, I needed a reliable screen for classroom demos. This one works flawlessly with our Pi 400s. The kids love the responsive touch, and the included screen protector has already saved it from a few drops. Highly recommend for educators!” – CodeWithKids
Customer Review: “Great display, but wish it supported the Pi Zero. I had to buy a separate HDMI screen for that project. Still, for full-sized Pi boards, it’s perfect. Bright, clear, and easy to set up.” – DIY_Guru
Is Pi Touch Display 2 Right for You?
The Pi Touch Display 2 is ideal for several user profiles:
- Hobbyists & Makers: If you’re building interactive projects like smart mirrors, weather stations, or custom dashboards, this display offers the perfect blend of size, quality, and ease of use.
- Educators: Teachers using Raspberry Pi in STEM classrooms will appreciate the plug-and-play reliability and kid-friendly touch interface.
- Developers: Those prototyping GUI applications or needing a portable coding station will benefit from the high-res screen and native OS support.
- Retro Gamers: While not a replacement for dedicated handhelds, it’s excellent for lightweight emulation and menu navigation.
However, you should skip it if:
- You’re using a Pi Zero or Pi Pico (no DSI port).
- You need built-in audio (requires external speakers or HDMI audio).
- You prefer landscape-only displays and don’t want to rotate the screen.
Is Pi Touch Display 2 Worth the Price?
At $69.99, the Pi Touch Display 2 sits in the mid-to-high range for Pi-compatible screens. Basic 7-inch HDMI displays can be found for under $40, but they often lack touch support, have lower resolution, or require external power. Compared to the official Raspberry Pi 7″ touchscreen (which retails for around $70 but lacks anti-glare and includes no screen protector), the Pi Touch Display 2 offers better value with its enhanced coating and included accessories.
When you factor in the time saved on setup, the durability of the build, and the seamless software integration, the price is justified. For anyone serious about Pi projects, this isn’t just a screen—it’s a productivity and creativity enabler. Over the long term, its reliability and ease of use make it a worthwhile investment.
For maximum performance, especially in gaming or media-heavy applications, consider upgrading your storage with a high-speed option like the WD_BLACK 4TB SN850P NVMe SSD, which delivers blazing-fast load times and ample space for large game libraries.
Frequently Asked Questions
Q: Does the Pi Touch Display 2 work with Raspberry Pi Zero?
A: No. The Pi Zero and Pi Pico lack a DSI connector, which is required for this display. It only works with Pi models that have a DSI port (Pi 3, Pi 4, Pi 400, Pi 5).
Q: Can I use it in landscape mode?
A: Yes. You can rotate the display in Raspberry Pi OS settings. The touch coordinates will adjust automatically.
Q: Is the screen protector removable?
A: Yes, it’s a standard PET film protector that can be removed or replaced if needed.
Q: Does it support audio?
A: No. Audio must be handled separately via HDMI, USB, or Bluetooth.
Q: What’s the power consumption?
A: Approximately 300–400mA at 5V, which is efficiently supplied via the GPIO header.
Q: Can I use it with other SBCs?
A: Officially, it’s designed for Raspberry Pi. Some users have had success with other boards, but compatibility isn’t guaranteed.
Q: Is the touch pressure-sensitive?
A: No. It’s capacitive touch, not stylus or pressure-sensitive like some premium tablets.
Q: Does it come with a stand or case?
A: No stand or case is included, but it has mounting holes for custom enclosures.
Q: How do I calibrate the touch?
A: Calibration is usually unnecessary, but advanced users can use xinput_calibrator if needed.
Q: Is it compatible with Pi OS Lite?
A: Yes, but you’ll need to install a desktop environment and touch drivers manually.
Final Verdict: Should You Buy Pi Touch Display 2?
After extensive testing across multiple use cases, I can confidently say the Pi Touch Display 2 is one of the best touchscreen upgrades available for Raspberry Pi users. It earns a solid ★★★★☆ (4.2/5) rating for its excellent display quality, responsive touch, anti-glare coating, and seamless integration with Pi OS.
- It solves the common problem of clunky, incompatible displays for Pi projects.
- The five-finger capacitive touch and HD resolution elevate the user experience.
- Setup is genuinely plug-and-play—no technical hurdles.
- The included screen protector and anti-glare coating add real-world durability.
If you’re using a compatible Pi model and value a clean, integrated, and responsive display, the Pi Touch Display 2 is absolutely worth the investment. It’s not just a screen—it’s a gateway to more creative, efficient, and enjoyable Pi projects.
Conclusion
The Pi Touch Display 2 stands out as a thoughtfully designed, high-quality touchscreen that delivers on its promises. Whether you’re a maker, educator, developer, or hobbyist, this display removes friction from your workflow and enhances your Pi experience. With its sharp visuals, intuitive touch, and hassle-free setup, it’s a standout choice in the crowded world of Pi peripherals.
If you’re ready to ditch the HDMI cable clutter and embrace a truly integrated Pi setup, the Pi Touch Display 2 is the upgrade you’ve been waiting for. At $69.99, it offers exceptional value for anyone serious about their Raspberry Pi journey.
Go ahead—add it to your cart. Your Pi deserves it.