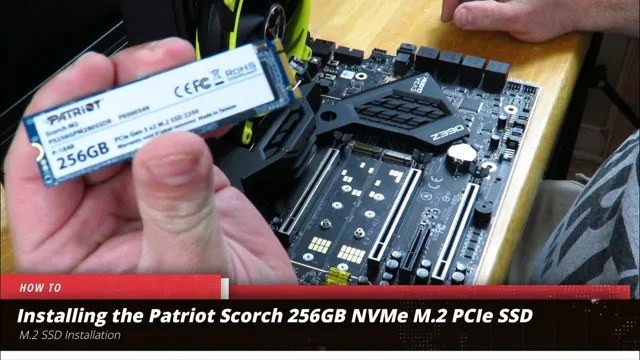
Looking to upgrade the storage capacity and performance of your computer? Then you might consider swapping out your old hard drive with an NVMe SSD. One such option is the Patriot Scorch NVMe SSD. This tiny device packs a lot of power and speed, and can significantly boost your system’s performance in every way imaginable.
But before you start installing the Patriot Scorch NVMe SSD on your Windows 10 computer, there are a few things you should know. In this blog, we will guide you through the step-by-step process of installing and configuring the Patriot Scorch NVMe SSD on your Windows 10 computer, so you can get the most out of your new drive. So, roll up your sleeves, get your tools ready, and let’s get started!
Check Compatibility
If you’re thinking of installing a Patriot Scorch NVMe SSD in Windows 10, then it’s important to check compatibility first. You’ll need to ensure that your motherboard supports NVMe protocol and has a compatible slot for the SSD. It’s also worth checking if you have the latest BIOS version installed.
While the installation process is relatively straightforward, it’s always wise to back up your data and create a system restore point before proceeding. Once you’ve completed the installation, you’ll see a significant improvement in your system’s performance, with faster boot times and file transfers. The Patriot Scorch NVMe SSD is an excellent choice for those looking to upgrade their system’s storage capabilities, but remember to check compatibility first to avoid any issues.
Verify your motherboard supports NVMe SSDs
Nowadays, SSDs are taking the computer world by storm with their faster read and write speeds as compared to traditional hard drives. However, not all SSDs are alike, and it is essential to ensure compatibility with your motherboard before making a purchase. In this regard, the NVMe SSDs are relatively new and have a different interface than the standard SATA SSDs.
Thus, it is crucial to verify that your motherboard supports NVMe SSDs before making a purchase. This can be easily checked by looking through the motherboard specifications on the manufacturer’s website. Generally, if your motherboard has an M.
2 slot, it supports NVMe SSDs. However, it is essential to cross-check to ensure that you buy the right SSD to maximize your computer’s performance. Using an NVMe SSD on a motherboard that does not support it can lead to compatibility issues and may result in your system not booting or facing other complications.
Therefore, before buying an NVMe SSD, it is essential to research and check the compatibility of your motherboard to enjoy the benefits of faster storage.
Ensure your motherboard has an M.2 slot
When building a PC, it’s essential to ensure compatibility between your components to avoid headaches and disappointment. One crucial component to consider is your motherboard, as it determines the type of processors, RAM, and storage drives that you can use. If you’re planning on using an M.
2 NVMe SSD for fast storage, it’s important to check if your motherboard has an M.2 slot. Some older motherboards, especially those that use DDR3 memory, may not have M.
2 slots, and you’ll have to look for other options like SATA SSDs or PCIe adapter cards. However, if you’ve recently bought a modern motherboard, chances are it comes with M.2 slots that support high-speed NVMe drives for lightning-fast boot and loading times.
So before purchasing any SSD, double-check your motherboard’s specifications, and ensure that it has an M.2 slot that matches the drive’s form factor and interface, whether it’s M.2 2280, M.
2 22110, or M.2 PCIe. By doing this, you’ll avoid the hassle of buying incompatible parts and maximize your PC’s performance with the latest storage technologies.
Prepare Your Computer
When it comes to installing a Patriot Scorch NVMe SSD in Windows 10, preparation is key. The first step is to locate the M.2 slot on your computer’s motherboard and ensure that it is compatible with the Patriot Scorch.
Once you have verified compatibility, you will need to back up any important data on your computer before beginning the installation process. It is also important to disable any antivirus software or security programs that may interfere with the installation. Finally, make sure you have all the necessary components, including a screwdriver for securing the SSD in place.
By taking these steps and being prepared, you can ensure a smooth and successful installation process for your Patriot Scorch NVMe SSD in Windows
Update your BIOS to the latest version
Updating your BIOS can greatly improve your computer’s performance and stability. Before you begin the process, it is essential to prepare your computer. First, check the manufacturer’s website for the latest version of your BIOS.
Ensure that you have identified the correct version for your motherboard as installing an incompatible BIOS update can cause irreparable damage to your computer. Next, back up all important files and documents in case of any unforeseen errors during the update process. Additionally, connect your computer to an uninterrupted power supply or ensure that your laptop is fully charged to prevent any power disruptions.
Once these steps are completed, you can safely begin updating your BIOS to experience all the benefits of the latest version. Remember to always follow the manufacturer’s instructions carefully and have patience during the update process.
Backup your data
Backing up your data is crucial in maintaining the integrity of your important files and documents. Before taking any steps towards protecting your data, the first thing you should do is prepare your computer. This involves organizing your files and folders, removing any unnecessary programs or files, updating your operating system and antivirus software, and ensuring that your computer is in good working condition.
Once you’ve prepared your computer, it’s time to think about backing up your data. One way to do this is to use an external hard drive or cloud storage services like Google Drive or Dropbox. Another option is to use backup software that automatically saves your files on a regular basis.
Remember, no matter what method you choose, it’s important to regularly check your backup to ensure that it’s working properly. By preparing your computer and backing up your data, you can have peace of mind knowing that you’re protected against data loss due to hardware failures, viruses, or other unforeseen circumstances.
Install the SSD
Installing a Patriot Scorch NVMe SSD in Windows 10 may seem daunting, but the process is actually quite straightforward. First, open up your computer and locate the M.2 slot on your motherboard.
Once you’ve found it, insert the SSD at an angle, making sure the notches on the SSD align with the notches on the slot. Gently press down until the SSD snaps into place. Next, you’ll need to initialize and format the drive using Windows Disk Management.
Simply search for “Disk Management” in the Start menu, right-click on the new drive, and select “Initialize Disk.” From there, you can create a partition, format the drive, and assign it a drive letter. And that’s it! With your new SSD installed and set up, you’ll be able to enjoy lightning-fast boot times and significantly faster file transfers.
So what are you waiting for? Upgrade your PC with a Patriot Scorch NVMe SSD today and experience the difference for yourself.
Turn off your computer and disconnect all cables
Before installing the SSD in your computer, it’s crucial to turn off your computer and disconnect all cables. This safety measure will prevent accidental electrocution or damage to your computer’s hardware. Once you’ve ensured that everything is turned off and disconnected, you’re ready to get started with installing the new SSD.
First, locate the hard drive bay in your computer and remove the old hard drive if needed. Depending on your computer model, some bays may require unscrewing the cover while others may have easy access. Once you’ve located the bay, gently slide in the SSD, ensuring that it’s aligned with the connectors.
Take care not to force the SSD in, as this may damage the connectors. Once it’s properly in place, screw the SSD into the bay and reattach the cover if needed. Now that the SSD is installed, you can reconnect all cables and turn on your computer.
You’ll notice a significant improvement in your computer’s performance, making the installation of an SSD a worthwhile investment.
Locate the M.2 slot on your motherboard
Installing an SSD on your computer is a great way to boost performance and increase storage capacity. One of the first steps in the process is to locate the M.2 slot on your motherboard.
This can be a bit tricky, as motherboard layouts can vary greatly. Typically, the M.2 slot is located near the middle or bottom of the motherboard.
Once you’ve identified the location of the M.2 slot, it’s time to install the SSD. First, remove the screw from the slot cover, then gently insert the SSD into the slot at an angle.
Make sure the SSD is securely in place before replacing the screw. It’s important to note that not all motherboards are compatible with M.2 SSDs, so be sure to check your motherboard’s specifications before purchasing an SSD.
By following these steps, you can easily install an M.2 SSD on your motherboard and enjoy faster boot times and improved performance.
Insert the SSD into the slot and secure it with a screw
If you’re looking to upgrade your computer’s storage space and speed, installing an SSD is a great option. The first step is to locate the slot where the SSD will go, which is usually found near the hard drive. Once you’ve identified it, gently insert the SSD into the slot, making sure it’s properly aligned.
Next, secure it in place with a screw, which is often provided with the SSD. This step is crucial to ensure the SSD doesn’t come loose over time and cause damage. Finally, you’ll want to connect any necessary cables, such as a power cable or data cable, to the SSD.
Once everything is securely in place, you can power up your computer and enjoy the increased speed and storage capacity of your new SSD. Don’t forget to properly dispose of your old hard drive, as it may contain sensitive information. Overall, installing an SSD is a relatively simple process that can have a big impact on your computer’s performance.
Setup Windows 10
If you’re looking to install a Patriot Scorch NVMe SSD in Windows 10, there are a few steps you’ll need to follow. First, make sure your computer’s BIOS is set to recognize the SSD. Then, download and install Windows 10 on the SSD.
Once Windows is installed, you’ll need to install drivers for the SSD to ensure optimal performance. You can do this by visiting the Patriot website and downloading the latest drivers for your specific model of SSD. Additionally, you may want to consider optimizing your Windows 10 settings to further improve the performance of your SSD.
This can include enabling TRIM support and disabling hibernation mode. Overall, installing a Patriot Scorch NVMe SSD in Windows 10 is simple and straightforward, and can greatly improve the speed and performance of your computer.
Turn on your computer and enter BIOS settings
Setting up a new computer can be an exhilarating experience. With Windows 10 being one of the most popular operating systems on the market, it’s likely that your new device runs on this software. Before diving into the installation process, it’s essential to access your computer’s BIOS settings and ensure that your hardware is properly configured.
To do this, you must boot up your machine and press the appropriate key to enter the BIOS menu. Depending on the model, this key may vary, but it’s typically one of the function keys (F1, F2, F10, etc.).
Once you’re in the BIOS settings, take a moment to verify that your hard drive, RAM, and other hardware components are recognized and functioning correctly. You can also adjust your boot order to prioritize the installation media, like a USB or DVD drive, over the hard drive. By doing so, you ensure that your machine boots from the correct device during the installation process.
Taking the time to prepare your computer in this manner can save you time and frustration along the way.
Select the SSD as the primary boot drive
So, you finally got yourself an SSD. Congratulations! Now, the next step is to set it up as your primary boot drive for Windows But how exactly can you do that? Well, it’s actually quite simple.
First, you need to go to your system’s BIOS and change the boot order so that your SSD is prioritized. To do this, restart your computer and press the key that’s indicated on the screen, usually F2 or Delete, to access the BIOS. Then, look for the Boot tab and rearrange the boot order to put your SSD at the top.
Once that’s done, save the changes and exit the BIOS. Now, your computer should automatically boot from your SSD. Keep in mind that if you have multiple drives, you’ll need to make sure that the SSD is the one that has the Windows 10 operating system installed on it.
With this setup, you should notice a significant improvement in your computer’s speed and performance. Enjoy your new SSD!
Install Windows 10 on the SSD and follow the prompts
If you’re looking to install Windows 10 on your SSD, then you’re in the right place. It’s vital to have a speedy operating system, and that’s where SSDs come in. So let’s get started.
The first thing you’ll want to do is insert your Windows 10 installation disc or USB into your computer and restart it. Next, hit the key displayed on your screen to access the boot menu. Then select the option that corresponds to the disc or USB key.
This will start the Windows 10 installation process. Follow the prompts, agree to the terms and conditions, select the language and time zone, and then choose the ‘Custom’ installation option. Here, you’ll want to select your SSD as the destination for your Windows 10 installation.
Once that’s done, all you need to do is sit back and wait for Windows 10 to install on your SSD. And there you have it – you’re all set with Windows 10 on your SSD.
Conclusion
In conclusion, installing a Patriot Scorch NVMe SSD in Windows 10 is truly a scorching experience that will take your computer’s performance to unprecedented heights. With lightning-fast read and write speeds, this SSD ensures that your system operates at hyperspeed, unleashing your creativity and productivity like never before. So, if you’re looking to upgrade your computer’s storage game, don’t hesitate to give the Patriot Scorch NVMe SSD a shot – you won’t regret it!”
Enjoy faster boot times and data transfer speeds with your new Patriot Scorch NVMe SSD
If you’re looking for a way to speed up your computer’s boot times and data transfer speeds, then a Patriot Scorch NVMe SSD might be just what you need. However, before you can start enjoying its benefits, you’ll want to set it up properly. One of the first steps to do this is to install Windows 10 onto your new SSD.
Luckily, the process isn’t too complicated, and most users should be able to handle it with a little patience. First, you’ll want to create a Windows 10 installation USB drive, which you can do by downloading the Windows 10 Media Creation Tool from Microsoft’s website. Once you’ve created the USB drive, you can switch off your computer and insert the SSD into an available slot.
Then, boot up with the USB drive plugged in and follow the prompts to install Windows 10 onto your SSD. Once you’ve completed the installation, you can enjoy the faster boot times and data transfer speeds that come with the Patriot Scorch NVMe SSD.
FAQs
What is a Patriot Scorch NVMe SSD?
The Patriot Scorch NVMe SSD is a high-speed solid-state drive designed for use in laptops and desktops.
Do I need any special software to install a Patriot Scorch NVMe SSD in Windows 10?
No, you do not need any special software to install the Patriot Scorch NVMe SSD in Windows 10.
Can I use the Patriot Scorch NVMe SSD as my primary drive on Windows 10?
Yes, the Patriot Scorch NVMe SSD can be used as your primary drive on Windows 10.
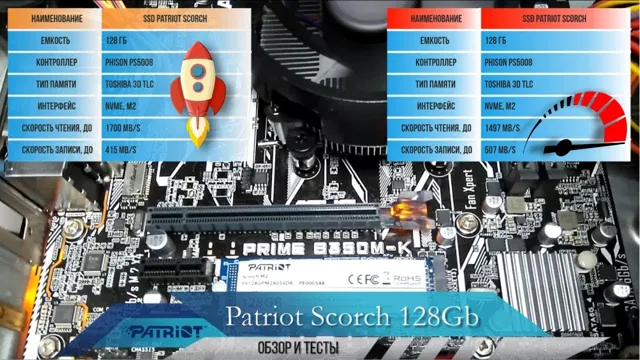
How fast is the Patriot Scorch NVMe SSD?
The Patriot Scorch NVMe SSD can read data at speeds of up to 3,000 MB/s and can write data at speeds of up to 1,700 MB/s.