If you’re looking to make the most out of your computer’s performance, one way to do so is by slaving an SSD drive. This step-by-step guide will explain everything you need to know about this process, from why you should do it to how to get it done. First things first, why should you consider slaving an SSD drive? An SSD (solid-state drive) is faster and more reliable than a traditional hard drive, and slaving it means setting it up as a secondary drive on your computer.
This allows you to use it for storage purposes, such as storing files, documents, and media, while keeping your primary drive free for the operating system and applications. To begin slaving your SSD drive, you’ll need to physically install it into your computer. This may involve opening up the case, unscrewing components, and connecting cables, so be sure to follow proper safety precautions and instructions.
Once your SSD drive is installed, the next step is to initialize it and partition it. This involves creating a logical storage unit on the drive, which can be done through your computer’s disk management tool. You’ll need to specify the size of the storage unit, formatting options, and assign it a drive letter for easy access.
Finally, you’ll need to transfer the files you want to store on your SSD drive over. This can be done through a simple drag and drop method, or by using a data transfer software. Once your files are on your SSD drive, you’ll be able to enjoy faster access times and increased performance.
In conclusion, slaving an SSD drive can significantly improve your computer’s performance and storage capacity. With this step-by-step guide, you’ll be able to get it done in no time. So what are you waiting for? Give it a try and see the difference for yourself!
Understanding the Basics of Slaving
When it comes to improving the storage capacity and performance of your computer, slaving an SSD drive is a great option. Slaving is the process of connecting an additional SSD drive to your computer to share resources and improve performance. The first step in slaving an SSD drive is to physically install it in your computer, making sure to properly connect the cables.
Once installed, you will need to access the Disk Management tool in your computer’s operating system to initialize and format the new drive. From there, you can partition the drive and assign a drive letter. Slaving an SSD drive can offer many benefits, including increased storage capacity and faster performance for tasks like booting up your computer and accessing files.
With the right tools and techniques, slaving an SSD drive can be an easy and effective way to enhance your computer’s capabilities.
What is a Secondary Drive/Slave Drive?
A secondary drive, also known as a slave drive, is an additional storage device that is connected to a primary drive on a computer. The primary drive, or master drive, is usually the main hard drive where the operating system and important files are installed. The secondary drive can be either an internal or external drive that is used for storing extra files and programs.
By slaving the secondary drive to the primary drive, the computer can access both drives simultaneously, allowing for more efficient storage and organization of data. Think of it like having two bookshelves – one for your most frequently used books and another for the books you don’t need as often. By slaving the secondary drive to the primary drive, you can easily access and organize your files in a way that suits your needs.
Why Slave an SSD Drive?
Slaving an SSD drive is a common practice that involves using one drive to boot from (the master drive) and another to store data (the slave drive). But why would you want to slave an SSD drive? Essentially, it allows you to extend the storage capacity of your computer without having to replace the existing drive. It’s also a good way to separate your operating system and applications from your personal files, making it easier to back up and organize your data.
Additionally, if you’re dealing with particularly large files such as videos or RAW photos, you may find that your main drive is quickly running out of space. Slaving another drive can help alleviate this issue, giving you more room to work with. Whatever the reason, slaving an SSD drive is a useful technique that can help boost your computer’s capabilities and make life a lot easier.
Preparing for the Process
If you’re looking to boost your computer’s storage capacity, slaving an SSD drive may be the way to go. Before you start, make sure your computer has an open power and data connector on the motherboard. Once that is confirmed, identify the correct bay to insert your SSD drive and ensure that you have the necessary cables to connect it.
Then, you’ll need to configure the BIOS settings to recognize the new drive. This involves navigating to your computer’s BIOS screen, selecting the drive boot sequence, and choosing the new SSD as the primary boot drive. Finally, you’ll need to format the drive and create a new partition to start using it.
With these steps completed, your computer should recognize and utilize the newly slaved SSD drive for faster computing speeds.
Check Compatibility and Capacity
Before you start with the process of upgrading and installing new hardware components on your computer, it’s important to check for compatibility and capacity. Compatibility refers to whether the new component will work well with the existing hardware and software. For example, if you’re planning to upgrade your RAM, you need to check if the new RAM module is compatible with your motherboard and processor.
On the other hand, capacity refers to the maximum amount of data that a hardware component can handle. For instance, if you’re planning to install a new hard drive, ensure that it has enough capacity to store all your files and documents. By checking compatibility and capacity beforehand, you can avoid any issues that may arise during the installation process and ensure that your computer runs smoothly with the new components in place.
Check for Dual Ports and Cables
When it comes to preparing for the process of charging your devices, it is important to check for dual ports and cables. Having dual ports will allow you to charge multiple devices simultaneously, saving you time and hassle. Make sure to also have the appropriate cables for each of your devices, as using incompatible cables can damage your devices and even pose a safety risk.
It’s important to remember that not all charging cables are created equal. Some low-quality cables may not provide the necessary power output, which can result in slow charging or no charging at all. Invest in high-quality cables that are compatible with your devices for optimal performance.
By being prepared with dual ports and the right cables, you can ensure that your devices are always charged and ready to go when you need them.
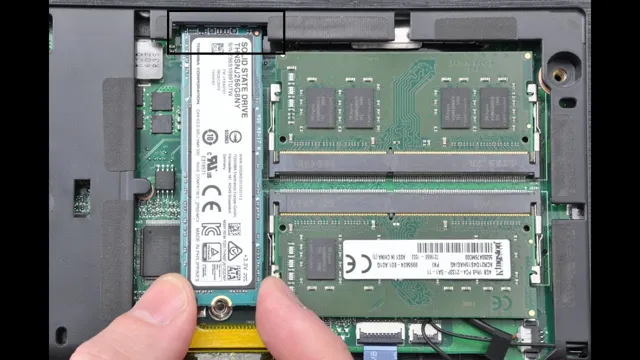
Setting Up Your Slave SSD Drive
If you’re looking to set up a slave SSD drive, it’s a fairly straightforward process that can save you a lot of hassle down the line. Before you begin, make sure your computer is turned off and unplugged, and that you have the necessary tools to work with your hardware. Identify the location of your slave drive, and remove any existing connections or mounting hardware.
Next, carefully insert your SSD into the slave drive bay, securing it with screws or other fasteners as needed. Once the drive is securely in place, reconnect any necessary cables or connections, making sure everything is firmly attached. Finally, power up your computer and double-check that your SSD is detected and configured correctly in your system settings.
With your new slave drive installed, you can enjoy faster boot and load times, improved system responsiveness, and better overall performance for all your computing needs.
Connect the Slave Drive
Setting up your slave SSD drive can be intimidating, but it’s actually a lot easier than you might think. Once you have your SSD drive in hand, it’s time to connect it to your computer. First, turn off your computer and unplug it from the wall.
Then, open the computer case and locate the SATA ports on the motherboard. The SATA ports are usually grouped together and labeled, so you should be able to find them easily. Next, locate the SATA cable that came with your SSD drive and connect one end of the cable to the SSD drive and the other end to an available SATA port on the motherboard.
It’s important to note that SATA cables can only plug in one way, so make sure you’re plugging it in the correct orientation. Once you’ve connected the SSD drive to the motherboard, secure the drive to the computer case using screws. Finally, close up your computer case, plug it back in, and power it on.
Congratulations, you’ve successfully connected your slave SSD drive!
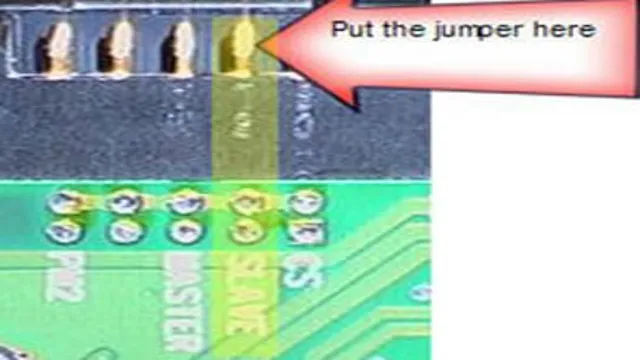
Set the Jumper to Slave Mode
When adding a new SSD drive to your computer, it’s essential to set the jumper to slave mode. This process is crucial to ensure that your computer recognizes the drive as a secondary storage device. To set up your slave SSD drive, start by locating the jumper pins on the drive.
These pins are usually located near the power and data connectors. Once you’ve found them, refer to your SSD’s user manual to determine which jumper settings you need to use. Typically, your manual will provide a diagram of the jumper settings you need to configure to enable slave mode.
Adjust the jumpers as indicated in the manual, and double-check that the jumper is tightly in place. Afterward, connect the SSD drive to your computer and try booting it up to see if it recognizes the slave drive. Now that you have your slave SSD drive set up, you’ll have additional storage space without having to replace your primary drive, making it a worthwhile investment.
Configuring the Slave Drive in BIOS
If you’re looking to add a new SSD drive to your computer, you may want to configure it as a slave drive to avoid overwriting your existing system files. Configuring a slave SSD drive is a straightforward process that requires a few steps in your computer’s BIOS settings. To begin, restart your computer and enter the BIOS by pressing either F2, F10, or Delete when prompted.
Navigate to the BIOS menu and locate the SATA Configuration or similar section. Choose the SATA port where the slave drive will connect, and select the IDE or AHCI mode if available. Save the changes and exit the BIOS, then power off your computer and connect the SSD drive to the chosen SATA port.
Restart your computer, and you should be able to access your new slave drive in Windows or another operating system. With this simple process, you can utilize your new SSD drive without worrying about disrupting your existing operating system.
Accessing BIOS Settings
When configuring a slave drive in BIOS, accessing the BIOS settings is the first step. Depending on the computer’s make and model, the process of accessing the BIOS settings can vary. Typically, pressing a specific key, such as F2, Delete, or Enter during the boot process will bring up the BIOS menu.
Once in the BIOS, navigate to the “Drives” or “Boot Options” section to see the available drives. Select the slave drive and set it as the secondary or slave device. Additionally, make sure the primary device, usually the master drive, is still set as the primary boot device.
This ensures that the computer boots from the master drive and uses the slave drive as a secondary storage option. With a few simple steps, configuring a slave drive in BIOS can be done quickly and easily, expanding the available storage options for the user.
Configuring and Saving Changes in BIOS
When configuring a slave drive in BIOS, the process can be a bit confusing for beginners. To get started, you’ll want to access the BIOS menu by pressing the corresponding key during boot-up (usually F2, F10, or DEL). From there, navigate to the “Storage” or “Boot” tab to find the option for configuring your slave drive.
You may need to change the boot order to prioritize it over your primary drive. Be careful not to make any other changes to the BIOS settings unless you know exactly what they do. Once you’ve made the necessary adjustments, be sure to save your changes before exiting the BIOS menu.
Otherwise, your changes will not take effect. With some patience and a bit of practice, configuring a slave drive in BIOS can be a relatively simple process that can greatly expand the storage capacity and capabilities of your computer system.
Formatting and Partitioning the Slave Drive
If you’ve recently purchased a new SSD drive and are looking to use your old drive as a slave drive, you’ll first need to format and partition it. This process involves wiping all of the data from the drive and setting up new partitions to separate your files. To begin, connect the old drive to your computer and open the Disk Management tool.
Select the old drive and choose to delete all existing partitions. Next, create a new partition and assign it a drive letter. You can repeat this process to create multiple partitions if needed.
Once you’ve set up your partitions, format the drive using the NTFS file system. This will ensure compatibility with your operating system and provide reliable performance. With your slave drive formatted and partitioned, you can now begin transferring files and storing data.
Remember to backup important files to ensure they aren’t lost during the formatting process. With a little bit of effort, you’ll have a fully functional slave drive to supplement your new SSD and expand your storage capacity.
Formatting in Windows
When it comes to setting up your Windows PC, formatting and partitioning the slave drive can be a daunting task. However, it is an essential process that allows you to organize and manage your files effectively. First, you need to decide which file system you want to use, such as NTFS or FAT3
NTFS is the recommended option for Windows 10, as it offers improved security features and can handle larger files. Once you have chosen your file system, you can begin formatting and partitioning the drive. This involves wiping all the old data and setting up new partitions, which divide the drive into separate areas.
By creating different partitions, you can store different types of data on the same drive, such as operating system files and personal files. With a little bit of patience and attention to detail, formatting and partitioning your slave drive can help you keep your files organized and easily accessible.
Partitioning in Windows
When it comes to setting up a secondary hard drive on a Windows computer, formatting and partitioning are essential steps that need to be taken. Formatting the drive erases any existing data and sets it up for use, while partitioning divides the drive into multiple sections, each with its own file system. This allows you to organize your data into different areas of the drive and can also improve performance by separating frequently accessed files from others.
To format and partition the slave drive, you can use the built-in Disk Management tool in Windows. Once you’ve located the drive you want to format, right-click on it and select “New Simple Volume.” From there, you can follow the prompts to allocate space and choose a file system type.
With proper formatting and partitioning, your secondary hard drive can become a valuable asset for storing files and improving your computer’s performance.
Conclusion
Well, it turns out that slaving an SSD drive isn’t about making it do your bidding (despite what the name might suggest). Rather, it’s all about harnessing the power of two drives working together in harmony. By setting up a slave drive, you can enjoy faster speeds, more storage capacity, and better overall performance.
And while it might sound like a complicated process, with the right tools and a little bit of know-how, you too can become a master of slaving SSD drives. So go forth and unleash the full potential of your computer!”
FAQs
What does it mean to slave an SSD drive?
Slaving an SSD drive refers to using it as a secondary drive alongside the primary drive in a computer.
How do I slave an SSD drive?
To slave an SSD drive, connect it to the second SATA port on your motherboard and configure it appropriately in the BIOS.
Can I use an SSD drive as a boot drive and slave drive simultaneously?
Yes, it’s possible to use an SSD as both a boot drive and slave drive, but it depends on your computer’s hardware configuration and the operating system installed.
How do I transfer data from my primary drive to a slaved SSD drive?
You can transfer data from your primary drive to a slaved SSD drive by copying or transferring files using file explorer or a backup software program.