Are you looking for ways to maximize your computer’s storage capacity? Slaving an SSD drive is one of the most efficient ways to achieve this without having to replace your hard drive entirely. In this blog post, we’ll explain how to slave an SSD drive, what its benefits are, and how to make the process as simple as possible. Whether you’re a student, a professional, or a gamer, you’ll find this guide useful and uncomplicated.
With our step-by-step instructions, you’ll be able to master the technique and make the most of your computer’s storage space. So let’s get started!
Gather Materials
When it comes to learning how to slave an SSD drive, the first step is to gather all of the necessary materials. This includes the SSD drive itself, a SATA cable to connect the drive to your computer, a power cable to supply power to the drive, and an available SATA port on your motherboard. You will also need a working computer that is already up and running.
Once you have gathered all of these materials, you can begin the process of slaving your SSD drive. This is a simple process that involves connecting the cables and configuring the drive in your computer’s BIOS settings. With a bit of patience and attention to detail, you can easily slave an SSD drive and enjoy the additional storage space it provides.
Get an SSD drive enclosure
If you’re thinking of upgrading your computer’s storage capabilities, getting an SSD drive enclosure can be a great option to consider. Before you start, make sure you have all the materials you’ll need. Firstly, you’ll need to purchase an SSD drive enclosure that’s compatible with the size of your SSD drive.
You can find these online or in electronics stores. Next, gather your screwdrivers as you’ll need them to open up your computer and remove the SSD drive. You’ll also need a USB cable to connect the drive enclosure to your computer for data transfer.
Once you have all these materials, you’ll be ready to get started! By using an SSD drive enclosure, you’ll be able to securely store your important files and enjoy faster data transfer speeds. So why not give it a try?
Get a USB connector cable
To begin the process of connecting your device to your computer, you’ll need to gather a few materials. One of the most important pieces you’ll need is a USB connector cable. This cable is essential for transferring data and charging your device.
Without it, you won’t be able to transfer files, sync your device, or even charge it. To ensure that you get the right cable, you need to check the type of connector on your device. Some devices have USB Type-C ports, while others have Micro USB or Lightning ports.
Once you’ve identified the correct port, you can purchase the appropriate cable. It’s essential to get a good quality USB connector cable to avoid potential hazards like overcharging or short-circuiting. A good quality cable will ensure that you can transfer data safely and charge your device without any issues.
It’s worth investing in a good quality cable to ensure that your device remains safe and secure while you’re using it.
Connect the SSD Drive to Your System
If you’re looking to slave an SSD drive to your system, the first step is to connect the drive to your computer. To do this, you’ll need to open your computer case and find an available SATA port on your motherboard. Once you’ve located the port, simply connect the SATA cable from the drive to the motherboard.
If your SSD drive is an external drive, you can connect it to your computer using a USB cable. Before you start using the drive, you’ll also need to ensure that your system recognizes it. To do this, you can check your system’s disk management tool, where you can format and partition the drive as needed.
Once you’ve done this, you’ll be able to access the data on your SSD drive, giving you more storage space and faster performance for your computer. Overall, slaving an SSD drive to your system is a simple process that can be done quickly with just a few basic steps.
Open your computer chassis
Before diving in, make sure your computer is unplugged and grounded. Then, open up your computer chassis. Some cases will have latches or screws holding it together, while others may have sliding panels.
Check your manufacturer’s instructions if you are unsure about how to do this. Once inside, locate an open SATA port and connect your SSD drive, ensuring it is firmly secured. If you are unsure which cable to use, refer to your motherboard’s manual.
Once connected, you may close the chassis and plug in your computer. Congratulations, you’ve successfully connected your SSD drive to your system! Now it’s time to format and install your operating system on the new drive.
Connect the SSD drive to an available SATA port
When it comes to upgrading your system by adding an SSD drive, the first step is to physically connect the drive to your computer. This can be done by connecting the SSD to an available SATA port. The SATA port is usually found on the motherboard of your system.
It may be located next to the other SATA ports that are already in use by your hard disk or DVD drive. Once you have located the SATA port, carefully insert the SSD drive into the port and fasten a screw to secure it in place. Make sure to consult your system’s manual for specific instructions on how to add an SSD drive and to ensure that your system’s BIOS is configured to recognize the new drive.
With the SSD drive properly connected, you can look forward to faster boot times and improved performance from your system!
Connect the USB cable to the SSD enclosure.
When it comes to connecting your SSD drive to your system, it’s important to follow the right steps to ensure a smooth and reliable connection. Firstly, you’ll need to connect the USB cable to the SSD enclosure. This step is crucial as it allows your system to detect the SSD so that you can access its contents.
Make sure to use a high-quality USB cable that is compatible with your SSD and system. Once you’ve established a connection, you can proceed to configure your drive and start moving files. Remember, a quality connection is essential for efficient data transfer, so it’s always best to double-check your connections to avoid any potential issues down the line.
With a little care and attention, you can easily connect your SSD and benefit from faster file transfer speeds and superior storage capabilities without any hassle.
Format Your SSD Drive
If you’re wondering how to slave an SSD drive, the first step is to format it properly. Formatting an SSD involves preparing the drive for use by cleaning it up and dividing it into sections that the operating system can recognize. To start, access your computer’s Disk Management tool, which can be found in the Control Panel or by searching for “Disk Management” in the Windows search bar.
From there, locate the SSD drive you want to format and right-click on it to select “Format.” Make sure to choose the correct file system (NTFS is usually the best option for SSDs) and allocation unit size before clicking “OK” to begin the formatting process. Once completed, your SSD drive is ready to be slaved to another device and used for additional storage space or backup purposes.
Format the drive using Disk Management on Windows
If you have a new SSD drive or want to repurpose your old one, formatting it properly is a crucial step. Fortunately, Windows has its own Disk Management tool that makes the process easy. To format your SSD drive, you’ll need to access the Disk Management window by right-clicking on the Start menu and selecting Disk Management.
From there, you can select the SSD drive you want to format, right-click it, and choose the “Format” option. You’ll then need to select the file system you want to use and enter a volume label before clicking “OK” to start the formatting process. It’s important to note that formatting will erase all existing data on the drive, so make sure to back up any necessary files beforehand.
By using Disk Management, you can ensure that your SSD drive is properly formatted and ready for use.
Format the drive using Disk Utility on MacOS
If you’re looking to format your SSD drive on a MacOS, Disk Utility is an excellent tool to get the job done. Firstly, you’ll need to connect the drive to your Mac and open Disk Utility. Then, select the SSD in the left sidebar of Disk Utility and choose the “Erase” option.
Here, you’ll be prompted to choose a name for your drive and select a format. For SSD drives, it’s recommended to use the “APFS” or “Mac OS Extended” format options. APFS is known for its advanced features like faster backups and increased security, while Mac OS Extended is more compatible with older MacOS versions.
Once you’ve chosen your format, hit “Erase” to start the formatting process. Keep in mind that formatting your drive will wipe all its contents, so make sure to back up important data before proceeding. In just a few steps, you can easily format your SSD drive using Disk Utility on MacOS.
Final Word
To slave an SSD drive is a relatively straightforward process that can have significant benefits in terms of data transfer and storage. By slaving an SSD drive, you can essentially use it as a secondary drive to store and transfer files that may not fit on your primary drive. To do this, you will need to connect the SSD drive to your computer via a SATA cable and then configure the drive to act as a slave drive.
Depending on your system, this may involve adjusting certain BIOS settings or using software to configure the drive. Once the drive is set up as a slave, you can begin transferring files to and from the drive with ease. Overall, slaving an SSD drive is an excellent way to expand your storage capabilities and streamline your data transfer processes.
Conclusion
Well, after all that hard work and dedication, your SSD is now officially slaved to your system! Congratulations! It may seem like an arduous task, but once you’ve successfully accomplished slaving your SSD drive, the benefits will be well worth it. Your system will run smoother and faster than ever before, giving you plenty of time to sit back and bask in the glory of your tech-savvy accomplishments. Don’t forget to treat your new slaved SSD with care and maintenance, and it will serve you well for years to come.
Happy slaving!”
FAQs
What is an SSD drive and how does it differ from a traditional HDD?
An SSD (Solid State Drive) is a type of storage device that uses flash memory to store data. It differs from a traditional HDD (Hard Disk Drive) in that it has no moving parts, which makes it faster, more reliable, and less noisy.
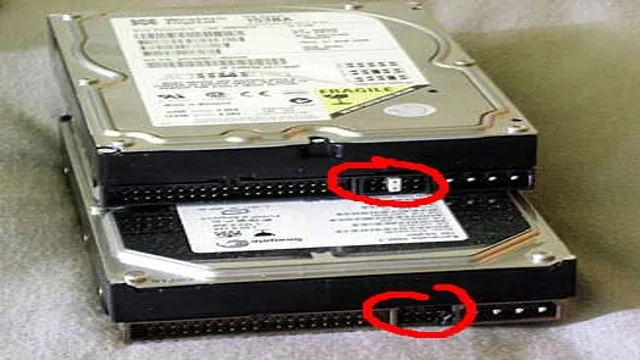
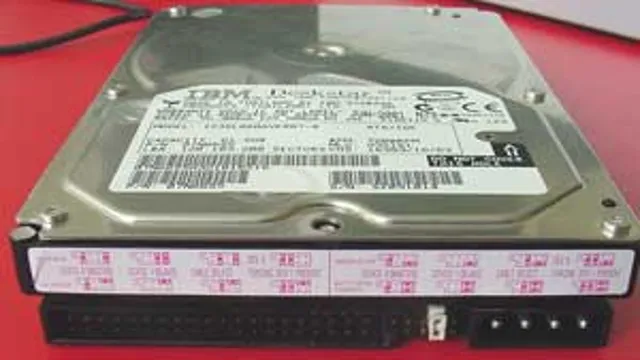
Can you slave an SSD drive?
Yes, you can slave an SSD drive like any other storage device. However, keep in mind that the term “slave” is mostly used in reference to IDE drives, while the newer SATA drives use a different terminology.
What are the benefits of slaving an SSD drive?
Slaving an SSD drive can be useful if you want to transfer data from one computer to another, or if you need additional storage space. It can also be a good way to back up important files and folders.
How do you slave an SSD drive?
To slave an SSD drive, you need to connect it to a computer that already has a master drive installed. Depending on the type of SSD, you will either need to use a SATA cable or an M.2 connector to connect the drive. Once connected, you can access the drive just like any other storage device.