Are you looking for a reliable and easy-to-use external Hard Disk Drive to store or backup your important data? Look no further than the Sandisk Extreme Portable SSD! This little powerhouse provides stunning speed and durability to safeguard your files and ensure that they’re always accessible. In this blog post, we’ll take you through the process of setting up your Sandisk Extreme Portable SSD and show you how to optimize its features for an enhanced experience. Are you ready to get started and take control of your data in a whole new way? Let’s dive in!
Check Contents
Setting up a SanDisk Extreme Portable SSD may seem daunting at first, but it’s actually a pretty straightforward process. First, connect the SSD to your computer using the USB cable that comes in the package. Once it’s connected, you’ll need to format the drive to make it usable on your computer.
To do this, open the Disk Utility application on your Mac or the Disk Management tool on your Windows computer. Next, select the SanDisk drive from the list of drives and click on the “Format” option. Choose the file system you want to use (we recommend exFAT) and click on “Format”.
Once the drive has been formatted, it’s ready for use. You can now transfer files to and from the SSD just like you would with any external hard drive. The SanDisk Extreme Portable SSD is a great option for those who need a reliable and fast external storage solution for their files.
So don’t be intimidated by the setup process – it’s quick and easy!
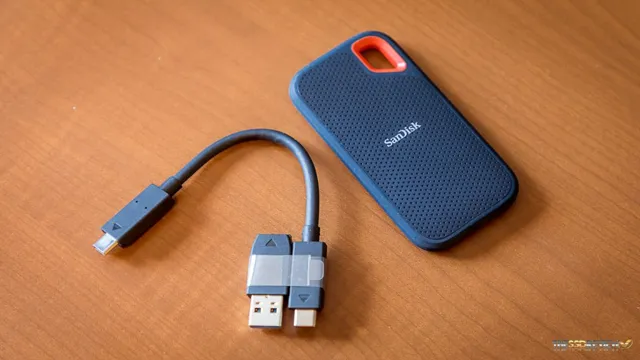
Confirm SSD and Cable are included
When you’re upgrading or building a computer, it’s important to make sure you have all the necessary components. One key component that you should double-check for is the SSD and cable. These components are crucial for ensuring that your computer’s hard drive runs smoothly and efficiently.
To confirm that they’re included, you’ll need to check the contents of your package carefully. Make sure you read the specifications of the product and cross-check against the listed components. It’s also advisable to buy from reputable dealers and vendors to ensure that you get the proper support in case of any issue.
By taking the time to confirm that your SSD and cable are included, you’ll save yourself from the hassle of having to go back and forth to the store or wait for replacement parts, which can have a significant impact on your work or gaming experience. So don’t skip this step when building or upgrading your computer; check the contents and confirm that you have everything you need to get started!

Connect SSD to computer
If you’re looking to connect your Sandisk Extreme Portable SSD to your computer, don’t worry – it’s a quick and easy process! First, locate the USB-C to USB-C cable that comes with your SSD. You’ll plug one end of this cable into the SSD, and the other end into your computer’s USB-C port. If your computer doesn’t have a USB-C port, you can also use a USB-A to USB-C adapter (which may need to be purchased separately).
Once you’ve connected the cable, you should see the SSD appear on your computer as a new drive. Congratulations – you’re now ready to start transferring files to and from your Sandisk Extreme Portable SSD with ease! Remember to keep your SSD in a safe and secure location when not in use, and to safely eject it from your computer before unplugging the cable to avoid data loss.
Insert cable into computer’s USB port
“USB port” When it comes to connecting your SSD to your computer, the first step is to insert the cable into the USB port. This may seem like a simple task, but it’s important to make sure you’re plugging the cable into the correct port. Most modern computers have USB
0 or 1 ports, which are typically blue in color and offer faster transfer speeds than older USB 0 ports.
However, if your computer only has USB 0 ports, that’s okay too – your SSD will still work, it just may take a bit longer to transfer files. Once you’ve located the correct USB port, insert the cable firmly until it clicks into place.
If your SSD requires an external power source, don’t forget to plug that in as well. Once everything is connected, turn on your computer and your SSD should be recognized automatically. Happy transferring!
Connect cable to SSD
Connecting an SSD to your computer can be a bit daunting, but it’s actually a lot easier than you might think. The first step is to connect the cable to your SSD. Most SSDs will come with a cable included, but if yours didn’t, you can easily purchase one that will work with your specific SSD.
Once you have the cable, simply connect one end to your SSD and the other end to your computer. Before you do that though, make sure that your computer is turned off and unplugged from the wall. Once everything is plugged in securely, you can turn your computer back on.
Your computer should automatically recognize your new SSD, but if it doesn’t, you may need to go into your computer’s settings to manually configure it. Overall, connecting an SSD to your computer is a straightforward process that can greatly improve your computer’s performance. With just a few simple steps, you can upgrade your storage and enjoy faster boot times and improved application loading times.
So, if you’re considering upgrading to an SSD, don’t be intimidated – it’s easier than you might think!
Set up SSD on computer
If you’ve just purchased a Sandisk Extreme Portable SSD and are wondering how to set it up on your computer, don’t worry: the process is straightforward and easy. First, connect your SSD to your computer using the USB 0 cable provided in the package.
Next, open the Disk Utility app on your Mac or the Device Manager on your Windows PC. Select the Sandisk Extreme Portable SSD from the list of connected devices, and format it according to your preferences. This will create a new partition on your SSD, and you can choose to encrypt it if desired.
Once the formatting is complete, you can start using your SSD by transferring files or installing applications onto it. Setting up your Sandisk Extreme Portable SSD is a simple process that can significantly enhance your data storage and transfer capabilities, allowing you to work more efficiently and securely.
Open disk management utility
If you’ve recently decided to upgrade your computer’s storage system to include an SSD, congratulations! You’re about to experience a significant improvement in speed and overall performance. However, before you start using your new SSD, you first need to set it up correctly on your computer. To do this, you’ll need to open the disk management utility program, which is built into your computer’s operating system.
Once you’re inside the utility, you’ll be able to format and partition your SSD, assigning it a drive letter and making it ready for use. This process is relatively straightforward, but if you’re not familiar with disk management, it can be a little intimidating. The good news is that there are plenty of resources available to guide you through the process step-by-step, ensuring that you set up your new SSD correctly and begin enjoying its benefits in no time.
Initialize the SSD
To set up an SSD on your computer, the first step is to initialize it. This involves creating a new partition and formatting it with a file system so that the computer can recognize it as a usable storage device. To start, you will need to connect your SSD to your computer using either a SATA cable or an NVMe connector.
Once the SSD is connected, you can begin the initialization process through the Disk Management tool on your Windows computer. Right-click on the unallocated space of the SSD and select “New Simple Volume”. Follow the prompts to format the drive with an appropriate file system.
Keep in mind that initialization will wipe any existing data on the SSD, so make sure to back up any important files beforehand. After these steps are completed, your SSD will be set up and ready to be utilized for high-speed data storage.
Partition the SSD
If you have recently installed an SSD on your computer, you may want to partition it to optimize its performance and organization. To partition your SSD, you will need to access the Disk Management tool in Windows. First, right-click on the button of the Windows start menu and select Disk Management from the list of options that appear.
Then, select the unallocated space on your SSD and create a new partition by right-clicking on it and selecting the New Simple Volume option. Follow the prompts to create the partition and format it to your desired settings. Partitioning your SSD allows you to separate your files and programs into different sections, improving your computer’s organization and speed.
Plus, if one partition becomes corrupted or infected, it will not affect the others. By setting up your SSD properly, you can take full advantage of its capabilities and improve your overall computer experience.
Transfer Data
Have you recently purchased a SanDisk Extreme Portable SSD and are wondering how to set it up? Well, you’re in luck! It’s a straightforward process that requires minimal effort. Firstly, connect the SSD to your computer/laptop using the USB-A to USB-C cable that’s provided with the device. Once connected, your computer will recognize the device automatically, and a prompt will appear on your screen asking you to initialize the drive.
If you’re using a Mac, ensure that you format it for macOS, and if you’re using Windows, ensure you format it for NTFS. After formatting the drive, you can transfer data to and from the SSD with ease. It’s that simple! The SanDisk Extreme Portable SSD is a fantastic investment for those requiring quick access to their files and maximum data transfer speeds, so ensure that you keep it safe and secure after setting it up.
So don’t hesitate, plug in your SSD, and start transferring data today!
Move files and folders to SSD
If you’ve recently installed an SSD in your computer, you’ll want to move your files and folders over to it to take advantage of its faster performance. The process of transferring data is relatively straightforward and can be done in a few different ways. One option is to use Windows’ built-in File Explorer to copy and paste your files and folders from your old hard drive to your new SSD.
Another option is to use a third-party software program designed specifically for data migration, such as EaseUS Todo Backup or Acronis True Image. These programs make it easy to transfer your entire operating system, applications, files, and settings from your old hard drive to your new SSD in one go. Whichever method you choose, be sure to back up your important data beforehand just in case something goes wrong.
With your files now residing on your SSD, you’ll notice a significant improvement in your system’s performance and responsiveness. So, go ahead and make the switch today!
Eject SSD
If you’re wondering how to set up your SanDisk Extreme Portable SSD, don’t worry – it’s a quick and easy process. First, connect the SSD to your computer using the included USB cable. Your computer should recognize the device automatically, and you’ll see it appear as a new drive in your file explorer.
You can then drag and drop files to the SSD just like you would with any other external drive. When you’re done transferring files, be sure to safely eject the SSD to avoid data loss or corruption. Simply right-click on the SSD in your file explorer and select “Eject.
” Wait until you see a notification that it’s safe to unplug the device before disconnecting it from your computer. With these simple steps, you’ll be up and running with your SanDisk Extreme Portable SSD in no time.
Safely remove the removable disk
When it comes to using external SSDs or any removable storage device, it’s essential to safely remove it from your computer to prevent data loss or corruption. While it may seem like a simple task, it’s crucial not to ignore it, as it can cause significant problems in the future. Ejecting an SSD or any external storage device ensures that all your data is written and saved correctly before being disconnected.
If you unplug the device without ejecting it, you might cause some files to become corrupt, or the entire volume may become unreadable. That’s why the best practices dictate that you properly eject a removable disk before unplugging it. This precautionary measure ensures that all of your files and folders are safely saved on the drive.
It’s a task that’s rarely given much thought, but it’s incredibly important when it comes to your valuable data.
Conclusion
Congratulations, you’ve set up your Sandisk Extreme Portable SSD! It wasn’t rocket science, but rocket fuel never hurt anyone, so let’s celebrate your newfound data storage spaceship. Now you can zoom through your files with lightning speed and never have to worry about losing your precious data again. So go ahead, take a victory lap and revel in the glory of being an SSD-setup superstar.
Remember, in space (and on your desk), no one can hear your files scream – they’re too busy flying through cyberspace on your trusty Sandisk Extreme Portable SSD.”
FAQs
What are the system requirements for using the SanDisk Extreme Portable SSD?
The SanDisk Extreme Portable SSD requires a computer with a USB Type-C port and supports USB 3.1 Gen 2 or Thunderbolt 3 interface. It works with Windows® 10, Windows 8.1, and macOS® v10.12 or later.
How do I connect the SanDisk Extreme Portable SSD to my computer?
To connect the SanDisk Extreme Portable SSD to your computer, plug the USB Type-C cable into the SSD and connect the other end to your computer with the USB Type-C port. You may need to install drivers if your computer does not recognize the device.
How fast is the SanDisk Extreme Portable SSD?
The SanDisk Extreme Portable SSD delivers read speeds of up to 550MB/s* and write speeds of up to 500MB/s*. These speeds make it ideal for transferring large files quickly and editing high-resolution photos and videos.
Can I use the SanDisk Extreme Portable SSD with my smartphone or tablet?
If your smartphone or tablet has a USB Type-C port, you can connect the SanDisk Extreme Portable SSD to it using a Type-C to Type-C cable (not included). Note that some devices may require additional drivers or software to recognize the SSD.