Are you ready to upgrade your computer’s performance? One way to boost your PC’s speed is by upgrading your storage to a Solid State Drive (SSD). But what happens once you have your new SSD in hand and are ready to set it up? In this blog post, we’ll walk you through the steps on how to set up your new SSD on Windows 11, making the process easier and smoother. Setting up a new SSD on Windows 11 may seem like a daunting task, but with the right instructions, it can be a quick and painless experience.
By following a few simple steps, you’ll be up and running in no time. We’ll walk you through the process step-by-step, so you can easily migrate your operating system and data to the new drive without losing any files or data. Don’t let the thought of upgrading your PC intimidate you.
With the help of this post, you’ll be well on your way to a faster and better-performing computer. So with that said, let’s dive into the details of setting up your new SSD on Windows 1
Requirements for the Installation
Installing a new SSD on Windows 11 can be a great way to boost your computer’s performance and speed. However, there are a few requirements you should consider before diving into the installation process. Firstly, ensure that your computer has the necessary ports to connect the SSD.
You may need to purchase an adapter or cable if your computer’s ports are not compatible. Additionally, you will need to have a copy of Windows 11 operating system, which you can download online or purchase from a physical store. You should also have a backup of your important files and data, just in case anything goes wrong during the installation process.
Finally, make sure you have the necessary tools, such as a screwdriver, to open your computer case and install the new SSD. By following these requirements, you can set up your new SSD on Windows 11 confidently and seamlessly, and enjoy its many benefits.
Check computer specifications
Before installing any software or program on your computer, it’s important to check the computer specifications to ensure that it meets the requirements for installation. The specific requirements for each program can vary, so it’s important to check the official website or documentation for the software you want to install. Typically, the requirements will include the operating system and version, processor type and speed, RAM, and available storage space.
It’s important to note that installing software that doesn’t meet the recommended requirements can result in slow performance, errors, crashes, or other issues. By taking the time to check your computer’s specifications before installation, you can avoid these problems and ensure a smooth experience with your new software. So, if you want to install a program on your computer, be sure to check its requirements first to avoid any potential issues later on.
Prepare a bootable Windows 11 USB drive
Preparing a bootable Windows 11 USB drive requires a few things to get started, and it’s essential to follow each step correctly. Firstly, make sure you have a USB flash drive with at least 8GB of storage space. You’ll also need a working computer running Windows 7, 8, or
Plus, download the Windows 11 ISO file from the official Microsoft website and install a free tool like Rufus. Once you have all these elements, connect your USB to your computer, launch Rufus, and select your USB drive from the Device dropdown menu. Choose your Windows 11 ISO file by clicking the Select button and browsing to your file.
Verify that all the chosen options are correct, then click Start to begin the process of creating a bootable Windows 11 USB drive. Within minutes, you’ll have a newly formatted USB that can be used to install Windows 1
Removing Old Hard Drive
If you’re looking to set up a new SSD with Windows 11, one of the first steps is to remove your old hard drive. This can be a bit intimidating for those who haven’t done it before, but it’s actually quite straightforward. First, shut down your computer and unplug any cables.
Then, open your computer case and locate your old hard drive. It should be connected to your motherboard with a SATA cable and a power cable. Carefully disconnect both of these cables from the hard drive.
Once you’ve removed the old hard drive, you’ll need to install your new SSD. This process varies depending on the type of SSD you have, but typically involves connecting it to the SATA port on your motherboard and attaching a power cable. With your new SSD installed, you can then proceed with setting up Windows 11 and transferring your data.
With a little bit of patience and attention to detail, you can successfully set up your new SSD and enjoy faster performance and improved reliability.
Unplug power cable, open computer case
When it’s time to upgrade your hard drive, you’ll need to remove the old one first. To begin, unplug the power cable and open up the computer case. You should see your current hard drive somewhere inside.
Before you unplug it, it’s important to note that removing the old drive will mean you’ll lose all the data stored on it. If there’s anything you want to keep, make sure to back it up on an external drive or cloud storage beforehand. Once you’ve done that, carefully remove the old drive from its slot by disconnecting the cables and screws holding it in place.
Be sure to handle it with care so you don’t damage it or any other components inside the computer. With the old hard drive out of the way, you can now install your new one and begin the process of copying your data over. It sounds easy enough, but always double-check the manual and take your time to avoid any mistakes.
With just a little patience and care, you’ll be up and running with your new hard drive in no time!
Disconnect old hard drive from motherboard
If you’re looking to upgrade your computer’s storage or just replace a faulty hard drive, disconnecting the old hard drive from the motherboard is a crucial step. This process is relatively straightforward and can be done with just a few tools. First, make sure to shut down your computer and unplug it from the wall to avoid any electrical shocks.
Locate the SATA data and power cables that connect the old hard drive to the motherboard and the power supply, respectively. Gently pull the cables out of their sockets by pulling the tab, and make sure not to force them. Once the cables are disconnected, you can remove the old hard drive from its housing.
This step may require additional tools, depending on your computer’s setup. Remember, always handle your computer’s components with care to avoid damaging any parts. By following these steps, you can safely remove your old hard drive and replace it with a new one.
Remove old hard drive from the computer case
If you’re upgrading to a new hard drive, the first step is to remove the old one from your computer case. This may sound daunting, but it’s actually quite simple. Start by unplugging your computer and opening up the case.
Look for the hard drive – it’s usually large and rectangular, with a bunch of cords coming out of it. Detach the cords from your hard drive by gently pulling them out of their ports. Depending on the type of computer case you have, you may need to use screws or latches to release the hard drive from its bay.
Once the hard drive is loose, pull it out of the case. Congratulations – you’ve successfully removed your old hard drive! Now, you’re ready to install your new one and start enjoying increased storage capacity and faster performance. Remember to dispose of your old hard drive safely and responsibly to protect your personal data.
Installing the New SSD
Upgrading to an SSD is one of the best ways to give your computer a boost in responsiveness and speed. Installing a new SSD on Windows 11 is a fairly straightforward process that can be easily accomplished in just a few steps. First, make sure to back up your data to an external drive or cloud storage service.
Then, power off your computer and open up the case. Locate the existing hard drive and unplug it. Carefully remove it from its bay and then insert your new SSD in its place.
Reconnect any necessary cables and close up the case. Once your computer is powered on, you’ll need to install the OS. Simply insert your Windows 11 installation disc or USB drive and follow the prompts on the screen.
Before you know it, you will be up and running with your new super-fast SSD!
Connect new SSD to motherboard
Installing a new SSD is a great way to boost your computer’s performance, and it’s a relatively simple task to complete. First, make sure you have all the necessary tools and components, including the new SSD and a screwdriver. Once you have everything you need, shut down your computer and unplug it from the wall.
Carefully open the case and locate the SATA port on the motherboard. Gently connect the new SSD to the motherboard using the SATA cable, making sure it’s securely connected. Attach the SSD to the case using the screwdriver and close the case.
Finally, plug your computer back in and turn it on to ensure it recognizes the new SSD. With just a few simple steps, you can connect your new SSD to the motherboard and take full advantage of its benefits, including faster boot times and improved overall performance.
Secure SSD to case with screws
Once you’ve purchased your new SSD, it’s time to install it properly. The first step is to secure the SSD to the case using screws. This might sound simple, but it’s an important step in making sure your new hardware stays in place and functions properly.
To do this, locate the mounting holes on your SSD and line them up with the appropriate holes on the case. Then, carefully insert the screws and tighten them until the SSD is snugly and securely in place. It’s important to use the correct type of screw and to not over-tighten, as this could damage your hardware.
Once you’ve secured the SSD, you’re ready to move on to the next step in upgrading your system and enjoying faster, more reliable performance.
Connect the power cable back in
To successfully install a new SSD in your computer, you’ll need to connect the power cable back in. This step is crucial in ensuring that power is supplied to the SSD, allowing it to function properly. Before proceeding, make sure you have properly shut down your computer and unplugged all cords.
Once you have opened your computer case and located the SSD slot, gently insert the SSD and secure it in place with screws. Then, connect the power cable back in by attaching it to the power supply and the SSD. Once the power cable is securely connected, you can proceed with putting the computer case back together and powering on your system.
It’s important to note that if you encounter any issues during this process, you may want to seek the assistance of a professional to avoid causing further damage. By following these steps, you can successfully install a new SSD and ensure that your computer is running at optimal performance.
Installing Windows 11 on the New SSD
So, you’ve just gotten your new SSD and want to install Windows 11 on it? Well, the good news is that it’s not as complicated as it may seem. The first step is to create a Windows 11 installation media, which can be done by downloading the official media creation tool from Microsoft’s website. Just make sure to select the correct version of Windows 11 that matches your system architecture.
Once you have the installation media ready, you need to go into your system BIOS and make sure that your new SSD is recognized as the boot device. From there, you can proceed with the Windows 11 installation process, which involves agreeing to the license terms, selecting the installation type, and formatting your new SSD. After that, you just need to wait for the installation to complete, and voila! You now have a freshly installed Windows 11 system on your new SSD, ready to be used.
Just remember to transfer all your important files and programs from your old drive to your new one before starting to use it to avoid losing data. Overall, setting up a new SSD with Windows 11 is a fairly straightforward process that anyone can do with a little bit of patience and knowledge.
Change Boot Order in BIOS
If you’re looking to install Windows 11 on a new SSD, then you’ll need to change the boot order in your BIOS. The BIOS is the basic input/output system that controls the startup process of your computer. By default, your computer is set to boot from the hard drive first, so you’ll need to change the boot order to prioritize the new SSD.
To do this, you’ll need to enter the BIOS by pressing a specific key during startup (usually F2, F10, or Del). Once you’re in the BIOS, you’ll need to navigate to the boot options and change the boot order to prioritize the new SSD. This will ensure that your computer boots up from the SSD and you can proceed with installing Windows 1
It’s a simple process, but it’s important to ensure that you follow the correct steps to avoid any hiccups during the installation process.
Boot from the USB drive
If you’re looking to install Windows 11 onto a new SSD, you’ll need to boot from a USB drive first. This means you’ll need to create a bootable USB drive with Windows 11 installed, which can be done easily with Microsoft’s Media Creation Tool. Once you have your bootable USB drive ready, you’ll need to insert it into your computer and restart your computer.
From there, you’ll need to enter the BIOS and change the boot order to prioritize the USB drive. This will ensure that your computer boots from the USB drive instead of your old hard drive. Then, you can follow the prompts to install Windows 11 onto your new SSD.
It’s important to note that this process may vary depending on your specific computer and BIOS settings, but the general steps should be similar. Overall, booting from a USB drive is an essential step in installing Windows 11 onto a new SSD and can pave the way for a faster and more efficient computer experience.
Follow Windows 11 installation process
If you’ve recently installed a new SSD and are looking to upgrade to Windows 11, the installation process is fairly straightforward. To start, you’ll need to download the Windows 11 ISO file from the Microsoft website and create a bootable USB drive with it. Once you’ve done that, you’ll need to restart your computer and boot from the USB drive.
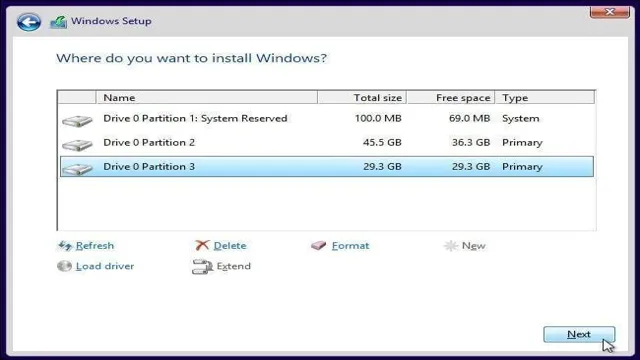
From there, the on-screen prompts will guide you through the installation process. It’s important to note that during the installation, you’ll have the option to choose the drive where Windows 11 will be installed. Be sure to select your new SSD at this step.
Once the installation is complete, make sure all of your drivers are up to date and enjoy your new operating system. Remember to backup your important files before starting the installation process. Happy computing!
Finalize and Optimize your New SSD and Windows 11 Installation
Setting up a new SSD drive to run Windows 11 can improve your computer’s performance and speed significantly, but you need to optimize it properly for the best results. First, you should update your firmware to ensure that your SSD is running at its top speed. Second, you should disable Windows services that you don’t need, which can use up your SSD’s resources and slow it down.
Third, consider using a specialist software tool to optimize your drive, such as the Windows 11 built-in disk optimization feature or a third-party application. This can ensure that your SSD is working efficiently and allowing your computer to operate without any lag. Lastly, be sure to move frequently accessed files to your SSD’s storage to boost loading times and improve access performance.
By following these steps, you can make the most out of your new SSD and get the best performance from your Windows 11 installation, optimizing both for a smooth and seamless experience.
Install device drivers
Once you have installed your new SSD and Windows 11, you will want to make sure that your device drivers are up to date. It is important to keep these drivers current to ensure that your system functions at its best. You can easily check for updates by going into your device manager and selecting the specific driver.
Updating drivers can often fix bugs, improve performance, and add new features. Additionally, some devices such as graphics cards or sound cards may require specific drivers to function properly. Take the time to research and download these drivers for optimal functionality.
Keeping your drivers current is a simple step that can make a big difference in the speed and efficiency of your new Windows 11 installation.
Tweak Windows 11 settings
Congratulations on getting your new SSD and installing Windows 11! To get the best performance possible, there are a few tweaks you can make to optimize your new setup. Firstly, make sure you have the latest drivers installed for your hardware. This will ensure that everything is working correctly and efficiently.
Next, adjust your power settings to prioritize performance over energy-saving. This will allow your system to use more power to run at its highest capacity. Additionally, disabling any unnecessary startup programs and services that you don’t need will free up system resources.
Finally, consider enabling Windows 11’s Game Mode if you plan on using your system for gaming. This will allow the operating system to prioritize game performance above everything else. With these simple tweaks, you can get the most out of your new SSD and Windows 11 installation.
Install apps and transfer data
Now that you have successfully installed your new SSD and Windows 11, the next step is to finalize and optimize your system. Start by installing and transferring your essential apps and data. This will ensure you have everything you need on your new device and can continue working without any interruption.
You can easily transfer your data from your old hard drive or backup using an external drive or cloud-based service. Once you have all your necessary files, you can start installing your apps. It’s crucial to only install what you need to avoid clutter and ensure the smooth running of your system.
Make sure to update your apps to their latest versions to avoid any security vulnerabilities. Additionally, ensure your system drivers are updated to their latest versions to ensure optimal performance. Optimizing your system will make a significant difference in its speed and efficiency, ensuring a seamless experience overall.
Optimize SSD for better performance
If you want to get the best performance out of your new SSD and Windows 11 installation, it’s important to take some time to optimize your settings. One important step is to ensure that your SSD is properly aligned. This means that the partitions on your drive should start at the beginning of a physical block rather than in the middle of one.
Another key way to optimize your SSD is to enable TRIM. This feature allows your operating system to tell your SSD which sectors are no longer in use, freeing up space for new data to be written. It’s also important to disable any defragmentation software, as it’s not necessary with SSDs and can actually reduce performance.
Finally, make sure that you have the latest drivers for your SSD and that you’ve configured your power settings to be optimized for performance rather than battery life. By following these steps, you can ensure that your new SSD and Windows 11 installation are running at peak performance.
Conclusion
In conclusion, setting up a new SSD on Windows 11 is as easy as 1, 2, ..
and a few more steps! But fear not, with a little patience and a lot of coffee, you’ll be up and running in no time. Remember to back up your data, migrate your operating system, and optimize your new drive for peak performance. And don’t forget to give yourself a pat on the back for successfully tackling this tech challenge.
You’re officially a SSD guru, congratulations!”
FAQs
What are the basic requirements for setting up a new SSD on Windows 11?
To set up a new SSD on Windows 11, you’ll need a compatible system, a screwdriver, an SSD, and a Windows 11 installation media.
Can I add a new SSD to an existing Windows 11 system?
Yes, you can add a new SSD to an existing Windows 11 system as a secondary storage drive. You can then use it to store your files and programs separately from your primary drive.
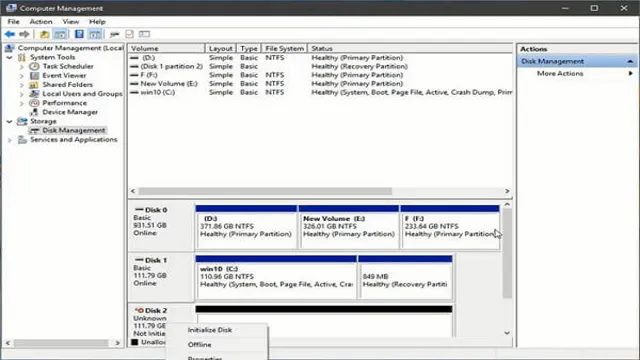
How do I format a new SSD on Windows 11?
You can format a new SSD on Windows 11 by opening the Disk Management tool, selecting the unallocated space on the SSD, right-clicking on it, and choosing the “New Simple Volume” option. Follow the prompts to format the SSD.
How do I transfer my Windows 11 operating system to a new SSD?
You can transfer your Windows 11 operating system to a new SSD using free tools like EaseUS Todo Backup or paid software like Acronis True Image. These tools will clone your existing OS installation to the new SSD so that you can boot from it.