SSDs have become popular among computer users due to their quick read/write speeds and overall performance. However, when it comes to upgrading or replacing SSDs, users may have to remove the old units first. This task may require some technical skills, but with the right guidance, it is not as complicated as it may seem.
In this step-by-step guide, we will show you how to remove an SSD from your computer without damaging the system. So, let’s roll up our sleeves and get started!
Preparation
Removing an SSD from a PC requires some preparation to avoid damaging the component or the computer. Firstly, shut down the PC completely and unplug it from the power source to prevent any electrical shock. Then, find the location of the SSD in your computer.
In most cases, it is installed on a PCIe slot or directly attached to the motherboard. If the SSD is in a PCIe slot, remove any screws or locking mechanism that holds it in place. However, if it is attached to the motherboard, disconnect the cable that leads to the drive.
Before removing the SSD, ensure that you have a compatible SSD replacement at hand to avoid any inconvenience. Finally, after removing the SSD, dispose of it safely or keep it away in case you may need it in the future. By following these simple steps, you will have removed your SSD without causing any damage to your computer, and you can replace it with a new one or upgrade your storage.
Turn off PC and unplug from power source
When it comes to computer maintenance, preparation is key. Before attempting to clean or repair your PC, one of the first things you should do is turn off the power and unplug it from its power source. This may seem like a no-brainer, but many people forget this crucial step and end up risking damage to their computer or even harm to themselves.
By shutting off the power and disconnecting it from the outlet, you can ensure that there is no electricity running through the device, making it safer to work with. Whether you’re cleaning the inside of your computer or simply moving it to a new location, taking this small step can make a big difference in the safety and longevity of your device. Keyword: Turn off PC

Ground yourself to prevent static discharge
Grounding yourself before handling sensitive electronic components is crucial in preventing damage caused by static discharge. Static electricity can build up in our bodies when we move around and accumulate on our fingertips, which can easily transfer to any electronic device that we touch. To ground yourself, all you need to do is touch an unpainted metal surface, such as a doorknob or a metal table leg, before handling electronic components.
This will allow any built-up static electricity in your body to discharge safely, preventing any damage to your electronics. While it may seem like a small step, it can make all the difference in preventing costly damage to your electronics. So, the next time you’re handling electronic components, take a moment to ground yourself first.
Removing the SSD
If you’re thinking of upgrading your SSD or replacing it altogether, it’s important to know how to remove it from your PC. First, ensure your computer is turned off and disconnected from any power source. Next, locate the SSD, which is usually found near the hard drive and looks like a rectangular chip attached to a circuit board.
Using a screwdriver, locate and remove the screw(s) securing the SSD in place. Gently pull the SSD out of its slot, being mindful of any connections it may have with other components in the PC. If there are any cables attached, make sure to disconnect them carefully.
Once you’ve removed the SSD, you can either replace it with a new one or simply upgrade it. Keep in mind that some PCs might have different steps for removing an SSD, so it’s always best to consult your computer’s user manual or online resources for specific guidance. With a little bit of caution, you can easily remove an SSD from your PC to upgrade or replace it.
Locate the SSD in your PC
If you’re looking to upgrade or replace your SSD, one of the first steps is to locate it within your PC. Depending on your computer model, the location of your SSD might differ. In general, most SSDs are found towards the bottom of your PC and installed onto the motherboard.
To remove the SSD, first, make sure to power off your computer and disconnect all cables. Then, locate the SSD and remove any screws or brackets that may be holding it in place. Carefully remove the SSD from its slot, avoiding any contact with other components, and ensure that you have all the necessary tools before proceeding.
Remember to handle all parts with care, as they are delicate. Once you have successfully removed the SSD, you can replace it with a new one or upgrade its capacity to improve your computer’s performance. By taking these steps, you can confidently upgrade or replace your SSD while keeping your PC safe and secure.
Remove any cables or components obstructing the SSD
When it comes to removing an SSD, it’s important to first remove any cables or components that might be obstructing it. This could include things like power cables, SATA cables, or even other components like RAM modules or graphics cards. These things can often get in the way and make it difficult to access the SSD, so it’s important to take the time to remove them before attempting to remove the SSD itself.
Once you’ve done that, removing the SSD is usually a fairly straightforward process. Depending on the type of computer or device you’re working with, you may need to unscrew the SSD from its mounting bracket or remove any fasteners holding it in place. Just be sure to handle the SSD with care to avoid any damage, and keep in mind that different SSDs may require different methods for removal.
With a bit of patience and some careful maneuvering, however, you should be able to remove your SSD without issue.
Loosen the screws holding the SSD in place
Removing the SSD from your computer can be a daunting task, especially if you are not familiar with computer hardware. To begin the process, you will need to loosen the screws holding the SSD in place. The screws are usually located on the sides of the SSD, and you can use a screwdriver to loosen them.
Once the screws are loose, you should be able to lift the SSD out of its slot. Be careful not to pull too hard or twist the SSD, as this can damage the connections. It is also important to remember to ground yourself before handling the SSD, as a static charge can cause damage as well.
With these things in mind, removing the SSD should be a relatively easy process. By following these simple steps, you can safely remove your SSD and replace it with a newer or larger one, giving your computer a boost in performance.
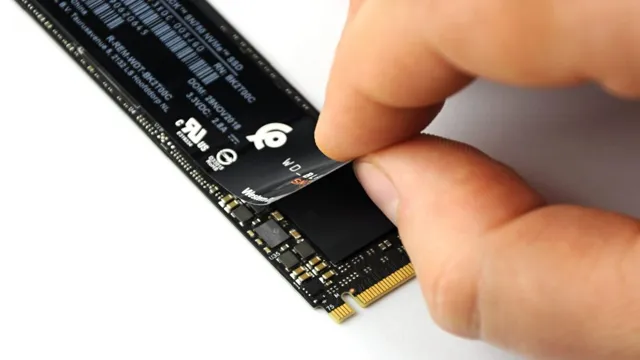
Carefully remove the SSD
Removing the SSD from a laptop or PC is a delicate process that requires some level of expertise. First, you need to ensure that the device is turned off, and then find where the SSD is located. Usually, it is located at the bottom of the laptop or on the side of a desktop PC.
Once you locate it, you’ll need to unscrew the bracket or cover that holds it in place. Then, gently disconnect the cable connector that connects the SSD to the motherboard. It’s essential to avoid excessive force to prevent damaging the connections or components.
Finally, carefully remove the SSD from the slot and place it aside. This process shouldn’t take more than a few minutes, but it requires caution to prevent accidents or damage to the device. Removing the SSD is a critical step when replacing or upgrading it, and it’s essential to do it right to prolong your device’s lifespan.
Post-removal
If you’re looking to upgrade or replace your computer’s SSD, the first step is to remove the old one. Removing an SSD from a PC is a straightforward process but requires some care and attention to detail. Before you start, make sure your computer is turned off and unplugged.
Locate the SSD, which is typically located near the CPU and is a small rectangular board. To remove it, you will need to unscrew any screws holding it in place and gently lift it out of the socket. Be gentle but firm, as you don’t want to damage any connectors or pins.
Once removed, be sure to store the old SSD safely and securely, as it may contain sensitive data that you don’t want falling into the wrong hands. With your old SSD removed, you can now install your new one and get back to using your computer with faster and more reliable storage.
Check SSD for any physical damage
Now that you’ve removed your SSD, it’s important to check for any physical damage before reinstalling it or disposing of it. A damaged SSD can result in lost data, system crashes, and other serious issues. To check for physical damage, first look for any cracks or dents on the exterior of the drive.
If the drive is bent or warped, it may have suffered damage from impact. Next, examine the connector pins for any signs of bending or misalignment. These pins are delicate and can easily be damaged if the drive is mishandled.
Lastly, give the drive a sniff test. If you detect any burning or electrical smells, the drive may have suffered internal damage and should be replaced. Taking these steps can help protect your data and ensure that your system runs smoothly.
Remember, prevention is always better than cure!
Replace any components and cables previously removed
After removing any components and cables during maintenance or repair, it is important to replace them carefully and securely. Reinstalling them using the correct techniques and tools is crucial to avoid malfunctions or safety hazards. Double-checking that you have replaced all the necessary parts before starting up your device is also important, and make sure the connections are tight and aligned properly.
It’s recommended to refer to the device’s manual or manufacturer’s instructions when replacing the components and cables. Remember, taking extra care when putting things back together can save time and money in the long run, and give you peace of mind knowing that your device is functioning smoothly and safely.
Store SSD in anti-static packaging
Once you’ve removed your SSD from your computer, it’s important to store it in anti-static packaging. This packaging will protect your SSD from electrostatic discharge, which can damage your device. Anti-static packaging is designed to prevent the buildup of static electricity while also providing a protective barrier from physical damage.
You can find anti-static bags or foam inserts to place your SSD in, which will keep it safe and secure until you need to use it again. Remember, even if you’re not planning on using your SSD for a while, it’s always better to be safe than sorry and store it properly. By taking care of your SSD, you can ensure that it lasts for years to come and continues to perform at its best.
Conclusion
Removing an SSD from a PC is as simple as saying goodbye to a bad ex. Just open up your PC, find the SSD, unplug it, and voila! You’ve gotten rid of any pesky issues and can move on to better things. Just remember to dispose of the SSD responsibly and don’t let it come back to haunt you.
“
FAQs
What are the steps to remove an SSD from a PC?
First, shut down the PC and unplug it from the electrical outlet. Open the case by removing any screws or clips and locate the SSD. Unplug the cables connected to it and gently remove it from its slot.
Can I remove an SSD while the PC is running?
No, it is not recommended to remove any hardware while the PC is running. Always shut down the PC and unplug it from the electrical outlet before removing any hardware.
Is it necessary to remove the power supply before removing the SSD?
It depends on the location of the SSD in your PC. If it is situated in a location near the power supply, then it is recommended to remove the power supply before removing the SSD.
Can I reuse the SSD after removing it from my PC?
Yes, you can reuse the SSD in another PC or external enclosure as long as it is still in good condition and compatible with the new device. Make sure to properly format the SSD before reuse.
Do I need any special tools to remove an SSD from my PC?
No, you do not need any special tools to remove an SSD from your PC. A screwdriver might be needed to open the case of your PC, but aside from that, the process of removing an SSD is straightforward.