So, you’ve decided to upgrade your system with a new M.2 SSD, congratulations! However, you might feel overwhelmed and unsure of how to install PCIe Gen 3 x 2 M.2 SSD Patriot.
But no worries, we’ve got you covered. In this blog post, we will guide you step-by-step on how to install your new M.2 SSD, so you can increase your system’s performance and storage capacity without any hassle.
Installing an M.2 SSD may seem intimidating at first, but with just a few tools and some basic knowledge, you can have your new SSD up and running in no time. First, we’ll go over the hardware and tools you’ll need for the installation process.
You’ll need a compatible M.2 SSD, a compatible motherboard with an available M.2 slot, and a screwdriver.
We’ll also cover some essential information about PCIe Gen 3 x 2 M.2 SSD Patriot, explaining what it is, its benefits, and how it differs from other types of SSDs. As we go through the steps of the installation process, we’ll provide you with easy-to-understand instructions, and we’ll also include visuals that will guide you along the way.
By the end of this blog post, you’ll be fully equipped and confident to install your new M.2 SSD with ease, giving you faster boot times, smoother operation, and an overall better computing experience. So grab your screwdriver and let’s get started!
Gather Your Equipment
If you’re looking to install a PCIe Gen 3 x 2 M.2 SSD from Patriot, you’ll need to gather some equipment first. The most important thing you’ll need is the M.
2 SSD itself, along with the screw that came with it. You’ll also need a screwdriver that fits the screw, as well as an anti-static wrist strap to protect your computer from any static electricity you may generate during the installation process. It’s also a good idea to have a clean and well-lit workspace, free from any clutter or distractions.
By having all of these items at the ready, you can ensure a smooth and successful installation process for your Patriot M.2 SSD. So, take some time to gather your equipment and get ready to upgrade your computer’s storage!
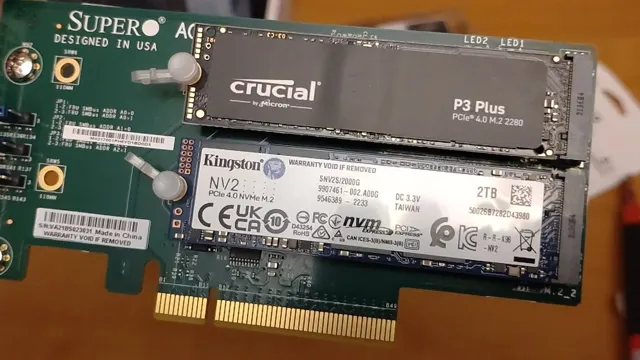
Patriot PCIe Gen 3 x 2 M.2 SSD
If you’re considering upgrading your computer’s storage system, the Patriot PCIe Gen 3 x 2 M.2 SSD is a fantastic option. Before you start installation, gather your equipment to ensure a smooth process.
First, you’ll need a screwdriver that fits the M.2 slot on your motherboard. Additionally, you’ll need an anti-static wrist strap to protect both you and your computer from static electricity.
This strap will ground any static charges on your body, preventing damage to your equipment. Finally, ensure you have a thermal pad or compound to transfer heat from the SSD to the motherboard. These few simple items can make all the difference when installing your new SSD, so take the time to gather them before you begin.
Screwdriver
When it comes to home repairs and DIY projects, having the right tools is essential. One of the most important tools in your arsenal is a screwdriver. But not all screwdrivers are created equal – there are different types for different jobs.
To start, gather your equipment. You’ll need a set of screwdrivers with different sizes and types of heads, such as flathead and Phillips. Make sure they’re made of high-quality materials that can withstand heavy use.
Additionally, you’ll want to have an electric screwdriver for larger projects or jobs that require a lot of screws. Gathering the right equipment is crucial for getting the job done efficiently and effectively. By investing in a good set of screwdrivers and an electric screwdriver, you’ll be ready for any repair or DIY task that comes your way.
Static wristband
When preparing to work with electronic devices, it’s essential to take the necessary precautions to safeguard both yourself and the equipment. One crucial piece of equipment for any technician or DIY enthusiast is a static wristband. As the name suggests, these wristbands are designed to dissipate static electricity buildup, which can cause damage to sensitive components.
To use a static wristband, you’ll need to gather the necessary equipment, which includes the wristband itself, an anti-static mat, and a grounding cord. Before starting work, you’ll need to attach the grounding cord to a grounded surface, such as a metal pipe or ground pin on a power outlet. Then, attach the wristband to your wrist, ensuring a snug fit.
Finally, connect the wristband to the grounding cord, and you’re ready to start working! By taking these simple steps, you can protect both yourself and your equipment from the damaging effects of static electricity buildup.
Prepare Your Motherboard
Are you looking to install a PCIe Gen 3 x 2M.2 SSD from Patriot on your PC? If so, you’ll need to prepare your motherboard first. Before beginning the installation process, make sure to turn off your computer and unplug the power cable.
Next, locate the M.2 slot on your motherboard and remove the screw holding down the M.2 cover plate.
Carefully insert the SSD into the M.2 slot, making sure to align the notches on the SSD with the notches on the slot. Finally, secure the SSD in place with the screw that came with your motherboard and replace the M.
2 cover plate. Once your SSD is securely in place, you can turn your computer back on and start enjoying faster speeds, improved performance, and more storage space. By following these simple steps, you’ll be able to easily install your new PCIe Gen 3 x 2M.
2 SSD from Patriot and take your PC to the next level.
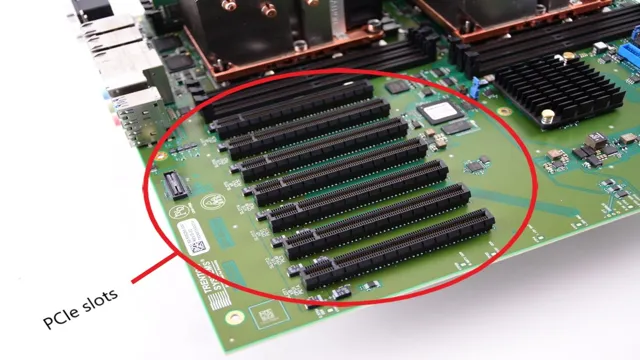
Locate the M.2 Slot on Your Motherboard
If you’re planning on upgrading your computer’s storage, using an M.2 SSD is a great option to consider. However, before you can install one, you’ll need to locate the M.
2 slot on your motherboard. This may seem daunting at first, but with a little preparation, you’ll be able to find it with ease. First, make sure to consult your motherboard manual to identify where the M.
2 slot is located. Some motherboards may have multiple M.2 slots, so it’s important to know which one you’re working with.
Once you’ve identified the slot, you’ll want to make sure your motherboard is properly prepared for the installation. This means grounding yourself to prevent electrostatic discharge, ensuring the motherboard is turned off and unplugged, and removing any components that may obstruct access to the M.2 slot.
With these preparations in place, you’ll be ready to install your M.2 SSD and enjoy faster boot times and improved storage performance.
Check the Compatibility of the Slot and SSD
When it comes to upgrading your computer’s storage capacity, it’s important to ensure that your motherboard is compatible with your chosen SSD and slot. Before you begin the installation process, it’s crucial to prepare your motherboard properly. Start by ensuring that your operating system is up to date and that your BIOS is properly configured.
Next, check the compatibility of the slot and SSD by matching the interface type, such as SATA or NVMe, and ensure that there is enough space to accommodate the drive. Additionally, it’s important to check for any firmware updates for your SSD, as these can often improve performance and stability. By double-checking these factors before beginning the installation process, you can ensure a smooth and successful upgrade.
Remember to take your time and follow the manufacturer’s instructions carefully to avoid any potential issues.
Secure Your M.2 SSD in the Slot
When installing an M.2 SSD, securing it in the designated slot is crucial to prevent any damage to the component. The first step in preparing your motherboard is ensuring that the M.
2 slot is compatible with the type of SSD you’ll be using. Most modern motherboards feature an M.2 slot, but not all of them support NVMe SSDs.
So, make sure to check whether the slot supports PCIe or SATA-based SSDs before installing it. Once you’ve identified the optimal slot, you can proceed to carefully insert the M.2 SSD into the slot with a screwdriver.
Ensure that the SSD is inserted correctly and in the right orientation, as it should fit snugly in the slot, and there should be no force needed to push it in. Finally, secure the M.2 SSD in place with the screw that came with your motherboard or SSD.
Usually, the screw is placed on the top of the M.2 SSD, allowing you to secure it gently until it stops moving. Following these steps will ensure that your M.
2 SSD is correctly installed in your system, giving you optimal performance and protection from any physical damage.
Connect the SSD to the Motherboard
Installing a PCIe Gen 3 x 2 M.2 SSD Patriot can be a bit daunting, but it’s not rocket science. Here’s how to connect it to the motherboard.
First, locate the M.2 slot on your motherboard. It’s usually near the PCIe slots, but check your motherboard manual to be sure.
Carefully insert your M.2 SSD into the slot and secure it in place with the screw provided. Then, depending on your motherboard, you may need to adjust the BIOS settings to recognize the new SSD.
Once you’ve done that, you’re ready to start enjoying the blazing-fast performance of your new SSD. Congratulations!
Attach the Screw to Secure the SSD
To connect the SSD to your motherboard, you’ll need to attach the screw to secure it. This is a crucial step in ensuring that the SSD is connected properly and won’t come loose during use. If you’re not sure where the screw should go, consult your motherboard manual for instructions.
Generally, though, you’ll find a small slot near the SATA port where the screw can be inserted. Once you’ve secured the screw, you can then connect the SSD to the motherboard. Make sure to connect the SATA cable to both the SSD and the motherboard, and also connect the power cable to the SSD.
With everything connected properly and securely fastened, you should be able to start using your SSD right away, enjoying faster boot times and improved system performance.
Connect the SSD to Your Motherboard
To connect your SSD to the motherboard, you’ll need to locate the SATA connectors on your motherboard. These are usually found near the edge of the board and are labeled SATA 0, SATA 1, etc. Depending on your motherboard, you may also need to locate a dedicated M.
2 slot for your SSD. Once you’ve found the appropriate connector, insert the data cable (usually red in color) into the SSD and then into the motherboard. Be sure to align the notches on the cable and connector to ensure a secure fit.
Once the data cable is connected, you’ll need to connect the power cable to the SSD. This will be a smaller, white cable with a plastic connector on the end. Simply plug it into the power supply unit and then into the SSD to provide power to the drive.
Voila, your SSD is now connected to your motherboard! It’s important to note that if you’re replacing an old hard drive with the SSD, you’ll also need to update your BIOS settings to ensure the SSD is recognized as the primary boot device.
Power On and Test the SSD
Once you have installed the PCIe Gen 3 x 2 M.2 SSD Patriot, it’s time to power on and test the new hardware. Start by shutting down your computer, disconnecting all cables, and opening your computer’s case.
Locate the M.2 slot on your motherboard and insert the SSD, making sure it’s properly seated in the slot. Secure it in place using the screw provided.
Once you finish installing the SSD, reconnect the cables and power on your computer. Enter your computer’s BIOS to ensure the SSD is recognized. If it’s not, check your connections and make sure you’ve properly installed the drive.
Finally, run a benchmark or stress test on the SSD to make sure it’s functioning correctly and to see the speed improvements compared to your old hard drive. Congratulations, you’ve successfully installed and tested your new PCIe Gen 3 x 2 M.2 SSD Patriot!
Power on Your Computer
When it comes to upgrading your computer’s storage, an SSD is a popular choice for its speed and reliability. Once you have installed your new SSD, the next step is to power on your computer and test it out. Don’t be afraid to double-check your connections and ensure everything is properly secured.
Once you’ve powered on your computer, go ahead and test the SSD to make sure it’s performing as expected. You can do this by opening your operating system and running basic tasks, such as opening files or applications. You should notice a significant increase in speed and overall performance with your new SSD.
With proper installation and testing, your computer can run smoothly for years to come and handle all of your computing needs.
Verify the SSD is Recognized by Your OS
SSD Once you have installed your SSD into your computer, it is crucial to verify that your operating system (OS) recognizes it. To do this, you need to power on your computer and navigate to your OS’s disk management utility. Here you should be able to see your new SSD listed alongside your other storage devices.
It is important to double-check that the SSD is labeled correctly and has the correct capacity listed. If you do not see it listed, double-check that the cables are connected correctly and that the drive is properly installed. If everything appears to be correct and your OS still does not recognize the drive, you may need to update your BIOS or install drivers for the drive.
Ensuring that your SSD is recognized correctly and functioning properly will enable you to take full advantage of its speed and performance benefits.
Final Thoughts
In conclusion, installing a PCIe Gen 3 x 2M.2 SSD from Patriot is a great way to boost the performance of your computer. By following the steps outlined in the manufacturer’s instructions, you can easily add this fast and reliable storage solution to your system.
Just make sure you have the right slot on your motherboard and that your BIOS is up to date prior to installation. It’s also important to handle the delicate M.2 SSD with care and to ensure that it’s properly secured in the slot.
With a bit of patience and attention to detail, you can enjoy lightning-fast transfer speeds and near-instantaneous boot times with your new PCIe Gen 3 x 2M.2 SSD from Patriot.
Enjoy Faster Load Times with your Patriot PCIe Gen 3 x 2 M.2 SSD
If you’re tired of sluggish load times on your computer or laptop, it’s time to upgrade to a Patriot PCIe Gen 3 x 2 M.2 SSD. With lightning-fast read and write speeds, this solid-state drive can significantly improve your overall computing experience.
Not only will programs and applications launch in a snap, but you’ll also notice faster boot times, smoother multitasking, and quicker file transfers. Plus, with a compact M.2 form factor, installation is a breeze, and you won’t have to deal with bulky cables or cluttered cables.
Overall, the Patriot PCIe Gen 3 x 2 M.2 SSD is an excellent investment for anyone looking to enhance their computing capabilities. Say goodbye to long load times and hello to blazing-fast performance!
Conclusion
Well, now that you’ve successfully installed your PCIe Gen 3 x 2 M.2 SSD Patriot, you’re ready to take your computer speed to new heights. The installation process may have seemed daunting at first, but with a little bit of patience, perseverance, and a lot of online tutorials, you’ve accomplished what you set out to do.
So congratulations, you’re now officially a tech-savvy mastermind and you’re sure to impress your friends with your lightning-fast computer capabilities. Just remember to always ground yourself before tinkering with your hardware and never underestimate the power of a good tutorial video!”
FAQs
What is PCIe Gen 3 x 2 M.2 SSD Patriot and why is it popular among PC users for installation?
PCIe Gen 3 x 2 M.2 SSD Patriot is a type of solid-state drive that utilizes the PCIe interface to transfer data at a faster rate than traditional hard drives. It is popular among PC users for installation because it can significantly improve their computer’s performance and speed.
How do I install a PCIe Gen 3 x 2 M.2 SSD Patriot in my PC?
Firstly, you need to locate the M.2 slot on your motherboard and make sure it supports PCIe Gen 3 x 2 M.2 interface. Then, carefully insert the SSD into the slot and secure it with the screw provided. Finally, enable the SSD in your BIOS settings and initialize it in your operating system.
Can I use a PCIe Gen 3 x 2 M.2 SSD Patriot with a laptop?
Yes, if your laptop supports M.2 interface and PCIe Gen 3 x 2, you can use the SSD for installation. However, make sure to check the specifications of your laptop before purchasing the SSD.
What are some benefits of using a PCIe Gen 3 x 2 M.2 SSD Patriot in my PC?
By using a PCIe Gen 3 x 2 M.2 SSD Patriot, you can experience faster boot-up time, quicker application loading, and improved overall system performance. It also consumes less power, produces less heat, and has a longer lifespan compared to traditional hard drives.