Have you ever encountered the problem of an unallocated SSD? It’s a frustrating situation that can leave you feeling helpless and frustrated. But don’t worry, there are some steps you can take to fix the issue and get your SSD back up and running in no time. In this troubleshooting guide, we’ll walk you through the process of fixing an unallocated SSD step by step.
We’ll cover everything from the causes of the issue to how to recover lost data. So sit back, grab a cup of coffee, and let’s get started!
Check for Physical Damage
One of the most common issues with SSDs is unallocated space, which means the drive is not recognized by the computer. Before attempting to fix the issue, one should always check for physical damage, as this could be the root cause. Inspect the SSD for any signs of physical damage, including cracks, dents, or scratches.
Additionally, ensure that the power and data cables are securely connected, as loose cables can prevent the drive from being recognized by the computer. If there is physical damage, it may be necessary to replace the SSD. However, if there is no physical damage, there are several troubleshooting steps that can be taken to fix the unallocated SSD, including using disk management tools, updating drivers, and running system scans.
Overall, checking for physical damage is an essential first step in resolving issues with unallocated SSDs.
Examine SSD for any physical damage
When it comes to examining your SSD, one of the most important things to check for is physical damage. This can occur in many ways, such as dropping your device, exposing it to extreme temperatures, or accidentally spilling liquids on it. Even small cracks or scratches can cause serious problems over time, leading to data loss or device failure.
That’s why it’s crucial to inspect your SSD regularly for any signs of physical damage. Look for any visible cracks, dents, or deformations on the casing or internal components. Additionally, pay attention to any unusual sounds, vibrations, or heat coming from your device, as these can also be indicators of physical damage.
By taking the time to thoroughly check for any physical damage on your SSD, you can ensure that it will last for years to come.
Try a different enclosure/cable
When experiencing issues with your external hard drive, it’s important to first check for physical damage to the enclosure and cable. The hard drive could be functioning properly, but if the cable or enclosure is damaged, it can cause connectivity issues. Start by inspecting the cable for any frayed areas or bends, which could indicate damage.
Look for any dents, scratches or cracks in the enclosure as well. If damage is found, consider replacing the cable or getting a new enclosure. Additionally, make sure the connectors are clean from any debris, as this can also cause issues with connectivity.
By ensuring your external hard drive components are free of damage, you can increase the chances of successfully accessing your data.
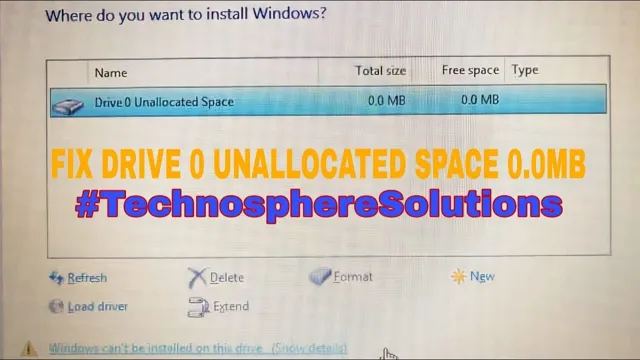
Use Disk Management
If you’re facing the issue of an unallocated SSD and looking for a fix, disk management might just be the solution you need. With disk management, you can create, resize, format, or delete partitions on your hard drive or SSD. To begin with, open the Disk Management tool by typing “diskmgmt.
msc” in the Run dialog box. Once the disk management window appears, locate your unallocated SSD and right-click on it. Then select “New Simple Volume” from the context menu, and the New Simple Volume Wizard will appear.
From here, you can assign a drive letter to the partition, format it using the NTFS file system, and give it a name. Keep in mind that this process will erase any existing data on the drive, so it’s essential to take a data backup before proceeding. Once the process is complete, your SSD should be allocated and ready to use.
Using disk management to fix your unallocated SSD can be a simple way to resolve the issue.
Access Disk Management in Windows operating system
Access Disk Management in Windows operating system Disk Management is a crucial tool for organizing and handling the storage space in your Windows operating system. This tool can be used to extend, shrink, format, or delete volumes, create new partitions, and assign drive letters to various volumes. To access Disk Management, there are a few simple steps you’ll need to follow.
First, right-click on the Windows icon located in the bottom left corner of your screen. Next, select “Disk Management” from the list of options. This will bring up the Disk Management window where you can view your computer’s storage devices, including hard drives and external devices.
From here, you can perform various tasks related to organizing and optimizing your storage space, like resizing partitions or creating new ones. So whether you’re a casual computer user or an IT professional, using Disk Management is an essential part of managing your computer’s storage space.
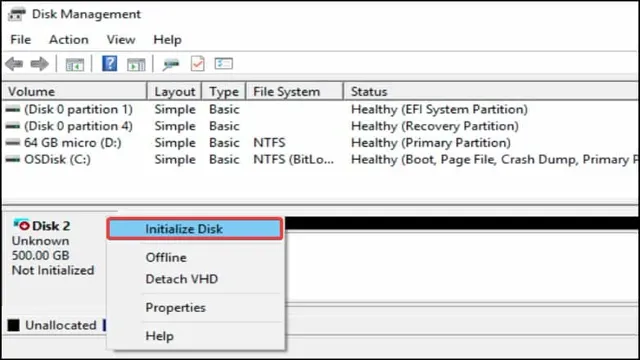
Initialize the unallocated SSD through Disk Management
If you’ve recently installed a new solid-state drive (SSD) on your computer, you may need to initialize it before you can start using it. Fortunately, Windows makes it easy to do this through Disk Management. To get started, right-click the Windows Start button and select Disk Management.
In the Disk Management window, you should see the new unallocated SSD listed. Right-click on it and select Initialize Disk. From here, you can choose whether to use the MBR or GPT partition style and then click OK.
Once you’ve initialized the disk, you can create partitions, format them, and start storing data. Initializing your SSD may seem like a daunting task, but it’s a quick and easy process that will ensure your new drive is ready to go.
Use Command Prompt
If you are facing the issue of an unallocated SSD, don’t worry, you can fix it using the command prompt. This issue occurs due to a problem with the disk partitioning process, and it can cause you to lose all the data on your SSD. However, through the command prompt, you can reclaim your lost space and gain access to your data.
To fix an unallocated SSD using the command prompt, you need to follow some steps. First, open the command prompt and type “diskpart” to open the disk partition tool. Then, enter “list disk” to see all the disks connected to your system.
Next, select the disk that is showing as unallocated by typing “select disk {number of the disk}” and then type “clean” to remove all partitions and data on the drive. To create a new partition on the SSD, type “create partition primary” and then assign a letter to the partition by typing “assign letter={letter you want to assign}”. Following these steps gives you full access to your SSD’s storage space, and you should now be able to save and access your files with ease.
Open Command Prompt as an administrator
If you want to use the full power of Command Prompt, you must know how to open it as an administrator. Luckily, it’s a quick and easy process. First, you’ll need to find Command Prompt in your start menu or by searching for it in the search bar.
Right-click the icon and select “Run as administrator.” You may get a notification asking for permission to run the program, so just click “Yes.” When Command Prompt opens, you’ll notice that it has more privileges than before.
This means you can perform administrative tasks, such as running system commands, modifying system files, and installing applications. It’s important to remember that running Command Prompt as an administrator can be dangerous if you don’t know what you’re doing. Always double-check your commands before executing them, and be aware of the potential risks.
Create a new partition on unallocated SSD
If you’ve recently purchased an SSD and want to create a new partition, the Command Prompt can simplify the process. This trick also works if you suddenly notice unallocated space on your SSD. First, press “Windows Key + X” and select the “Command Prompt (Admin)” option.
In the cmd menu, type “diskpart” and press enter. Next, type “list disk” to view all the disks present in your system. Look for the number that corresponds to your unallocated SSD and type “select disk [number]” to select it.
Afterward, type “create partition primary” to create a new partition on your SSD. Lastly, type “assign letter=[letter]” to assign a drive letter to your new partition. By following the above steps, you’ve successfully created a new partition on your unallocated SSD, and now it’s ready to use!
Format the new partition to make it usable
To make a new partition usable, you need to format it first. And one of the ways you can do that is by using Command Prompt. Open Command Prompt on your Windows operating system, type “diskpart,” and hit enter.
Then, type “list disk” and hit enter to see all the available disks attached to your system. Once you have identified the disk that you want to format, type “select disk (disk number)” and hit enter. Then, type “list partition” to see the partitions that are on the selected disk.
Select the partition that you want to format by typing “select partition (partition number),” then enter the command “format fs=ntfs quick” to format the partition as a new file system. Make sure you replace “ntfs” with the desired file system. After the format is complete, you can assign a letter to the new partition by using the “Assign” command.
Finally, type “exit” to close diskpart and exit the command prompt. Congratulations! You now have a usable new partition on your system.
Recover Data from Unallocated SSD
Losing data due to an unallocated SSD can be a nightmare, but don’t worry, as there are ways to recover it. One of the most effective methods is to use a data recovery software, as it can help you to recover your lost or inaccessible files. These software are designed to scan the unallocated space on your SSD and retrieve the data that has been lost.
In some cases, the data may not be recoverable, but it is always worth a try. Another option is to do a quick format on your SSD, as this can fix any errors that may have occurred and allow you to access your files once again. However, this process will erase all the data on your SSD, so it is critical to backup your data before doing so.
By taking these steps, you can fix an unallocated SSD and recover your lost data.
Use data recovery software to recover lost data from the unallocated SSD
If you have lost important data from your SSD and it shows up as unallocated space, don’t panic. You can use data recovery software to retrieve your lost files. Unallocated space means that the partition table has been erased or damaged, making it inaccessible to the operating system.
However, the data is still present on the SSD, and with the right tools, you can retrieve it. There are various data recovery software options available online, but make sure to choose a reliable one that can handle your specific SSD’s file system. Some software may require you to create a disk image of the unallocated SSD to perform the recovery.
Once the software has completed the scanning process, select the files you want to recover and save them to another drive. Keep in mind that it is crucial to avoid overwriting the unallocated space on the SSD while attempting to recover the lost data. It’s always a good practice to back up your important files regularly to prevent data loss.
With the right data recovery software, recovering lost data from an unallocated SSD is possible.
Backup recovered data on another storage device
If you’ve experienced a data loss on your unallocated SSD, the first step is to turn to data recovery tools to retrieve your essential information. However, the recovered data should be backed up on another storage device to avoid any future mishaps. One great way to do this is to use an external hard drive, a cloud-based service like Google Drive or Dropbox, or copy the recovered data to another computer.
By having a backup on another storage device, you can rest assured knowing that your data is safe and secure. It’s important to make sure that the backup is also regularly updated, so in case of another data outage, you have the latest version of your crucial files ready to be restored with ease. Remember, backing up your data is crucial in protecting against data loss and helping you stay on top of potential roadblocks.
Prevent Future Unallocated SSD Issues
If you’re dealing with an unallocated SSD, there are a few measures you can take to both fix the issue and prevent it from occurring in the future. One solution is to use a software tool to recover the lost partitions on your SSD and assign them a drive letter. Another option is to run a disk check and try to repair any errors on your drive.
Once you’ve fixed the issue, it’s important to back up your data regularly and keep your SSD well-maintained by updating its firmware and avoiding sudden power outages. You can also check your drive’s health periodically using diagnostic tools to catch any potential issues before they become serious problems. By taking a few proactive steps, you can prevent future unallocated SSD issues and ensure the longevity of your drive.
Regularly check for firmware updates
Regularly checking for firmware updates is one of the best ways to prevent future unallocated SSD issues. With each firmware update, manufacturers address any bugs and improve the overall stability and performance of your SSD. By staying up-to-date with the latest firmware versions, you can ensure that your SSD is running smoothly and efficiently.
Firmware updates can help prevent unexpected SSD failures and data loss, as well as extend the lifespan of your drive. So, make sure to regularly check for firmware updates to keep your SSD in tip-top shape!
Backup data to prevent data loss in case of future issues
SSD, Data Loss, Backup, Unallocated, Issues Taking precautions to ensure the safety of our data should always be a top priority. One of the most effective ways to prevent future unallocated SSD issues and potential data loss is to regularly backup our important files. As anyone who has experienced data loss can attest, it can be an incredibly frustrating and stressful experience.
Therefore, investing some time and effort into setting up a reliable backup system is well worth it. Whether it’s through cloud-based services, external hard drives, or even just creating duplicate files on different devices, having a backup plan in place can provide peace of mind and guarantee that important data isn’t lost forever. Unallocated SSD issues can happen unexpectedly, and without a backup, there’s no guarantee that important files can be recovered.
So why take the risk? By implementing a backup strategy now, we can prevent future issues and ensure that our data is always safe and sound.
Conclusion
After taking all the necessary steps and going through the troubleshooting process, your unallocated SSD should now be back to its full glory – ready to store all your important data and cat videos. Remember, when dealing with tech issues, patience is key. So take a deep breath, keep calm, and don’t panic.
And if all else fails, just blame the gremlins in your computer and call IT support.”
FAQs
What is the meaning of SSD unallocated space?
SSD unallocated space is the space on the solid-state drive that is not assigned to any partition or file system. It is like a blank slate waiting to be utilized.
How can I fix an unallocated SSD?
There are several ways to fix an unallocated SSD. One way is to use disk management in Windows to create a new partition or to assign a drive letter to the unallocated space. Another way is to use a third-party partition manager tool to create and manage partitions on your SSD.
What can cause an SSD to become unallocated?
An SSD can become unallocated due to several reasons, such as a failed partitioning process, disk management errors, virus or malware attacks, system crashes, or accidental deletion of partitions.
Can I recover data from an unallocated SSD?
Yes, it is possible to recover data from an unallocated SSD if you have not overwritten the data. You can use a data recovery software tool to recover lost data from the unallocated space.
How can I prevent my SSD from becoming unallocated in the future?
To prevent your SSD from becoming unallocated, you can back up your data regularly, avoid incorrect partitioning or formatting actions, use reliable and updated anti-virus software to protect your system from malware attacks, and avoid rough handling or sudden power interruptions while operating your SSD.