Upgrading your computer’s storage system is a great way to boost its overall performance. If you’re looking to replace your old SSD with an M.2 drive, you might be wondering how to easily transfer all of your data from one drive to the other.
Fortunately, cloning your SSD to an M.2 drive is a relatively simple and painless process. In this guide, we’ll explain how to clone SSD to M.
2 step-by-step, so you can smoothly transition to your new storage solution without losing any valuable data.
Check Compatibility
If you are upgrading your system from an SSD to an M.2 drive, cloning your system is pretty straightforward. However, before you begin the cloning process, you need to check if your motherboard supports NVMe M.
This is because not all motherboards come with an M.2 slot, and some only support SATA M.
2 drives. To check if your motherboard supports NVMe M.2, check the documentation that came with your motherboard or look up your motherboard model online.
If your motherboard does not support NVMe M.2, you need to purchase a PCIe adapter to connect the M.2 drive to your system.
Once you have successfully confirmed compatibility, you can start the cloning process without any hitches. Overall, ensuring compatibility is a crucial step before attempting to clone your SSD to M.
Make Sure M.2 Slot is Available
When it comes to upgrading your computer’s storage drive, the M.2 slot is a popular choice due to its high-speed capabilities and small form factor. But before you rush out to buy a new M.
2 SSD, it’s important to check if your motherboard has an available M.2 slot and if it’s compatible with the type of M.2 SSD you want to use.
Not all motherboards have an M.2 slot, and even if they do, they may only support certain sizes and types of M.2 SSDs.
Make sure to do your research and check your motherboard’s specifications before making a purchase to avoid compatibility issues and disappointment. It’s always better to be safe than sorry when it comes to upgrading your computer’s components.
Confirm SSD and M.2’s Interface Match
When upgrading your computer’s storage with a new SSD or M.2 drive, it’s important to check if the interfaces match for compatibility. A mismatch in interface can cause the drive to not function or run at a slower speed than intended.
Before purchasing a new drive, it’s necessary to confirm the type of interface your computer uses for its storage. Most modern motherboards have a variety of interface options, so take a look at the specs to make sure you’re getting the right match. Generally, SSDs use SATA or PCIe interfaces, while M.
2 drives use PCIe or NVMe interfaces. With a bit of research, you can make sure your new storage drive matches your motherboard’s interface and enjoy faster read and write times. So, it’s vital to check this aspect to avoid any waste of time and effort.
Choose a Cloning Software
So you’re up for a faster and more efficient storage solution and you’re thinking of swapping your SSD for an M.2? Great idea! But before you do so, you might want to transfer your files and system from your SSD to the M.
And the best way to do that is by cloning your SSD. To clone SSD to M.2, you need to choose a reliable cloning software.
There are plenty of options in the market, each with their own strengths and weaknesses. Some of the most popular choices include Acronis True Image, EaseUS Todo Backup, and Macrium Reflect. These programs can help you migrate your data and operating system seamlessly, without losing any important files or settings.
Just make sure you choose the right software that can cater to your specific needs and compatibility. With the right cloning software, your SSD to M.2 transfer shouldn’t be a problem!
EaseUS Todo Backup
When it comes to choosing cloning software, a reliable and efficient option is EaseUS Todo Backup. This software provides a user-friendly interface that allows you to clone your hard drive in just a few clicks. Cloning your hard drive is essential if you want to transfer your entire system, including settings, applications, and files, to a new storage device.
With EaseUS Todo Backup, you can also create backups and restore your system in case of any issues or data loss. It is essential to choose a trustworthy cloning software to avoid any data loss or system failures during the cloning process. EaseUS Todo Backup makes the cloning process seamless and hassle-free, making it a top choice for those looking to transfer their entire system to a new device.
AOMEI Backupper
When it comes to choosing a cloning software for your computer, AOMEI Backupper is an excellent option to consider. This software allows you to create an exact copy of your system and installed programs, including your operating system and personal data. Whether you’re upgrading to a new computer or need to transfer files and applications to a different hard drive, AOMEI Backupper makes it easy to do so efficiently and quickly.
With its intuitive user interface and customizable options, you can choose how you want to clone your system and customize the process to fit your needs. Plus, its advanced features, such as system backup and restore, disk imaging, and scheduled backups, make it a reliable and comprehensive backup and cloning software. Choosing AOMEI Backupper for your cloning needs is a decision you won’t regret.
Samsung Data Migration
When it comes to upgrading to a new computer, the thought of backing up and transferring all of your data can be daunting. Fortunately, you can easily clone your entire hard drive with cloning software like Samsung Data Migration. This software allows you to seamlessly transfer all of your files, applications, and operating system to your new device, without the hassle of manually transferring each file.
By choosing a cloning software like Samsung Data Migration, you can upgrade to a new computer with ease, without the stress of losing important documents or wasting time transferring files. Plus, with its user-friendly interface, even those who are not technically savvy can successfully clone their hard drive. So, if you’re looking to upgrade your device but are hesitant to transfer all of your important data, consider using Samsung Data Migration for a hassle-free experience.
Macrium Reflect
If you’re looking for a reliable cloning software, Macrium Reflect might just be the solution you need. With its user-friendly interface and powerful features, Macrium Reflect is an excellent choice for those who want to clone their hard drive or backup their data. What makes Macrium Reflect stand out from the competition is its ability to create a compressed image of your entire disk, making it easier and faster to transfer data to another drive.
Whether you’re switching to a new computer or just need to backup your files, Macrium Reflect simplifies the process with its straightforward yet powerful features. Plus, with its robust backup and recovery options, you can rest assured that your data is always safe and secure. So why wait? Try Macrium Reflect today and start cloning and backing up your data with ease!
Prepare M.2 for Cloning
If you’re looking to upgrade your system, cloning an SSD to an M.2 can be a great way to increase speed and capacity. However, before you get started, there are a few things you’ll need to do to prepare your M.
First, check to make sure your motherboard supports M.2 storage.
Next, you’ll need to install the M.2 into your motherboard’s M.2 slot and fasten it with the provided screws.
Then, format the M.2 using your computer’s disk management tool. Once your M.
2 is ready, you can proceed with cloning your SSD. With your M.2 properly prepared and cloned, you’ll be able to enjoy faster boot times, faster application launch times, and increased storage capacity.
Overall, cloning an SSD to an M.2 can be a great way to upgrade your system and improve performance.
Format M.2 to NTFS
If you’re preparing to clone your M.2 drive, one important step is to format it to NTFS. NTFS is the file system used by Windows, and it’s essential if you want to transfer your files over to a new M.
2 drive. Fortunately, formatting your M.2 drive to NTFS is a straightforward process.
Simply open the Disk Management tool in Windows, right-click on the M.2 drive, and select “Format.” From there, choose NTFS as the file system and allocate the appropriate allocation unit size.
It’s important to note that formatting your M.2 drive will erase all data on it, so be sure to back up any important files before proceeding. Once your M.
2 drive is formatted to NTFS, you’re ready to start the cloning process and transfer your files over to the new drive.
Initialize M.2 to GPT
Before cloning your hard drive onto your M.2 drive, it’s important to properly initialize it to the GPT partition style. This will ensure that your M.
2 drive is compatible with modern operating systems and can support larger capacities beyond what the older MBR partition style can handle. Initializing your M.2 drive to GPT is a relatively straightforward process that you can do through Disk Management on Windows or Disk Utility on Mac.
Once you’ve initialized your drive, you can then format it and begin the cloning process. It’s important to note that initializing your M.2 drive will erase any existing data, so be sure to back up any important files beforehand.
By properly preparing your M.2 drive for cloning, you can ensure a smooth transition and optimal performance for your new storage solution.
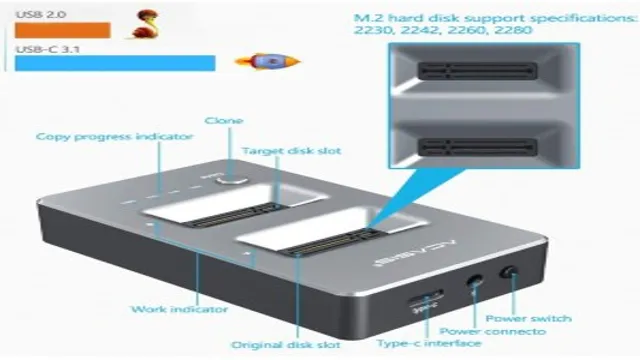
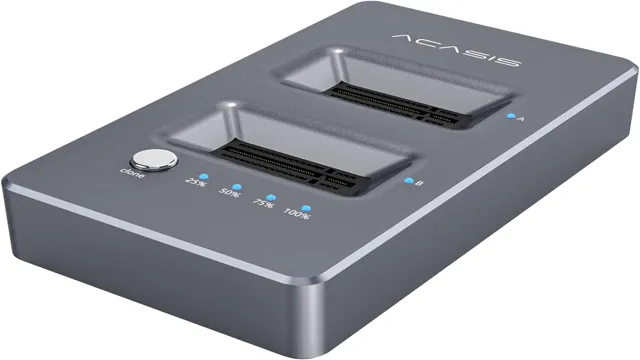
Clone SSD to M.2
If you’re looking to upgrade your computer’s storage, you might be wondering how to clone your existing SSD to an M.2 drive. Luckily, it’s a straightforward process that can be easily done with the right software.
First, you’ll need to purchase an M.2 drive that matches the size and type of your existing SSD. Next, download a cloning software such as Macrium Reflect or Acronis True Image.
These programs will guide you through the cloning process, including creating a bootable USB drive to transfer the data to the M.2 drive. Once you’ve successfully cloned the SSD to the M.
2 drive, it’s simply a matter of installing the M.2 drive into your computer and booting up. Your computer should recognize the new drive with all the data from your previous SSD intact.
With a new and faster M.2 drive, you’ll be able to enjoy faster load times and improved overall performance from your system.
Connect M.2 with SSD to the Computer
To connect your M.2 with SSD to the computer, you’ll need to clone the SSD. This process is relatively straightforward and ensures that all of your important data is transferred securely and efficiently.
Once you’ve inserted your M.2 SSD into the compatible slot on your motherboard, you’ll need to install the necessary drivers and software to get started. Then, you can use a cloning software to transfer the contents of your SSD to your M.
There are many different programs available that can help with this process, including EaseUS Todo Backup and Clonezilla. Be sure to follow all instructions carefully and back up your data before initiating the transfer.
Once the cloning process is complete, you can enjoy faster boot times, improved performance, and more storage space on your computer.
Choose Source and Destination Disk
If you’re looking to upgrade your computer’s storage, you may want to consider cloning your SSD to an M.2 drive. Before you begin the cloning process, you’ll need to choose your source and destination disks.
Your source disk is your current storage device (in this case, your SSD), while your destination disk is your new M.2 drive. When selecting your destination disk, make sure it’s at least the same size as your source disk, or larger.
This will ensure that all of your files, programs, and operating system are transferred successfully. It’s also important to note that some M.2 drives require specific types of connections, so make sure your motherboard is compatible before making a purchase.
By choosing the right source and destination disks, you’ll be on your way to a faster and more efficient computer.
Click on Start Clone
If you’re looking for a way to optimize your computer’s performance, cloning your SSD to an M.2 drive can make a big difference. And with the right tools, it’s easier than you might think.
One of the best options available is to use a clone software like EaseUS Todo Backup. Once you have it installed and set up, it’s simply a matter of clicking “Start Clone” and watching the magic happen. This process will copy everything on your current SSD and transfer it to your newer, faster M.
2 drive, including your operating system, applications, and files. The result should be a noticeable boost in speed and efficiency. So, whether you’re a gamer, video editor, or heavy computer user, an SSD-to-M.
2 clone is definitely worth considering.
Swap SSD with Cloned M.2
Are you tired of slow load times on your computer? Upgrading your storage to a faster M.2 SSD can be a great solution to this problem. However, the process of cloning your current SSD can seem daunting to some.
Don’t worry, it’s actually quite simple! First, you’ll want to purchase an M.2 SSD that matches your current storage capacity. Next, download cloning software such as Macrium Reflect or Acronis True Image.
Connect the new M.2 SSD to your computer and use the cloning software to make an exact copy of your old SSD onto the new one. Once the cloning process is complete, power your computer down and disconnect the old SSD.
Finally, install the new M.2 SSD in its place and reboot your computer. Voila! Your storage has been upgraded without losing any data.
With the easy process of cloning, upgrading to a faster M.2 SSD has never been easier.
Install M.2 into the M.2 Slot
If you’re looking to upgrade your computer’s storage capacity, swapping out your old SSD with a new M.2 SSD can give you a significant boost in performance. To do this, you’ll need to install the M.
2 SSD into the M.2 slot on your motherboard. But first, make sure to clone your old SSD onto the new M.
2 drive using software like Macrium Reflect or Acronis True Image. Once the cloning process is complete, shut down your computer and open the case. Locate the M.
2 slot on your motherboard and gently insert the new SSD into the slot, making sure to secure it with the screw provided. Finally, close the case and power on your computer. Your operating system should recognize the new drive and you can start using your upgraded storage immediately.
With this simple upgrade, you can enjoy faster boot times, quicker file transfers, and a smoother overall experience.
Change Boot Order in BIOS
Changing the boot order in BIOS can be a simple process that can provide significant benefits. One such benefit may be swapping an SSD with a cloned M.
To do so, you’ll need to ensure that the cloned M.2 is installed and recognized by your system. Once you confirm that, you can go ahead and access BIOS using the appropriate key during startup.
From there, you’ll navigate to the boot order section and select the cloned M.2 as your primary boot device. This allows your system to boot from the M.
2 every time it starts up. Swapping your SSD with a cloned M.2 can improve system performance, which is crucial for those that rely on their computers for work or gaming.
By changing the boot order, you can enjoy the benefits of your new storage device without any hiccups.
Conclusion
Cloning your SSD to an M.2 drive may seem like a daunting task, but with the right tools and knowledge, it’s a breeze. Just remember to approach the process with caution and double-check all your settings before hitting that “Clone” button.
And if you’re feeling particularly adventurous, you could always try cloning multiple drives at once for an even faster cloning experience. So, go forth and clone with confidence, my fellow tech enthusiasts!”
FAQs
What is the benefit of cloning SSD to M.2?
Cloning SSD to M.2 provides improved performance and faster data transfer rates, as M.2 drives use the NVMe interface for faster data read and write speeds.
Can I clone my SSD to M.2 using software?
Yes, there are several software options available like Samsung Data Migration, Acronis True Image, or Macrium Reflect that allow you to clone your SSD to M.2 with ease.
Do I need to format my M.2 drive before cloning?
No, the cloning software will format the M.2 drive during the cloning process, so you don’t need to format it beforehand.
How long does it take to clone an SSD to M.2?
It depends on the size and speed of your SSD and M.2 drives. Generally, it takes around 30 minutes to an hour to clone a 250 GB SSD to M.2. The process may take longer for larger drives.
Can I clone multiple partitions at once to my M.2 drive?
Yes, most cloning software allows you to clone multiple partitions at once to your M.2 drive, making it a convenient way to migrate your entire SSD to M.2 without losing any data.