Are you planning on upgrading your computer’s hard drive to increase the storage space or boost performance? If you’re looking to transfer all your important files to a new solid-state drive (SSD) and worry about going through the tedious process of reinstalling the Windows operating system, the good news is that you don’t have to! With the help of Windows backup and restore utility, you can easily clone your existing drive and move all your data – including the operating system, programs, and settings – to a new SSD without having to reinstall everything from scratch. In this blog, we will guide you through the steps on how to install Windows backup to a new SSD and help you avoid any potential hiccups along the way. So let’s get started!
Check Hard Drive Formatting
If you’re looking to install Windows backup onto a new SSD, the first thing you need to do is check the hard drive formatting. You’ll want to ensure that your SSD is properly formatted and ready to receive the Windows backup files. To do this, you can use the Disk Management tool on your computer.
Simply right-click the Start Menu button and select Disk Management. From there, you can check the format of your SSD and see if it’s in the correct format (most likely NTFS). If it isn’t, you can easily format the SSD by right-clicking it and selecting the format option.
Just be aware that formatting the SSD will erase any data on it, so make sure you’ve backed up any important files before proceeding. Once your SSD is properly formatted, you can proceed with transferring the Windows backup files onto it and getting your new system up and running.
Format New SSD to NTFS
When you buy a new SSD (Solid State Drive), it usually comes unformatted. In order to use it, you need to format it to a readable file system like NTFS. But before you begin the formatting process, it’s important to check whether there is an existing file system on the drive.
If there is, formatting the drive may erase all the data on it. Therefore, take some precautionary steps to ensure that you are not formatting the wrong drive. Once you have confirmed that it is the right drive, you can proceed to format it to NTFS.
Formatting the drive is a simple process that can be done through the Windows Disk Management tool. Simply right-click on the drive, select the Format option, choose NTFS as the file system, and click on the Start button. The formatting process may take some time depending on the size of the drive.
Once it’s done, you can use the SSD for data storage or as the primary drive for your operating system. Remember to always check your drive’s formatting before proceeding with the NTFS format.
Initialize SSD within Disk Management
When setting up a new SSD in your computer, one of the first things you should check is its formatting. Before you can use the drive, you need to make sure it has been initialized and formatted correctly. To do this, you can use Disk Management, which is a built-in utility in Windows.
Firstly, you’ll need to connect your SSD to your computer and launch Disk Management. Once you’re in Disk Management, you should see your SSD listed under the disk drives section. If your SSD is not listed, you may need to check your connections or refer to the manufacturer’s instructions.
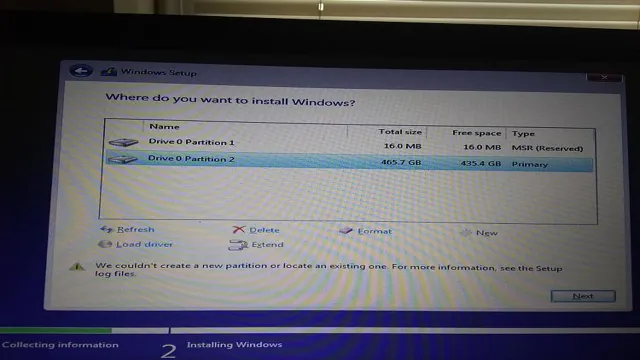
Assuming your SSD is listed, the next step is to check its formatting. If the drive has not been formatted, you’ll need to initialize it first. To do this, right-click on the unallocated space on the drive and click “Initialize Disk.
” Follow the prompts to initialize the disk, and then you can proceed with formatting it. Ensuring your SSD is initialized and formatted correctly will allow you to use the drive to its full potential and ensure you don’t encounter any issues.
Create/Restore Windows Backup
If you’re looking to install Windows backup on a new SSD, there are a few steps you need to follow to ensure a successful transfer. Firstly, make sure you have a backup of your current system on an external hard drive or cloud storage service. Next, install your new SSD and make sure it’s properly connected to your system.
Then, use the Windows Backup and Restore feature to restore your data and system image onto the new SSD. This will ensure that all your personal files, settings, and applications are transferred over to the new drive. Once the restore process is complete, you should be able to boot up your system as usual and start using your new SSD.
Remember to regularly backup your system to avoid any potential data loss or system failures in the future. With just a few simple steps, you can easily transfer your Windows backup to a new SSD and enjoy faster boot times and improved system performance.
Plug External Drive into Computer
Creating a backup of your Windows system is crucial to maintaining the security of your data. To get started, plug an external drive into your computer and ensure it is recognized by your system. The next step is to navigate to the Backup and Restore feature in your Control Panel and click on the option to “Create a system image.
” This will create a snapshot of your entire Windows system, including all software, settings, and files. Depending on the size of your system, this process may take several hours to complete. Once the backup process is finished, you can use the same Backup and Restore feature to restore your system to its previous state in the event of a crash or malfunction.
By regularly creating backups of your Windows system, you can ensure that your important data is safe and secure, no matter what happens.
Locate Backup and Restore Settings in Control Panel
If you’re looking to create or restore a Windows backup, the first thing you’ll need to do is locate the backup and restore settings in your computer’s control panel. This can be easily done by typing “backup and restore” into the search bar in the bottom left-hand corner of your screen. Once you’ve opened the backup and restore settings, you’ll be presented with a few different options.
To create a backup, click on the “set up backup” button and follow the prompts to select the files and folders you want to backup and choose where you want to store the backup. To restore a backup, you’ll need to click on the “restore my files” button and select the backup you want to restore from. From there, the process is fairly straightforward and should only take a few minutes.
By creating a backup of your important files and documents, you can rest easy knowing that your data is safe and secure in case of a computer crash or other unexpected disaster.
Select ‘Restore my Files’ Option
When it comes to creating or restoring a Windows backup, the process may seem daunting at first glance. However, it’s a crucial step to ensure that important files and data are safeguarded against any unexpected loss or damage. Selecting the “Restore my Files” option is a necessary step in this process and can be easily accessed through the Control Panel.
From there, users will be prompted to select the backup file they wish to restore and choose which files they would like to retrieve. This convenient feature allows for a seamless and efficient recovery of files, ensuring that nothing is lost permanently. By taking the time to create a Windows backup and utilizing the “Restore my Files” option, users can breathe easy knowing that their data is protected and can be easily retrieved in the event of any unforeseen circumstances.
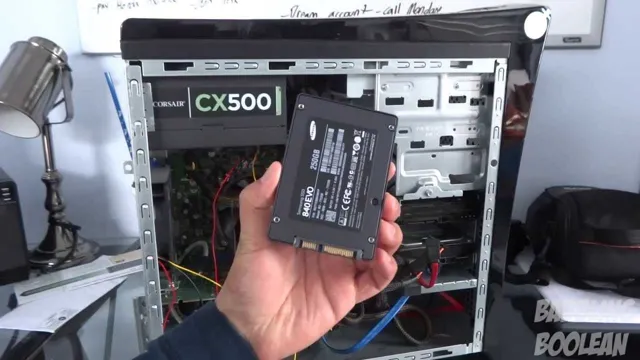
Clone Internal Drive to New SSD
Are you looking to upgrade to a new SSD but want to ensure that your Windows operating system and data are preserved? The good news is that you can easily clone your internal drive to your new SSD using backup software. This process involves creating a backup of your current hard drive and restoring it onto the new SSD. There are several backup software options available, but the most popular are Macrium Reflect, Acronis True Image, and EaseUS Todo Backup.
Once you have created the backup, you will need to install the new SSD, boot from it, and then restore the backup onto it. This process may take some time depending on the size of your internal drive and the speed of your computer, but it is a straightforward way of ensuring that your data and operating system are transferred seamlessly to your new SSD. So, go ahead and upgrade your computer’s performance without worrying about losing any data.
Use a Disk Cloning Software
If you’re looking to upgrade your computer’s performance, then cloning your internal drive to a new SSD is a great way to do it. This process involves using a disk cloning software to transfer all your data, including your operating system and applications, from your old hard drive to your new SSD. The benefit of using a cloning software is that it saves you a lot of time and effort compared to manually transferring your files.
Plus, it ensures that all your files are copied over precisely, without any missing files or data loss. The process of cloning your drive can be straightforward, especially if you use user-friendly software like EaseUS or Clonezilla. Don’t forget to backup your old drive in case of any errors during the cloning process.
Cloning your drive is an excellent way to breathe new life into your computer and enjoy faster processing speeds and improved performance.
Attach New SSD via SATA or USB
When it comes to upgrading your computer’s storage, attaching a new SSD via SATA or USB is a great option. However, it’s important to clone your internal drive to the new SSD first to ensure everything is transferred over smoothly. This process involves making an exact copy of your internal drive’s contents onto your new SSD, including your operating system, applications, and files.
One of the benefits of cloning your drive is that you won’t have to reinstall any programs or transfer files manually. Simply connect your new SSD, download a cloning software, and follow the prompts to complete the process. Additionally, using a USB connection for your new SSD can make the cloning process faster and more convenient as it eliminates the need to open up your computer and physically install the SSD.
Overall, cloning your internal drive to your new SSD is a straightforward process that can greatly improve your computer’s performance and storage capacity. By following these steps, you can ensure a seamless transfer of all your important files and applications to your new drive. So why wait? Give your computer a boost today by upgrading to an SSD!
Configure Boot Order and Reboot PC
If you’ve recently purchased a new SSD and want to install Windows backup onto it, you’ll need to configure the boot order and reboot your PC. This process can seem a bit daunting, but with the right steps, it can be quite straightforward. First, you’ll want to make sure your new SSD is properly connected to your PC.
Then, you’ll need to enter the BIOS menu by pressing the appropriate key during startup (usually F2 or Delete). From there, go to the boot tab and set the boot priority to your new SSD. Save the changes and exit the BIOS menu to reboot your PC.
Once your PC restarts, it should automatically boot from your new SSD, allowing you to install your Windows backup onto it. With these simple steps, you’ll be able to seamlessly upgrade to a new SSD and enjoy faster boot times and improved performance.
Conclusion
In conclusion, installing Windows backup to a new SSD can be a daunting task for some, but with the right steps and tools, it can be a breeze. Just remember, if at first, you don’t succeed, don’t give up. Keep pushing forward, and soon enough, your new and improved SSD will be up and running in no time.
And if you’re feeling overwhelmed or lost in the process, don’t be afraid to reach out for help. After all, even the most skilled techies can use a little assistance every now and then. Now go forth, conquer your new SSD, and may your backups be forever safe and secure!”
FAQs
Can I use Windows Backup to transfer my data to a new SSD?
Yes, you can use Windows Backup to create a system image of your current setup and then restore it to your new SSD.
How do I create a system image using Windows Backup?
Go to Control Panel > System and Security > Backup and Restore (Windows 7), then click “Create a system image” and follow the prompts.
Do I need to format my new SSD before restoring the system image?
No, you do not need to format your new SSD before restoring the system image as the restore process will overwrite any existing data on the drive.
Can I use Windows Backup to transfer my operating system to a new computer with a different hardware setup?
No, you cannot use Windows Backup to transfer your operating system to a new computer with a different hardware setup as the drivers and configurations will not be compatible.