Do you want to experience faster boot times and improved performance on your computer? Installing an SSD (Solid State Drive) can be the perfect solution for you. An SSD can significantly enhance your computer’s speed and make it run like a dream. But, how do you install an SSD? If you’re unsure about the process, don’t worry – it’s relatively easy to do.
In this article, we’ll guide you step-by-step through this process, so you can enjoy the benefits of a lightning-fast computer and take advantage of its capabilities. So, let’s get disk-savvy!
Check Compatibility
If you’re considering upgrading your computer’s hard drive to an SSD, you may be wondering how hard it is to install one. The good news is, it’s a straightforward process that shouldn’t take too long. However, before you begin, it’s essential to check that your computer is compatible with the SSD you’re planning to install.
You’ll need to ensure that your computer has an available drive bay for the SSD, and that the SSD is the correct form factor and interface for your computer. Once you’ve determined compatibility, you’ll need to open up your computer’s case and physically install the SSD. This involves connecting it to your computer’s power supply and motherboard, which should be relatively straightforward if you have a basic understanding of computer components.
Then, you’ll need to transfer your operating system and data to the new SSD, which can be done using cloning software. Overall, while installing an SSD may seem intimidating at first, it’s a manageable process that can significantly improve your computer’s performance and speed.
Ensure Your System Supports SSDs
When upgrading your system to include a Solid State Drive (SSD), it’s crucial to check compatibility to ensure a seamless experience. Not all systems support SSDs, and simply purchasing one without ensuring compatibility can lead to various issues. Before buying an SSD, be sure to check your system’s motherboard and ensure it has the necessary ports and connections for installation.
Additionally, check your system’s BIOS to ensure it supports booting from an SSD. Upgrading to an SSD can bring significant improvements to your system’s speed and performance, but it’s essential to do your research and ensure compatibility before making any purchases. By taking the time to check compatibility, you can avoid any issues and enjoy the full benefits of your new SSD.
Get the Right Size (2.5-inch or M.2)
When it comes to choosing the right SSD, size does matter. And by size, we mean the physical size of the drive – be it a 5-inch or M.
2 form factor. But before you go ahead and make a purchase, it’s important to check your system’s compatibility. Not all systems support both types of drives, and certain motherboards may only have one or the other type of slot.
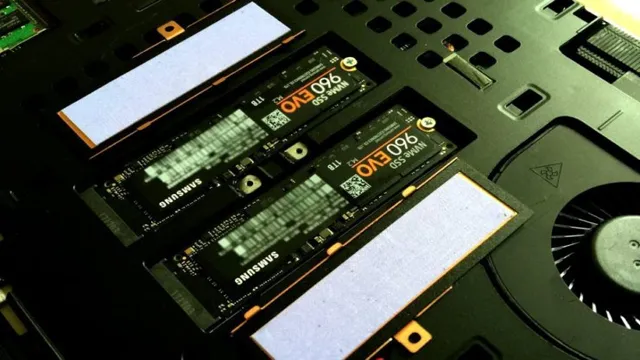
If your system has an M.2 slot, you may want to opt for an M.2 SSD as it offers faster speeds and takes up less space, but if your system only has a
5-inch slot, then that’s your only option. So, before you buy an SSD, make sure to double-check your system’s compatibility to ensure you’re getting the right size for your needs.
Gather Your Tools
When it comes to upgrading your computer’s storage with an SSD, it might seem daunting at first, but it’s actually a fairly straightforward process. First, you’ll need to gather your tools. You’ll want a screwdriver that fits the screws on your computer’s case, as well as any mounting brackets that may have come with your SSD.
You’ll also need a SATA cable to connect your SSD to your motherboard. If you don’t already have one, you can typically purchase these items at a local electronics store or online retailer. Once you have your tools, it’s just a matter of opening up your computer’s case, locating your hard drive, disconnecting it, and replacing it with the SSD.
Most SSDs come with instructions or online tutorials that can guide you through the installation process step by step. So while it may sound intimidating, installing an SSD is actually a fairly simple task that can greatly improve your computer’s performance.
Screwdriver and Screws
When it comes to assembling furniture or hanging shelves, a screwdriver and some screws are must-have tools. But before you dive into your project, it’s essential to gather the right tools to ensure success. First and foremost, you’ll need a screwdriver.
There are two types of screwdrivers: flathead and Phillips head. A flathead screwdriver has a single blade that fits into a slot on a screw head, while a Phillips head screwdriver has a four-pronged head that fits into a cross-shaped slot on a screw head. It’s important to use the right size and type of screwdriver to avoid damaging the screw and making it difficult to loosen or tighten.
You’ll also need screws in the right size and type for your project. Consider the weight and materials of the object you’re attaching and choose screws of appropriate length and thickness. With the right tools in hand, you’re ready to tackle your project with ease and confidence.
Cloning Software or Windows Installer
When it comes to cloning software or installing Windows, having the right tools can make all the difference. First and foremost, you’ll need the latest version of the cloning software or Windows installer. This can usually be downloaded directly from the manufacturer’s website.
You’ll also need a USB drive or CD to store the installer, as well as a spare computer to use as the target device. Depending on the software or installer you’re using, you may need specific cables or adapters to connect the two computers together. It’s important to read the instructions carefully and make sure you have all the necessary tools and equipment before beginning the cloning or installation process.
With the right tools and a bit of preparation, you can easily clone your hard drive or install Windows without any problems. Just be sure to follow all instructions carefully and double-check everything before starting the process, to avoid any potential complications.
External Enclosure (optional)
If you’re planning to build your own external enclosure, there are a few tools you’ll need to have on hand to ensure a successful project. First and foremost, you’ll need a screwdriver (either Phillips or flathead, depending on the type of screws your enclosure uses). Depending on what type of enclosure you’re building, you may also need pliers (for bending metal or working with wires), a drill (for creating holes in the case), or a saw (for cutting pieces of wood or plastic).
Additionally, it’s a good idea to have a ruler or measuring tape and a pencil on hand so you can make accurate marks on your enclosure components. By gathering up all the necessary tools before you begin your project, you’ll be ready to tackle any challenges that come your way and ensure a successful external enclosure build.
Choose Installation Method
When it comes to installing an SSD, the process isn’t necessarily difficult, but it can vary in complexity depending on the method you choose. If you’re familiar with computers and feel comfortable opening up your device, installing an SSD internally may be your best option. This process involves connecting the drive to your motherboard and power supply, and then configuring the BIOS to recognize the new hardware.
However, if you’re not comfortable with the internal installation process or don’t want to open up your device, there are external options available. External SSDs connect to your computer via a USB port and are essentially plug-and-play. They offer the benefit of not needing to open up your device, but may be slightly slower due to the connection being over USB rather than the faster internal SATA connection.
Overall, while the installation process of an SSD may seem daunting at first, with the right method and a little bit of patience, it can easily be done.
Cloning vs Fresh Install
When it comes to setting up a new computer, you have two options: cloning or fresh install. Cloning involves creating a copy of your entire hard drive, while fresh install means starting from scratch and installing everything from the beginning. Both methods have their pros and cons depending on your situation.
Cloning can be a great option if you want to transfer all of your data and settings from an old computer to a new one. It’s also faster than starting from scratch since you don’t have to reinstall everything. However, it can also duplicate any errors or issues from your old computer.
Plus, if you’re upgrading to a new operating system, cloning may not be the best choice since it can carry over incompatible drivers or software. On the other hand, a fresh install ensures that your new computer starts off clean and free from any issues. You’ll know exactly what’s installed and how it was configured.
Plus, you can take the opportunity to clear out any old files or software that you no longer need. However, it’s a time-consuming process and can take several hours or even days to install and configure everything you need. Ultimately, the choice between cloning or fresh install comes down to your personal preference and needs.
If you want to quickly transfer everything from an old computer to a new one, cloning is the way to go. But if you want a fresh start and a clean slate, then a fresh install is the better option. So, consider your situation and make the choice that works best for you.
Using an External Enclosure
When it comes to using an external enclosure, the first thing you need to decide is how you want to install it. There are generally two choices: the first option is to install it internally on your computer, while the second option is to use it externally. The choice you make will depend on your specific needs and the equipment you have available.
If you have enough space inside your computer, an internal installation may be best for you. However, if you need more portability and flexibility, an external enclosure might be the better choice. Either way, using an external enclosure can offer an array of benefits, including increased storage capacity, improved backup solutions, and faster data transfer speeds.
Whether you are using it for personal or professional reasons, an external enclosure can be a great investment for those looking to expand their computer’s capabilities.
Install SSD
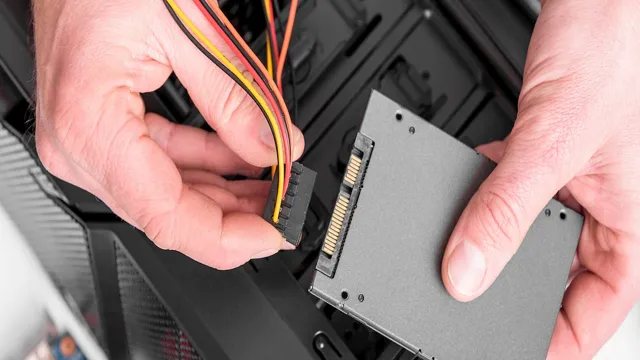
Are you thinking about upgrading your computer’s hard drive with an SSD, but unsure of how difficult the installation process is? Installing an SSD may seem daunting at first, but it’s actually a straightforward process that can be done with just a few basic tools. The first step is to back up all of your important data before beginning the installation process. Then, simply locate your computer’s hard drive and remove it from the system.
Afterward, insert the SSD into the hard drive bay and secure it with screws. Finally, connect the SATA cable and power cable to the SSD, and boot up your computer. With the right tools and a bit of patience, the installation process doesn’t have to be complicated or difficult at all.
Upgrading to an SSD can significantly boost your computer’s performance, making it well worth the effort. So, don’t be afraid to take the plunge!
Open Your Laptop or Desktop
Are you tired of your slow and outdated laptop or desktop? Upgrading to an SSD could be the solution for you! Installing an SSD (Solid State Drive) can drastically improve loading times and overall performance, giving your computer a new lease on life. The installation process is fairly simple, but it’s important to make sure you have the right tools and take proper precautions before attempting. First, open up your laptop or desktop and locate the hard drive bay.
Some computers may require additional screws or clips to be removed before accessing. Once you have access to the hard drive, remove it and disconnect any cables connected to it. Then, carefully insert the SSD, making sure it’s properly secured.
Connect any necessary cables and reassemble your computer. Don’t forget to transfer any important data from your old hard drive to your new SSD. With just a few steps, you can enjoy faster performance and a smoother computing experience.
Give it a try today!
Attach SSD to Mounting Bracket
One important step in installing a solid-state drive (SSD) is attaching it to a mounting bracket. This is necessary because most cases are not designed to hold an SSD on their own. The good news is that most SSDs come with the necessary brackets and screws needed for installation.
To attach the SSD to the bracket, simply align the holes on the drive with the holes on the bracket and screw them together. It’s important to tighten the screws just enough to secure the drive to the bracket, but not too tight as to damage the drive. Once the SSD is securely attached to the bracket, it’s ready to be installed in the computer’s drive bay.
Not only is installing an SSD relatively easy, but it can also greatly improve the overall performance of a computer. So, if you’re looking to speed up your computer’s boot times, reduce program load times, and increase overall system responsiveness, consider installing an SSD today.
Replace Old HDD with SSD
If you’re looking to breathe new life into your computer, swapping out your old hard disk drive (HDD) for a solid-state drive (SSD) is a surefire way to see some major improvements. Not only will an SSD speed up boot and load times, but it will also give your computer a noticeable performance boost. To install an SSD, the first step is to purchase the drive itself and a SATA-to-USB cable.
Once you’ve got those items, it’s time to start cloning your existing HDD to your new SSD. This process can take a bit of time, depending on how much data you need to transfer. But once the cloning is complete, you’ll then need to physically swap out your old HDD for the new SSD.
This may involve opening up your computer case, so be sure to follow the manufacturer’s instructions carefully. With your new SSD in place, you should notice a near-immediate improvement in your computer’s speed and responsiveness. So what are you waiting for? Upgrade to an SSD today and experience the difference for yourself!
Transfer Operating System and Data
Have you been considering upgrading your computer’s hard drive to a faster solid-state drive (SSD)? You might be wondering how hard it is to install an SSD. Well, the good news is that it’s not as difficult as you might think. In fact, most SSDs are designed to be plug-and-play, meaning you can easily remove the old hard drive and replace it with the new SSD without the need for any special tools or technical knowledge.
However, the process of transferring your operating system and data can be a bit more complicated. You can either clone your old drive onto the new SSD, which is a quick and easy option, or you can do a fresh install of your operating system and manually transfer your files. Whichever method you choose, just make sure to back up your important data before you start and follow the instructions carefully.
With a bit of patience and attention to detail, you’ll soon be enjoying the lightning-fast speed and improved performance of your new SSD.
Use Cloning Software or Windows Installer
When it comes to transferring your operating system and data to a new computer, two popular options are using cloning software or the Windows installer. Cloning software allows you to create an exact copy of your existing system on a new computer, including all your installed programs, applications, and data. This can save you a lot of time and effort as you don’t have to reinstall everything from scratch.
On the other hand, the Windows installer can also be used to transfer your data and operating system, but it requires a bit more manual work. You’ll need to install the operating system first, then transfer your files and programs, which can be a time-consuming process. Ultimately, the best option depends on your specific situation and level of expertise.
Cloning software may be more suitable for those who have a lot of applications and data to transfer, while the Windows installer may be a good option if you only need to transfer a few files.
Reboot and Enjoy Your New SSD
When it comes to upgrading your computer with a new SSD, one of the most important steps to take is transferring your operating system and data. This can seem like a daunting task, but with the right tools and approach, it can be done easily and efficiently. One useful tool for transferring your operating system is a disk cloning software, which allows you to make an exact copy of your old hard drive and transfer it to your new SSD.
This ensures that everything on your old hard drive, including your operating system, files, and settings, will be transferred over seamlessly to your new SSD. Once the transfer is complete, all you need to do is reboot your computer and enjoy the lightning-fast speed and performance of your new SSD. Don’t let the transfer process hold you back from upgrading to a better, faster, and more reliable storage option – with the right tools and approach, it can be a breeze.
Conclusion
Installing an SSD may seem daunting at first, but with a little patience and guidance, even the least tech-savvy person can do it. Think of it as upgrading your car’s engine – a little effort now can yield a significant performance boost. So, the next time you’re tempted to back out of an SSD installation, remember that it’s not rocket science – it’s just a matter of following a few simple steps to unlock your computer’s full potential.
The end result? A faster, smoother computing experience that’s sure to put a smile on your face. Now, that wasn’t so hard, was it?”
FAQs
What tools are needed to install an SSD in a computer?
To install an SSD, you’ll need a screwdriver, SATA data cable, and SATA power cable.
Can I install an SSD on a laptop?
Yes, you can install an SSD on a laptop if the laptop has a slot to install it. However, some laptops may not have a slot for it.
How much time does it take to install an SSD?
Installing an SSD usually takes 30 to 60 minutes, depending on your computer’s make and model, and your experience with computer hardware.
Is it necessary to reinstall the operating system after installing an SSD?
It is not necessary to reinstall the operating system, but it is recommended to make the most of the SSD’s performance. You can clone the old hard drive to the SSD, and then change the boot order to the SSD.
How much faster is an SSD compared to an HDD?
SSDs are significantly faster than HDDs, as they use flash memory to read and write data faster than spinning disks. With an SSD, your computer will boot faster, applications will load faster, and the overall performance will be snappier.