Welcome to our guide on connecting SSD to motherboard! If you’re building a new PC or upgrading your existing one, one of the things you need to know is how to properly connect your SSD to your motherboard. This task might seem daunting at first, but with a little bit of knowledge and the right tools, it’s actually quite easy to do. An SSD, or solid-state drive, is a faster and more reliable alternative to a traditional hard disk drive.
It uses flash memory to store data, which allows for faster read and write speeds and better overall performance. If you want to take advantage of the benefits of an SSD, you need to make sure it’s connected to your motherboard correctly. There are a few different ways to connect an SSD to your motherboard, depending on the type of SSD and motherboard you have.
You might need to use a SATA cable, an M.2 connector, or a PCIe slot, for example. We’ll cover all of these methods in detail, so you’ll know exactly what to do.
Whether you’re a beginner or an experienced PC builder, you’ll find this guide helpful. We’ll explain everything in simple terms and provide clear step-by-step instructions. By the end of this guide, you’ll be able to connect your SSD to your motherboard like a pro.
So, let’s dive in and get started!
Understanding SSDs
SSDs, or Solid State Drives, have become increasingly popular in recent years due to their speed and reliability. Unlike traditional hard drives, SSDs do not have any moving parts, which makes them less prone to failure and faster at accessing data. But how exactly does an SSD internal hard drive connect to a motherboard? The answer lies in the interface used by the SSD, which can be SATA, NVMe, or PCIe.
SATA is the most common interface and uses a small connector that plugs into a motherboard’s SATA port. NVMe and PCIe interfaces are faster and use a small M.2 connector that plugs into a dedicated M.
2 slot on the motherboard. When an SSD is connected to a motherboard, it can be used to store and retrieve data just like any other hard drive, but at much faster speeds. So if you’re looking to upgrade your computer’s storage and speed, consider investing in an SSD with a compatible interface.
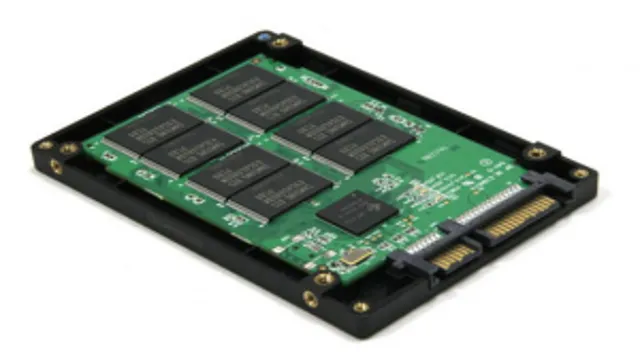
What is an SSD?
An SSD, or solid-state drive, is a type of storage device that uses flash memory to store data. Unlike traditional hard disk drives (HDDs) that use spinning discs to access data, SSDs contain no moving parts and are much faster and more reliable. They are popular in modern laptops and desktops because of their speed and durability.
An SSD is like a supercharged engine in your computer, allowing you to boot up faster and load programs and files quickly. Think of it like a sports car compared to a regular sedan – it can handle intense workloads and access data with lightning speed. Overall, SSDs are a game-changer for computer performance and have revolutionized the way we store and access data.
Types of SSDs: SATA, NVMe, and PCIe
SSDs, SATA, NVMe, PCIe Solid-state drives (SSDs) offer a faster and more reliable alternative to traditional hard drives, but they come in different types. The most prevalent types of SSDs include SATA, NVMe, and PCIe. SATA is the slowest of the three, offering speeds of up to 600MB/s.
NVMe is faster, offering read and write speeds of up to 3,500MB/s and 3,300MB/s, respectively. PCIe is the fastest and most expensive option, offering lightning-fast speeds of up to 15,000MB/s. NVMe and PCIe SSDs rely on the M.
2 form factor, while SATA SSDs can use either the M.2 or 5-inch form factors.
When choosing an SSD, it is important to pick one that best suits your system’s needs and your budget. SATA SSDs are affordable and suitable for basic computing tasks, while NVMe and PCIe SSDs are ideal for heavy-duty applications such as gaming and video editing. Overall, understanding the different types of SSDs is essential in selecting the right SSD that will meet your specific needs.
Advantages of SSDs over HDDs
SSDs, HDDs SSDs, or Solid-State Drives, have been making headlines for their advancements over HDDs, or Hard Disk Drives. An SSD works on the principle of storing data on Flash Memory, similar to USB drives, while HDDs store data on platters that spin at high speeds. Unlike HDDs, SSDs have no moving parts, making them faster, quieter, and more efficient.
SSDs have a higher data transfer rate, making them ideal for gaming and heavy-duty tasks, and also have a longer lifespan compared to HDDs. Not only are they more durable, but they also consume less power and generate less heat. They’re an excellent option for those seeking faster boot times, quicker file transfer speeds, and an overall smoother computing experience.
Although SSDs are pricier than HDDs, they deliver a lot more value in terms of performance and reliability. If you’re looking to upgrade your computer, SSDs are worth the investment.
Connecting SSD to Motherboard
When it comes to connecting an SSD internal hard drive to a motherboard, you’ll need to take a few key steps to ensure everything works properly. First, make sure your motherboard supports the type of SSD you’re using. Most modern motherboards will have an M.
2 slot or SATA ports that can accommodate an SSD. Once you’ve located the correct slot, gently insert the SSD into place, making sure it’s seated properly. Then, you’ll need to connect the SSD to the motherboard using the appropriate cable.
For example, if you’re using an M.2 SSD, it will connect directly to the motherboard without a cable. On the other hand, if you’re using a SATA SSD, you’ll need to connect a SATA cable from the motherboard to the SSD.
Some motherboards may also require you to adjust BIOS settings to recognize the SSD. With these steps complete, your SSD internal hard drive should be properly connected to the motherboard and ready for use.
Identifying the SATA port on your motherboard
SSD, SATA port, motherboard When it comes to installing an SSD onto your motherboard, identifying the right SATA port to connect to can be confusing. Most motherboards have multiple SATA ports, but not all of them can support an SSD. To find the correct SATA port, start by checking your motherboard manual or manufacturer website for specifications.
Look for SATA ports labeled as “SATA III” or “0 Gb/s” as these ports offer the fastest speeds and are best suited for SSDs. You may also want to consider the placement of the SATA ports on your motherboard.
Some motherboards have ports that are vertically aligned while others are horizontally aligned. It’s important to note that some ports may be shared with other devices, so ensure that you choose a free port that is not already in use. With the right SATA port identified, installing an SSD can be a quick and painless process.
Simply connect the SSD to the SATA port using a SATA cable, and you’re good to go!
Connecting the power cable to the SSD
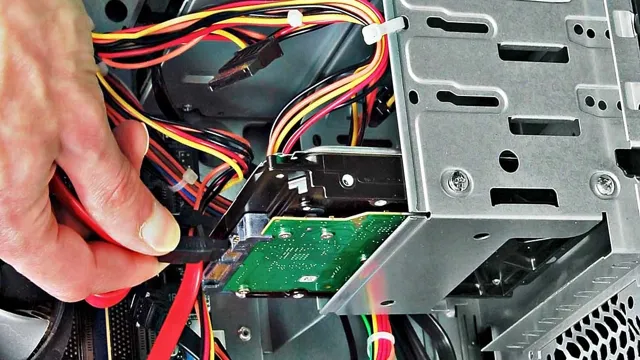
Connecting an SSD to your motherboard can seem like a daunting task, but it’s actually pretty simple once you know what you’re doing. The first step is to locate the necessary cables. You’ll need a SATA data cable to connect your SSD to the motherboard, as well as a power cable to give it the juice it needs to run.
Once you have these cables, locate the SATA ports on your motherboard. These ports are usually located near the bottom of the board and are labeled. Simply plug one end of the SATA data cable into your SSD and the other end into the corresponding SATA port on your motherboard.
Next, connect the power cable to your SSD and ensure that it’s securely in place. Congrats! You’ve just connected your SSD to your motherboard. Now it’s time to turn on your computer and start enjoying all the benefits of lightning-fast storage.
Don’t forget to double-check your BIOS settings to make sure your SSD is set up correctly!
Connecting the SATA cable to the SSD and motherboard
When it comes to connecting an SSD to a motherboard, the SATA cable is key. This small cable is what enables the SSD to communicate with the rest of the system. To connect the SATA cable, you’ll want to locate the SATA connector on the motherboard.
This will typically be labeled as SATA1, SATA2, etc. Once you’ve found the connector, take the SATA cable and plug one end into the motherboard and the other end into the SSD. Make sure the cable is firmly in place on both ends to avoid any data transfer issues.
And that’s it! You’ve successfully connected your SSD to your motherboard. With this simple yet crucial step, you can unlock the power and speed of your SSD for all of your computing needs.
Configuring SSD for Optimal Performance
When it comes to connecting an SSD internal hard drive to a motherboard, there are a few things to keep in mind for optimal performance. First, it’s important to make sure your motherboard has a compatible interface, such as SATA or NVMe. Once you’ve confirmed compatibility, you’ll need to connect the drive to the appropriate port on the motherboard using a data cable.
It’s also crucial to properly configure your SSD through the BIOS or UEFI settings to enable features such as TRIM and AHCI. TRIM helps keep the drive running efficiently by clearing out unused data, while AHCI allows for faster access to the drive itself. Additionally, you may want to consider adjusting your power management settings to reduce the amount of wear on your SSD over time.
All of these factors can impact the performance and overall lifespan of your SSD, so taking the time to properly connect and configure it is well worth the effort.
Enabling AHCI in the BIOS
SSD If you want your SSD to perform optimally, one of the first things you should do is enable AHCI in the BIOS. AHCI (Advanced Host Controller Interface) is a setting that ensures efficient communication between the storage device and the computer. This setting unlocks the full potential of your SSD, allowing it to read and write data quicker.
To enable AHCI, you will need to go into your computer’s BIOS and look for the storage settings. Once you find the settings, switch the mode from IDE to AHCI and save the changes. By doing this, you will immediately notice a boost in your computer’s performance.
Your SSD will now be able to access and write files at a faster speed, giving you a better experience overall. Making sure you have AHCI enabled is an important step towards getting the most out of your SSD.
Partitioning and Formatting the SSD
Partitioning and formatting a newly bought SSD is crucial to getting optimal performance from it. Before we jump into the process, it’s essential to understand what formatting means. It is the means of preparing your device for data storage by creating a file system that organizes and manages your data.
A robust file system facilitates fast access to data on the drive, which leads to faster boot times and improved overall system performance. To format an SSD, launch the disk management utility and select the SSD. From there, you can create partitions, assign drive letters and format the volume with the file system of your choice.
Keep in mind that these steps will wipe any existing data on the drive, so be sure to back up any relevant files before proceeding. By following these steps properly, you can configure your SSD for optimal performance and take full advantage of its capabilities.
Conclusion: Enjoy Faster Load Times with SSDs
In conclusion, the way a solid-state drive (SSD) internal hard drive connects to a motherboard is all about speed, efficiency, and innovation. Instead of relying on outdated, physical connections like the traditional hard disk drives (HDDs), SSDs use modern connectors such as SATA, NVMe, or PCIe to achieve lightning-fast data transfers and faster boot times. It’s like upgrading from a horse-drawn carriage to a sports car – it’s faster, smoother, and more efficient.
So, when it comes to SSDs and motherboards, it’s all about pushing the limits and keeping up with the latest and greatest technology.
FAQs
What type of cable do you need to connect an SSD internal hard drive to a motherboard?
You will need a SATA cable to connect an SSD internal hard drive to a motherboard.
Can you connect an SSD internal hard drive to a motherboard using a USB port?
No, you cannot connect an SSD internal hard drive to a motherboard using a USB port. You need to connect it using a SATA cable.
Do all motherboards support SSD internal hard drives?
No, not all motherboards support SSD internal hard drives. You need to check the specifications of your motherboard to see if it supports SSDs.
What is the maximum transfer speed you can achieve when connecting an SSD internal hard drive to a motherboard?
The maximum transfer speed you can achieve when connecting an SSD internal hard drive to a motherboard depends on the type of interface you are using. SATA III has a maximum transfer speed of 6 Gbps, while NVMe has a maximum transfer speed of 32 Gbps.