When it comes to upgrading your computer’s storage, one popular option is to add a solid-state drive (SSD). Unlike traditional hard drives, SSDs offer faster speeds and improved performance. However, before you can enjoy the benefits of an SSD, you’ll need to connect it to your motherboard.
This process can seem intimidating at first, but with a few simple steps, you can have your SSD up and running in no time. So, let’s take a closer look at how to connect an SSD to your motherboard.
Overview of SSD and Motherboard Compatibility
When it comes to connecting an SSD to a motherboard, there are a few things you need to keep in mind. First and foremost, you need to ensure that the SSD you’re using is compatible with your motherboard. This means checking the type of interface your SSD uses, such as SATA or NVMe, and making sure your motherboard has the corresponding interface.
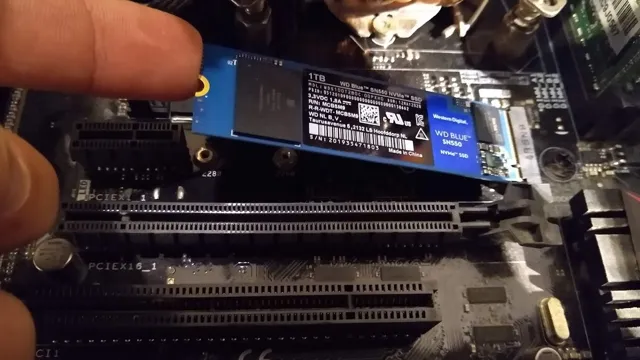
Additionally, you’ll need to make sure you have the necessary cables and ports to connect your SSD to your motherboard. For example, if you’re using an NVMe SSD, you’ll likely need an M.2 slot on your motherboard, as well as a corresponding M.
2 cable. Overall, while the specific details may vary depending on your setup, with a little bit of research and know-how, connecting an SSD to a motherboard is a relatively straightforward process.
Different Types of SSDs and Connectors
SSD Compatibility with Motherboard When it comes to SSD compatibility with motherboards, there are a few things to consider. The first is the type of SSD you have. There are three main types of SSDs: SATA, NVMe, and PCIe.
SATA SSDs are the most common and are compatible with nearly all motherboards. NVMe and PCIe SSDs, on the other hand, require specific motherboard support. Before purchasing a motherboard, it’s important to make sure it has the necessary M.
2 and PCIe slots to accommodate the type of SSD you plan to use. Another factor to consider is the connector type. Most motherboards use either an M.
2 or U.2 connector for NVMe and PCIe SSDs. It’s important to make sure your SSD and motherboard have compatible connectors to ensure proper installation and performance.
Overall, with a little attention to detail, it’s easy to find a compatible SSD and motherboard combination that will provide fast and reliable performance for your computing needs.
Motherboard Compatibility with SSDs
When it comes to SSDs and motherboard compatibility, it’s important to understand that not all motherboards are created equal. While most modern motherboards will support SSDs, the type of SSD you have may dictate whether it will work with your motherboard. SATA SSDs are the most common and are compatible with most motherboards, but newer NVMe SSDs require motherboards with NVMe M.
2 slots and may not work with older motherboards. It’s also important to check if your motherboard supports the size of the SSD you want to use, as some older motherboards may not support larger SSDs. That being said, if you have a newer motherboard and a compatible SSD, you can expect much faster boot times and improved application load times compared to a traditional hard drive.
So, do your research and make sure your motherboard and SSD are compatible to get the most out of your system.
Steps to Connect SSD to Motherboard
Connecting an SSD to a motherboard is a straightforward process that requires only a few simple steps. First, locate the SATA ports on the motherboard and ensure that you have a compatible cable. Next, attach one end of the cable to the SSD and the other to the motherboard’s SATA port.
After connecting the SSD to the motherboard, you’ll need to check the BIOS settings to ensure that the system recognizes the new hardware. Finally, install the operating system on the SSD and start using it. Overall, the process of connecting an SSD to a motherboard is relatively easy and can be completed by anyone with basic computer skills and knowledge.
With some patience and attention to detail, you can enjoy fast data access and improved performance on your computer.
Identifying SSD and Motherboard Ports
Connecting an SSD to your motherboard can improve your computer’s performance and provide speedy data transfer. But before you start, you need to identify the correct ports. The most common type of SSDs uses SATA (Serial Advanced Technology Attachment) connectors, and these ports are usually found on the motherboard near the SATA ports.
Ensure that your motherboard has an available SATA port by checking the manual or manufacturer’s website. Locate the SATA port on your motherboard and connect the SATA cable to it. Then, connect the other end of the cable to the SSD.
Finally, secure the SSD to your computer case using screws or brackets. That’s it! You have successfully connected your SSD to the motherboard and can now enjoy faster data transfer and improved performance.
Connecting SSD to Motherboard
Connecting an SSD to your motherboard is a relatively simple task. The first step is to locate the SATA connectors on your motherboard. These are usually located near the bottom of the motherboard and are labeled SATA0, SATA1, SATA2, etc.
Next, connect one end of a SATA cable to the SATA connector on the SSD and the other end to the SATA connector on the motherboard. Make sure the cable is securely fastened on both ends. After the cable is connected, you’ll need to attach power to the SSD.
Locate a spare SATA power connector from your power supply and connect it to the SSD power connector. Again, ensure the cable is securely connected. Once the SSD is connected to the motherboard and has power, you’ll need to enable it in your system BIOS.
To access the BIOS, restart your computer and hit the designated key, usually F2 or DEL, during bootup. In the BIOS, navigate to the section that controls boot order and make sure your SSD is set to the top of the list. That’s it! Your SSD is now connected to your motherboard and ready to use.
Remember to format the SSD and install an operating system before using it as your primary drive. Following these steps will help ensure a fast, efficient, and reliable experience with your newly-added SSD.
Securely Fixing SSD to the Chassis
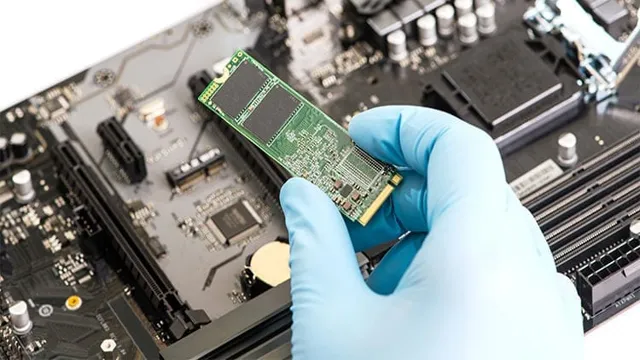
When it comes to installing an SSD into your computer, securely fixing it to the chassis is a crucial step to ensure the safety of your valuable data inside. The process of connecting the SSD to the motherboard involves several simple steps. First, locate an empty drive bay within the chassis and remove the mounting bracket from the bay.
Next, attach the bracket to the SSD using screws or other hardware that came with your SSD. Once you have the SSD mounted, slide it into the drive bay until it clicks into place, reconnect any cables or connections, and secure the drive with screws or other mounting hardware. It is important to follow these steps carefully to prevent damage to your SSD or other components in your computer.
By taking the time to properly secure your SSD to the chassis, you can rest assured that your data is safe and your computer will function smoothly.
Testing SSD-Motherboard Connection
When assembling a PC, connecting the SSD to the motherboard is a crucial step that needs to be done correctly for the system to function correctly. An SSD connects to a motherboard through a SATA connector, which is a small, rectangular port that allows the transfer of data and power between the two components. Most modern motherboards come equipped with multiple SATA connectors to handle multiple storage devices, including hard drives and SSDs.
When connecting an SSD to the motherboard, it’s essential to ensure that the drive is securely fastened in place and that the connector is firmly attached to the port. Some motherboards may also come with an M.2 slot that allows for direct attachment of an SSD to the motherboard without the need for cables.
Regardless of the type of connector used, it’s important to handle the SSD with care to avoid damaging the device. By correctly connecting your SSD to your motherboard, you’ll be able to enjoy faster boot times, quicker application loading, and improved overall system performance.
Verifying SSD in System Information
If you’re concerned about the performance of your SSD, checking the connection between your SSD and motherboard can help to identify any issues. One way to verify the connection is to use System Information, which can provide detailed information about your computer’s hardware components. To test the connection, open System Information and navigate to the Hardware section.
Look for the entry for your SSD, which should be listed under the Storage section. If the SSD is showing up correctly in System Information, then the connection between the SSD and motherboard is likely working properly. On the other hand, if the SSD is not listed or is displaying errors, there may be a problem with the connection that needs to be addressed.
By verifying your SSD in System Information, you can ensure that your computer’s storage is working correctly and efficiently.
Running Diagnostic Tests for SSD-Motherboard
If you’re experiencing performance issues with your SSD, one possible culprit could be a faulty connection between the SSD and the motherboard. Luckily, there are diagnostic tools you can use to test this connection. The first step is to make sure the SSD is properly installed and connected in the motherboard.
Once you’ve confirmed this, you can run a few tests. The simplest test is to try swapping out the SSD with a different one to see if the issue persists. If the problem seems to be isolated to one particular SSD, another option is to use a diagnostic software tool to check the SSD’s health and performance.
Some popular options include CrystalDiskMark and AS SSD Benchmark. By running diagnostic tests, you can identify and address any issues with the SSD-Motherboard connection, helping to improve your system’s performance and reliability.
Conclusion and Recommendation
As we’ve explored, the connection between an SSD and motherboard is all about speed, efficiency, and innovation. Simply put, an SSD connects to a motherboard using a lightning-fast interface to transfer data at breakneck speeds. It’s like a high-speed highway, connecting the powerhouse of your computer to the speedy SSD, allowing for lightning-fast data access and retrieval.
So if you want a computer that’s fast, reliable, and ready to take on anything you throw its way, an SSD is the way to go – and the connection to your motherboard is the key to unlocking its full potential.”
FAQs
What type of connector is used to connect SSD to a motherboard?
SSDs can be connected to a motherboard using an SATA (Serial ATA) connector or a PCIe (Peripheral Component Interconnect Express) slot.
How do I know if my motherboard supports SSDs?
You can check the specifications of your motherboard to determine if it has SATA or PCIe slots for SSDs. Alternatively, you can consult the manufacturer’s website or user manual.
Can I connect multiple SSDs to my motherboard?
Yes, most motherboards have multiple SATA or PCIe slots that can be used to connect multiple SSDs. However, it is important to check the specifications of your motherboard to determine the maximum number of SSDs it can support.
What is the difference between an M.2 SSD and a traditional SSD?
M.2 SSDs are a newer type of SSD that are smaller in size and connect directly to the motherboard using an M.2 slot. Traditional SSDs, on the other hand, use SATA or PCIe connectors to connect to the motherboard. M.2 SSDs are generally faster and more efficient than traditional SSDs, but they may also be more expensive.