So, you’ve decided to upgrade your PC’s storage and are wondering how to move your PS to SSD. Congratulations on taking the first step towards getting faster game loading times, smoother graphics performance, and overall better gaming experience! However, if you’re new to the world of computer hardware, it can be overwhelming to figure out how to clone or transfer your PS (operating system) from your old hard drive to a new SSD. But don’t worry! In this beginner’s guide, we’ll walk you through all the steps of moving your PS to SSD.
Think of it as transferring your life from a cramped studio apartment to a spacious house with a pool. You’ll have more storage, speed, and comfort. Let’s get started!
Understanding PS and SSD
Moving your PS (operating system) to an SSD (solid-state drive) can significantly improve your computer’s performance and speed. There are a few methods you can use to accomplish this task. One way is to clone your current PS to the SSD.
This process involves creating an exact copy of your current PS and transferring it to the new drive. Another option is to fresh install the PS on the SSD. This method requires you to install a new copy of the PS on the new drive and then transfer your files over.
Whichever method you choose, make sure to back up your important data before making any changes. Moving to an SSD can be a game-changer and make a noticeable difference in your computer’s performance.
What is a PS?
A PS, or a power supply unit, is a crucial component of any computer system, as it is responsible for supplying power to all the other components. It converts the AC power from the wall outlet into DC power that the computer can use. Without a PS, your computer wouldn’t be functional, but choosing the right one can be a challenge.
One important thing to consider is the wattage, or the amount of power it can deliver. You want a PS that can provide enough power for all your components without being overloaded, as that can lead to instability or even damage. Another crucial component to consider is an SSD, or a solid-state drive.
SSDs are faster than standard hard drives, as they do not have moving parts, resulting in faster boot times and faster loading of applications. They’re also more reliable and durable, as they can handle more shock and vibration. Combined with a quality PS, an SSD can significantly improve the performance of your computer.

What is an SSD?
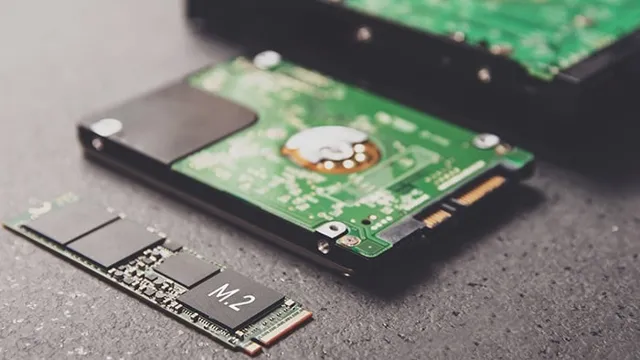
An SSD, or Solid State Drive, is a type of storage device that is becoming increasingly popular due to its fast performance and reliability. Unlike a traditional hard disk drive (HDD), which uses spinning disks to read and write data, an SSD uses flash memory to store and access data. This means that an SSD is much faster than an HDD, as there are no moving parts that can slow down data transfer speeds.
Additionally, SSDs are more reliable than HDDs, as they are less susceptible to physical damage and data loss due to a lack of moving parts. If you’re looking for a storage solution that is fast, reliable, and efficient, an SSD is definitely worth considering.
Preparing for the Move
So, you’re ready to upgrade your computer’s storage and want to move your PS to your SSD? Great! It’s simpler than you think. First, make sure you have enough space on your SSD to transfer everything from your PS. You’ll need to transfer your operating system and all installed programs.
You can use cloning software to move everything over in one go, or manually transfer files by reinstalling programs to the new drive and moving documents and other files in small batches. Before you start, be sure to back up all of your important files to an external hard drive or cloud storage, just in case. Once you’ve successfully transferred your PS to your SSD, you’ll enjoy faster boot-up times, snappier program performance, and plenty of room for all of your files and applications.
Back up your PS data
If you’re planning on moving your PlayStation (PS) data to a new console or storage device, it’s important to prepare ahead of time and back up your data. Backing up your data ensures that you won’t lose any important files or progress in your games. To back up your data, you’ll need to connect your PS to an external hard drive or cloud storage service.
Once connected, follow the prompts to back up your files and save them to your chosen location. This process may take some time, so be patient and make sure you have enough space on your external device. With your data safely backed up, you can move your PS with peace of mind!
Get an SSD and adapter
So you’ve decided to upgrade your computer’s storage to an SSD – that’s great news! But before you can enjoy the lightning-fast speeds and increased performance, you’ll need to prepare. One key step is to get an SSD and adapter. These essential components will allow you to physically install the SSD into your computer.
It’s important to make sure you get the right size and type of SSD for your computer, as well as a compatible adapter. Some adapters even come with software to help you easily clone your existing hard drive onto the new SSD, so you can transfer all your files and settings with ease. Once you have the SSD and adapter, you’re ready to start the installation process.
Don’t worry if you’re not tech-savvy – there are plenty of tutorials and guides available to help you along the way. With a little preparation and the right tools, you’ll be enjoying the benefits of an SSD in no time!
Cloning Your PS drive
Are you looking to upgrade your PlayStation’s storage capacity by transferring it to an SSD? The process can be daunting, but don’t worry, we’ve got you covered. The best way to do it is by cloning your PS drive onto your SSD using specialized software. Keep in mind, though, that not all SSDs are created equally, and you should choose one with enough capacity and speed to handle your games and data.
Additionally, you shouldn’t forget to back up your data before cloning your drive in case anything goes wrong. Once you’ve got everything ready, simply connect your SSD to your PC, launch your cloning software, select your PS drive as the source, and your SSD as the destination. Click “clone,” wait for the process to finish, and voila! Your PS console is now running on your shiny new SSD, giving you faster load times and more storage space.
Install cloning software
Cloning your PS drive is a great way to backup your data and ensure you don’t lose anything important. To do this, you’ll need to install cloning software on your computer. This software will allow you to create an exact copy of your PS drive, including all your files and settings.
Once the software is installed, you can begin the cloning process, which typically involves selecting the source drive (your PS drive) and the target drive (where you want to clone it to). The cloning process can take some time, depending on the size of your drive and the speed of your computer, so be patient and let the software do its thing. Once the process is complete, you’ll have a perfect replica of your PS drive on your new drive, which you can use as a backup or for other purposes.
Overall, cloning your PS drive is a valuable tool for anyone looking to keep their data safe and secure, and with the right software, it’s easy to do.
Connect SSD to computer
So, you’re ready to upgrade your PS drive to an SSD, but you’re not sure how to connect it to your computer. Don’t worry, it’s a simple process! First, you need a USB to SATA cable or SSD docking station. Connect the SSD to the cable or docking station and plug it into your computer’s USB port.
Once your computer recognizes the SSD, you’re ready to start cloning your PS drive. Cloning is the process of copying all the data from your PS drive onto the SSD. It ensures that your new drive has the same data as the old one, without the need to reinstall your operating system or programs.
There are a variety of cloning software options available, including Clonezilla, EaseUS, and Macrium Reflect. Choose the software that works best for you, follow the instructions, and soon you’ll have a faster, more efficient PS drive on your computer!
Begin cloning process
Cloning your PS drive is a smart move before making any significant changes to your system. It’s an essential process to ensure that all your data and settings are safe and secure. To begin the cloning process, you’ll need a reliable cloning software like EaseUS Todo Backup.
Once you have the software ready, connect your PS drive to your computer and launch the software. Select the source drive (your PS drive) and the target drive (where you want to clone it). If you have more than one partition on your PS drive, make sure you select all of them.
Hit the “Proceed” button, and the software will start working its magic. Depending on the size of your drive, the process may take some time to finish. Cloning your PS drive is a hassle-free process that ensures all your data stays intact while providing you with peace of mind.
Give it a try, and you won’t regret it!
Swapping in the SSD
When you’re looking to upgrade your computer’s speed and performance, swapping out your old hard drive for a new SSD can make a significant difference. But how do you move the OS to an SSD? The first step is to make a backup of all your important data. Once you’ve done that, you’ll need to create a bootable USB drive with your operating system installation file.
Then, you can install your new SSD into the computer and connect it. Restart the computer from the bootable USB drive, and select the option to install the operating system onto the new SSD. Once the operating system has been installed, you can transfer your backed-up data onto the SSD and enjoy the increased performance of your newly-upgraded computer.
Remember, taking the time to properly swap in an SSD is well worth the effort for the boost in speed and efficiency it provides.
Disconnect power supply
When it comes to swapping in a new SSD, the first step you should take is to disconnect your power supply. This may sound like common sense, but it’s important to emphasize that you should never work on your computer while it’s still plugged in. Once you’ve unplugged your power supply, you can begin opening up your computer and locating the hard drive bay where your SSD will go.
Depending on the type of computer you have, this might involve unscrewing a panel or removing a few screws. It’s important to be patient and methodical when doing this, as rushing can lead to mistakes or lost screws which can be frustrating later on. Once you’ve located the hard drive bay, it’s time to remove the old hard drive and install your new SSD.
Again, take your time and be gentle when handling your hardware to avoid damaging anything. With a bit of patience and care, swapping in a new SSD can be an easy and rewarding upgrade to your computer system.
Remove old PS and install SSD
Swapping in an SSD is a simple and effective way to improve the overall performance of your system. The first step is to remove the old power supply and any cables connected to it. This will give you access to the hard drive, which can be easily removed by disconnecting the power and data cables.
Once the hard drive has been removed, you can install the SSD by securely screwing it into place. Next, connect the power and data cables to the SSD, making sure they are firmly in place. Finally, reattach the power supply and any other cables you have disconnected.
With the new SSD installed, you can expect faster boot times, faster application loading times, and overall improved system performance. Make sure to transfer your important files from the old hard drive to the new SSD, and enjoy the benefits of a faster and more efficient system.
Booting up Your System
If you’re looking to switch your PS to SSD, you’re in luck because the process is relatively straightforward. First, you will need to clone your PS to the SSD using cloning software. There are plenty of free and paid cloning options available online.
Once you’ve successfully cloned your PS to the SSD, you’ll need to replace the old hard drive with the new SSD. This involves unscrewing the old hard drive from your computer and placing the new SSD in the same spot. Once the new SSD is in place, plug your computer back in and turn it on to make sure everything is working correctly.
If you did everything correctly, your system should boot up from the new SSD, and you should be good to go. Overall, moving your PS to SSD is a relatively easy process that can significantly improve your computer’s performance.
Reconnect power supply
After going through the process of troubleshooting and identifying the issue with your computer system, the next step is to finally boot it up again. To do this, the first thing you need to do is reconnect the power supply. If you had disconnected the cables and wires from the power source during the troubleshooting process, make sure to plug them back in securely.
Double-check to ensure you have reconnected all the necessary wires and that they are all plugged in properly. Once you have reconnected the power supply, turn on your computer and wait for it to boot up. The boot-up process may take a few minutes depending on the system’s speed and the number of programs you have installed.
As it boots up, you may see the computer manufacturer’s logo or a black screen with white text scrolling by. This is normal, so don’t worry if it takes a bit of time. When your computer finally boots up, you will be greeted by your desktop or login screen, depending on whether you have a password set up.
After logging in, you can check that all your programs and files are still intact and functioning as they should. If not, retrace your steps to see where you went wrong during the troubleshooting process. In conclusion, reconnecting the power supply is a crucial step in the process of rebooting your computer system.
Double-check that all the cables and wires are securely plugged in, turn on your computer and wait for it to boot up. Once it does, you should see your desktop or login screen. If you encounter any issues, take a step back and retrace your steps.
With these steps, you should be able to get your system back up and running in no time.
Boot up your system, and enjoy SSD speed!
If you want to enjoy blazing fast speed when you boot up your computer, then it’s time to consider SSDs. An SSD, or solid-state drive, is a type of storage device that uses flash memory to store and retrieve data. Unlike traditional hard drives that use spinning disks to read and write data, SSDs have no moving parts, resulting in much faster performance.
With an SSD, you can expect your computer to boot up in seconds rather than minutes, allowing you to get started on your work or play right away. So, if you’re tired of waiting for your system to start up, invest in an SSD and experience the speed and efficiency that it provides.
Conclusion
In conclusion, moving the PS to SSD may seem daunting at first, but it can be accomplished with ease and finesse. It’s like whisking away the old and dusty furniture from your living room and replacing it with sleek, modern pieces. With the right tools and guidance, your PS can make a smooth transition to SSD, enhancing your experience and giving you a hitch-free gaming session.
So, let’s say goodbye to stuttering graphics, slow loading times, and sluggish performance and usher in a new era of smooth gameplay and effortless fun. Happy gaming!”
FAQs
What are the benefits of moving the PS to SSD?
Moving the PS (operating system) to SSD (solid-state drive) can result in faster boot and load times, improved overall system performance, and reduced power consumption.
How do I move the PS to SSD?
There are several ways to move the PS to SSD, such as using cloning software or performing a fresh Windows installation on the SSD. It is recommended to backup important files and data before proceeding with any method.
Can I move only the PS to SSD and keep my files on the HDD?
Yes, it is possible to move only the PS to SSD and keep your files on the HDD (hard disk drive) by creating a partition on the SSD for the PS and selecting the HDD as the default location for data storage.
What size of SSD do I need to move the PS?
The size of the SSD needed to move the PS depends on the size of the PS and the amount of data you intend to store on it. Generally, a 256GB or 512GB SSD is sufficient for most users, but it is recommended to choose a larger capacity if you plan on storing large files or programs on the SSD.