Are you looking to ramp up the speed of your computer’s storage system? Perhaps you’re tired of slow boot times or sluggish program loading speeds. Whatever the case may be, one solution is to upgrade to an SSD (Solid State Drive) from your traditional hard drive. But how do you go about connecting an SSD to your motherboard? Don’t fret! We’ve got you covered.
In this blog, we’ll discuss the steps you need to take to connect your SSD to your motherboard and get the most out of your new storage upgrade. So grab a cup of coffee and let’s get started!
Check Motherboard Compatibility
If you want to connect an SSD to your motherboard, you need to ensure compatibility between the two first. You should first determine the type of SSD you have and match it with the appropriate SATA connector on your motherboard. Additionally, you need to check whether your motherboard supports the type of interface that your SSD uses.
A popular SSD interface is the NVMe, which is faster than a regular SATA interface. So, you need to ensure that your motherboard supports NVMe if you have an NVMe SSD. One key thing to remember during installation is to double-check that all connectors are fully plugged-in.
Sometimes, an incomplete connector can lead to data corruption or weakening performance. Overall, it’s essential to do your research regarding the compatibility of your SSD and motherboard before installation to ensure optimal functionality.
Check if Motherboard has SATA or NVMe support
If you’re looking to add a new storage device to your PC or upgrade your existing one, it’s important to know whether your motherboard is compatible with SATA or NVMe drives. SATA (Serial Advanced Technology Attachment) is an older standard, whereas NVMe (Non-Volatile Memory Express) is a newer and faster one. To check whether your motherboard supports these standards, you can look up its specifications online or consult its manual.
Generally, newer motherboards are more likely to support NVMe, while older ones may only support SATA. It’s important to note that even if your motherboard supports both of these connections, you may need to adjust some settings in your BIOS to ensure your drive is properly recognized. By doing a bit of research before purchasing a new storage device, you can save yourself the headache of compatibility issues down the line.
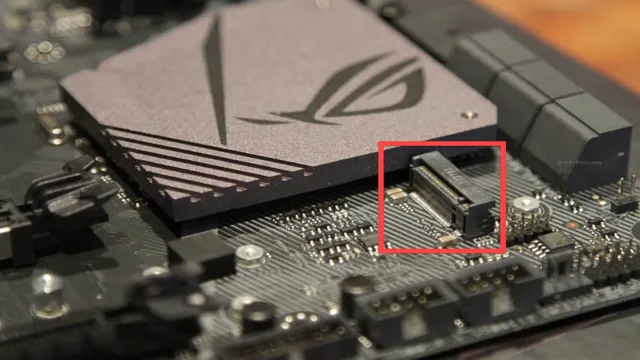
Check if motherboard has M.2 SSD slot
If you’re building or upgrading a computer, one of the most important things to consider is whether your motherboard has an M.2 SSD slot. M.
2 is a small form factor SSD that can greatly improve your PC’s performance. However, not all motherboards have an M.2 slot, so it’s important to check whether yours is compatible.
The easiest way to do this is by looking at your motherboard’s manual or specifications online. There, you should be able to find information on whether or not your motherboard supports M.2 SSDs, as well as what types of M.
2 SSDs it supports. It’s also worth noting that some motherboards only have one M.2 slot, while others have multiple, so make sure to check how many you have available.
If your motherboard doesn’t have an M.2 slot, you can still use an M.2 SSD with an adapter or by using a PCIe slot, although this may not be as fast as using a dedicated M.
2 slot. Overall, it’s essential to check your motherboard’s compatibility before buying an M.2 SSD to avoid any compatibility issues.
Gather Necessary Hardware
When it comes to connecting an SSD to your motherboard, there are a few hardware pieces that you need to gather beforehand. Firstly, you will need your motherboard manual to ensure that you locate the correct SATA port. Usually, if you are using an SSD, you would go for a SATA III slot.
You will also need a SATA cable that is long enough to connect your SSD to the motherboard. Secondly, you need screws to attach your SSD onto your computer case. These screws usually come included with your SSD, but if not, you can usually find them at most hardware stores.
Lastly, you will need a computer case that supports an SSD and a power supply unit (PSU) that can provide power to your SSD and other components. Once you have gathered all these pieces of hardware, you can then proceed to connect your SSD to your motherboard.
Get the right SSD
When it comes to upgrading your computer’s storage, getting the right SSD is crucial for ensuring efficient and fast performance. But before you start shopping for an SSD, you need to gather some necessary hardware. Firstly, you need to check if your computer has an available slot for an SSD.
Most modern desktops and laptops have at least one M.2 or SATA slot. You also need to ensure that your computer supports the interface of the SSD you are planning to buy, whether it is SATA, NVMe, or PCIe.
Additionally, since SSDs generate heat, make sure that your computer has adequate cooling and ventilation to avoid overheating. Lastly, if you plan to transfer data between your old and new drives, you will need a SATA-to-USB adapter or an external SSD enclosure. By taking these hardware requirements into consideration, you will be well on your way to choosing the right SSD for your computer and upgrading your storage game.
Get the right cables
When it comes to setting up your computer, gathering the necessary hardware is essential. One crucial piece of hardware is the cables. Choosing the right cables can make a big difference in the functionality and efficiency of your computer.
The first step is to identify what cables you will need for your particular setup. Make sure to get high-quality cables that are compatible with your devices to avoid any connectivity issues. Whether you need HDMI, USB, Ethernet, or power cables, it’s important to invest in cables that are durable and long-lasting.
Don’t settle for cheap cables that can damage your devices or cause connectivity issues. Remember, getting the right cables is crucial for ensuring optimal performance and avoiding technical headaches in the future.
Prepare Your Workstation
If you’re looking to upgrade your computer’s storage capabilities, adding an SSD (solid-state drive) can significantly improve your computer’s overall performance. But how do you connect an SSD to a motherboard? The first step is to prepare your workstation. Make sure it’s turned off and unplugged.
Before opening your computer tower, ground yourself by touching a metal surface to discharge any static electricity. Once you’ve opened the tower, find an empty SATA (Serial Advanced Technology Attachment) port on the motherboard. This is where you’ll plug in the SATA cable that comes with your SSD.
Next, attach the SSD to a drive bay inside the tower using screws. Finally, connect the other end of the SATA cable to the SSD and the power cable to the power supply. That’s it! Your SSD is now connected and ready to use.
Turn off your PC and unplug it
When it comes to working on your PC, it’s essential to ensure that you have a well-prepared workstation. One of the most critical steps in preparing your workstation is turning off your PC and unplugging it. Why is this important, you may ask? Well, it’s quite simple – it helps prevent electrical damage to your PC.
When you shut down your PC and unplug it, you give it a chance to cool down and avoid any power surges that could result in hardware damage. This step also ensures that you have a fresh start the next day and avoid any potential problems when you start working on your PC. So, the next time you finish your work, don’t forget to turn off your PC and unplug it to prepare your workstation for the next day.
Ground Yourself
When it comes to setting up your workstation, one important step in ensuring safety and stability is grounding yourself. This means creating an electrical connection between your body and the ground, which can help eliminate the risk of electric shock and static discharge while you work. To ground yourself, start by wearing ESD (electrostatic discharge) wrist straps that connect to your work surface and keep you in contact with a ground point.
Additionally, make sure your workstation is properly equipped with grounding elements like anti-static mats and ESD-safe tools. By taking these steps, you can create a safe and secure environment for your work, protecting both yourself and your equipment. Remember, always prioritize safety when preparing your workstation and take the necessary steps to ground yourself properly, avoiding unnecessary risk and ensuring optimal performance.
Installation Process
Connecting an SSD to a motherboard can seem intimidating at first glance, but it’s actually a straightforward process. First, locate the SATA port on your motherboard and plug in the power and data cables from the SSD. Make sure to align the notches on the cables and the port correctly to avoid any damage.
Next, screw the SSD onto the designated mounting bracket inside your computer case to secure it in place. Once everything is plugged in and secured, you’ll need to enter your motherboard’s BIOS and change the boot settings to prioritize the SSD as the primary boot device. From there, you can install your operating system and enjoy the improved speed and performance that comes with having an SSD in your setup.
With these steps, connecting an SSD to a motherboard is a quick and easy way to upgrade your computer’s capabilities.
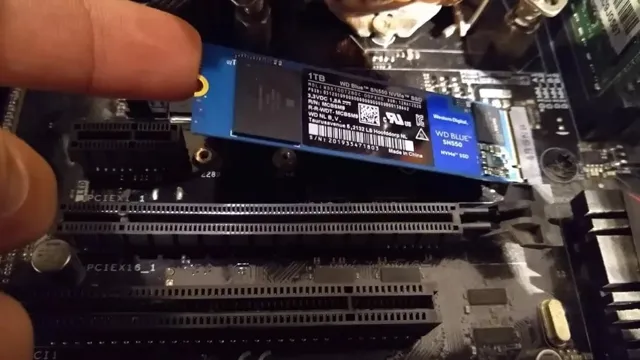
Open your PC case and locate the M.2 SSD slot
One of the first steps in installing an M.2 SSD in your PC is to locate the M.2 SSD slot.
If you’re unsure of where the slot is located, don’t worry, it’s not that difficult to find. You’ll need to open up your PC case and take a look at the motherboard. The M.
2 SSD slot is typically located near the center of the motherboard, and it’s usually labeled as such. It’s important to note that not all motherboards have an M.2 SSD slot, so make sure to check your motherboard’s specifications to see if it’s compatible.
Once you’ve located the slot, the next step is to insert the M.2 SSD into the slot. Make sure to align the notches on the SSD with the keys on the slot, and then gently push it down until it clicks into place.
Congratulations, you’ve successfully installed an M.2 SSD in your PC!
Insert the SSD into the slot
When it comes to installing an SSD into your computer, it’s important that you take the necessary precautions to prevent any damage to your device. To begin the installation process, locate the SSD slot on your computer. It is typically located near the hard drive bay on laptops and on the motherboard on desktops.
Once you have located the slot, ensure that the computer is turned off and unplugged from any power source. Carefully insert the SSD into the slot, making sure that it is properly aligned and securely fastened. It’s crucial that you handle the SSD with care, making sure not to touch the connectors or PCB.
After inserting the SSD, reassemble your computer and power it back on. Congratulations, you have successfully installed your SSD! By following these steps, you can ensure that your device is functioning optimally and that you won’t encounter any issues with your new SSD.
Secure the SSD with a screw
When installing a solid-state drive (SSD), securing it in place is essential, and this can be achieved by using a screw. The process of installing an SSD involves opening your computer case, locating the slot or bay for the SSD, and then screwing it into place using the compatible screw holes. Ensure that the SSD is accurately aligned with the screw holes before tightening the screw to prevent any misalignments or damage to the drive.
By securing the SSD with a screw, you’ll be protecting it from vibration that could cause data loss and physical damage. A loose SSD can also create noise, which could be another reason to ensure that it’s firmly screwed in place. Remember to avoid overtightening the screws since this could damage the drive or strip the screw holes, making subsequent drives difficult to install.
Connect data cable from SSD to motherboard
If you’re new to building computers, connecting a data cable from an SSD to the motherboard might seem intimidating. However, it’s a fairly simple process once you know what you’re doing. First, locate the SATA connector on your motherboard and connect one end of the data cable to it.
Then, locate the SATA connector on your SSD and connect the other end of the cable to it. Make sure the cable is securely connected on both ends. Some motherboards also require you to connect a power cable to the SSD, so be sure to check your motherboard manual for any additional instructions.
With the data cable securely connected, you’re one step closer to completing your build and enjoying faster load times on your SSD.
Final Checks
So, you’ve got yourself a shiny new SSD and you want to connect it to your motherboard. First things first, you need to identify where your SSD is going to fit in on your board. Most motherboards have a slot specifically designed for an additional SSD.
Once you’ve located this, you can then proceed to attach the SSD. There are different ways to connect an SSD, but the easiest and most common method is to use a SATA cable. SATA cables come in different shapes and sizes, so make sure to select the right one for your SSD and motherboard.
Once you’ve secured the SSD using screws, you can then connect the SATA cable to the motherboard. Finally, connect the power cable to the SSD and make sure everything is secured in place. Now you’re ready to go! Your new SSD should be detected by your motherboard and ready to use.
Connecting an SSD to a motherboard is a relatively painless process, just make sure to follow these steps carefully, and you’ll be up and running in no time!
Close PC case and plug it back in
Now that you’ve installed all the components, it’s time to give the PC its final checks. The first thing to do is to close the PC case properly, ensuring that all the screws are tightened and secured in place. This ensures that the internal components are safe and protected from dust and accidental damage.
Once the casing is secured, plug the power cord back in and turn the PC on. Check to see if the fans are spinning, the GPU is detected, and the HDD is recognized. Also, check if the PC is booting up correctly, and the monitor displays the correct output.
If everything is functioning correctly, then congratulations! You have successfully assembled your own PC. Now it’s time to install the operating system, drivers, and software you need and start using your new machine. Remember to keep your PC updated, maintain it regularly, and enjoy your new powerful system!
Check BIOS detects your new SSD
Now that you’ve installed your new SSD into your computer, it’s time to make sure your BIOS can detect it. This is an essential final step to ensure that your system recognizes the new hardware and that it’s running correctly. To check your BIOS, restart your computer and access the BIOS menu by pressing a specific key, which is usually displayed during the startup process.
Once you’re in the menu, navigate to the SATA or Storage options and check if your new SSD is listed. If it is, then congratulations, you’ve successfully installed your new SSD, and it’s ready to use. However, if it’s not listed, then check your cables or consult with your motherboard manual to troubleshoot why it’s not being detected.
It’s crucial to make sure you’ve done this final check to avoid issues like data loss, system crashes, or the inability to boot your computer. So, take the time to make sure that your new SSD is detected by your BIOS, and enjoy the improved performance and storage capacity.
Initialize and format the SSD in Disk Management
After initializing and formatting the SSD in Disk Management, it’s time to do some final checks to ensure everything is running smoothly. First off, make sure that the SSD has been assigned a drive letter by checking in Disk Management. If it hasn’t, simply right-click on it, select “Change Drive Letter and Paths”, and assign one.
Next, check that the volume label is correct and matches what you want to call your SSD. You can do this by right-clicking on the drive letter and selecting “Properties”. Finally, it’s always a good idea to do a quick performance test to make sure your SSD is performing as it should be.
You can easily do this by using a program like CrystalDiskMark or AS SSD Benchmarks. With these final checks, you can rest assured knowing that your SSD is properly set up and ready to use.
Conclusion
Connecting an SSD to a motherboard is like a match made in tech heaven – it’s a simple and efficient process that can massively boost your computer’s performance. With just a few clicks and cables, you can enjoy faster boot times, quicker file transfers, and a seamless computing experience. It’s like upgrading from an ordinary bike to a fancy sports car.
So, if you’re still stuck with a sluggish hard drive, it’s time to make the switch and inject some lightning-fast SSD power into your motherboard!”
FAQs
What type of cable do I need to connect an SSD to a motherboard?
You will need a SATA cable to connect the SSD to the motherboard.
Where do I connect the SSD on the motherboard?
You can connect the SSD to the SATA port on the motherboard. Consult your motherboard manual to find the exact location of the port.
Can I use an M.2 SSD with any motherboard?
No, not all motherboards have an M.2 SSD slot. You will need to check your motherboard specifications to see if it supports M.2 SSDs.
Do I need to install any special drivers for my SSD to work on the motherboard?
No, usually the motherboard will automatically detect the SSD and install the necessary drivers. However, it is always a good idea to check for any updates on the manufacturer’s website.