Are you looking to upgrade your storage system and connect SSDs to your motherboard? If so, you’re in the right place! The process of connecting SSDs to motherboards may seem overwhelming at first, but fear not! In this blog, we’ll break down the steps required to connect your SSDs to your motherboard, ensuring that your upgraded system runs smoothly. Think of your motherboard as the brain of your computer, and your SSD as the storage unit. While there are different types of SSDs and motherboards available, the process of connecting them is relatively similar.
It’s essential to understand the available ports on your motherboard and the type of SSD you’re looking to connect to ensure compatibility. Whether you’re a gamer, creative professional, or simply in need of more storage space, a solid-state drive can improve your computer’s performance and load times significantly. By following the right steps and proper installation techniques, you can connect your SSD to your motherboard without any hassle.
So, let’s get started! In the following paragraphs, we’ll run through a step-by-step guide on how to connect your SSD to your motherboard. From locating the correct ports to BIOS settings, we’ll cover everything needed to upgrade your storage system effectively.
What is SATA?
When it comes to connecting SSD drives to a motherboard, the most common interface used is SATA. SATA stands for Serial Advanced Technology Attachment, and it is a type of data transfer technology that allows for high-speed communication between the SSD and the motherboard. Basically, SATA provides a physical and electrical interface between the drive and the motherboard, allowing them to communicate with each other and transfer data quickly and efficiently.
Most modern SSDs use the SATA III interface, which can achieve transfer speeds of up to 6 Gbps. Of course, there are other ways to connect SSD drives to a motherboard, such as through PCIe or M.2 slots, but SATA is by far the most popular and widely used option.
So, the next time you’re shopping for an SSD upgrade for your computer, make sure to check for a SATA interface to ensure compatibility with your motherboard.
Explanation of SATA technology and how it works.
SATA or Serial ATA is an interface used to connect storage devices to a computer’s motherboard. This technology works by transmitting data through a single cable with two pairs of wires. One wire sends data while the other receives it, allowing faster and more efficient data transfer rates.
SATA technology was introduced as a replacement for the older parallel ATA or PATA technology, which had limitations in data transfer rates and cable length. Unlike PATA, SATA uses a smaller and thinner cable that can support speeds of up to 6 Gbps. Another advantage of SATA is that it allows for hot-swapping, meaning that storage devices can be connected and disconnected while the computer is running without the need to restart the system.
Overall, SATA technology has greatly improved the reliability and speed of data transfer between storage devices and computers.
SSD Interface Types
When it comes to connecting an SSD drive to a motherboard, there are several interface types to consider. One of the most common interface types is SATA, which stands for Serial Advanced Technology Attachment. SATA interfaces are widely supported and offer fast transfer speeds for speedy data transfer between your storage device and the motherboard.
Another interface type is PCIe, which stands for Peripheral Component Interconnect Express. PCIe interfaces are typically found on high-end motherboards and offer even faster transfer speeds than SATA interfaces. On the other hand, there are also M.
2 interfaces, which are typically found on laptops and newer motherboards. M.2 interfaces offer an ultra-compact and fast connection for your SSD storage device.
Ultimately, the type of interface you choose will depend on your specific needs and the type of motherboard you have, but it’s always important to choose a fast and reliable interface to ensure optimum performance from your SSD drive.
Description of SSD interface types, including SATA, PCIe, and NVMe.
SSD interface types When it comes to SSDs, there are many interface types to choose from, each with their own unique features. SATA, which stands for Serial Advanced Technology Attachment, is a common interface for SSDs that is compatible with most motherboards and offers fast data transfer rates. PCIe, or Peripheral Component Interconnect Express, is another popular interface that offers even faster data transfer rates than SATA.
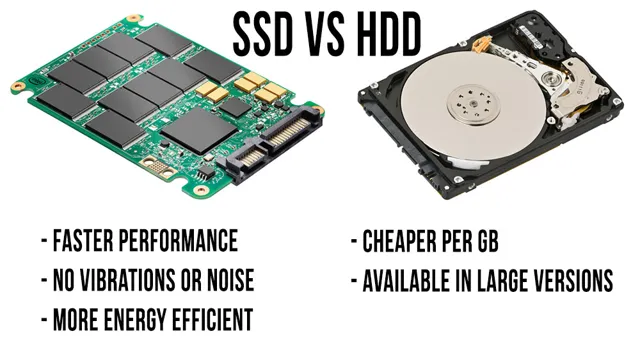
NVMe, or Non-Volatile Memory Express, is a newer interface type that was developed specifically for use with SSDs and offers the fastest data transfer rates of all. Overall, the interface type you choose for your SSD will depend on your specific needs, such as the type of data you plan to store and how much speed you require. Regardless of which interface type you go with, SSDs offer significantly faster boot-up and load times compared to traditional hard disk drives, making them a great choice for anyone looking to improve the performance of their computer.
Connecting SATA SSDs
If you’re wondering how SSD drives connect to your motherboard, the answer lies in the SATA (Serial ATA) interface. A typical SSD drive comes with a SATA connector, which plugs into a matching socket on your motherboard. These connectors are usually found near the bottom of the motherboard and can accommodate multiple drives.
Once plugged in, the SATA interface allows the motherboard to communicate with the SSD and transfer data at high speeds. However, keep in mind that there are different types of SATA connectors, namely SATA I, SATA II, and SATA III, which vary in terms of data transfer rates and compatibility. It’s important to ensure that your motherboard supports the same SATA version as your SSD to avoid any compatibility issues.
Overall, connecting an SSD to your motherboard via the SATA interface is a straightforward process and can help boost your system’s performance significantly.
Step-by-step instructions for connecting SATA SSDs to motherboards.
Connecting SATA SSDs to motherboards is a straightforward process that anyone can do. First, make sure your computer is turned off and unplugged. Locate the SATA ports on your motherboard, which should be labeled with SATA1, SATA2, and so on.
Take your SATA data cable, which comes with your SSD, and connect one end of the cable to the SSD and the other end to the SATA port on the motherboard. Next, find the power cable that connects to the SSD and plug it in. Once these steps are complete, close up your computer and make sure everything is snugly in place.
Congratulations, you’ve successfully connected a SATA SSD to your motherboard!
Connecting PCIe/ NVMe SSDs
If you’re wondering how SSD drives connect to a motherboard, the answer is through a PCIe or NVMe interface. Both PCIe and NVMe are high-speed data transfer protocols that allow for fast read and write speeds. The PCIe interface connects a range of components to a motherboard, including graphics cards, WiFi cards, and sound cards.
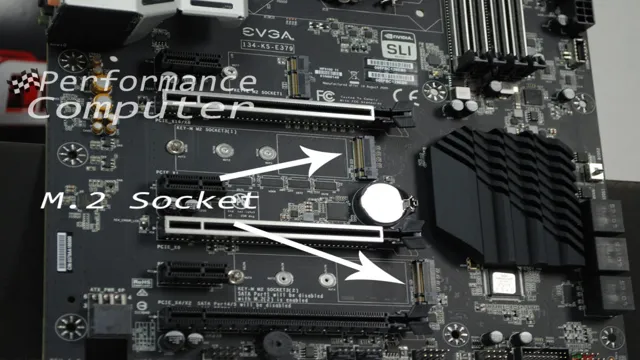
In contrast, NVMe is a storage interface designed specifically for SSDs, providing faster access times for the drives. To connect an SSD to a motherboard, you will need an NVMe-compatible M.2 slot or PCIe slot, depending on the type of SSD you have.
It’s essential to check your motherboard specifications to ensure compatibility and determine the number of available slots. The process of connecting an SSD to a motherboard is quick and straightforward. Simply insert the SSD into an available slot and secure with a screw, if required.
Once connected, the SSD should be recognized by the motherboard and the operating system, allowing for smooth performance and fast data transfer speeds.
Step-by-step instructions for connecting PCIe/NVMe SSDs to motherboards.
Connecting PCIe/NVMe SSDs to motherboards can offer faster data transfer speeds and improved overall system performance. To start, locate the PCIe slot on your motherboard and remove any protective covers. Insert the PCIe/NVMe SSD into the slot, ensuring it is seated firmly and securely.
Some motherboards may require additional screws or brackets to hold the SSD in place. Once the SSD is connected, boot up your system and enter the BIOS settings. From there, you should be able to select the PCIe/NVMe SSD as your primary boot device and configure any necessary settings.
It’s important to note that not all motherboards support NVMe SSDs, so it’s essential to check your motherboard’s specifications beforehand. Additionally, make sure your operating system and drivers are up-to-date to ensure optimal performance. With these simple steps, you can take advantage of the lightning-fast data transfer speeds provided by PCIe/NVMe SSDs.
Common Issues and Troubleshooting Tips
If you’re looking to upgrade your computer’s storage capacity with an SSD drive, you may be wondering how it connects to the motherboard. SSD drives use either a SATA or PCIe interface to communicate with the motherboard. SATA SSD drives use the same connectors as traditional hard drives and connect to the motherboard via a SATA cable.
PCIe SSD drives, on the other hand, connect to the motherboard through the PCIe slot, which provides faster transfer speeds than SATA. It’s important to make sure that your motherboard supports the type of SSD drive you choose. If you experience any issues with your SSD drive, such as slow speeds or data corruption, you can try updating the firmware, checking the cables and connections, or running diagnostics software to troubleshoot the problem.
Overall, adding an SSD drive is a simple and effective way to improve the speed and performance of your computer.
Identifying and solving common issues with SSD connections.
If you’re having trouble connecting your solid-state drive (SSD) or experiencing issues with speed or performance, don’t worry, you’re not alone. Some common issues with SSD connections include loose cable connections, outdated drivers, and software compatibility issues. The first step in troubleshooting is to check for loose connections and make sure everything is securely fastened.
Another potential issue is outdated drivers, so you’ll want to make sure you have the latest software and firmware updates for your SSD. Additionally, some software programs may not be compatible with your SSD, so it’s important to check for updates or find alternatives to ensure optimal performance. Lastly, if you’re still experiencing issues, it may be time to consider upgrading your SSD to a newer, faster model to improve speed and overall performance.
By identifying these common issues and taking the appropriate steps to troubleshoot, you’ll be able to improve your SSD’s performance and get the most out of your computer.
Conclusion
It’s like an intricate dance between the SSD and the motherboard, with each step and move carefully choreographed for optimal performance. The SSD connects to the motherboard through a special port, much like a tango dancer pressing her hand firmly against her partner’s back. And just like in any good dance, it’s all about the timing and precision in order to achieve a seamless and lightning-fast performance.
So the next time you’re marveling at the lightning-fast load times of your computer, remember the intricate steps that SSD and motherboard took to get you there.”
Summary of the process and key takeaways.
When it comes to troubleshooting common issues in any process, the key is to identify the root cause of the problem. It’s important to keep in mind that every issue is unique, and what may work for one problem may not necessarily work for another. However, some common issues that may arise during a process include unexpected error messages, slow performance, or inaccurate results.
To troubleshoot these issues, first, identify the problem and gather any relevant information. Then, try restarting the process or resetting any associated tools. Check for any updates or patches that may be available, and consult any documentation or user forums for troubleshooting tips.
It’s also important to stay organized and keep track of any solutions that have been successful in the past. Remember, troubleshooting is an iterative process, so don’t get discouraged if the first solution doesn’t work. Keep trying until you find the root cause and a successful solution.
FAQs
What type of connector is used to connect SSD drives to the motherboard?
Most SSDs use a SATA interface to connect to the motherboard. However, some newer SSDs use PCIe interfaces for faster data transfer rates.
Do all motherboards support SSD drives?
No, not all motherboards support SSD drives. Older motherboards may only support traditional hard drives with SATA connections. It’s important to check the specifications of your motherboard to see if it supports SSD drives.
Can I connect multiple SSD drives to my motherboard?
Yes, you can connect multiple SSD drives to your motherboard as long as you have enough available SATA or PCIe ports. However, it’s important to ensure that your motherboard supports RAID configurations if you plan on using multiple SSD drives.
What is the maximum data transfer rate for an SSD drive connected to a motherboard?
The maximum data transfer rate for an SSD drive connected to a motherboard depends on the type of interface used. SATA III interfaces can provide data transfer rates of up to 6 Gbps, while PCIe interfaces can provide much faster data transfer rates of up to 32 Gbps.