
Are you tired of your laptop chugging along sluggishly? Gaining a new laptop can be costly, and often unnecessary. One of the easiest and most effective ways to breathe new life into your old laptop is to upgrade its hard drive to an SSD. SSD stands for Solid State Drive, and is a much faster and more reliable storage device than the traditional HDD (Hard Disk Drive) that many laptops come with.
By swapping out your old HDD for an SSD, you can expect much faster boot and load times, smoother multitasking, and increased overall performance. Think of it like upgrading from a snail to a cheetah; your laptop will practically fly! In this article, we’ll guide you through how to upgrade your laptop’s hard drive to an SSD and the benefits you can expect from doing so. So sit back, grab a coffee, and get ready to learn how to revive your laptop with an SSD upgrade.
Backup Your Data
If you’re looking to upgrade your laptop’s hard drive to an SSD, the first thing you need to do is backup your data. This is important because replacing your laptop’s hard drive means that you’ll be wiping all your data from your old drive, and you want to make sure that you don’t lose anything. One way to backup your data is to use an external hard drive or a cloud-based backup service.
This will ensure that all your files are safe and secure in case something goes wrong during the upgrade process. Additionally, it’s a good idea to make a list of all the programs and applications that you have installed on your current hard drive, as you will need to reinstall them on your new SSD. By taking these steps, you can make sure that your upgrade goes smoothly and that you don’t lose any important data.
External Hard Drive or Cloud Backup
Backing up your data is essential in this day and age, where technology plays an integral part in our daily lives. When it comes to backing up, there are two main options to consider: external hard drives and cloud backup. An external hard drive is a physical device that you can connect to your computer via a USB port and store your data on it.
On the other hand, cloud backup involves storing your data on remote servers accessible via the internet. While external hard drives offer the convenience of being readily available and easily accessible, they are prone to physical damage and can malfunction with time. Cloud backup, on the other hand, offers the security of your data being stored on remote servers, which are often equipped with advanced security measures to protect your data against cyber threats.
Moreover, cloud backup offers the convenience of being accessible from anywhere with an internet connection. When choosing between the two, it is important to consider your data storage needs and budget. If you have a high volume of data to backup, cloud backup may be the more affordable and practical choice.
However, if you have limited internet bandwidth and need quick access to your data, external hard drives may be a better fit. Whichever option you choose, it is vital to back up your data regularly to prevent the unpleasant and potentially catastrophic loss of important files. Remember, your data is valuable, and having a backup plan in place can provide peace of mind knowing your files are safe and secure.
Choose an SSD
If you’re looking to upgrade your laptop hard drive to an SSD, there are a few things you need to consider before making your purchase. First, you’ll want to make sure you select an SSD with enough storage space to suit your needs. Depending on what you use your laptop for, you may need anywhere from 128GB to 1TB of storage.
Next, consider the speed and performance of the SSD. Look for products with high read and write speeds, as well as a good random access time. Finally, think about the price and warranty of the SSD.
While it can be tempting to go for the cheapest option, investing in a higher-quality SSD with a reliable warranty can save you money in the long run. With these factors in mind, you’ll be able to choose an SSD that fits your needs and budget, while improving the speed and performance of your laptop. So, go ahead and make the upgrade today to enjoy faster load times and improved overall productivity!
Consider Size, Speed, and Budget
When it comes to choosing an SSD, it’s important to consider factors such as size, speed, and budget. First, consider the size of the SSD you need. Do you need a large capacity for storing large files and software applications, or can you make do with a smaller one? Next, think about the speed of the SSD.
Faster speeds can greatly improve your computer’s overall performance, but may also come with a higher price tag. Finally, consider your budget and choose an SSD that fits within your financial means. Don’t overspend on a high-end SSD if you don’t really need all of its features and capabilities.
Ultimately, the right SSD for you will depend on your individual needs and preferences, but taking into account these three factors can help you make an informed decision.
Prepare Your Laptop
If you’re looking to upgrade your laptop’s storage to an SSD, there are a few steps you should take to prepare beforehand. First, you’ll need to make sure you have a compatible replacement SSD. Check your laptop’s specifications or contact the manufacturer to ensure the SSD will work with your laptop.
Additionally, you’ll want to back up all of your important files and data before beginning the upgrade process. This can be done using an external hard drive or cloud storage service. Once you have your replacement SSD and have backed up your data, it’s time to begin the upgrade process.
However, you may want to consult with a professional or follow step-by-step instructions to ensure the upgrade is successful. With the right preparation and care, upgrading your laptop’s hard drive to an SSD can have a tremendous impact on its performance and speed.
Shut Down and Unplug Everything
When it comes to preparing your laptop for storage or transportation, it’s important to shut it down properly and unplug all cables and accessories. This will prevent any potential damage or battery drain while it’s not in use. Simply turning off the power button is not enough, so be sure to go through the proper shutdown procedure.
Once everything is unplugged, make sure to store any cables and chargers separately to avoid tangling or damage. Taking these extra steps can help maintain the longevity and functionality of your laptop. So, whether you’re storing it for a few days or packing it for a road trip, remember to shut down and unplug everything to keep your laptop safe and secure.
Identify the Hard Drive Bay
If you’re planning on replacing your hard drive, the first step is to prepare your laptop for the process. The first thing you need to do is identify where the hard drive bay is located. This can vary depending on the make and model of your laptop, but it’s usually located on the underside of the laptop.
To find it, look for a panel that’s held in place by screws. Once you’ve located the bay, you can remove the screws and open up the panel to gain access to the hard drive. Before you start working on anything, make sure you power off the laptop, unplug it from the wall, and remove the battery to avoid any potential damage.
Always use caution as this can be a delicate process and any damage could lead to data loss or even render your laptop unusable. By following these steps, you’ll be well on your way to replacing that old hard drive and giving your laptop a new lease on life.
Install the SSD
Upgrading your laptop hard drive to an SSD is a great way to give your laptop a new lease on life. The process of installing an SSD can vary depending on your laptop model and the type of SSD you have purchased. However, the basic steps are fairly simple.
First, you’ll want to make sure you have the necessary tools and accessories. You’ll need a screwdriver, your new SSD, and an external enclosure or cable to connect your old hard drive to your laptop. After backing up your old data, you’ll need to remove your laptop’s old hard drive and replace it with the new SSD.
This often involves removing screws, unsnapping clips, and carefully pulling out the old drive. Once the new SSD is installed, you’ll need to format it and install your operating system. Overall, upgrading your laptop hard drive to an SSD is a worthwhile investment that can greatly improve your laptop’s performance and speed up your daily tasks.
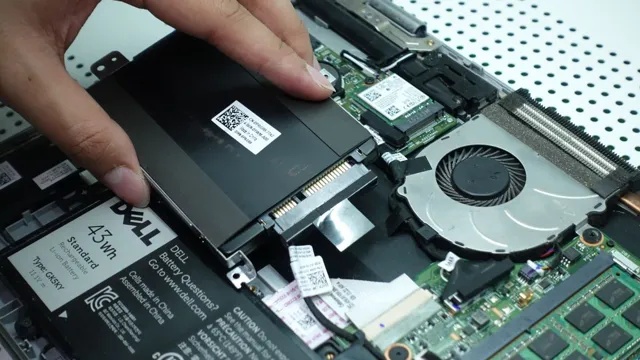
Remove and Replace the Old Hard Drive
When it comes to upgrading your computer, installing a solid-state drive (SSD) is one of the best ways to give it a new lease on life. One of the first steps in the process is removing the old hard drive. To install the SSD, you need to open up your computer and locate the old hard drive.
Disconnect it from the cables and carefully remove it from the system. Once the old hard drive is out, you can install the SSD. First, you need to slide the SSD into the drive bay.
Once it’s in place, you can secure it with screws or other fasteners. After that, you’ll need to connect the cables to the SSD. Finally, you can plug your computer back in and power it up.
The whole process is relatively straightforward, but it’s important to be careful and take your time. With a little patience, you can upgrade your computer with a lightning-fast SSD and enjoy much faster performance.
Connect the SSD and Battery
Now that you have opened up your laptop, it’s time to install the SSD. The first step is to connect the SSD to your laptop’s motherboard. You will need to find a slot that matches the type of SSD you have bought, whether it’s M.
2 or SATA. Align the SSD with the slot and gently slide it in until it clicks. Once the SSD is properly installed, it’s time to reconnect the battery.
It’s crucial to make sure that the battery is securely connected as this will ensure that your laptop turns on and runs smoothly. To do this, gently press the battery connector into its slot until it clicks. Now your laptop is ready to be closed up and turned on.
Don’t forget to format and install the operating system onto your new SSD before using it. With these simple steps, you can have a faster and more efficient laptop in no time!
Install the Operating System and Restore Data
So, you’ve decided to upgrade your laptop’s hard drive to an SSD. Great decision! The first step in this process is to install the new operating system. If your SSD didn’t come with a pre-installed OS, you’ll need to acquire a copy of your preferred operating system and create a bootable USB drive.
Once that’s done, you can boot from the USB and follow the installation steps. Don’t forget to change your boot order in the BIOS to ensure your computer boots from the USB drive. Once the new OS is installed, it’s time to restore your data.
If you have an external backup, plug it in and copy your files over. If not, you can use migration software to transfer your data from the old hard drive to the new SSD. Remember to disconnect the old hard drive before booting up your computer to avoid any potential conflicts.
Congratulations, you’re now all set to enjoy the speed and performance of your new SSD!
Create a Bootable USB Drive with a New OS
Creating a bootable USB drive with a new operating system can be a game-changer when it comes to restoring your computer’s functionality. With just a few simple steps, you can have a brand new operating system up and running, giving your computer a fresh start. To begin, you will need to download the operating system of your choice onto your USB drive.
Once that is complete, you will need to boot your computer from the USB drive, which may require some changes to your computer’s BIOS settings. From there, you can begin the installation process, which may take some time depending on the size of the operating system. Once your new operating system is installed, you can begin restoring your data from your backups or other storage devices.
With a little bit of patience and some know-how, you can have your computer working like new again with a brand new OS.
Install Needed Drivers and Restore Data
After installing the operating system on your computer, the next step is to install necessary drivers and restore any lost data. Drivers are crucial software that help your hardware components communicate with the operating system. Without them, your computer may not function optimally.
Gathering the right drivers before installing them can save you a lot of time and hassle. You may want to visit the manufacturer’s website to download the latest drivers for your specific hardware components. Once you have all the drivers, installing them is straightforward and should be done in the correct sequence for optimal performance.
Restoring data is the next step after installing drivers. If you have backed up your data to an external hard drive or cloud storage, you can proceed to restore it. However, if you have lost data and have not backed it up, you may need to employ data recovery software.
Restoring data can be a time-consuming process, but it is worth the effort to get your files and folders back. Overall, installing drivers and restoring data are crucial steps after installing the operating system, and they can ensure your computer runs optimally.
Enjoy the Increased Speed and Performance!
If you want to enjoy faster speeds and improved performance on your laptop, upgrading your hard drive to a solid-state drive (SSD) is a great option. The process of upgrading your laptop hard drive to SSD might sound intimidating at first, but it’s actually quite simple if you follow the steps carefully. First, make sure your laptop’s hard drive is compatible with an SSD.
Then, backup your data and create a recovery USB drive before removing the old hard drive. Install the SSD and transfer your data from the backup. Voila! Your laptop will now boot up and load files much faster than before.
Don’t let a sluggish laptop hold you back – upgrade to an SSD and enjoy the increased speed and performance!
Conclusion
Upgrading your laptop’s hard drive to an SSD is like replacing your old, slow horse with a sleek, speedy racehorse. Not only will it drastically improve your laptop’s performance, but it will also give you bragging rights among your tech-savvy friends. So what are you waiting for? Saddle up and make the upgrade!”
FAQs
Why should I upgrade my laptop hard drive to an SSD?
An SSD can significantly improve your laptop’s performance, making it faster and more responsive. It also has a longer lifespan than traditional hard drives, making it a worthwhile investment.
What type of SSD should I use for my laptop upgrade?
It’s important to choose an SSD that’s compatible with your laptop’s interface (such as SATA or NVMe) and form factor (such as 2.5-inch or M.2). You should also consider the storage capacity you need and your budget.
Can I clone my existing hard drive to the new SSD?
Yes, you can use software like Macrium Reflect or Acronis True Image to clone your existing hard drive to the new SSD. This will transfer all your files, applications, and settings to the new drive, allowing you to seamlessly upgrade without losing any data.
Do I need to reinstall my operating system after upgrading to an SSD?
It’s not necessary to reinstall your operating system, but it’s recommended to do a fresh installation for optimal performance. You can use a bootable USB drive with your operating system installer to install it on the new SSD. Make sure to backup your data before doing a fresh installation.