Upgrading your desktop to an SSD can be a game-changer for your computing experience. Not only can it significantly increase your computer’s speed, but it can also greatly improve your workflow and productivity. If you’re thinking about making the switch, you’re in the right place.
In this comprehensive guide, we’ll cover everything you need to know to upgrade your desktop to an SSD, from choosing the right type of SSD to cloning your existing hard drive. So, sit back, relax, and get ready to take your computer to the next level!
Benefits of an SSD
If you’re wondering how to upgrade your desktop to an SSD, it’s actually a lot easier than you might think. The benefits of an SSD make it a smart choice for anyone looking for faster performance and better reliability from their computer. Not only are they faster than traditional hard drives, SSDs are also more durable and less prone to failure.
Upgrading to an SSD can give your computer a significant speed boost, making it faster and more responsive overall. Plus, since SSDs don’t have any moving parts, they’re quieter and more energy-efficient than traditional HDDs. So whether you’re a gamer, a professional user, or just someone who wants a faster computer, upgrading to an SSD is definitely worth considering.
And with so many different options available today, it’s easier than ever to find the right SSD for your needs and budget.
– Faster boot and load times
If you’re tired of waiting for your computer to start up or your files to load, then it’s time to consider upgrading to an SSD. Solid-state drives (SSDs) offer faster boot and load times than traditional hard disk drives (HDDs). With an SSD, you can expect your computer to start up in seconds, and your applications and files to load in a fraction of the time it would take with an HDD.
Not only does this improve your productivity, but it also saves you time. It’s like upgrading from a bicycle to a sports car – you’ll notice a significant difference in speed and performance. So, don’t waste any more time waiting for your computer to catch up, upgrade to an SSD and experience the benefits for yourself.

– Improved overall performance
When it comes to improving the overall performance of your computer, choosing to install an SSD is a wise decision. Solid State Drives or SSDs offer significant benefits over traditional Hard Disk Drives or HDDs. One of the fundamental advantages of an SSD is its lightning-fast read and write speeds.
Data access from an SSD is almost instantaneous, making it several times faster than an HDD. This speed translates to faster boot-up times, quick application launch, and quicker access to data files. SSDs do not have any moving parts like an HDD, making them more durable and less prone to failure.
Additionally, SSDs consume less power, generate less heat, and produce no noise when in operation. In short, installing an SSD is a game-changer, and it can transform your computer’s performance like never before.
– Increased durability and reliability
One of the biggest benefits of using a solid-state drive (SSD) is its increased durability and reliability compared to traditional hard disk drives (HDDs). SSDs have no moving parts, which means they are less likely to suffer damage from drops or bumps, and less susceptible to failure from wear and tear. Additionally, SSDs are less likely to suffer data corruption and errors because they use less power and generate less heat than HDDs.
This means that an SSD can last longer and perform more reliably than an HDD, even under heavy use. So, whether you’re using an SSD for your personal computer or a critical server, you can rest easy knowing your data is safe and your system is running smoothly.
Choosing the Right SSD
If you’re considering upgrading your desktop to an SSD, you’re making a smart choice. But, with so many options available, choosing the right one can be overwhelming. To start, consider the capacity you’ll need for your storage.
If you use your desktop for heavy-duty tasks like gaming or graphic design, you’ll want a larger capacity. Next, consider the type of SSD. A NVMe SSD offers faster speeds and better performance, but is more expensive.
A SATA SSD is a more budget-friendly option that still provides faster speeds than a traditional hard drive. Finally, look for SSDs with features like error correction, wear leveling, and power loss protection for added reliability. Keep in mind that a good SSD can breathe new life into your desktop, making it faster and more responsive, so choose wisely!
– Determine compatibility with your system
When looking for an SSD to upgrade your system, it is essential to determine its compatibility. The safest way to ensure that you are getting the right SSD is to check your system’s manual for the type of interface supported. The most common types are SATA, PCIe, and NVMe.
Once you know the type of interface, you can easily find an SSD that matches your system’s specifications. Some SSD manufacturers provide online tools to aid in compatibility checking, which can assist you in finding the most suitable SSD for your system. Always make sure to double-check the compatibility before making a purchase to avoid any potential damage to your system.
Taking the time to research and determine compatibility is vital to ensure that you make the right decision and get the best performance out of your new SSD.
– Consider storage capacity and budget
When it comes to choosing the right SSD, there are a few things you need to consider. One of the most important factors is the storage capacity and budget. SSDs come in a variety of storage sizes, from a few gigabytes to multiple terabytes.
It’s essential to determine your storage needs and budget before making a purchase. If you’re dealing with large files, such as video or photo editing, you may need more storage capacity. On the other hand, if you’re looking for a budget-friendly option, you may need to opt for a smaller storage size.
Keep in mind that the larger the storage capacity, the higher the price tag. It’s essential to find a balance that meets your needs and budget. Whether you’re a gamer or a professional, choosing the right SSD can significantly improve your computer’s performance.
Backup and Data Transfer
Upgrading your desktop to an SSD can lead to significant improvements in performance and speed. However, before you make the switch, it’s important to back up your data and transfer it to the new drive. One option is to use a cloning tool that will copy your entire operating system, applications, and data onto the new SSD.
It’s a quick and easy solution, but you need to be sure that your new SSD has enough space for all your data. Another option is to manually transfer your files to an external hard drive before swapping out the drives. This process can take longer but allows you to select which files you want to keep and ensures that you won’t lose any important data.
Either way, remember to make a backup of your important files, just in case. With your new SSD in place and your data safely transferred, you can enjoy the benefits of a faster, more responsive desktop computing experience.
– Backup important files and data
Backing up important files and data is an essential step to ensure that all your important data is secure and protected. Whether you use a computer, a smartphone, or a tablet, it’s important to have a backup of all your important files, documents, photos, and videos. There are various ways to do this, including cloud services, external hard drives, and even USB drives.
It’s recommended to back up your data periodically to ensure that you don’t lose anything in the event of a hardware failure or a cyber attack. Backing up your data also allows you to transfer it to a new device easily, without having to worry about losing anything important. By taking the time to back up your important files and data, you can rest assured knowing that your valuable information is protected and accessible whenever you need it.
– Transfer data to the new SSD
When it comes to upgrading to an SSD, data transfer is a crucial step to consider. Before you install the new SSD, it is important to back up your data to prevent any loss of critical information. There are several ways to transfer your data, including using a backup software program, cloning software, or manually transferring files.
The most common and easiest method is using cloning software, which allows you to copy everything from your old hard drive to the new SSD without losing any data. The process usually takes a few hours, depending on the size of your data. By transferring your data to your new SSD, you can ensure that all your files, including your operating system, applications, and personal files, are readily available on your new drive.
With your new SSD, you can enjoy faster speed, better performance, and more storage space for your files.
Installing the SSD
If you’re looking to upgrade your desktop to an SSD, you’ll want to start by physically installing the new drive. First, make sure your computer is powered off and unplugged. Then, locate the existing hard drive in your computer and remove it from its mounting brackets.
Carefully disconnect any cables, and set the old drive aside. The SSD should have come with its own mounting brackets, so attach those to the bottom of the drive. Slide the SSD into the empty drive bay, and secure it with screws.
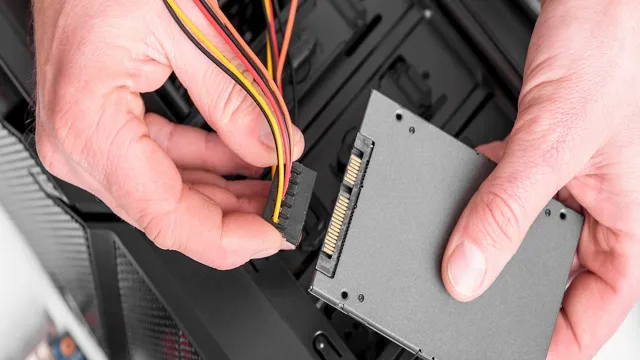
Once the physical installation is complete, you’ll need to connect the appropriate cables. Most modern SSDs use a SATA connection, so you’ll need to connect a SATA cable from the motherboard to the SSD, as well as a power cable. Finally, power up your computer and ensure the new SSD is recognized in your BIOS settings.
With the SSD installed, you can expect lightning-fast boot times, improved application load speeds, and smoother overall performance.
– Open the desktop’s casing
Installing an SSD in your desktop is a great way to improve its performance. Before beginning, ensure everything is unplugged, and you’ve grounded yourself to prevent static discharge. Once you open the desktop’s casing, you’ll need to locate a suitable spot to fit your SSD.
First, remove the required screws from the mounting bracket. Then, slide your SSD into the bracket and replace the screws to secure it in place. Once you’ve installed the SSD in the bracket, you’ll need to connect the SATA and power cables to the motherboard.
The SATA connector typically has an L-shape, making it easy to identify where it fits. If you’re having trouble connecting the power cable, don’t force it; instead, make sure it’s correctly oriented before applying gentle pressure. Finally, put everything back in place and plug in your computer.
Your desktop should now detect the new SSD, and you’re ready to start enjoying its increased speed and performance.
– Locate the hard drive and disconnect it
When it comes to installing a new SSD, one of the first things you need to do is locate the hard drive and disconnect it. This can be a bit tricky, but with the right tools and a steady hand, it shouldn’t take too long. The hard drive is usually located on the bottom or side of the laptop, and you’ll need to remove the screws that hold the cover in place to access it.
Once you’ve located the hard drive, carefully remove the cables that connect it to the motherboard. Be sure to keep an eye on the orientation of the cables so you can easily reconnect them later on. With the hard drive disconnected, you’re ready to proceed with installing your new SSD.
So, let’s get started!
– Install the SSD and reconnect cables
Installing an SSD is a simple way to significantly boost the performance of your computer. Once you have selected your new SSD and have prepared to install it, the next step will be to physically install it inside your computer. First, make sure your computer is unplugged and opened up.
Locate the hard drive bay and remove the existing hard drive, if necessary. Then, carefully install the SSD into its respective slot, ensuring all screws and connectors are securely in place. Reconnecting the necessary cables may require some patience and attention to detail, but take this as an opportunity to clean and organize the inside of your computer while you’re at it.
Once everything is reconnected, close up your computer, plug it in, and power it on. With your new SSD, you’ll now be able to experience faster boot times, quicker application launches, and improved overall performance.
Setting Up the SSD
If you’re looking to upgrade your desktop to an SSD, the first step is to select the SSD that best suits your needs. Once you’ve made your choice, you’ll need to open up your computer and locate the hard drive. Depending on the type of computer you have, this may be relatively easy or quite difficult.
You’ll need to disconnect any cables and unscrew any screws holding the hard drive in place. Once the hard drive is removed, you’ll need to screw the SSD into place in the same spot. You’ll then need to connect any cables that ran to the old hard drive to the SSD.
Finally, you’ll need to turn your computer back on and make sure it recognizes the new SSD as the main hard drive. With some basic knowledge of computer hardware and a bit of time, upgrading your desktop to an SSD can be a fairly simple process that can greatly improve your computer’s speed and overall performance.
– Format and partition the SSD
Setting up an SSD is an essential task for anyone looking to upgrade their computer’s performance. One of the first things you should do is format and partition the SSD to ensure it’s ready for use. Formatting will erase any existing data on the drive, so make sure to backup any important files beforehand.
To format the drive, you can use the built-in tool in your operating system, such as Disk Management for Windows or Disk Utility for Mac. Once formatted, you can partition the SSD into different sections, which can be useful for organizing your files and improving read/write speeds. For example, you could have one partition for your operating system and applications and another for your personal files.
To create partitions, you can again use the built-in tool in your operating system or a third-party software. Overall, formatting and partitioning your SSD is an important step in getting the most out of your new SSD.
– Install the operating system and necessary software
Installing the operating system and necessary software on your new SSD doesn’t have to be a daunting task. Here are a few simple and straightforward steps to follow that will help you get your SSD up and running in no time. Begin by formatting your SSD to ensure that it is clean and ready for the operating system.
You can do this using either the Windows Disk Management tool or a third-party software like Rufus. Once your SSD is formatted, you’ll need to download and create a bootable USB drive with the operating system you want to install. This is done by downloading the operating system from the official website and using a free tool like Rufus to create the bootable drive.
Once you have your bootable drive ready, insert it into your computer and follow the prompts to install the operating system. Once the operating system is installed, you can begin installing the necessary software and drivers to get your computer up and running. With a little patience and know-how, setting up your new SSD can be a breeze!
Conclusion and Further Tips
Upgrading your desktop to an SSD is like giving it a caffeinated boost – it’s faster, more efficient, and ready to take on any task that comes its way. With the right tools and steps, the process is simple and well-worth the investment. In the end, your computer will thank you for the upgrade, as it’ll be running smoother and quicker than ever before.
Say goodbye to sluggish loading times and hello to a snappy desktop that can keep up with your demanding needs!”
FAQs
What is an SSD and how does it differ from a traditional hard drive?
An SSD (solid-state drive) is a type of storage device that uses flash memory to store data. It is faster and more reliable than a traditional hard drive, which uses spinning disks to read and write data.
What are the benefits of upgrading from a traditional hard drive to an SSD?
Upgrading to an SSD can dramatically improve your computer’s performance, with faster boot and load times, improved overall responsiveness, and increased durability due to the lack of moving parts.
How do I determine if my desktop is compatible with an SSD?
The easiest way to determine if your desktop is compatible with an SSD is to check the specifications of your motherboard or consult the manufacturer’s documentation. You’ll want to ensure that your desktop has an available SATA port and supports the same form factor as the SSD you’re considering.
Can I install an SSD myself, or should I hire a professional?
Installing an SSD is a relatively straightforward process that can be done by most users with basic computer skills. However, if you’re uncomfortable opening your computer’s case or unsure of how to transfer your data to the new drive, it may be worth hiring a professional to assist you.