Have you recently upgraded to an SSD and are wondering how to transfer your files from your old HDD? Well, fear not, because in this blog post, we’ll guide you through the whole process step by step. Moving files from an HDD to an SSD can seem intimidating, but with a little bit of guidance, it can be a breeze. Just like packing up your old house and moving to a new one, transferring files from one storage device to another requires some planning and organization.
In this guide, we will provide you with everything you need to know to make your transfer easy and stress-free. So, grab a cup of coffee, sit back, and let’s get started!
Check SSD Compatibility
Moving files from an HDD to an SSD can speed up your computer’s performance dramatically. But before you start transferring files, make sure that your SSD is compatible with your system. Most modern computers use SATA III (6Gbps) for data transfer, so ensure that your SSD supports this standard.
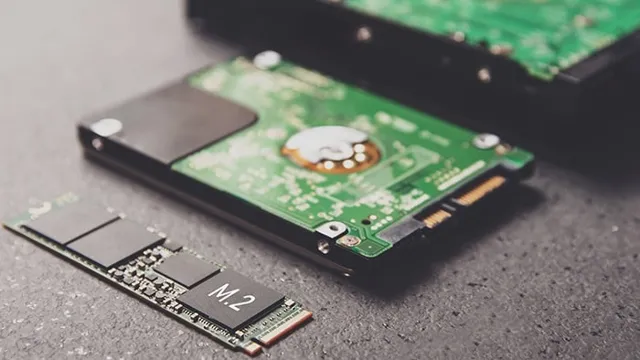
You can also check your motherboard manual to see if your system supports the NVMe or M.2 format, which are newer and faster than SATA III. Once you have confirmed compatibility, you can begin transferring files by either cloning your entire HDD, copying and pasting specific files or using software like Windows Easy Transfer or Mac’s Migration Assistant.
Using an SSD can greatly enhance your computer’s response time and make your computing experience much more enjoyable.
Ensure SSD and HDD Connections
When it comes to building a computer, ensuring that all the components are compatible with each other is crucial. This also goes for connecting the SSD and HDD to the motherboard. Before purchasing an SSD, it is important to make sure it is compatible with the motherboard.
Most modern motherboards have multiple M.2 and SATA ports, but it’s always good to check the specifications before making a purchase. Once you’ve confirmed compatibility, be sure to connect the SSD to the correct port on the motherboard.
Similarly, when connecting an HDD, make sure it’s connected to the correct SATA port, as some motherboards have different speeds for different ports. By ensuring the compatibility and correct connections of your storage devices, you can avoid any potential issues, and ensure smooth and efficient performance of your computer.
Backup Your HDD Data
Moving files from an HDD to an SSD can be a daunting task, but with the right approach, it can be a smooth process. The first step is to back up all the data you want to move from the HDD to the SSD. You can use an external hard drive, cloud storage, or any other reliable backup tool.
Once you have your backup in place, it’s time to clone your HDD to the SSD. This process involves copying the entire contents of your HDD to the SSD. There are multiple software tools available that can help with this process.
Some of the popular ones include EaseUS Todo Backup, Clonezilla, and Macrium Reflect. After you’ve chosen the tool you want to work with, connect the SSD to your computer and follow the prompts to start cloning. Once the cloning process is complete, the final step is to replace the HDD with the SSD.
Power down your computer, remove the HDD, and install the SSD in its place. Turn on your computer, and you should be able to boot up just like you normally would, except now you’ll be running your OS and applications on the faster SSD. In summary, moving files from an HDD to an SSD requires backing up your data, cloning your HDD to the SSD, and replacing the HDD with the SSD.
Using reliable tools and following the proper steps will ensure a seamless transition from your old HDD to a new and improved SSD.
Create a Backup of Your Files
Backing up your HDD data is crucial to ensure its safety and accessibility in case of unexpected system crashes or accidental deletions. Without a proper backup, you run the risk of losing all your important files, including documents, photos, videos, and more. To create a backup of your files, you can use various methods such as external hard disk drives, cloud storage solutions, or even backup software.
One effective way is to regularly copy your files to an external hard drive on a monthly, weekly, or daily basis, depending on your workflow and frequency of updates. Another option is to use cloud-based services like Google Drive, Dropbox, or iCloud, which not only provide backup and storage services but also allow you to access your files from anywhere with an internet connection. Regardless of the method you choose, make sure you have a proper plan in place to ensure the safety and accessibility of your valuable data.
Remember, prevention is always better than cure, and taking the time to backup your files can save you from a lot of headaches in the long run.
Copying Files to SSD
If you’re looking to speed up your computer, transferring your files from your HDD to an SSD is a great place to start. You’ll notice a significant increase in speed and better overall performance. To do this, you’ll need to copy your files to the SSD.
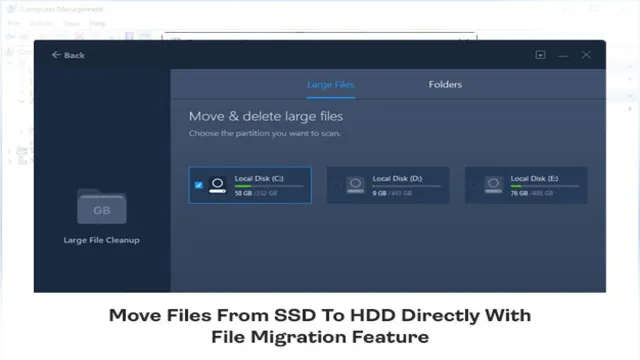
There are various methods to achieve this, including using Windows built-in tools or third-party software. One way is to use the File Explorer to select and drag your files from your HDD to the SSD. Alternatively, you can use a software like EaseUS Todo PCTrans to transfer your files.
This software can transfer your files, applications, and even user accounts, so you don’t have to do it all manually. Regardless of which method you use, make sure to review your files and delete any duplicates or unnecessary files to free up space on your SSD. With these steps, you’ll have successfully moved your files from your HDD to your SSD and will enjoy faster performance.
Use System Migration Software
When it comes to upgrading your computer’s storage to a faster and more efficient SSD, it can be a daunting task to transfer all your files and programs over. This is where system migration software comes in handy. With just a few clicks, this software can copy all your data from your old drive to the new SSD.
This makes the process much easier and faster than manually transferring each file one by one. Not only does it save you time, but it also ensures that you don’t lose any important data or settings during the transfer. The best part is that you can continue to use your computer while the migration process is happening in the background.
Make sure to choose a reliable and user-friendly system migration software to ensure a seamless transition to your new SSD.
Manually Transfer Files
Manually transferring files from your old hard drive to your new SSD can be a bit of a hassle but the process can be done easily with a few simple steps. First, be sure to back up all important files before starting the transfer process. Next, connect the SSD to your computer and make sure it is properly recognized.
Then, select the files you want to move over to the SSD and copy them over using the drag and drop method or through a file transfer program. Depending on the amount of data you have, this process can take anywhere from a few minutes to a few hours. Once all the files have been transferred, be sure to test out the SSD to ensure everything is working properly.
By manually transferring files to your SSD, you can ensure that all your important data has successfully made the move to your faster, more efficient storage solution.
Verification and Cleanup
If you’re looking to transfer files from your HDD to your SSD, there are a few steps you can take to make sure the process goes as smoothly as possible. First, you’ll want to verify that all the files you want to transfer are in good working order. This means checking for any corrupted files, broken links, or other issues that could cause problems down the line.
Once you’ve verified that your files are in good shape, it’s time to clean them up. This might involve deleting unnecessary files or consolidating multiple files into a single, more manageable file. Once your files are cleaned up, it’s time to start the transfer process.
There are a few different ways to do this, depending on your operating system and the specific hardware you’re using, but most involve copying the files from your HDD to a storage device (like an external hard drive) and then transferring them to your SSD. With a little bit of patience and care, you should be able to move your files from your HDD to your SSD without any major issues.
Verify Contents on SSD
If you are using an SSD, it’s essential to verify and clean up its contents periodically. Verification ensures that your files are intact, and no corruption has occurred. On the other hand, cleanup helps optimize your SSD’s performance by removing unnecessary files, such as temporary files, cache files, and other junk files.
When left unchecked, these files can clutter your SSD, causing it to slow down and reduce its lifespan. Therefore, it’s crucial to verify and clean up your SSD routinely. You can use various tools to accomplish this, including built-in Windows tools like Windows Defender or third-party tools like CCleaner and SSD Fresh.
By running these tools regularly, you will keep your SSD in good shape and avoid potential data loss and hardware failure.
Remove Unnecessary Data from HDD
Verification and cleanup are essential steps to remove unnecessary data from your HDD. You should first verify your data by checking the last time you used a file or folder. If it’s been months or years since you last accessed it, then it’s probably not important and can be safely deleted.
Also, keep your important files in separate folders so that you can easily access them, while getting rid of unwanted files that take up disk space. You can also use various software tools to clean up your HDD, allowing you to delete old and unwanted files. These include tools that scan your system for junk files, temporary files, and unnecessary registry entries.
Once you’ve identified the files and folders you no longer need, you can select them for removal. By removing unnecessary data, you can not only free up disk space but also improve the overall performance of your system. So, it’s important to regularly verify and clean up your HDD to keep your system running smoothly and efficiently.
Conclusion
In conclusion, moving files from an HDD to an SSD is like upgrading from a bicycle to a sports car. While the process may seem daunting at first, the end result is a significant improvement in speed and performance. Whether you’re transferring important work documents or your favorite movies and music, following the proper steps ensures a seamless transition.
So go ahead, rev up your computer’s engine and enjoy the ride with lightning-fast access to all your files on your new SSD.”
FAQs
What is the benefit of moving files from HDD to SSD?
Moving files from HDD to SSD can significantly improve the performance of your computer. SSDs have faster read and write speeds than HDDs, which means that data transfer and boot times will be faster.
Can I move all files from my HDD to my SSD?
You can move most files, including your operating system and applications, from your HDD to your SSD. However, you may need to uninstall some applications and then reinstall them on your SSD, as they may not function properly when moved.
What is the best way to transfer files from my HDD to my SSD?
The easiest way is to use a cloning software, such as EaseUS Todo Backup, to transfer the entire contents of your HDD to your SSD. Another option is to manually transfer files through file explorer or use backup and restore tools, like Windows Backup and Restore.
Do I need to erase my HDD after transferring files to my SSD?
It is recommended to erase your HDD after transferring files to your SSD for security reasons. However, this step is optional and depends on your personal preferences and data sensitivity. If you plan to continue using your HDD as a storage device, make sure to back up all important data before erasing.