Are you looking to move your C drive from SSD to HDD? Maybe you’ve realized that you’re running out of space on your SSD and want to free up some room, or perhaps you simply want to optimize your system by having files stored on separate drives. Whatever your reason, the process of moving your C drive from SSD to HDD might sound daunting at first, but with the right guidance, it can be a smooth and straightforward task. In this blog, we’ll provide you with step-by-step instructions on how to transfer your operating system from your SSD to your HDD, so you can make the most out of your storage space without sacrificing performance or stability.
So let’s dive in!
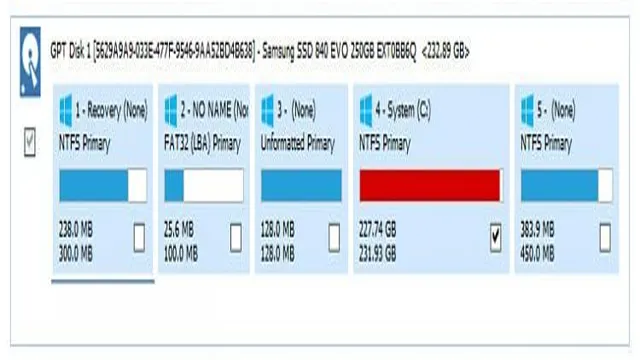
Backup Important Data
If you’re looking to move your C drive from an SSD to an HDD, there are a few steps you’ll need to take to ensure that you don’t lose any important data. First and foremost, it’s crucial to back up all of your important files, documents, and folders to an external hard drive or cloud storage. Once you’ve backed up all of your important data, you can use a software program to clone your C drive onto your HDD.
This process involves creating a bootable USB drive, connecting your new HDD to your computer, and installing the software program. After the cloning process is complete, you’ll need to change your boot order to boot from the new HDD instead of the old SSD. While this process may seem daunting, it’s actually quite straightforward and can be completed in just a few simple steps.
By taking the time to back up your important data and following these instructions carefully, you can safely and easily move your C drive from your SSD to your HDD.
Copy Contents of C Drive to HDD
Backing up important data is always a smart move to ensure that you don’t lose any important files or documents in case of a system crash or failure. Copying contents of C drive to a separate external HDD is a good way to keep your precious data safe. It might seem like a daunting task, but it’s actually pretty straightforward and easy to do.
All you need is an HDD with enough space to accommodate all the files from your C drive. Simply connect your external HDD to your computer, locate your important files and folders, and drag and drop them onto the external drive. It’s important to note that you should do this periodically to keep your backup up-to-date with any changes you make to your C drive files.
By taking this simple precaution, you’ll have peace of mind knowing that all your important files are safely stored and can be easily retrieved in case of any emergency.
Change Drive Letter of HDD
If you ever need to change the drive letter of your HDD (hard disk drive), it’s always best to backup your important data first. This ensures that any data or files you have stored on the drive are kept safe and secure during the process. You don’t want to risk losing important files, documents, photos, or videos due to an error or mistake.
So, take the time to transfer everything onto an external hard drive, cloud storage, or another location on your computer before proceeding with changing the drive letter. This may seem like a hassle, but it’s well worth it in the long run. Remember, it’s always better to be safe than sorry when it comes to protecting your valuable data.
Update Boot Settings
If you want to move your C drive from your SSD to your HDD, you’ll need to update your boot settings. This is a crucial step to ensure that your computer recognizes the new location of your operating system. First, you’ll need to go into your BIOS settings and change the boot order to prioritize your HDD.
This will ensure that your computer boots up from your HDD instead of your SSD. Next, you’ll need to clone your C drive from your SSD to your HDD using a third-party software. Make sure that you select the option to copy all partitions and ensure that your C drive is set as the active partition.
Once you’ve successfully cloned your C drive, shut down your computer and remove your SSD. Then, restart your computer, and it should boot up using your HDD as the primary drive. Remember to check that all your files and applications are working correctly on your new drive.
By updating your boot settings, you’ll be able to enjoy faster boot-up times and better storage capacity on your HDD.
Reboot System and Enter BIOS
If you’re looking to update your computer’s boot settings, you’ll need to reboot the system and enter BIOS. The BIOS, or Basic Input/Output System, is responsible for managing hardware settings and initializing software during the boot process. To enter BIOS, you’ll typically need to press a specific key as your computer is starting up, such as F2 or Delete.
Once you’re in BIOS, you can navigate through the various settings to customize your boot options. For example, you may want to change the boot order so that your computer boots from a USB drive instead of the hard drive. It’s important to note that making changes in BIOS can be risky, so it’s important to proceed with caution and make backup copies of any important files before making any changes.
By following the proper steps and taking necessary precautions, you can successfully update your computer’s boot settings and optimize its performance.
Change Boot Order to HDD
If you’re struggling with changing the boot order on your computer to prioritize the hard drive, you’ve come to the right place. The process is relatively simple and can be done in a few steps. First, access your computer’s BIOS settings by restarting your computer and pressing the appropriate key (usually F2 or Delete) as soon as the screen shows the manufacturer’s logo.
Once you’re in the BIOS menu, navigate to the Boot tab, and look for the boot order options. You can then select the hard drive option and move it to the top of the list by using the respective arrow keys. Save the changes and exit the BIOS settings to reboot your computer.
Voila! Your computer will now boot from the hard drive first. Keep in mind that the exact steps may vary depending on your computer’s brand and model, so make sure to consult your manual or manufacturer’s website. By prioritizing your hard drive as the boot device, you’ll be able to enjoy a faster, more reliable start-up experience.
Save and Exit BIOS
Once you’ve made the necessary changes to your computer’s BIOS settings, it’s time to save and exit. This step is crucial to ensure that your changes take effect and your computer boots up properly. To save and exit, you’ll need to navigate to the “Exit” tab in your BIOS menu.
There, you’ll see an option to “Save changes and exit,” which you should select. Keep in mind that if you make any mistakes or encounter any issues with your computer’s booting process after making changes to BIOS settings, you can always return to the BIOS menu to make further adjustments. Updating boot settings may seem daunting at first, but once you become familiar with your computer’s BIOS menu, it will become second nature.
Test Your New HDD
If you’re looking to move your C drive from an SSD to an HDD, there are a few steps you can take to ensure a smooth transfer. First, make sure you have a backup of all your important files and data. Next, use disk cloning software to clone your SSD’s C drive onto the new HDD.
Once the cloning process is complete, you’ll need to go into your computer’s BIOS settings and change the boot order so that the HDD is the primary boot drive. This will ensure that your computer boots from the HDD instead of the SSD. Finally, test your new HDD to make sure everything is working properly.
You can do this by running a disk benchmark test or by simply opening and saving files to the new drive. With these steps, you should have no problem moving your C drive from an SSD to an HDD.
Ensure System is Booting Up Correctly
Testing your new HDD is a crucial step in ensuring that your system will boot up correctly. Even the best quality HDDs can sometimes have issues, so it’s important to run a test before relying on it for storage. There are a few different methods for testing your HDD, but one of the most popular is using software specifically designed for this purpose.
Programs like CrystalDiskInfo or HD Tune can help you identify any potential issues with your hard drive, such as bad sectors or read errors. Once you’ve run a test and confirmed that your new HDD is free of any issues, you can feel confident that your system will boot up correctly. It’s important to note, however, that even if your test comes back clean, there’s still a chance that your HDD could fail in the future.
It’s always a good idea to keep regular backups of your important data, just in case something goes wrong. Another thing to keep in mind when testing your new HDD is to make sure that it’s compatible with your system. Most modern HDDs will work with just about any system, but it’s still a good idea to check the manufacturer’s website to make sure that your system meets the minimum requirements.
If you’re not sure how to check this, a quick online search should give you all the information you need. Overall, testing your new HDD is a simple step that can save you a lot of headaches in the long run. By taking the time to run a test and ensure that your HDD is working properly, you can feel confident that your system will boot up correctly and that your data will be safe and secure.
So if you’ve recently installed a new HDD, be sure to take the time to run a test and make sure everything is running smoothly.
Verify Files on HDD
When you purchase a new hard disk drive (HDD), it’s important to test it thoroughly to make sure it’s working correctly. One of the best ways to do this is by verifying the files on your HDD. This process involves checking the integrity of every file on your hard drive to ensure they have not been corrupted or lost.
Failure to do this could result in data loss and damage to your system. To begin the verification process, you’ll need to run a disk checking utility. Windows users can use the built-in CHKDSK tool to scan their hard drive for errors.
Simply open the command prompt, type “chkdsk /f” and press enter. This will initiate the file verification process and attempt to repair any errors found on the drive. If you’re using a Mac, you can verify your files by using the Disk Utility application.
Simply open Disk Utility, select your hard drive and click “First Aid.” This will scan your drive and check for any errors or corrupted files. It’s important to note that verifying your files can take some time, especially if you have a large amount of data on your HDD.
However, it’s a critical step that should not be skipped. By verifying your files, you can ensure that your new HDD is working correctly and that your data is safe and secure. Overall, verifying your files is a simple but crucial step in testing your new HDD.
It’s important to stay vigilant and take the necessary precautions to protect your data, as a failed or corrupted hard drive can be a major headache. By taking the time to run regular file verification checks, you can rest easy knowing that your system is running smoothly and your data is protected.
Conclusion
In conclusion, moving your C drive from SSD to HDD is like a game of Jenga- carefully and strategically moving each block until you reach your desired outcome. However, unlike Jenga, you won’t have to worry about everything tumbling down. With a little patience and know-how, you can easily transfer your C drive and enjoy the benefits of increased storage space on your HDD.
“
FAQs
What is the best way to move the C drive from an SSD to an HDD?
One of the simplest ways to move the C drive from an SSD to an HDD is to use a cloning software such as EaseUS Todo Backup or AOMEI Backupper. These programs will copy the contents of your SSD to the HDD, allowing you to access your files and programs from the new drive.
Can I move my C drive without reinstalling the operating system (OS)?
Yes, you can move the C drive without reinstalling the operating system. Cloning software can make a duplicate of your current OS and transfer it to the new drive. Just make sure that the HDD has enough space to accommodate all of your files before initiating the cloning process.
What precautions should I take before transferring the C drive to a new HDD?
Before transferring the C drive to a new HDD, it is essential to back up all of your important files and data. You can use an external drive or cloud storage to do this. Additionally, ensure that the HDD has enough space to accommodate all of your files and software.
Will moving the C drive from SSD to HDD affect my computer’s performance?
The performance of your computer may be affected by moving the C drive from SSD to HDD. SSDs are often faster and more efficient than HDDs, so your programs and files may take longer to load from the HDD. However, if you have a high-performing HDD, the difference may not be significant.