If you’ve just installed a new SSD in your computer, the next step is to transfer your Windows operating system to it. By doing so, you’ll be able to enjoy faster boot and load times and an overall snappier experience. But, how do you go about it? In this handy guide, we’ll show you step-by-step how to mount Windows on your new SSD, so you can get the most out of your computer.
From creating a bootable USB drive to installing Windows and transferring all your files, we’ve got you covered. So, grab your coffee, put on your geek hat, and let’s get started!
Check Hardware Compatibility
If you’re planning to mount Windows to a new SSD, it’s crucial to check the hardware compatibility. You don’t want to waste your time and money on a new SSD only to find out that it’s not compatible with your computer’s hardware. One way to check hardware compatibility is to refer to your computer’s user manual or manufacturer’s website to see what types of SSDs your computer supports.
You can also use hardware diagnostic tools like CPU-Z, which can give you information about your computer’s hardware and what types of components it can handle. It’s important to note that some older computers might not support SSDs, or might require a firmware update to do so. Before purchasing an SSD, make sure to do your research and ensure that it’s compatible with your computer’s hardware and firmware.
By doing so, you’ll save yourself the hassle of returning or exchanging your new SSD and be able to enjoy your high-speed storage upgrade hassle-free.
Ensure SATA or NVMe Interface is Available
When building your PC, it is crucial to make sure that the hardware you choose is compatible with each other. One important factor to consider is the interface of your storage devices. Ideally, you want to look for either SATA or NVMe connections to ensure that your storage device is compatible with your motherboard.
SATA is the standard interface used for most traditional hard drives and solid-state drives, while NVMe is a newer and faster interface specifically designed for fast flash-based storage devices. When it comes to speed, NVMe is the clear winner here as it can outperform SATA by up to 7 times faster. However, not all motherboards support NVMe, so it’s important to check its compatibility first.
It’s always a good idea to check the compatibility of your hardware before making any purchases to save you from headaches in the future.
Verify Compatibility with Motherboard
When it comes to building a PC, verifying the compatibility of all the hardware components is crucial. One important aspect to consider is the compatibility of the motherboard with the other components such as the CPU, RAM, and graphics card. This can be done by checking the specifications of the motherboard to ensure it supports the hardware components chosen for the build.
It’s important to note that not all motherboards have the same socket type for the CPU, so choosing the right CPU and motherboard combination is vital. Additionally, the RAM should be compatible with the motherboard’s supported memory type and speed. Graphics card compatibility can also vary depending on the motherboard’s PCIe slots.
To verify hardware compatibility, you can consult the motherboard’s documentation or use online tools such as PC Part Picker. These resources can help you select components that are guaranteed to work well together. Taking the time to check compatibility before making a purchase can save both time and money in the long run, as it ensures the components will work flawlessly together.
Overall, thorough verification of hardware compatibility is essential for a smooth PC building process.
Create Windows Installation Media
If you’re upgrading your computer’s hard drive to an SSD, one of the crucial steps is to mount Windows onto your new drive. To do this, you’ll need to create Windows installation media, which is basically a bootable USB drive that contains Windows installation files. The easiest way to create installation media is by using the official Windows Media Creation Tool.
Once downloaded and run, the tool will guide you through the process of creating the media, which involves selecting the Windows version you want to install, choosing the language and architecture, and specifying the USB drive as the destination. It’s important to note that creating the installation media will wipe out any data on the USB drive, so make sure to back up any important files beforehand. Once you’ve created the installation media, simply insert it into your computer’s USB port and boot from it to start the installation process.
With some patience and a bit of technical nous, you’ll have Windows installed on your new SSD in no time!
Download Windows 10 ISO Image
If you’re looking to download a Windows 10 ISO image, it’s easy to do so with the Windows Media Creation Tool. This tool allows you to create Windows installation media, which is essential for installing Windows on a new computer or upgrading an existing one. To get started, simply download the tool from the Microsoft website and run it on your computer.
You’ll be prompted to choose between creating installation media for another PC or upgrading this PC now. Once you make your selection, the tool will guide you through the rest of the process, including selecting your language, edition, and architecture. Don’t forget to have a USB flash drive or DVD handy to save your installation media to.
With the Windows Media Creation Tool, downloading a Windows 10 ISO image has never been easier!
Create Bootable USB Drive using Rufus
If you’re planning to install Windows on a new computer or upgrade an existing one, creating a bootable USB drive can be a fast and convenient way to do it. Rufus is a free and easy-to-use tool that can help you create a bootable USB drive quickly and efficiently. To get started, you’ll first need to download Rufus from its official website and install it on your computer.
Once installed, connect your USB drive and launch Rufus. Select the USB drive you want to use, choose the Windows ISO image you want to create a bootable drive from, and click the “Start” button. Rufus will format your USB drive and copy the necessary files to it.
After it’s done, you’ll have a bootable USB drive that you can use to install or upgrade Windows on your computer. With Rufus, creating a Windows installation media has never been easier!
Install Windows on New SSD
If you just upgraded to an SSD and want to install Windows on it, there are several steps you need to follow. First, create a bootable USB or DVD that contains the Windows installation files. You can do this by downloading the Windows Media Creation Tool from the Microsoft website.
Once you have the installation media, connect your new SSD to your computer and boot from the USB or DVD. Follow the prompts to install Windows on your SSD, making sure to select the new SSD as your installation destination. After installation is complete, you may need to change the boot order in your computer’s BIOS settings to ensure that it boots from the SSD instead of the old hard drive.
With these steps, you’ll have a fresh installation of Windows on your new SSD, ready for use.
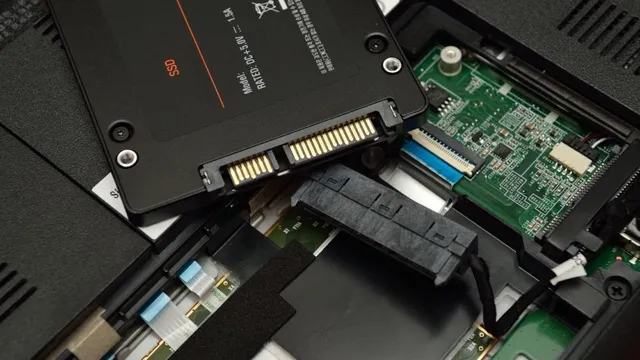
Connect the SSD to the System
Connecting the SSD to your system is the next step in the process of installing Windows on your new SSD. First, unplug your system from the power source, and remove the side panel of your PC case. Locate a free SATA port on your motherboard and connect one end of the SATA cable to the port and the other end to the SSD.
Finally, connect the power cable to the SSD. Once you have connected the SSD, replace the side panel and plug your system back in. At this point, you are ready to boot your system and start the installation process.
Remember to set the SSD as the primary boot device in the BIOS settings. When done, your system will likely be ready for an improved performance and faster computing experience.
Boot System from USB Drive
If you’ve just upgraded your computer with a new SSD, the next step is to install Windows on it. To do so, the first thing you’ll need to do is boot your system from a USB drive. This can be a bit tricky if you’ve never done it before, but it’s not too difficult to figure out.
First, plug in your USB drive and restart your computer. Before Windows boots up, you’ll need to enter the BIOS settings. This is typically done by pressing a key (often F2 or Delete) during the boot process.
Once you’re in the BIOS settings, navigate to the Boot menu and look for an option to change the boot order. Move the USB drive to the top of the list, save your changes, and restart your computer. Now your computer should boot from the USB drive instead of your old hard drive.
From there, you can follow the prompts to install Windows onto your new SSD, and you’ll be up and running in no time!
Select Custom Installation Option
If you’re looking to install a fresh copy of Windows on your new SSD, it’s important to choose the custom installation option. This allows you to select the specific drive where you want to install Windows, giving you complete control over the process. During the installation process, you’ll be prompted to select the language, time, and keyboard settings.
Be sure to double-check these settings before proceeding with the installation. Once you’ve selected the custom installation option, you’ll be shown a list of the available drives on your computer. Choose your new SSD from the list and click next to begin the installation.
Remember, this process will erase all data from the drive, so be sure to backup any important files beforehand. With your new SSD up and running, you can expect faster boot times and improved system performance. Get ready to experience the full power of your computer with an upgraded SSD.
Choose the New SSD as the Installation Destination
When it comes to installing Windows on a new SSD, there are a few things you need to keep in mind. First and foremost, you’ll want to choose the new SSD as the installation destination. This will ensure that Windows is installed properly and that all of your files are stored on the new drive.
To do this, you’ll need to select the option to customize the installation process during the installation wizard. From there, you should see a list of available drives. Select your new SSD as the destination and follow the rest of the prompts to complete the installation.
This process may vary slightly depending on the version of Windows you are installing, but the general steps should be the same. By installing Windows on your new SSD, you’ll be able to take advantage of faster boot times and improved performance for all of your applications and files. So if you’re looking to upgrade your computer, make sure to consider installing Windows on a new SSD.
Complete Windows Installation
If you’ve just upgraded to a new Solid State Drive (SSD), one of the first things you’ll need to do is install your operating system, such as Windows. Don’t worry, it’s not as complicated as it may seem. Firstly, you’ll need to connect your SSD to your PC via SATA or USB cable, depending on your setup.
Next, insert your Windows installation media (whether it’s a USB stick or DVD) into your PC and restart it. You may need to enter your BIOS settings and select your installation media as the primary boot device. Once you’ve booted from your installation media, simply follow the on-screen instructions to install Windows on your new SSD.
Remember to format the drive during the installation process to ensure the best performance. Once the installation is complete, you can enjoy a faster, smoother running system on your new SSD.
Activate Windows License
If you’ve recently upgraded your computer and want to transfer your Windows license to your new SSD, there are a few things you need to do to activate it. First, you need to make sure that your new SSD is properly installed and recognized by your computer. Once you’ve done that, you can begin the process of activating your Windows license.
This can typically be done by entering a product key or by signing in with your Microsoft account. If you don’t have a product key, you can usually find one on the packaging or on a sticker on your computer. Once you’ve entered your product key or signed in with your Microsoft account, your new SSD should now be fully activated and ready to use.
It’s important to note that if you’re running a version of Windows that’s not fully supported, you may need to upgrade to a newer version in order to activate your Windows license. Regardless of the version of Windows you’re running, make sure to follow the activation process carefully to ensure that your license is properly activated.
Verify License Activation Status
If you’re a Windows user, you might have encountered activation messages requesting you to input a genuine product key or activate your license. Activating your Windows license allows you to access features that are otherwise unavailable, obtain security updates, and receive technical support. To verify the status of your Windows activation, you can easily check by going to your System Settings.
From there, click on “Activation,” and you’ll see the activation status of your license. If your license is activated, you’ll see a message saying “Windows is activated,” along with the activation details. However, if your Windows license isn’t activated or if there is a problem with the activation process, you’ll see an error message with instructions on how to activate your license.
It’s important to keep your Windows license activated to ensure that your system is up-to-date and secure. By doing so, you’ll be able to enjoy the full range of features offered by the operating system.
Activate Windows using Product Key
As we all know, the Windows operating system plays a vital role in the functioning of our personal computers. However, using an unactivated version of Windows can limit the features and functionalities available on your PC. To get the most out of your Windows experience, activating your license is crucial.
The easiest way to activate your Windows license is by using a valid product key. Once you have a product key, you can enter it into the provided activation dialog box and your Windows license will be activated. The product key serves as a digital license that helps to verify that your copy is genuine.
Therefore, save yourself the hassle of having to deal with the limitations of an unactivated Windows by activating your license with a valid product key.
Conclusion
So there you have it, my dear tech-savvy friend. Mounting Windows to a new SSD might seem like a daunting task at first, but with the right tools and guidance, you can easily accomplish it like a pro. Just remember to back up your data, create a bootable USB, and follow the steps with precision.
And who knows, with your newfound skills, you might even be able to impress your non-techy friends with your magic tricks of SSD mounting. Happy installing!”
FAQs
What is the process for mounting Windows to a new SSD?
The process involves cloning the Windows operating system to the new SSD using a disk cloning software, removing the old hard drive and installing the new SSD in its place, and then changing the boot order in the BIOS to ensure that the computer boots from the new SSD.
Can I mount Windows to a new SSD without cloning it?
While cloning is the recommended method for transferring the Windows operating system to a new SSD, you can also perform a clean install of Windows onto the new SSD. This will require a Windows installation media or USB and a product key.
Will I need to reinstall my programs and applications after mounting Windows to a new SSD?
Yes, any programs and applications that were installed on the previous hard drive will need to be reinstalled onto the new SSD. However, any data and files stored on the old hard drive can be transferred to the new SSD.
What should I do if my computer does not recognize the new SSD after mounting Windows to it?
If the computer does not recognize the new SSD, it may be necessary to check that the drive is properly connected or to update the firmware on the SSD. You can also try accessing the BIOS and checking the boot order to ensure that the computer is attempting to boot from the correct drive.