Got a powerful GPU just waiting to get to work? You’ll want to make sure it’s running at its best, and installing it to your SSD can do just that. By following just three easy steps, you can experience top performance and enjoy the full capabilities of your GPU. It’s a process that might seem daunting, but don’t worry – we’ve got you covered.
After all, we know your time is valuable, so let’s dive in and get started!
Step 1: Check Compatibility
If you’re wondering how to install your GPU to your SSD, the first step is to check for compatibility. Make sure that your graphics card will fit in your motherboard and that your SSD has the necessary connections for the GPU. It’s also important to check that your power supply unit (PSU) can handle the added power requirements of the GPU.
If all components are compatible and you have the necessary tools, you can begin the installation process. Remember to ground yourself and handle the GPU with care, as it’s a delicate component. With patience and attention to detail, you can successfully install your GPU to your SSD and enjoy improved graphics performance.
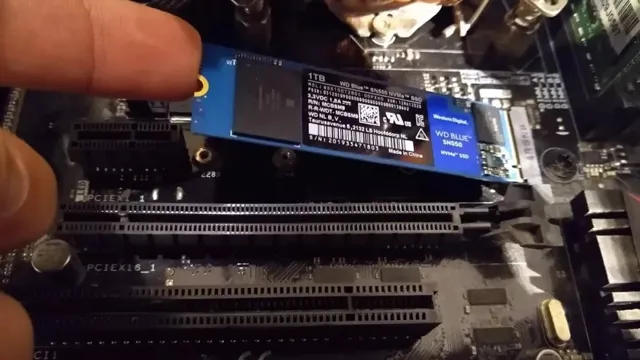
Ensure your GPU and SSD are compatible before installation
Before installing a new GPU and SSD onto your computer, it’s important to check if they are compatible with each other. This can save you time and money by avoiding any issues that may arise from a mismatch. A good way to ensure compatibility is to check the interfaces on both the GPU and SSD.
Many modern GPUs use the PCIe interface, while SSDs may use SATA or NVMe. Make sure that the interface on your GPU matches the interface on your SSD, as this will affect the transfer speeds and overall performance. Another thing to consider is the power supply of your system, as a more powerful GPU may require a stronger PSU.
By checking the compatibility of your GPU and SSD before installation, you can ensure a smooth and hassle-free upgrade to your system.
Step 2: Remove the Old GPU
Now that you’ve chosen your new GPU and prepared your PC for installation, it’s time to remove the old GPU. This process may vary slightly depending on your specific PC setup, but generally, it involves removing any screws or clips securing the card to the motherboard and gently pulling the card out of the PCIe slot. Before you touch anything, make sure to ground yourself by touching a metal surface to avoid any static electricity that may damage the PC components.
Once you have removed the old GPU, it’s important to store it correctly and safely, so it can be reused, sold, or disposed of properly. You may want to place it in the original packaging or an anti-static bag to prevent damage from dust or moisture. With the old GPU out of the way, you’re now ready to install your new GPU and enjoy improved graphics performance on your PC!
Remove the old GPU from the motherboard
Removing the old GPU from the motherboard is the next step to take when upgrading your computer’s graphics card. You must first remove any screws or brackets that are holding the GPU in place. Make sure that you discharge any static electricity on your body before you handle the GPU to prevent any damage to the card.
Hold the GPU by its edges and carefully pull it out of the slot. If the GPU is secured by tabs, press them down before pulling it out. Remember to remove any cables that are attached to the GPU before doing so.
Be gentle to avoid any damage to the motherboard as well. Removing the old GPU can be tricky, but take your time and follow the instructions to avoid any mishaps. When finished, you can now install the new graphics card and enjoy high-quality visuals with improved performance for your computer system.
Unscrew the bracket holding the GPU in place
When it comes to upgrading your computer’s graphics card, removing the old GPU is the first step. To do this, you’ll need to locate the bracket securing the GPU in place. Once you’ve spotted it, use a screwdriver to unscrew the bracket and release the old graphics card.
Take care when handling the GPU, as they are delicate and can be easily damaged if mishandled. If the GPU is stuck in place, be sure to apply gentle pressure to remove it. Once removed, be sure to place it in an anti-static bag or a safe storage location.
Removing an old GPU can seem daunting at first, but with some care and precision, it can be done quickly and easily. Remember, the process may differ slightly depending on your specific computer and graphics card model.
Step 3: Install the New GPU
Now that you have successfully removed your old GPU, it’s time to install your new one. First, make sure the PCIe slot is clean and free of debris. Then, carefully align the new GPU with the slot and gently push it down until it clicks into place.
Don’t use too much force as this could cause damage to the card or the slot. Once it’s securely in place, use screws to fix it onto the chassis. Next, plug the power cables into the GPU and make sure they’re firmly attached.
Finally, connect your monitor to the new GPU and power on your computer. If you encounter any issues, make sure that you have properly installed the drivers for your new GPU to your SSD. With your new GPU now installed, you should see improved performance and a better overall gaming experience.
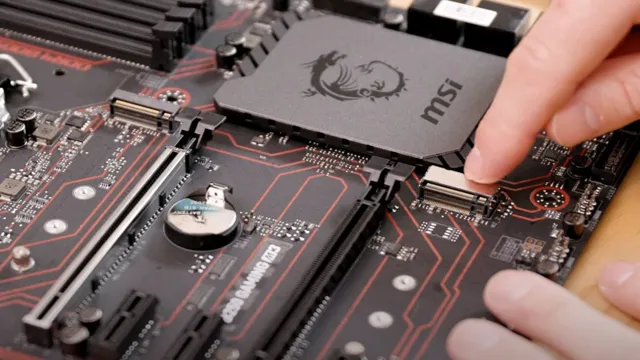
Insert the new GPU into the PCIe slot
After preparing your computer and removing the old GPU, it’s time to install the new one. The first step is to locate the PCIe slot on your motherboard. It’s usually the longest one and is often located close to the CPU.
Before inserting the new GPU, make sure to remove the safety cover from the slot. This will prevent any potential damage to the GPU during insertion. Align the notches on the GPU with those on the PCIe slot and gently push down until it clicks into place.
Be careful not to use excessive force as this could damage your GPU or motherboard. Once the GPU is securely in place, screw it down to hold it firmly in place. Congratulations, you’ve successfully installed your new GPU! Now it’s time to finish up the installation by connecting power cables and installing drivers.
Secure the GPU bracket and power cables
Step 3 of installing a new GPU involves securing the GPU bracket and power cables. This is a crucial step that ensures the new GPU won’t wiggle or loosen up, which can lead to poor performance or even damage to the device. To start, locate the GPU bracket and screw it tightly into place.
Make sure to tighten all screws and ensure there is no wiggle room. Then, connect the power cables to the new GPU. Depending on the model, the power cable might have anywhere from six to eight pins.
Match the pins on the cable to the port on the GPU and firmly connect the two. Once the bracket and cables are secure, test the new GPU and make sure it’s functioning correctly. With this crucial step complete, you’re one step closer to enjoying faster and smoother graphics performance on your computer.
Install drivers for your new GPU
When it comes to upgrading your PC’s graphics performance, one of the most critical steps is to install the right drivers for your new GPU. Depending on the brand and model of your graphics card, you’ll either need to download the drivers directly from the manufacturer’s website or use a driver installation software. Typically, NVIDIA and AMD have their software that you need to download.
Once the drivers are downloaded, make sure to completely uninstall the old ones to avoid any conflicts or issues. Installing the new GPU requires you to remove the old graphics card, place the new one in the designated slot on your motherboard, and then connect any required power cables. After that, boot up your computer, install the drivers, and tweak the settings as necessary to optimize your GPU’s performance.
With everything set up correctly, you can expect a significant improvement in your computer’s graphics capabilities, providing you with a smoother, better-looking experience and the ability to run demanding applications and games.
Final Thoughts
When it comes to installing your GPU to your SSD, the process can vary depending on the specific components you have and the steps needed to properly connect them. First and foremost, make sure you have the right hardware and are following all relevant safety protocols. You will need to remove your old graphics card, locate the PCI-E slot on your motherboard, and securely install your new GPU.
Once this is done, you can connect any necessary power cables, install any required software or drivers, and configure settings as needed. When it comes to the SSD, you may need to use a SATA cable to connect it to your motherboard, depending on the type of drive you have. Make sure you select the SSD as your primary boot device in your BIOS settings to ensure optimal performance.
With these steps in mind, you can successfully install your GPU to your SSD and enjoy improved graphics performance and storage capabilities.
Be sure to follow safety precautions during installation
It’s crucial to prioritize your safety when installing any new equipment or system, and this holds true for HVAC systems as well. Regardless of whether you’re installing a new AC or upgrading your furnace, it’s vital to follow safety guidelines to avoid any potential hazards. One crucial step is to turn off the power source before you start installing any HVAC equipment, as you don’t want to be electrocuted in the process.
It’s also essential to have a clear understanding of the manuals and guidelines provided with the equipment. This information contains critical safety guidelines that should be followed for optimal operation and safety. Finally, it’s essential to work with a knowledgeable and experienced HVAC contractor to ensure that the installation process is smooth and that all safety guidelines are being followed.
By taking these precautions, you can rest easy knowing that you have a safe and efficient HVAC system. Don’t take any shortcuts when it comes to your safety-remember that it is always better to be safe than sorry.
Consult your motherboard manual for further instructions
When it comes to building a PC, the motherboard is one of the most important components. It serves as the foundation for all other parts to connect and communicate with one another. However, setting up a motherboard can be a bit confusing, especially for beginners.
That’s why it’s always a good idea to consult the manual that comes with your motherboard. It provides step-by-step instructions tailored to your specific model. It includes all the information you need to know, from installing the CPU and RAM to connecting the power cables.
So, if you’re unsure about anything, don’t hesitate to refer to the manual! It’s better to take a few extra minutes to read through it than risk damaging your components. Remember, a little bit of research goes a long way in ensuring a successful build.
Conclusion
Installing a GPU to an SSD is like giving a racecar driver a faster engine, but forgetting to fill the gas tank. Your graphics card may be powerful, but it needs a reliable and speedy source of data to function at its maximum potential. So, make sure to properly connect your SSD to your motherboard, install the necessary drivers, and then sit back and enjoy the speedy performance of your GPU and SSD working together in perfect harmony.
Happy computing!”
FAQs
What are the necessary steps to install a new GPU in my SSD?
Firstly, shut down your system and unplug from the power source. Then, remove the old GPU and connect the new one to your SSD. Follow the manufacturer’s instructions to install the necessary drivers.
Is it possible to install a GPU to an external SSD?
Yes, it is possible. You can use a compatible external enclosure and connect your SSD to your system via USB or Thunderbolt port. Make sure your enclosure supports the specific GPU you have.
Can I install multiple GPUs on my SSD?
Yes, you can install multiple GPUs on your SSD, depending on the number of PCIe slots available on your motherboard. However, it may not always be necessary, and some applications may not require multiple GPUs.
How do I troubleshoot issues after installing a GPU on my SSD?
If you encounter any issues after installing your GPU, start by ensuring that the connections are secure and the drivers are up to date. You can also try resetting the system or uninstalling and reinstalling the device. If you continue to face issues, seek assistance from the manufacturer or a professional technician.