So, you’ve just acquired a brand new SSD, and you can’t wait to experience the lightning-fast speeds it promises. But when you plug it into your computer, it doesn’t show up. Suddenly, your excitement is replaced with frustration and confusion.
What should you do? Relax, take a deep breath, and read on. In this blog post, we’ll guide you through the steps to get your new SSD to show up on your computer. Simply follow these instructions, and you’ll be up and running in no time.
Think of it as a treasure hunt – with our help, you’ll find the hidden gem that is your new SSD.
Verify SSD Is Recognized
If you have installed a new SSD but it’s not showing up on your computer, it could leave you scratching your head. But don’t worry, there are a few things you can do to verify if your SSD is recognized. First, check your computer’s BIOS or UEFI firmware to see if the drive is listed in the boot order.
If it is, then your computer has detected the SSD successfully. If it’s not showing up here, check your cables and make sure they’re plugged in securely. You can also open Disk Management on Windows or Disk Utility on macOS to check if the SSD is listed under the list of drives.
If it is, you may need to initialize and format the drive before you can use it. Another useful tool is to check the device manager and search for the SSD. If it is listed, then you can try updating the drivers or firmware to ensure that the SSD is working with the latest updates.
By following these steps, you can ensure that your new SSD is recognized and ready to use.
Check BIOS
When setting up a new SSD, it’s essential to ensure that your BIOS recognizes it so that it can be utilized to its fullest potential. You can do that by checking the BIOS settings and making sure your SSD is identified as the primary boot device. Once you get into your BIOS settings, you should check the storage drive settings and confirm that the SSD shows up on the list of storage devices.
If your SSD isn’t detected, double-check that all cables are correctly connected, and try resetting your BIOS options to default settings. After making any necessary changes, save your settings, exit your BIOS, and restart your device. If everything is working correctly, your SSD should boot up as expected, and you should notice a significant improvement in storage speed and overall system performance.
Checking your BIOS for SSD recognition might seem intimidating the first time, but it’s a necessary step to ensure your newly installed drive is being recognized and utilized to its fullest potential.

Check Disk Management
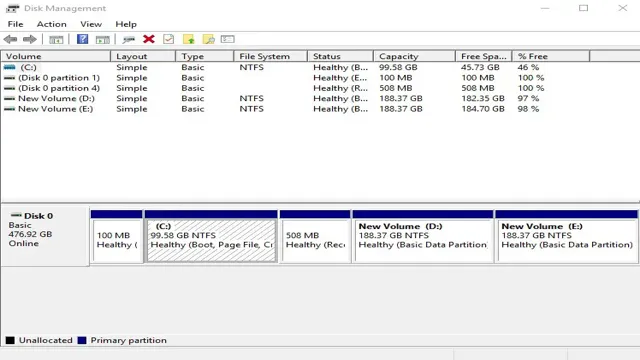
If you’ve just installed an SSD, it’s important to verify that your computer recognizes it properly. One way to check this is through Disk Management. Simply type “disk management” into the Start menu, and open up the Disk Management utility.
If your SSD is recognized, it should show up in the list of drives, along with any partitions that you’ve created. If your SSD isn’t showing up, there could be a variety of issues at play. First, make sure that your BIOS is set up to recognize the SSD.
You may also need to check that your cables are properly seated, or that the SSD is receiving power. If you’ve verified that your SSD is properly connected and recognized, and it’s still not showing up in Disk Management, then you may need to replace the drive or seek further assistance. By checking Disk Management, you can verify that your SSD is properly recognized and functioning as it should.
Initialize SSD
If you’ve recently purchased a solid-state drive (SSD) and are having trouble getting it to show up on your computer, don’t worry – it’s a common issue. The first step is to make sure that the SSD is properly connected to your computer. Double-check all cables and ensure that the drive is securely fastened in its slot.
Next, you’ll need to initialize the SSD using disk management tools. In Windows, this can easily be accessed by right-clicking on the start menu and selecting “Disk Management”. From there, you can select your new SSD and format it to show up on your computer.
Be careful not to accidentally format any existing drives or partitions in the process. Once the initialization process is complete, your new SSD should show up and be ready to use. By following these simple steps, you’ll have your SSD up and running in no time.
Windows 10 Initialization
When it comes to initializing an SSD on Windows 10, there are a few steps you need to follow. First, ensure that the SSD is properly connected to your computer and powered on. Next, you need to format it by opening the Disk Management tool.
Right-click the unallocated space on the SSD and select “New Simple Volume.” This will bring up the New Simple Volume Wizard, where you need to assign a drive letter, specify the volume size, and choose a file system. Finally, you need to complete the wizard and wait for the format to complete.
Overall, initializing an SSD on Windows 10 is a simple process that can significantly improve your computer’s speed and performance. So, why not give it a try today and experience the benefits for yourself?
MacOS Initialization
Initializing an SSD on MacOS is a straightforward process, but it’s essential to ensure that it’s done correctly to avoid data loss. Firstly, it’s crucial to ensure that the SSD is connected correctly to the Mac. Once connected, navigate to the “Disk Utility” tool in the Application folder.
Select the new SSD from the left-hand sidebar and click on “Erase” to format the drive. Make sure to choose the appropriate format, such as APFS or HFS+, depending on the version of MacOS running on the system. Once formatting is complete, the drive is initialized and ready to use.
It’s essential to create a backup of all data before initialization to avoid data loss. In addition, it’s essential to check that the SSD is compatible with the version of MacOS running on the system. By following these simple steps, initializing an SSD on a MacOS system can be a smooth and straightforward process that ensures smooth performance and data security.
Third-Party Software Initialization
When it comes to initializing SSDs, third-party software can be a game-changer. The right software can help you get the most out of your SSD, improving performance and ensuring that it is set up correctly. There are a few different tools out there for initializing SSDs, each with its own strengths and weaknesses.
One of the best options is SSD Utility, which offers a wide range of features and is easy to use. With this tool, you can monitor your SSD’s health, optimize performance, and even update the firmware if needed. Other popular options include Kingston SSD Manager and Samsung Magician, both of which also offer powerful functionality.
No matter which tool you choose, initializing your SSD with third-party software can help you get the most out of your hardware.
Format the SSD
If you’ve just installed a new SSD into your computer and you’re wondering why it’s not showing up, the answer is simple: You need to format the SSD first. Even though many new SSDs are pre-formatted, you may still encounter compatibility issues with some computers. To format your SSD, you’ll need to access the Disk Management tool.
Once you’re in Disk Management, locate the unallocated space on your SSD and right-click on it. From there, select “New Simple Volume” and follow the prompts to format your SSD. Don’t forget to assign a drive letter to your new volume so the computer can recognize it.
Once formatting is complete, your new SSD should be visible and ready to use. Remember, formatting an SSD will erase all data stored on it, so make sure to back up any important files before proceeding. With this simple process, you can get your new SSD up and running in no time.
Windows 10 Formatting
If you’re planning on giving your computer a fresh new start, formatting the SSD should be a necessary step. It’s much easier to format an SSD with Windows 10 than it was with previous versions. The process is completely automated, and all you need to do is follow a few simple steps.
Before formatting the SSD, it’s important to back up any important data as the formatting process will erase everything on the drive. Once that’s done, you can continue by opening the “Settings” menu, clicking on “Update & Security,” selecting “Recovery,” and then choosing “Get started” under “Reset this PC.” From there, simply select the “Remove everything” option, and let Windows do its thing.
In no time, your SSD will be formatted and you’ll be ready to start afresh.
MacOS Formatting
If you’re looking to format the SSD on your Mac, there are a few steps you need to follow. The first thing to do is to back up all of your important files and data, as formatting the drive will erase everything stored on it. Once you’ve backed up everything you need, you can open up Disk Utility, which can be found in your Utilities folder.
From there, select the SSD you want to format and click the “Erase” button. You can then choose the format you want to use – for example, you may want to use the APFS format if you’re running High Sierra or later. Once you’ve chosen your format, give your drive a name and click “Erase” to format the SSD.
Keep in mind that formatting your SSD can take some time – how long it takes will depend on the size of your drive. Overall, as long as you follow these steps, formatting your Mac’s SSD should be a straightforward process.
Conclusion
If you’re struggling to get your new SSD to show up, don’t fret! It’s not uncommon for new hardware to require a little extra TLC before it’s ready to show off its full potential. So, make sure you’ve got the right drivers, BIOS settings, and cables, give it a little time to settle in, and before you know it, your SSD will be strutting its stuff like a tech-savvy supermodel.”
FAQs
How do I connect my new SSD to my computer?
To connect your new SSD to your computer, you can either replace your existing hard drive with the SSD or connect it as an additional drive. If you choose to replace your existing hard drive, you will need to clone your existing operating system onto the new SSD. If you choose to connect the SSD as an additional drive, you will need to format it and assign a drive letter in the Disk Management tool.
Why isn’t my new SSD showing up in my computer?
If your new SSD is not showing up in your computer, there are a few potential reasons: it may not be installed or connected properly, it may not be formatted, it may be conflicting with another device, or it may be faulty. Check the physical connections, try formatting the SSD, and make sure there are no conflicts in the Device Manager.
How do I format my new SSD?
To format your new SSD, go to the Disk Management tool in Windows. Select the SSD and choose “New Simple Volume”. Follow the prompts to assign a drive letter and format the SSD.
Can I use my old hard drive as a secondary drive after installing a new SSD?
Yes, you can use your old hard drive as a secondary drive after installing a new SSD. Simply connect the old drive as an additional drive and format it in the Disk Management tool. You can then transfer files or use it for extra storage.
