Have you recently installed a new SSD on your computer but don’t see it in your file explorer? Don’t panic, this is a common issue that can be easily fixed. Recognizing a new SSD on your computer may require a few extra steps before it shows up on your screen. Just like when you buy a new phone, you need to install certain apps and configurations to set it up.
Similarly, a new SSD needs to be recognized by your operating system to function properly. In this blog post, we’ll walk you through the steps to recognize your new SSD, so you don’t have to stare at a blank screen anymore. Let’s get started!
Check If SSD is Supported
If you want to upgrade your computer with a new SSD, the first step is to check if your computer supports SSD. Most modern computers can support most SSDs available in the market, but it’s always better to check before buying to avoid any compatibility issues. To check if your computer supports SSD, you need to check the SATA interface of your motherboard.
SSDs use SATA connectors to connect to the motherboard. If your motherboard has a SATA III connector, which is a blue-colored connector, it can support the latest and fastest SSDs available in the market. However, if your motherboard has an older SATA II connector, which is a red-colored connector, it will still support SSDs, but with a limited data transfer rate.
So, before buying an SSD, make sure to check your motherboard’s SATA port type and upgrade it if required to avoid any bottleneck issues. With the proper research, finding the right SSD that is compatible with your computer will be a breeze!
Check motherboard or laptop manual
If you’re thinking of upgrading your old computer by adding an SSD, the first thing you need to do is to check if your motherboard or laptop supports it. SSDs have become increasingly popular, and most modern systems are designed to support them. However, if your computer is a few years old, it might not be able to accommodate an SSD.
The best way to check is to refer to your motherboard or laptop manual. This manual will give you all the information you need to know about your system’s specifications, including whether or not it can support an SSD. It may also give you instructions on how to install the SSD properly.
If you don’t have the manual, you can usually find it online. Remember, if your system doesn’t support an SSD, it may be time to consider upgrading to a newer machine that does.
Check if BIOS/UEFI firmware is updated
When considering upgrading to an SSD, it’s essential to check if your BIOS/UEFI firmware is updated to support the latest hardware. Often, newer SSDs require the latest firmware updates to operate correctly and efficiently. You can usually check for firmware updates by visiting the manufacturer’s website and searching for your motherboard or laptop model.
Once you’ve located the relevant page, download any available updates and follow the manufacturer’s instructions to install them. It’s also important to ensure that your SSD is compatible with your system’s SATA or NVMe interface. While most modern systems support both interfaces, some older models may only support SATA, limiting your options for upgrading to an NVMe SSD.
Checking compatibility and firmware updates beforehand can save you time and headaches later on. So, don’t forget to do your research before investing in a new SSD for your system.
Connect the SSD to Your Computer
Once you have bought and installed your new SSD, you might still need to connect it to your computer to make it work. If your computer doesn’t automatically recognize the new SSD, you can use different methods to make it show up. One of the easiest ways to connect the SSD is to use a USB-to-SATA adapter cable.
Just plug one end of the cable into the SSD and the other end into your computer’s USB port. This way, you can treat the SSD like any external hard drive, and transfer files to it. Another option is to check your computer’s BIOS settings, as it might need some configuration to detect the new hard drive.
Make sure the SSD is properly plugged in, and then enter your computer’s BIOS settings by pressing a specific key during startup. From there, locate the Storage or SATA configurations, and check if the new SSD is listed. If not, you might need to enable the SATA port and save your changes.
By incorporating these tips, you will be able to get your computer to recognize your new SSD in no time.
Use SATA or USB accessories
If you’re looking to connect your SSD to your computer, there are a couple of options you can consider. One option is to use SATA accessories, which are used to connect storage devices to your motherboard. SATA accessories typically come in the form of cables and connectors, and they’re designed to connect directly to your motherboard.
Another option you can consider is to use USB accessories, which allow you to connect your SSD to your computer using a USB port. USB accessories come in the form of external enclosures and docking stations, and they’re a convenient option for those who prefer to keep their SSD external to their computer. Overall, the choice between SATA and USB accessories will depend on your personal preferences and the specific requirements of your computer configuration.
With either option, however, you can enjoy faster, more reliable access to your data and applications, making it easier than ever to work and play on your computer.
Check the cable connection
When it comes to installing an SSD to your computer, the cable connection is crucial. You need to ensure that the SSD is correctly connected to your computer to enjoy its benefits fully. Before you start the installation process, ensure that you have the right cable that is compatible with your computer.
If the cable is not compatible, you won’t be able to connect your SSD, and you will need to get another one that is. Most SSDs use a SATA cable that connects through the motherboard. To connect the SSD to your computer’s power supply, you will also need a specific cable that most computers come with.
The type of cable you need depends on the SSD’s size and the type of computer you have. After checking the compatibility of your cables, ensure that the SSD is correctly connected to the motherboard and the power supply. If you do this correctly, you can enjoy the benefits of a faster, more reliable computer.
Initialize and Format the SSD
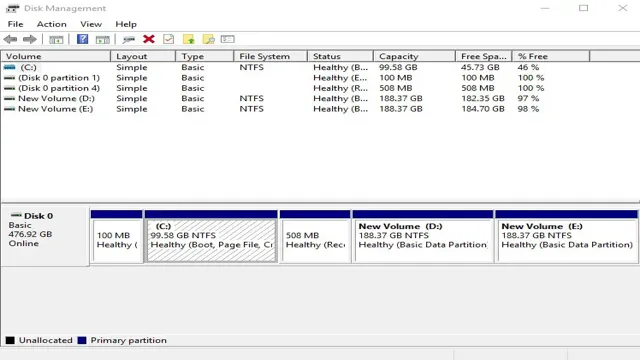
If you’ve just installed a new SSD and your computer isn’t recognizing it, you’ll need to initialize and format it so that it can be used as a storage device. Here’s how to do it: First, open up the Disk Management tool in Windows by pressing the Windows key + X and selecting “Disk Management” from the list. Find your new SSD in the list of drives and right-click on it, then select “Initialize Disk.
” Choose the appropriate partition style (either MBR or GPT) and select “OK.” Next, right-click on the unallocated space on the drive and select “New Simple Volume.” Follow the on-screen instructions to format the drive and give it a drive letter.
Once the formatting process is complete, your computer should recognize the new SSD and it will be ready to use. By following these simple steps, you’ll be able to get your computer to recognize your new SSD and start using it to store your files and data.
Use Disk Management utility in Windows
Initializing and formatting a new SSD drive is an essential step before you can start using it on your Windows computer. The Disk Management utility in Windows is an excellent tool that allows you to manage the new drive efficiently. To initialize the drive, you need to open Disk Management, locate the new SSD drive, right-click on it, and select “Initialize Disk.
” Choose the partition style (MBR or GPT) and click OK. Once the drive is initialized, you can format it by right-clicking on the unallocated space, selecting “New Simple Volume,” and following the wizard. The wizard will guide you through selecting the file system, assigning a drive letter, and formatting the drive.
After formatting the drive, it will be ready to use for storing data. By following these steps, you can start using your new SSD drive to store your files, programs, and other data.
Format the SSD in the correct file system
When setting up a new SSD, it is essential to initialize and format it correctly to get the best performance. Initializing the SSD prepares it for use and creates the necessary structures for storing data. The next step is to format the SSD with the appropriate file system.
Windows, macOS, and Linux all support different file systems, and it’s important to use the right one for your operating system to ensure maximum compatibility and performance. For Windows, the best file system is NTFS, which comes with a host of features, including security, compression, and encryption. For macOS, the default file system is APFS, which offers excellent performance, stability, and security.
On Linux, there are several file systems to choose from, including ext4, xfs, and btrfs, and each has its advantages and disadvantages. Overall, selecting the right file system for your operating system is crucial, so make sure to research and ensure compatibility before formatting your SSD.
Verify the SSD is Recognized
If you’ve just installed a new SSD into your computer and it’s not being recognized, there are a few things you can try to troubleshoot the issue. First, check to make sure the SSD is properly connected to your computer’s motherboard and power supply. If it is, then enter your computer’s BIOS setup to verify that the SSD is being detected by your computer.
If the SSD is not shown in the BIOS, try updating your computer’s BIOS firmware to the latest version. You can also try connecting the SSD to a different SATA port on your motherboard to see if that resolves the issue. Additionally, you can see if the SSD shows up in your computer’s Device Manager by right-clicking on the Start menu and selecting Device Manager.
If it does show up, then try updating the device driver to see if that resolves the issue. With some troubleshooting, you can get your computer to recognize your new SSD in no time.
Check the Device Manager
When you install a new SSD on your computer, you want to ensure that it’s working correctly and recognized by your system. One way to do this is by checking your device manager. Simply press the Windows key + X and select “Device Manager.
” From there, scroll down and find “Disk drives” and expand it. You should see your SSD listed, but if you don’t, it might not be connected properly or might require a driver update. If your SSD is listed, but there’s a yellow warning icon next to it, it might be a sign of a problem.
However, if there are no issues, your SSD is ready to use and you can enjoy faster speeds and improved performance. Overall, it’s essential to verify that your SSD is recognized to make sure you get the most out of your hardware upgrade.
Check the Disk Management utility
One essential step in setting up a new SSD is to check if the disk management utility recognizes it. Disk Management allows you to view all connected drives, including your SSD. This ensures that your computer recognizes the newly installed hardware.
To do this, you can search for “Disk Management” in the search bar on your computer. Once there, you can see the list of drives, and your new SSD should be included. If you don’t see it, you may need to ensure that it is correctly connected and functioning properly.
The Disk Management utility is an essential tool for verifying that your SSD is recognized and ready for use.
Verify the capacity of the SSD
When upgrading or purchasing a new SSD, it’s crucial to verify if your computer recognizes the storage device’s capacity. If the SSD is not recognized by the computer, you may experience performance issues or other problems. To check if the SSD is recognized, you can head to the BIOS setup and check for the storage device’s presence.
You can also check if the computer detects the SSD in the Device Manager and Disk Management. If you find that the SSD is not registered, you can try updating the drivers or firmware. Sometimes, the issue may be with a faulty cable or connection, so inspecting the physical connection is also essential.
Remember that checking SSD capacity is necessary to ensure optimal performance and avoid any data loss.
Conclusion
In conclusion, getting your computer to recognize a new SSD is a bit like introducing a new friend to your inner circle. It takes a little effort and patience, but once you’ve properly connected them, you’ll wonder how you ever got along without them. So, take the time to properly install and configure your new SSD, and soon enough, your computer will be running faster and smoother than ever before!”
FAQs
What steps do I need to follow to install a new SSD on my computer?
First, shut down your computer and disconnect any cables. Then, open the case and locate the drive bay. Next, install the SSD into the bay, secure it with screws, and connect the necessary cables. Finally, close the case and turn on the computer. Your new SSD should now be recognized by your system.
Do I need to format my new SSD before my computer will recognize it?
Yes, you will likely need to format your new SSD before it can be recognized by your computer. To do this, go to “Disk Management” (on a Windows PC) or “Disk Utility” (on a Mac), find your new SSD, and follow the prompts to format it.
What should I do if my computer still doesn’t recognize my new SSD after installing it?
There are a few things you can try if your computer doesn’t recognize your new SSD. First, check that all cables are securely connected. Next, try updating your system’s BIOS or firmware. If this doesn’t work, you may need to check that your system is able to support the size and type of SSD you have installed.
Can I clone my old hard drive onto my new SSD?
Yes, it is possible to clone your old hard drive onto your new SSD. You can use software like “EaseUS Todo Backup” or “Clonezilla” to clone your old drive onto your new one. Just be sure to follow all instructions carefully to avoid data loss or other issues.