Ready to take your computer’s storage game to the next level? Converting your SDD to an M2 SSD can be a game-changer in terms of speed and storage capacity. Whether you’re a gamer, content creator, or just looking for faster load times, making the switch is definitely worth considering. But where do you even start? Don’t worry, we’ve got you covered with a step-by-step guide on how to convert SDD to M2 SSD.
Think of it like upgrading from a sedan to a sports car – it’s going to make a noticeable difference in your computer’s performance. So buckle up and let’s get started on this exciting journey!
Understanding SDD and M2 SSD
Converting SDD to M2 SSD is a straightforward process, but it’s important to understand the key differences between the two types of drives before you start. SDD, or solid-state drive, is a type of storage device that uses NAND-based flash memory to store data. The M2 SSD, on the other hand, is designed specifically for use with M.
2 interface, and can use either SATA or PCI-Express interfaces. That being said, if you have an SDD drive and want to convert it into an M2 SSD, you’ll need to get an M2 interface adapter that can be installed onto an available PCIe slot in your computer. Once you’ve installed the adapter, you can then remove the SDD drive and insert it into the M2 interface slot.
After that, you can then configure your computer’s BIOS to boot from the M2 SSD, and you should be good to go. Just remember to do your research before you start any hardware modifications to your computer, to ensure that you don’t accidentally damage any of your components.
SDD vs M2 SSD: The Difference
When it comes to choosing between a SDD and M2 SSD, it is important to understand the differences between the two. SDDs, or solid-state drives, are a popular storage option that use NAND flash and operate similarly to traditional hard drives. M2 SSDs, on the other hand, are newer and use the PCIe interface to transfer data, providing faster read and write speeds.
While SDDs may be more affordable, M2 SSDs offer faster performance and higher storage capacity. Additionally, M2 SSDs have a smaller form factor and can be easily installed directly onto the motherboard, saving space within the system. Ultimately, the choice between the two depends on budget and storage needs.
Those who need faster performance and larger storage capacity may opt for an M2 SSD, while those on a tighter budget could consider an SDD.
Advantages and Disadvantages of M2 SSD
SSD, M2 SSD, advantages, disadvantages Solid-state drives (SSDs) are becoming increasingly popular as they provide faster access times to data than traditional hard drives. One variation of SSDs is the M2 SSD, which has a smaller form factor and uses the SATA or PCIe interface to connect to a computer. The main advantages of an M2 SSD are its compact size and faster data transfer rates, resulting in better performance and faster boot-up times.
However, it can be more expensive than traditional SSDs, and some older motherboards may not support the M2 interface. Additionally, M2 SSDs tend to run hotter than traditional SSDs due to their smaller form factor, and overheating can lead to decreased performance. Ultimately, whether an M2 SSD is the right choice for you depends on your specific needs and budget.
Preparing for Conversion
If you’re looking to improve the speed and performance of your computer by replacing your old SDD drive with an M2 SSD, you’ll need to be prepared for the process. First, make sure your computer’s motherboard has an available M.2 slot for the new drive.
Then, you’ll need to clone your existing SDD to the M2 SSD. One option is to use software such as EaseUS Todo Backup, which allows you to create a mirror image of your current drive and transfer it to the new one. However, make sure the M2 SSD has enough storage capacity to hold all your files.
If not, you may need to transfer some files to an external drive or upgrade to a larger M2 SSD. Additionally, if your computer is a laptop, you may need to open up the chassis and physically install the new M2 SSD. With a bit of preparation and the right tools, converting from an SDD to an M2 SSD can be a simple way to improve your computer’s performance.
Backing Up Data
Backing up your data before converting to a new system is an essential step that is often overlooked. It’s natural to get excited about the new capabilities and features of the system, but not taking the time to back up your data can lead to disastrous consequences. A data backup ensures that you have a copy of all your important files, documents, and data, so you don’t have to worry about losing them during the conversion process.
It’s crucial to choose a reliable backup solution that suits your needs and budget. You can opt for cloud storage solutions, external hard drives, or USB drives. By having a backup, you’ll have peace of mind that even if something goes wrong, your data is safe and secure.
So, don’t procrastinate and make sure you back up your data before making any changes to your system. It’s always better to be safe than sorry.
Gathering Necessary Tools
Before starting the conversion process, it’s essential to gather all the necessary tools you’ll need. Depending on the type of conversion you’ll be doing, the tools may vary, but some essential tools for any conversion are a screwdriver, pliers, and wire cutters. If you’re converting an old appliance or gadget, you’ll also need an old power cord, wires, and new fuses to replace the old ones.
Safety is also vital in any conversion, so be sure to have gloves, safety glasses, and a fire extinguisher on hand. You may also need a multimeter to test the voltage and current of components. In some cases, a soldering iron may also come in handy for delicate work.
Whether you’re a DIY enthusiast or a professional, always take the time to prepare and gather the necessary tools before starting any conversion project to avoid frustration and ensure success.
Steps to Convert SDD to M2 SSD
If you’re looking to upgrade your computer’s storage capabilities, you might be wondering how to convert an SDD to an M2 SDD. Well, the good news is that it’s relatively straightforward! First, you’ll need to take a look at your computer’s motherboard to ensure it has an M2 slot. If it does, you can purchase an M2 SDD and use a cloning software to copy the contents of your existing SDD onto the new M2 SDD.
Once you’ve finished cloning your data, you’ll need to physically install the M2 SDD into the motherboard’s M2 slot. This typically involves removing the old SDD and screwing the new one into place. Make sure to consult your computer’s user manual or manufacturer website for specific instructions for your model.
Overall, converting an SDD to an M2 SDD is a great way to achieve faster storage speeds and increase your computer’s overall performance.
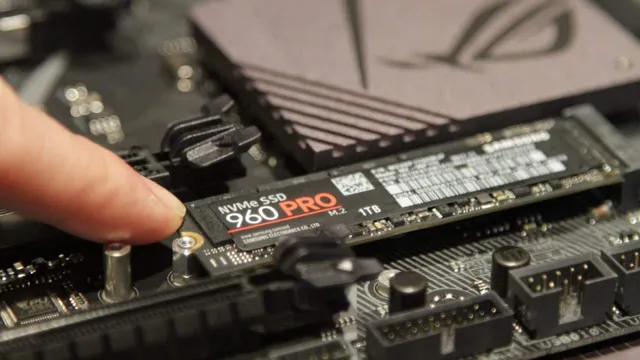
Step 1: Physically Install the M2 SSD
If you’re considering upgrading from a traditional SSD to an M2 SSD, then you’ve made a great choice. M2 SSDs offer superior performance and speed, and they are also more compact and energy-efficient than their traditional counterparts. So, let’s get started with step one – physically installing the M2 SSD.
First, you’ll need to power down your computer and unplug it from any electrical sources. Then, locate the M2 slot on your motherboard – it should be a small slot, usually located near your CPU. Once you’ve located the slot, gently insert the M2 SSD, making sure it’s aligned correctly before firmly pushing it in until it clicks into place.
Be sure to check your motherboard user manual to ensure you are placing the M2 SSD in the proper slot. With the M2 SSD properly installed, you can now power up your computer and begin the process of converting from your traditional SSD to the M2 SSD.
Step 2: Disk Management in Windows
If you’re looking to upgrade from a traditional SSD to an M.2 SSD, there are a few steps you’ll need to follow. The first step is to make sure your computer is compatible with M.
2 drives, as not all systems are capable of supporting them. Once you’ve confirmed that compatibility is there, you’ll need to format and partition your M.2 drive using Disk Management in Windows.
This can be done by opening Disk Management, right-clicking on your M.2 drive, and selecting “New Simple Volume.” From there, you’ll be able to set your preferred partition size, format, and drive letter.
Once the process is complete, your M.2 drive will be ready to use. Overall, converting from an SSD to an M.
2 SSD can be a bit time-consuming, but it’s definitely worth it for the significant speed boost you’ll experience.
Step 3: Cloning the SDD onto M2 SSD
Cloning the SDD onto M2 SSD is the next step in converting your computer’s storage system. This process involves copying all the data from the existing SDD to the new M2 SSD. First, you need to have a cloning software such as Acronis True Image or Clonezilla to initiate the cloning process.
With the software, you can create a bootable USB or CD that you’ll use to boot your computer and start the cloning process. Once you have booted your computer with the external drive, you’ll need to choose the source disk which is the old SDD and target disk which is the new M2 SSD. After selecting both disks, you can start the cloning process and wait for it to complete, depending on the size of your data, this may take from several minutes to a couple of hours.
After the cloning process is done, you can shut down your computer, remove the old SDD and replace it with the new M2 SSD. Once your computer is up and running after the replacement, you’ll find that all your files and applications are intact, giving you more storage space to work with. The proper use of cloning software helps give you a smooth transition when switching to an M2 SSD.
Finishing Touches
If you want to know how to convert your SDD to M2 SSD, then you’re in the right place. First off, you need to make sure your motherboard can support M2 SSDs. Once you’ve confirmed that, you need to remove the existing SDD and replace it with the M2 SSD.
You’ll need to screw the M2 SSD onto the motherboard and ensure it’s seated correctly. Additionally, you’ll want to make sure your BIOS is up to date so it can detect the M2 SSD properly. Once everything is set up, simply format the M2 SSD and you’re good to go.
In no time, you’ll enjoy faster read/write speeds and a more responsive computer. Overall, converting from SDD to M2 SSD is a simple process that can be accomplished with a little bit of know-how and patience.
Removing Old SDD
Now that we’ve migrated our data to the new SSD, it’s time to remove the old one and ensure everything is running smoothly. Before you go ahead and remove the old drive, make sure to back-up any important data that may still be on it. Once you’ve double-checked, power down your system and carefully disconnect the old drive, keeping in mind that you’ll need to reuse the cables to connect the new one.
Once the old drive is removed, take a moment to clean out any dust or debris that may have accumulated inside your computer’s case. This will help keep it running at optimal levels. With that done, it’s time to power back on and check that everything is working as it should.
If you followed the migration process correctly, you should have no issues at all. Congratulations, you’re now reaping the benefits of a faster, more reliable SSD!
Booting from M2 SSD
When it comes to finishing touches for booting from an M2 SSD, there are a few things to keep in mind. First of all, make sure that your BIOS is set up to boot from the M2 SSD instead of other drives. This can usually be adjusted in the boot order settings.
Secondly, it’s a good idea to enable TRIM support for your M2 SSD, which helps the drive to maintain peak performance over time. Finally, consider setting up regular backups of your system, as this can help to prevent data loss in the event of an unexpected issue with your M2 SSD. By taking these steps, you can make sure that your system is optimized for fast and reliable performance when booting from your M2 SSD.
Conclusion
In conclusion, converting from SDD to M2 SSD isn’t as complicated as it might sound. Think of it like moving your things from one apartment to another. You pack it all up, carefully transport it, and then unpack it in your new place.
Similarly, you just need to clone your data from your old SDD drive onto the new M2 SSD drive, install it, and you’re ready to go! With the boost in speed and performance, you’ll be navigating your computer with lightning-fast efficiency. So go ahead, make that move to M2 SSD, and enjoy the upgrade!”
FAQs
What is SDD?
SDD stands for Solid State Drive. It is a type of storage device that uses NAND-based flash memory to store data.
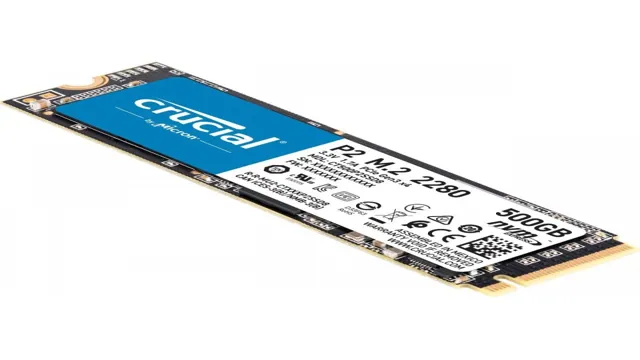
What is M2 SSD?
M2 SSD is a type of solid state drive that uses a smaller form factor than traditional SATA drives. It uses the M.2 standardized interface to connect to motherboards.
Why would I want to convert from SDD to M2 SSD?
There could be several reasons why you would want to do this. M2 SSDs are faster and more efficient, which means better performance. They also take up less space, which is beneficial if you need to conserve space in your system.
Can I convert SDD to M2 SSD?
Yes, you can convert SDD to M2 SSD. However, it requires the right components and tools, as well as some technical knowledge. It is recommended that you consult a specialist if you are not comfortable doing it yourself.
How do I convert SDD to M2 SSD?
The process involves removing the SDD and installing the M2 SSD into the M.2 slot on your motherboard. You will need to ensure that you have the right tools and components for the job. It is not a difficult process, but it does require some technical knowledge.