Have you ever been frustrated when your computer or laptop starts to slow down? Have you considered upgrading to a faster storage solution, but are not sure how to do it? One option to consider is adding an M.2 SSD to your PC. M.
2 SSDs are small and fast solid-state drives that offer much faster read and write speeds compared to traditional hard drives. By installing one in your PC, you can experience faster boot and load times, improved application performance, and quicker file transfers. But how do you go about connecting an M.
2 SSD to your PC? Don’t worry; it’s not as complicated as it may seem. In this blog post, we’ll go over the steps needed to connect an M.2 SSD to your PC, as well as some useful tips to ensure a smooth installation process.
So, if you’re ready to upgrade your PC’s storage performance, read on to learn how to connect an M.2 SSD.
Check Compatibility
If you’re wondering how to connect your M.2 SSD to your PC, the first step is to check compatibility. Does your motherboard have an M.
2 slot? If not, you’ll need an adapter card that fits in a PCIe slot. Once you’ve determined compatibility, the next step is to physically install the SSD. Make sure to ground yourself to avoid static electricity damage.
Carefully insert the SSD into the slot and secure it with the screw provided. Finally, you’ll need to initialize the drive in order for it to show up in Windows. This can typically be done in the Disk Management utility.
Just remember to back up any important data before making any changes to your system. With a little know-how and a bit of caution, adding an M.2 SSD to your PC can give your system a noticeable boost in speed and performance.
Ensure Your Motherboard Supports M.2 SSDs
If you’re thinking of upgrading to an M.2 SSD, it’s essential to check your motherboard compatibility. Not all motherboards support the latest M.
2 SSD technology, and investing in one without checking could turn out to be a costly mistake. M.2 SSDs are faster and more efficient than traditional hard drives, and they allow for faster boot times, improved application loading speeds, and better overall performance.
To check if your motherboard supports M.2 SSDs, consult the manual or check the manufacturer’s website for specifications. You’ll also want to make sure your motherboard has an M.
2 slot that supports the type of SSD you want to install. Don’t neglect this step as it can save you from a lot of frustration and wasted money.
Gather Necessary Tools
If you’re wondering how to connect your M.2 SSD to your PC, the first step is to gather the necessary tools. You’ll need a screwdriver, as most M.
2 SSDs require screwing in, as well as an open M.2 slot on your motherboard. Make sure you consult your motherboard’s manual to identify its location and ensure compatibility with your M.
2 SSD. It’s also a good idea to ground yourself by touching a metal object before handling any components to avoid any static electricity damage. Once you have everything you need, it’s time to start connecting your M.
2 SSD to your PC.
Screwdriver, M.2 SSD, and Your PC
If you’re looking to upgrade your computer’s storage, you’re going to need a few tools to get started. The first tool you’ll need is a screwdriver. This will be used to remove the side panel of your computer case, so you can access the internals of your computer.
Make sure you have the right size screwdriver for your case. The second tool you’ll need is an M.2 SSD.
This is the type of SSD you’ll be installing. M.2 SSDs are faster and more compact than traditional
5″ SSDs, making them a popular choice for computer upgrades. Once you have these two tools, you’re ready to upgrade your computer’s SSD. Just make sure you follow the manufacturer’s instructions for installing the SSD, so you don’t damage anything during the process.
Overall, this upgrade can be done fairly easily with the right tools and a bit of patience.
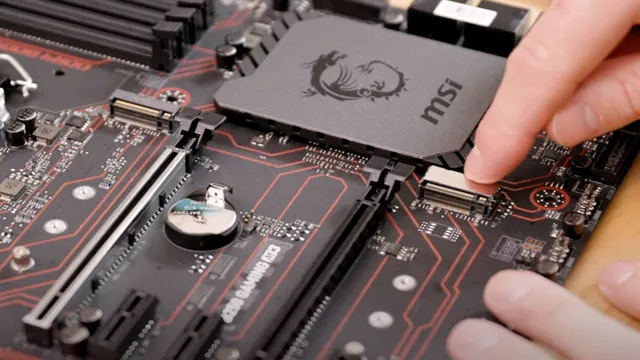
Locate Your Motherboard’s M.2 Slot
If you’re looking to connect an M.2 SSD to your PC, the first step is to locate your motherboard’s M.2 slot.
Depending on your motherboard, this slot may be located in different places. Some motherboards have the M.2 slot located near the CPU socket, while others may have it on the bottom of the board or near the PCIe slots.
Be sure to consult your motherboard manual or manufacturer’s website to locate the exact location of your M.2 slot. Once you’ve found the M.
2 slot, double-check that it supports the type of M.2 SSD you’re trying to install. M.
2 SSDs come in different sizes and speeds, so make sure your motherboard supports the type you have before proceeding. Once you’ve confirmed that your M.2 slot is compatible, simply insert the M.
2 SSD into the slot at a 30-degree angle, applying gentle pressure until it clicks into place. Congratulations, you’ve successfully installed an M.2 SSD!
Refer to Your Motherboard Manual
When it comes to installing an M.2 solid-state drive (SSD), the first step is always to refer to your motherboard manual. This is because the location of the M.
2 slot can vary depending on the motherboard model. The manual will provide clear instructions on where to find the M.2 slot, often accompanied by diagrams or photos.
Once you’ve located the M.2 slot, it’s important to check whether it supports SATA or NVMe protocol. NVMe SSDs offer faster speeds than SATA, so it’s worth ensuring that your M.
2 slot is compatible with NVMe if you plan to use this type of SSD. With the manual as your guide, you’ll be well on your way to installing your new M.2 SSD in no time.
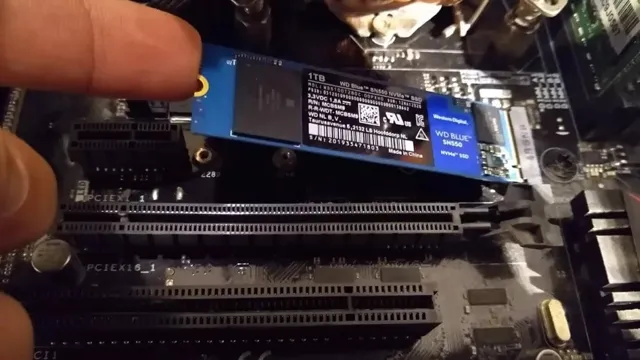
Insert the M.2 SSD
Connecting an M.2 SSD to your PC can be a straightforward process, but requires careful handling to avoid damaging the drive or other components. First, locate the M.
2 slot on your motherboard, typically found near the CPU socket. Carefully insert the M.2 SSD into the slot at a slight angle, ensuring it is lined up with the keying notch.
Gently press down on the drive until it clicks into place, and secure it with the designated screw or locking mechanism. It’s important to note that some motherboards may require the use of a standoff screw to prevent the drive from bending or flexing, so consult your motherboard manual for instructions. Once the M.
2 SSD is installed, ensure that your BIOS recognizes it as a bootable device, and format the drive to your preferred file system before transferring data or installing your operating system. With a simple and careful installation process, adding an M.2 SSD to your PC can greatly improve its performance and storage capabilities.
Using the Screwdriver, Secure the SSD in Place
To install an M.2 SSD, you’ll need to use a screwdriver to secure it in place. First, locate the M.
2 slot on your computer’s motherboard. It should be easy to spot, as it will likely be labeled with the initials “M.
” Gently insert the SSD into the slot at a slight angle, being sure to align it correctly with the notches on the slot. Once the SSD is in place, use a screwdriver to secure it by tightening the screw on the retention mechanism. Be careful not to overtighten, as this could damage your equipment.
Once you’ve secured the SSD, you’re ready to move on to the next step in the installation process. By taking your time and being gentle with your hardware, you can install your M.2 SSD with ease and ensure that it will function properly.
Connect the SSD to PC
If you are wondering how to connect your M.2 SSD to your PC, there are a few steps you need to follow. Firstly, ensure that your PC has an M.
2 slot available. Once you have confirmed this, switch off your computer and unplug it from the power source. Remove the side panel of the PC tower and locate the M.
2 slot on the motherboard. Carefully insert the M.2 SSD into the slot, making sure it is aligned correctly.
Once this is done, use the screw provided to secure it in place. Finally, replace the side panel and power the PC back on. It should now detect the new SSD and allow you to configure it for use.
Connecting an M.2 SSD to a PC is a great way to improve overall system performance, so give it a try today!
Refer to Your Motherboard Manual for Connection Details
When it’s time to connect your SSD to your PC, the process might seem daunting, especially if you’re not an expert in computer hardware. However, the process itself is relatively straightforward when you have the right knowledge and tools at your disposal. Before you begin, it’s critical to refer to your motherboard manual for connection details specific to your system.
Once you have the manual, take a look at the available SATA ports on your motherboard and identify which one you’ll be using to connect the SSD. Keep in mind that the SSD requires a power connection, which can come from the SATA power cable from your power supply. After locating the SATA port and power connection, carefully connect the SSD to your PC.
It’s important to be gentle during this process so you don’t damage any hardware components. With the SSD securely and properly installed, you’re now ready to enjoy improved performance and faster boot times on your PC.
Turn on Your PC and Configure the M.2 SSD
If you’re looking to connect your M.2 SSD to your PC, there are a few steps you need to follow. First, you’ll need to turn on your computer and access the BIOS.
Once there, you’ll need to find the option to enable the M.2 slot. This may vary depending on your motherboard, but should be relatively easy to find.
Next, you’ll need to physically install the M.2 SSD into the slot. Be sure to consult your motherboard manual for specific instructions on this, as the process can differ depending on the model.
Finally, you’ll need to configure the M.2 SSD. This involves formatting the drive and assigning it a primary partition.
Again, this process can vary depending on your operating system, but should be straightforward. Overall, connecting an M.2 SSD to your PC is a relatively simple process, and can greatly improve the performance of your system.
By following these steps, you’ll be up and running in no time!
Using BIOS or Operating System Software
To configure your newly installed M.2 SSD, you can use either the BIOS or the operating system software. Firstly, turn on your PC and enter the BIOS settings by pressing the designated key during startup.
Once you’re in the BIOS, navigate to the Storage Configuration or SATA Configuration section and find the M.2 slot. Here, you should be able to see your new SSD listed.
If it’s not, make sure it’s properly installed and connected. Now select the SSD and set it as the primary boot device. Save the changes and exit the BIOS.
Alternatively, if you’re using an operating system like Windows, you can configure your M.2 SSD from within the OS. Open the Disk Management tool and locate the new SSD.
Initialize the disk, create a partition, and format it to the file system of your choice. Once that’s done, you can start using your M.2 SSD to store files and programs or install an operating system on it.
By configuring your M.2 SSD properly, you’ll be able to take advantage of its fast read and write speeds, which can significantly improve your computer’s performance.
Conclusion
Connecting your M.2 SSD to your PC is as simple as finding the right slot and popping it in. With its lightning-fast speeds and compact size, your computer will thank you for the upgrade.
So go ahead and give your PC the boost it deserves with a sleek and speedy M.2 SSD – trust us, your files will thank you.”
FAQs
What is an M.2 SSD?
M.2 is a form factor for solid-state drives (SSDs) that are commonly used in newer computers. It is a compact and high-performance storage solution that directly connects to the motherboard.
Does my PC support M.2 SSDs?
If your PC has an M.2 slot on the motherboard, then it supports M.2 SSDs. You can check your PC specifications or consult with the manufacturer to confirm M.2 compatibility.
How do I physically install an M.2 SSD in my PC?
First, locate the M.2 slot on your motherboard and remove the protective shield or cover. Next, carefully insert the M.2 SSD into the slot at a 30-degree angle and gently push it down until it clicks into place. Finally, secure the SSD with the screw provided.
How do I connect my M.2 SSD to my PC?
M.2 SSDs connect directly to the motherboard, so there is no need for additional cables or adapters. Simply insert the SSD into the M.2 slot and secure it with the screw provided.