Upgrading your computer’s storage capacity is a great way to improve its performance. And what better way to do that than by connecting an SSD to your computer? By doing so, you’ll be giving your machine a significant boost in speed and responsiveness. But, it can be a bit overwhelming if you’re a novice to the world of tech.
Essentially, SSDs or Solid State Drives are alternatives to traditional hard drives (HDDs) and utilize no moving parts. They’re designed to store your data more effectively, so you can run programs and access your files more quickly. In this post, we’ll go over the process of connecting an SSD to your computer, so you can start enjoying the many benefits!
First Step: Check Compatibility
If you’re considering upgrading your computer’s storage by adding an SSD, the first step is to check compatibility. Not all computers are equipped to handle SSDs, so it’s important to see if your computer has an available slot for it. You should also consider the type of SSD you want to install – whether it is a SATA, M.
2, or NVMe SSD. Each type may have different compatibility requirements, so it is crucial to do your research before making the purchase. Keep in mind that some older computers may require a BIOS update to be compatible with the SSD.
Checking compatibility is a crucial first step in ensuring that your SSD installation is successful and that your computer is running at its full potential.
Verify Your Computer’s Compatibility with an SSD
If you’re considering upgrading your computer with an SSD (Solid State Drive), the first thing you need to do is check your computer’s compatibility. Not all computers are compatible with SSDs, so it’s important to do your research before investing in one. One way to check if your computer is compatible is to look at the specs of your current hard drive.
Most SSDs use the same SATA interface that traditional hard drives use, so if your computer has a SATA interface then you should be good to go. However, it’s important to note that some computers may require a specific type of SSD, so it’s always best to check with the manufacturer or consult a professional before making a purchase. Keyword: SSD compatibility, computer upgrade, SATA interface.
Choose the Right Type of SSD for Your Computer
When choosing an SSD for your computer, the first step you need to take is to check compatibility. Not all SSDs are created equal, and you’ll need to ensure that the one you’re eyeing will work seamlessly with your computer. For instance, if you have an older computer, you might need to look for an SSD that’s compatible with SATA II, while newer computers may require NVMe-based SSDs.
Another thing to consider is whether you need a 5-inch SSD, which is the same size as a traditional hard drive, or an M.2 SSD, which is a smaller form factor that frees up more space inside your computer.
Ultimately, choosing the right SSD can significantly boost your computer’s performance, so it’s worth doing your research and investing in a quality, compatible SSD that meets your needs.
Second Step: Open Your Computer
So, you’ve got yourself a brand-new SSD and you’re ready to give your computer a performance boost. Great! The first thing you need to do is power down your computer and unplug it from the socket. Once that’s done, it’s time to crack open your computer and locate the hard drive bay.
Typically, this can be found at the bottom of your computer or inside the side panel. Depending on the type of computer you have, the process may vary slightly. If you’re unsure about how to open your computer, a quick Google search should do the trick.
Once you have the hard drive bay open, you can slot your SSD into place and secure it using the screws provided. Don’t forget to connect the SATA power and data cables to your new drive! Once you’ve done this, close up your computer, plug it back in and power it up. Your new SSD should now be visible in your operating system and ready to use! Connecting an SSD to your computer is a relatively simple process and can be done in just a few easy steps.
Power Down Your Computer and Disconnect Cables
After shutting down your computer, the second step to open up your computer. This process begins with ensuring that all cables have been disconnected from your computer. This is an essential safety measure that prevents any electrical damage from occurring during the disassembly process.
Once you have disconnected all of the cables, it is time to take off the cover of the computer. The way to open your computer depends on the model; some computers may require that you unscrew the back panel, while others may have a sliding panel. Make sure to read the manual or do some research to ensure that you know how to safely open your particular computer model.
Remember that if you are not comfortable with opening your computer, it is best to consult a professional.
Remove Your Computer’s Side Panel
Removing your computer’s side panel is the second step in opening your computer. This may seem like a daunting task, but it’s actually quite simple. First, you’ll need to locate the screws that are holding the side panel in place.
In most cases, these are located along the back edge of the computer. Use a screwdriver to loosen the screws and then gently pull the panel away from the computer. You may need to apply a bit of force, but be careful not to bend or break the panel.
Once you have the panel removed, you’ll have access to the inside of your computer. This is where you can make any upgrades or repairs that you need to. Remember to handle the components with care and always discharge any static electricity before touching them.
By removing your computer’s side panel, you’ll be able to take full advantage of the hardware inside and get the most out of your machine.
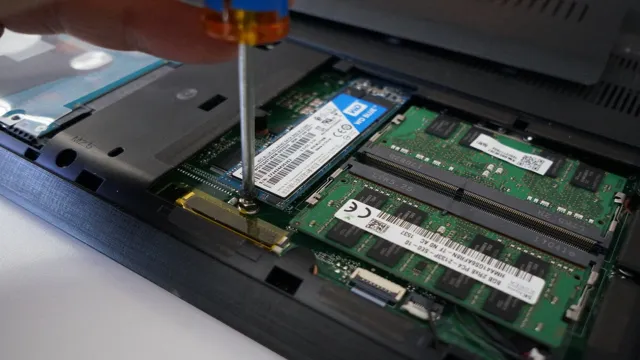
Third Step: Install the SSD
Now that you have prepared your computer and have your SSD on hand, it’s time to start the installation process. Before anything else, ensure that your computer is shut down and unplugged from any power source. Open up your computer’s casing and locate the hard drive bays.
Typically, these bays are located at the bottom of the casing and are easily removable. Carefully remove the existing hard drive from its bay and replace it with the SSD. You’ll need to connect the appropriate cables to the SSD, including the data cable and power cable.
Once properly connected, you can secure the SSD in place using screws or the case’s mechanism. It’s essential to ensure that the SSD is evenly aligned and securely in place to avoid any damage. You should also double-check that the cables are firmly connected to avoid any potential data loss or system errors.
Finally, replace the casing, plug in your computer, and turn it on to ensure everything is running smoothly. Congratulations, you’ve successfully installed your SSD!
Locate the SSD Slot and Mounting Bracket
Now that you know how to prepare your system and acquire the necessary tools, it’s time to finally install your SSD. The third step in this process is to locate the SSD slot and mounting bracket. Depending on your computer’s make and model, this location may vary, so it’s advisable to refer to your instruction manual or online resources.
Once you’ve identified the location, you can prepare the mounting bracket by taking the screws and attaching them to the SSD. Next, slide the bracket containing the SSD into the designated slot and secure it with the screws provided. It’s important to make sure that the SSD is securely fastened, as any loose components can interfere with your system’s performance.
With your SSD successfully installed, you’re one step closer to enjoying faster boot times, quicker data transfer, and improved overall system performance.
Attach the Mounting Bracket to the SSD
To install an SSD, the third step is attaching the mounting bracket to the SSD. This step is necessary as it secures the SSD in place and prevents it from moving around inside the computer case. To start, check the mounting bracket for compatibility with the SSD and for any screws needed in the process.
Once you have the mounting bracket and screws, place the SSD on top of it and align the holes on the SSD with the holes on the bracket. Then, screw the SSD onto the mounting bracket, making sure it sits securely in place without any wobbling. Once the SSD is attached to the bracket, it’s ready to be installed into the computer case.
This step is crucial to ensure that your SSD functions properly and does not come loose. By properly installing your SSD, you can enjoy faster boot times and overall performance on your computer.
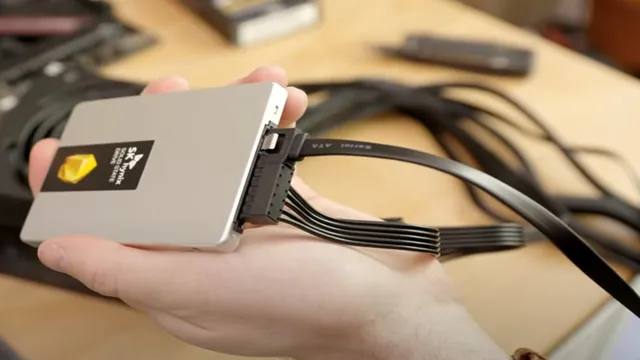
Install the SSD into the Slot and Connect Cables
Now that you’ve successfully mounted the SSD, it’s time to install it into the slot and connect all the necessary cables. First, locate the slot where you will install the SSD. This is usually located near the hard drive or the existing SSD, depending on your computer’s configuration.
Once you’ve identified the slot, insert the SSD into the slot, ensuring that it’s mounted securely. Next, connect the power supply cable to the SSD, which should be located near the slot. This is a SATA power cable, which provides power to the SSD.
Lastly, connect the data cable to the SSD. This cable is also a SATA cable and allows the SSD to communicate with the motherboard. Make sure that both cables are firmly attached, and ensure that the SSD is installed correctly in the slot.
Once you have done this, you are now ready to format and use your new SSD! Congratulations on completing the third step.
Fourth Step: Configure Your BIOS Settings
If you’re wondering how to connect an SSD to your computer, the fourth step is to configure your BIOS settings. This is an important step to ensure that your computer recognizes the new SSD. To access your BIOS settings, restart your computer and press the key indicated on the screen.
The key may vary depending on your computer’s manufacturer, but it’s usually F2, F10, or DEL. Once you’re in the BIOS settings, look for the option to change the boot order. This will allow you to prioritize the new SSD over the old hard drive.
You may also need to enable AHCI mode to fully utilize the SSD’s speed. Keep in mind that changing BIOS settings can be a bit tricky, so consult the user manual or online resources if you’re unsure. With the right BIOS settings, your computer should recognize the new SSD and you can start enjoying faster boot times and quicker access to your files.
Power Up Your Computer and Enter BIOS
After powering up your computer, the next step to configure your new PC is to enter the BIOS. BIOS stands for Basic Input/Output System, and it is responsible for handling the communication between your computer’s hardware and software. To access the BIOS settings, you need to press a specific key on your keyboard during the startup process.
The most common keys are F2, F12, Delete, ESC, or the combination of Ctrl+Alt+Delete. Once you enter the BIOS, you’ll see a series of menus that allow you to tweak various system settings, such as the boot order, clock speed, and RAM timings. It’s essential to configure your BIOS correctly to ensure optimal performance, stability, and security of your computer.
However, it’s important to note that fiddling with the wrong settings can cause serious consequences, so be careful and follow the instructions provided in your motherboard manual or online guides. A well-configured BIOS can significantly improve your computer’s performance and functionality.
Locate the SSD in the BIOS Settings
When it comes to configuring your BIOS settings to locate the SSD, the process can be a bit overwhelming, but don’t worry, we’ve got you covered. The first step is to access your BIOS settings by restarting your computer and pressing the appropriate key. Once you’re in, you’ll need to navigate to the “Storage” or “Advanced” settings tab, depending on your BIOS.
From there, you’ll want to look for the option to enable the SATA mode or AHCI mode, depending on your storage device. Once that is enabled, save and exit your BIOS settings. Your computer will then restart, and the SSD should be recognized in the BIOS.
If you’re still having trouble locating the SSD, double check all of your connections and ensure that the device is properly installed. With a little patience, you’ll be able to configure your BIOS settings and locate your SSD in no time.
Set the SSD as the Boot Drive
When you’re upgrading your computer’s hardware, it’s essential to configure your BIOS settings properly. This ensures that your system recognizes and prioritizes your new hardware correctly. In this case, we’re focusing on configuring your BIOS settings to set the SSD as the boot drive.
This can help speed up your system’s boot time because the SSD has faster read and write speeds compared to traditional hard drives. When configuring BIOS settings, make sure to enter the BIOS menu during the boot process by pressing the appropriate button, usually displayed on the screen. From there, you’ll need to navigate to the boot options and select the SSD as the primary boot device.
Once you’ve confirmed your changes, save them and exit the BIOS menu. With these settings configured, your computer should automatically boot from the SSD, giving you faster startup times and faster overall performance. So, take the time to configure your BIOS settings, and you’ll be able to take full advantage of your upgraded hardware.
Conclusion: Enjoy Faster Speeds with Your New SSD
In conclusion, connecting an SSD to your computer is a lot like connecting two old friends who have lost touch over the years. It may seem daunting and complex at first, but with the right tools and a bit of patience, the reunion can be a seamless and exciting experience. Whether you opt for a SATA or M.
2 connection, make sure to double check compatibility and follow the manufacturer’s instructions. And just like rekindling an old friendship, connecting an SSD can breathe new life into your computer, enhancing speed and performance for years to come. Happy connecting!”
FAQs
What type of SSD connector do I need for my computer?
This depends on the age and model of your computer. Most modern computers will use a SATA connector, while some older models may use IDE or SCSI connectors. Check your computer’s specifications or consult with the manufacturer to determine which type of connector you need.
Can I install an SSD alongside my existing hard drive?
Yes, you can install an SSD alongside your existing hard drive. This is known as a “dual drive” setup and allows you to use the SSD for your operating system and programs while storing files and data on the hard drive.
Do I need to enable AHCI in my computer’s BIOS to use an SSD?
AHCI (Advanced Host Controller Interface) is a feature in some BIOS settings that can improve performance and compatibility with SSDs. While it is not strictly necessary to enable AHCI to use an SSD, it is recommended for optimal performance. Check your computer’s documentation or consult with the manufacturer for more information on enabling AHCI.
How do I migrate my existing operating system to my new SSD?
There are several software tools available that can help you clone your existing operating system and files to your new SSD. Some SSD manufacturers also provide their own migration software. Be sure to back up any important data before cloning your drive to avoid data loss.