Are you fed up with your slow and outdated HDD? Do you want to upgrade to a lightning-fast SSD without losing all your precious files saved on your current hard drive? Look no further as we have just the solution for you! Cloning Windows from HDD to SSD is the perfect way to transfer all your files, applications, and settings to your new SSD without having to start from scratch. Cloning a hard drive may sound daunting, but it’s actually a straightforward process that can save you a lot of time and effort. By replicating your current hard drive’s contents onto your solid-state drive, you can enjoy the faster read and write speeds of an SSD while retaining your familiar software environment.
While some people opt to perform a fresh Windows install on their new SSD, cloning is a better option as it ensures that all your programs, drivers, and settings are transferred exactly as they were on your old hard drive. Additionally, cloning is a hassle-free way of upgrading your computer without having to reinstall everything or reconfigure your personal settings. So, if you want to enjoy the benefits of an SSD without losing your valuable data, consider cloning Windows from HDD to SSD.
In our upcoming blog, we’ll guide you through the process of cloning, step-by-step, and show you how to make the most out of your new solid-state drive. Stay tuned!
Requirement for Cloning HDD to SSD
If you’re upgrading from a traditional hard disk drive (HDD) to a faster solid-state drive (SSD), then you’ll want to clone your Windows operating system and all your data to the new drive. Cloning your hard drive to an SSD provides several benefits, such as faster boot times, improved performance, and better responsiveness. However, it’s important to remember that your SSD needs to be large enough to accommodate all your data, otherwise, you’ll need to free up some space before you can clone your disk.
To clone your HDD to an SSD, you’ll need cloning software, such as Macrium Reflect, Acronis True Image, or EaseUS Todo Backup. Once you’ve backed up everything, simply connect your SSD, run the cloning software and follow the step-by-step instructions to clone your hard drive to your new solid-state drive. Once the cloning process is complete, shut down your computer, disconnect the HDD, and connect the SSD to your computer.
You should be good to go with your faster, more responsive new SSD.
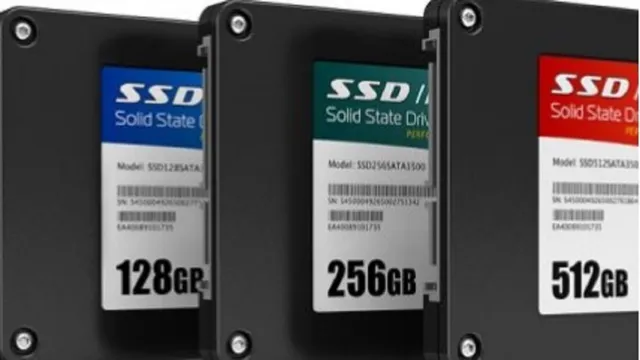
SSD with enough storage
When it comes to cloning your HDD to an SSD, having a sufficient amount of storage is crucial. You don’t want to run into the issue of your new SSD not having enough space to hold all of your files and data. That’s why it’s recommended to get an SSD with enough storage to accommodate all of your needs.
But how do you determine what “enough storage” is? Well, it really depends on the size of your current HDD and how much of it is being used. A general rule of thumb is to get an SSD with at least double the capacity of your current HDD. For example, if your HDD is 500GB and you’re using 250GB of it, you should get an SSD with at least 500GB of storage.
This will give you enough space to clone your HDD and leave room for future files and programs. Making sure you have enough storage when cloning your HDD to an SSD will ensure a smooth transition and prevent any headaches down the road.
External dock or USB enclosure
If you’re looking to upgrade your computer’s storage capacity or speed, one of the best things you can do is to clone your existing hard drive onto a new SSD. However, before you can do that, you’ll need to have an external dock or USB enclosure that can hold both the old HDD and the new SSD at the same time. This will allow you to transfer all of the data from the old drive to the new one without having to install either of them inside the computer.
Using an external dock or USB enclosure is a relatively simple process. First, you’ll need to remove the old hard drive from your computer and install it into the dock or enclosure (which will connect to your computer via USB). Then, you’ll need to install the new SSD into the same dock or enclosure.
Once both drives are in place, you can use cloning software to copy the contents of the old HDD onto the new SSD. It’s important to note that not all external docks or USB enclosures are created equal. You’ll want to make sure that the one you choose can handle both the size and type of drives you’ll be using, and that it has enough bandwidth to allow for speedy data transfer.
Additionally, you’ll want to make sure that the cloning software you use is compatible with your setup, as different docks and enclosures may require different software. In summary, an external dock or USB enclosure is a crucial component when it comes to cloning your old HDD onto a new SSD. By taking the time to choose the right one and following the proper steps, you can seamlessly upgrade your computer’s storage and performance.
Step by Step guide on cloning Windows
If you’ve recently upgraded to an SSD and want to transfer your Windows operating system from your old HDD to your new drive, cloning your Windows system is the way to go. Cloning your Windows system is essentially duplicating your existing system onto your new SSD, and with the right software, it’s a fairly straightforward process. Firstly, you need to ensure that your SSD is connected to your computer.
Next, you’ll need to download cloning software like EaseUS Todo Backup, Macrium Reflect, or Clonezilla. Once the software is installed, you can follow the simple steps provided by the software to clone your Windows system. This process can take some time depending on the size of your system and how much data needs transferring, but once completed, you can use your new SSD with your old Windows system.
Cloning your Windows system is a great way to make sure you don’t lose any data or settings, making your upgrade process much more seamless. So, if you’re wondering how do I clone Windows from HDD to SSD, don’t worry, it’s a quick and easy process that you can handle with ease.
Connect SSD to the system via dock
Cloning Windows can be a daunting task for many especially if you’re doing it for the first time. One of the key steps in the cloning process is to connect the SSD to the system via dock. First, ensure that your system is turned off, then connect the SSD to the dock and connect the dock to your system using a USB cable.
Once it’s connected, turn on the system, and it should recognize the SSD as an external storage device. It’s always best to ensure that your dock and cable are reliable before proceeding with cloning. You don’t want to risk losing your data during the process.
Additionally, it’s crucial to have cloning software such as EaseUS Todo Backup or Clonezilla, making it easier to clone your Windows. Overall, cloning Windows is a straightforward process, and with this step-by-step guide, you can easily and efficiently clone your Windows system.
Download and install a reliable cloning software
Cloning your Windows operating system can be a useful tool for many different situations, whether it’s upgrading your hard drive or transferring your system to a new computer. A reliable cloning software is essential for a successful clone process, and there are many great options available online. Once you’ve downloaded and installed your chosen software, follow these simple steps to clone your Windows system.
First, connect the target drive to your computer. Then, open the cloning software and select the source and target drives. Next, choose your desired cloning method and adjust any settings as necessary.
Finally, start the cloning process and wait for it to complete. It’s important to note that cloning can take some time, so be patient and let the software do its job. With this guide, you’ll have no problem cloning your Windows system and maintaining all your important files and settings.
Launch the cloning software
As you begin the process of cloning your Windows operating system, the first step is to launch the cloning software. This can typically be done by inserting a USB drive or CD with the cloning software into your computer and choosing to boot from it. Once the software is launched, you will be prompted to choose your source drive (the drive that has the operating system you want to clone) and your destination drive (the drive where you want to copy the operating system to).
It is important to make sure that the destination drive is of equal or greater size than the source drive to ensure that all data is properly copied. Once you have selected your drives and chosen any necessary settings, the cloning process can begin. This is an essential step in transferring your operating system to a new computer or upgrading to a larger hard drive, and following these steps carefully can ensure a successful and seamless transition.
Select the Source Disk – HDD
When it comes to cloning your Windows operating system, choosing the right source disk is crucial. In this step-by-step guide, we’ll cover how to select the source disk – the HDD – for your cloning process. First, it’s essential to ensure that your HDD is in good working order before starting the cloning process, as any potential issues could cause problems during the transfer.
Once you’ve confirmed that your HDD is in good condition, you’ll need to connect it to your computer and boot it up. From there, you can access the cloning software, select the HDD as your source disk, and begin the cloning process. It’s crucial to note that the cloning process could take anywhere from a few minutes to several hours, depending on the size and speed of your HDD.
However, with patience and attention to detail, you can successfully clone your Windows operating system onto a new drive and ensure that your data remains safe and secure throughout the process. So, take your time and follow the steps carefully to ensure a successful and stress-free cloning experience.
Select the Destination Disk – SSD
When it comes to cloning Windows onto a new SSD, one of the first steps is to select the destination disk where the clone will be placed. An SSD (solid-state drive) is often recommended for its speed and reliability, compared to traditional HDD (hard disk drive) options. Once you have your SSD ready, connect it to your computer and ensure it is recognized by the system.
Then, use cloning software to begin the process of copying everything from your old disk to the new SSD. During this process, you’ll be prompted to select the destination disk, which should be your new SSD. It’s important to double-check that you’ve chosen the correct disk, as any data on that disk will be overwritten during the cloning process.
Once you’ve made your selection, simply follow the on-screen prompts to complete the cloning process. With your new SSD fully set up and cloned, you’ll be able to enjoy improved performance and faster system speeds.
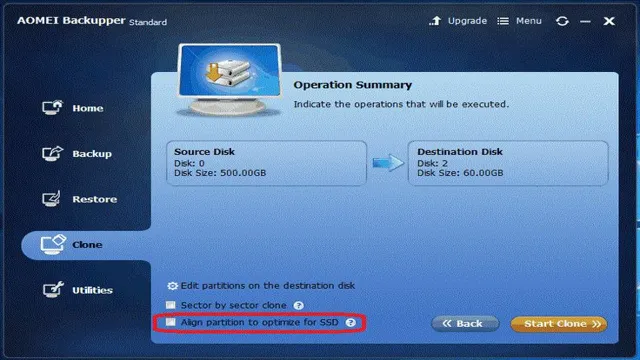
Start the Cloning process
Cloning Windows can be a daunting task, but with the right guidance, it’s a breeze. Here’s a step-by-step guide on how to clone Windows. The first step is to choose a cloning software that suits your preferences.
There are many options out there, but we recommend using Macrium Reflect. Once you’ve installed it on your computer, connect the destination drive to your computer. Then, click “Clone this disk” and select the source disk you want to copy.
Next, choose the destination disk. Make sure it has enough space to accommodate all the data from the source disk. After that, select the partitions you want to clone.
If you want to clone the entire disk, select all partitions. Finally, click “Finish” and let the cloning process begin. This may take some time, depending on the size of the disk.
Once it’s done, your destination drive should boot your computer just like the source disk did. Congratulations, you’ve successfully cloned your Windows!
Booting from the Cloned SSD
If you want to improve the performance of your computer, cloning Windows from an HDD to an SSD is the way to go. Once you have completed the cloning process, you may wonder how to boot your computer from the new cloned SSD rather than the old HDD. This process is relatively simple and can be done in a few quick steps.
First, make sure your computer is turned off and the new SSD is installed. Next, turn on your computer and enter the BIOS settings by pressing F2 or DEL, depending on your computer. Once in the BIOS settings, navigate to the boot order settings and select the cloned SSD as your primary boot device, save the changes and exit the BIOS.
Finally, your computer will reboot from the new cloned SSD and you can enjoy the improved speed and performance that comes with it. By following these simple steps, you can easily switch to your cloned SSD and enjoy a faster, more efficient computer.
Shutdown the system
When it comes to cloning your SSD, it’s always a good idea to ensure that your system settings are properly configured for a successful boot-up process. One of the most crucial steps before switching to the cloned SSD is to properly shut down the system. Powering down your system improperly can cause damage to the cloned SSD and result in data loss.
Once you have performed a safe shutdown, you can then switch to booting up from the cloned SSD to test its functionality. To ensure that the cloned SSD is working correctly, you can check the BIOS settings and configure the boot order to prioritize the new SSD. By doing so, your system will boot up smoothly and quickly without any issues.
Overall, following these steps will enable you to enjoy a seamless and error-free experience when using your cloned SSD.
Disconnect the HDD and connect the SSD
After successfully cloning your HDD onto your new SSD, it’s time to disconnect the old hard drive and connect the new one. But what happens now? How do we boot from the cloned SSD and start using it as our primary storage? Firstly, make sure you’ve properly disconnected the old hard drive and connected the new SSD. Double-check all cables and connections to avoid any issues.
Now, power up your computer and press the BIOS key while it is booting (this key is usually displayed on the manufacturer’s splash screen). Once you’re in the BIOS, you should see a list of bootable devices. Move your SSD to the top of the list to ensure that your computer boots from it first.
Save any changes and exit the BIOS. Your computer should now boot from the newly cloned SSD. It may take a little longer to boot up the first time, as your computer is configuring drivers and settings specific to the new hardware.
But don’t worry, this is perfectly normal. Now that you’re booted up on the new SSD and everything seems to be working properly, it’s time to enjoy the enhanced speed and overall improved performance. Congratulations, you’ve successfully cloned your HDD onto your SSD and are now ready to reap the benefits of lightning-fast storage!
Boot-up the system and select SSD boot option
When you’ve successfully cloned your operating system onto your new SSD, the next step is to boot the system from this new drive. To do this, first, shut down your computer and install the SSD into its proper slot. Once you turn the computer back on, immediately enter your computer’s BIOS settings by pressing the designated key (usually F2, F12, or Delete).
In the BIOS settings, navigate to the boot options and select your new SSD as the primary boot device. This will ensure that the computer boots up using the cloned operating system saved on your new SSD. Once the setting is saved, restart the system, and your computer should boot up on the cloned SSD.
A word of caution is that don’t forget to remove the previous boot device from the motherboard to prevent any confusion between the two drives. Following these simple steps will allow you to enjoy the benefits of faster speeds and improved performance from your new SSD.
When it comes to wrapping up your thoughts and ideas, nothing speaks better than a good conclusion. That’s right! The conclusion is where you, as a writer, get to leave a lasting impression on your readers. It’s that final paragraph that brings together all the key points and summarizes everything that’s been discussed.
But how do you go about writing a great conclusion? In this article, we’ll dive into the world of conclusions, discussing what they are, why they’re important and how to write a perfect one. Whether you’re a student, a blogger, or content writer, this guide will provide you with everything you need to know to master the art of crafting compelling conclusions that resonate with your audience. So, let’s get started!
Cloning Windows is an easy process.
If you are looking to clone Windows from HDD to SSD, you have come to the right place. Cloning Windows is an easy process that can save you a lot of time and effort. With the help of specialized software, you can transfer all your data, settings, and preferences from your old hard drive to the new SSD.
This means that you won’t have to reinstall all your applications and configure them from scratch. To get started, you will need to acquire a good cloning software, such as EaseUS Todo Backup, Macrium Reflect, or Acronis True Image. Once you have installed the software, you can connect your new SSD to your computer and launch the cloning tool.
Follow the on-screen instructions to select the source drive (your HDD) and the destination drive (your SSD), and start the cloning process. It may take a few hours to clone your entire hard drive, depending on the size of your system, but once it’s done, you can reboot your computer and start using your new, faster drive. Overall, cloning Windows from HDD to SSD is a straightforward process that can give your old computer a new lease on life.
So why not give it a try?
Cloning provides the same windows version, installed application, and data.
If you’re looking to upgrade your old hard drive to a faster solid-state drive, you may be wondering how to clone Windows from HDD to SSD. Cloning your hard drive creates an exact copy of all the data, applications, and operating system present on your existing hard drive onto the SSD. This ensures that you can continue using the same applications, settings, and files without any interruption.
Cloning is also much faster than manually transferring files, as it automatically duplicates everything in one go. Simply connect the SSD to your computer, open the cloning software, select your old hard drive as the source and the new SSD as the destination, and begin the cloning process. Once it’s done, you can replace the old hard drive with the new SSD, set it as your computer’s boot drive, and start enjoying faster load times, better performance, and improved durability.
So get your cloning software ready and start the process of upgrading your system today!
Cloning provides an efficient way to transfer windows from HDD to SSD.
If you’re looking to upgrade your computer by transferring your Windows operating system from a hard disk drive (HDD) to a solid-state drive (SSD), cloning is the way to go. Cloning provides an efficient way to transfer all of your data, files, and settings from one drive to another without having to start from scratch. To clone your Windows operating system, you’ll need a cloning software.
There are many cloning software options available online, but some of the most popular ones include EaseUS Todo Backup, Clonezilla, Macrium Reflect, and AOMEI Backupper. Once you’ve downloaded and installed your cloning software of choice, follow the prompts to clone your HDD to your SSD. Once the process is complete, your Windows operating system will be installed on your SSD, allowing for faster boot times and overall improved performance.
With this simple cloning process, you can enjoy the benefits of an SSD without having to sacrifice your data or start from scratch.
Conclusion
In conclusion, cloning your Windows operating system from an HDD to an SSD is like giving your computer a new lease on life. It’s like giving your sluggish four-door sedan a souped-up engine and racing stripes. With the seamless transfer of data and lightning-fast boot and load times, you’ll be cruising down the digital highway in style.
So, go ahead and pull off that cloning heist with confidence – you’ll be the envy of the PC world. And who knows, you might even get some street cred from your fellow tech-savvy buddies.”
FAQs
What software do I need to clone Windows from HDD to SSD?
There are several software options, including Macrium Reflect, Acronis True Image, and EaseUS Todo Backup.
How long does it take to clone Windows from HDD to SSD?
The time it takes varies depending on the size of the drive and the speed of your system, but generally it can take several hours to complete.
Can I clone only the Windows partition to my SSD?
Yes, many cloning software options allow you to select specific partitions to clone, so you can choose only your Windows partition if desired.
Can I use a USB drive to clone Windows from HDD to SSD?
Yes, some software options allow you to create a bootable USB drive to use for the cloning process.
Do I need to reinstall Windows after cloning to a new SSD?
No, if the cloning process was successful, your system should boot up as normal and you should not need to reinstall Windows.