If you’re struggling with your SSD and want to optimize its performance, chances are you’re thinking of changing it to a Basic MBR. However, the process can be quite confusing, especially if you’re not familiar with the technical aspects of your computer. In this blog, we’ll take you through every step of the way, explaining everything you need to know about changing SSD to Basic MBR and helping you get the most out of your computer.
So, grab a cup of coffee, sit back, and let’s dive in!
Backup Your SSD Data
If you’re looking to change your SSD to a basic MBR, it’s important to backup your data first. This ensures that you don’t lose any critical information during the process. The first step is to connect an external hard drive and copy all your important files over.
You can either do this manually by dragging and dropping the files, or by using backup software. Once you’ve backed up your files, you can then proceed with the MBR conversion process. It’s important to note that changing your SSD to MBR involves deleting all your existing partitions and creating new ones.
Therefore, make sure you have a backup of all your important data before attempting any changes. With the right tools and instructions, changing your SSD to MBR doesn’t have to be a daunting task. Just remember to backup your data beforehand to ensure a smooth transition.
Create System Repair Disc
Backing up your SSD data is an essential and often overlooked task that every computer user should prioritize. In the event of a system failure or a virus attack, having a backup can save you from losing irreplaceable files, photos, and videos. One way to back up your information is by creating a system repair disc, also known as a recovery drive.
This disc contains the tools needed to restore your computer to its original state, making it an essential tool for troubleshooting and solving problems. Creating a system repair disc is easy and can be done by following a few simple steps. First, navigate to the control panel and select the backup and restore option.
Next, select the “create a system repair disc” option and follow the prompts. Once the disc is created, store it in a safe place and create periodic backups of your SSD data to ensure you always have a copy of your important files. In short, backing up your SSD data is a crucial step in protecting your information, and creating a system repair disc is an effective method to do so.
Boot into System Repair Options
If you’re experiencing issues with your SSD and are unable to boot into Windows, don’t panic! You can try booting into System Repair Options to troubleshoot the problem. Before doing so, however, it’s important to back up your SSD data to ensure you don’t lose any important files. To back up your SSD data, you can use an external hard drive or cloud storage service.
If your SSD is still accessible, you can simply drag and drop your files to the external hard drive or upload them to the cloud. If your SSD is not accessible, you may need to use a data recovery tool to access your files. Once you have backed up your data, you can boot into System Repair Options by restarting your computer and pressing the appropriate key (usually F12 or F8) during startup.
From there, you can access various repair tools and options, such as restoring your system to a previous point, repairing startup issues, or resetting your PC. Remember that booting into System Repair Options should be a last resort and should only be done if you are experiencing serious issues with your SSD. If your problem persists, it may be time to consider replacing your SSD.
With proper backup procedures and a little bit of troubleshooting, you can get your SSD back up and running in no time!
Delete SSD Partitions
If you’re looking to change your SSD to a basic MBR, you’ll need to delete any existing partitions on your drive. The process of deleting partitions can be done using your computer’s built-in Disk Management tool. First, open Disk Management by right-clicking on the Start menu and selecting “Disk Management” from the list of options.
From there, you’ll see a list of all the drives connected to your computer, including your SSD. Right-click on the SSD and select “Delete Volume” from the context menu. This will remove any existing partitions on your SSD, effectively returning it to a basic MBR partition style.
Just be sure to backup any important files before you begin, as deleting partitions will erase all data on the drive. With this process completed, you should be able to install your preferred operating system on the SSD without any issues.
Select Your SSD in Disk Management
When it comes to setting up your SSD in Disk Management, it’s important to ensure that it’s set up correctly. One crucial step in this process is deleting any existing partitions on your SSD. This will allow you to start fresh with a clean slate and ensure that your SSD performs optimally.
To do this, you’ll need to open up Disk Management by typing “diskmgmt.msc” into the search box in your Start Menu. Once you’re in Disk Management, locate your SSD and right-click on it.
From the drop-down menu, select “Delete Volume” to remove any existing partitions. It’s important to note that this process will erase any data that’s stored on your SSD, so make sure you have a backup of any important files before proceeding. Once you’ve deleted the partitions, you’ll be able to create new ones and start using your SSD the way you want.
With a bit of time and effort, you can set up your SSD in Disk Management and ensure that it’s optimized for the best performance possible.
Delete All Partitions on SSD
If you’re looking to start with a clean slate on your SSD, the first step is to delete all the partitions. But before you begin, it’s essential to backup all your data to avoid losing it. Once you’re ready to proceed, there are several ways to delete SSD partitions, such as using the Disk Management tool or third-party software like EaseUS Partition Master or AOMEI Partition Assistant.
It’s important to note that deleting partitions will erase all data stored on your drive, so proceed with caution and double-check that you’ve backed up everything. By deleting all SSD partitions, you’ll have a fresh start to install a new operating system or create new partitions that better suit your needs. So, take your time and follow the steps carefully to ensure successful partition deletion, and enjoy a clean and optimized SSD.
Create A New Partition
If you want to create a new partition on your SSD, the first step is to delete any existing partitions that you don’t need. This can be done using disk management tools in your operating system. Once you have deleted the unwanted partitions, you can create a new partition with the available space.
However, before you delete any partitions, it’s important to back up your data to prevent any data loss. To delete a partition, you can right-click on the partition in disk management and choose the delete partition option. Once you have deleted the partition, the space becomes unused and can be used to create a new partition.
Creating a new partition is important when you want to store different types of data or when you want to run multiple operating systems on your computer. By creating a new partition, you can manage your data effectively and prevent any clutter on your SSD.
Convert SSD to MBR Format
If you are looking to change your SSD to a basic MBR format, there are a few steps you can follow. Firstly, you will need to create a bootable USB with software that can convert the SSD to MBR. Once you have the bootable USB, you can then boot your computer from it and begin the conversion process.
It’s worth noting that changing your SSD to MBR is not always necessary, and sometimes it can lead to data loss or other issues. It’s essential to back up all your data before attempting any changes to your SSD’s format. With that said, converting an SSD to MBR can be beneficial in specific situations, such as when you need to install an older operating system or boot from a disk that is not compatible with GPT partitioning.
While the process may seem daunting, it’s relatively straightforward with the right software and preparation.
Open Disk Management and Locate Your SSD
Converting your SSD to MBR format might seem like a daunting task, but with a little guidance, you can do it yourself. First, you need to open the disk management application on your computer and locate your SSD. Once you have found it, right-click on the partition and select “Delete Volume.
” This will remove all data from the SSD, so be sure to back up any important data before proceeding. Next, right-click on the SSD again, and select “Convert to MBR Disk.” This will convert the SSD to the MBR format, allowing you to use it as a bootable disk for your operating system.
Finally, you can create a new partition on the SSD by right-clicking on the unallocated space and selecting “New Simple Volume.” This will guide you through the process of creating a new partition and formatting it. With these simple steps, you can convert your SSD to MBR format and make the most of your storage space.
Right-click on Your SSD Partition
If you want to convert your SSD to MBR format, the first step you need to take is to right-click on your SSD partition. But before you do that, make sure you have backed up all your important files because this process will erase everything on your SSD. Once you have ensured that your important files are saved, right-click on your SSD partition and select the “Format” option.
From there, select “Master Boot Record (MBR)” as the partition style and click on the “OK” button. This will initiate the conversion process and your SSD will be formatted to MBR format. Keep in mind that MBR format only supports up to 2TB of storage and if your SSD has more than that, you should consider converting it to GPT format instead.
By converting your SSD to MBR format, you can ensure compatibility with older operating systems and legacy hardware.
Select Convert to MBR Disk
If you want to convert your SSD to MBR format, it’s easier than you might think. First, you’ll need to access your disk management utility. You can do this by right-clicking on the Windows start button and selecting “Disk Management” from the menu.
Then, select the SSD you want to convert and right-click on it. From the drop-down menu, select “Convert to MBR Disk.” This will help you convert your SSD partition style to MBR without losing any data.
It’s important to remember that MBR only supports up to 2TB hard drives, so if you’ve got a larger SSD, you may want to consider switching to the newer GPT format. Either way, making the switch is quick and easy, so why not give it a try and see if it helps improve your system’s performance?
Finalize MBR Conversion Process
If you’re looking to change your SSD to a basic MBR, it’s not as complicated as it may sound. The first step is to back up any important data on your drive, just in case something goes wrong during the process. Then, you’ll need to boot your computer from a Windows installation disk or USB drive.
Once you’re in the Windows Setup menu, press Shift + F10 to open the command prompt. From there, type “diskpart” to open the disk partitioning tool, and select your SSD. Type “clean” to wipe all the data from the drive, and then type “convert mbr” to convert your drive to a basic MBR partition.
Once you’ve done this, you can exit diskpart and install Windows on your newly converted drive. It’s important to note that this process will completely erase all data on your drive, so make sure you’ve backed up everything you need before you start. By following these steps, you should be able to convert your SSD to a basic MBR partition with ease.
Right-click on Your SSD Partition
If you’ve followed all the previous steps in converting your HDD system to an SSD, you’re almost there! In this final step, you need to right-click on the SSD partition to finalize the MBR conversion process. This simple action will enable your computer to recognize the SSD as the primary boot device, ensuring that you get all the speed and performance benefits that come with an SSD. It’s important to make sure this step is done correctly, so take your time and ensure you’ve selected the correct partition before completing the process.
Once you’ve done that, all that’s left to do is sit back and enjoy the blazing-fast speed of your new SSD-powered system!
Initiate the New Volume Wizard
Once you’ve successfully converted your hard drive from MBR to GPT, it’s time to finalize the process by initiating the new volume wizard. This step is crucial in ensuring that the new partition is set up correctly and that there won’t be any issues moving forward. To begin the wizard, open the Disk Management tool and locate the unallocated space created during the conversion process.
Right-click on this space and select “New Simple Volume.” This will bring up the wizard, which will guide you through the process of creating a new volume. You’ll be prompted to select the size of the partition, assign a drive letter, and format the new volume using NTFS.
Once you’ve completed all the steps, click “Finish” to complete the process. With the new partition in place, you can now start using your computer without any worries about the MBR partition limit.
Format Your SSD Partition
After converting your hard drive to an SSD, the next step is to format your SSD partition. This is an important step because it ensures that your operating system and its associated files are properly installed on your new SSD. To format your SSD, you’ll need to access the Disk Management tool in your Windows operating system.
You can do this by right-clicking on the Windows start button and selecting Disk Management. Once you’re in the tool, you’ll see a list of available drives. Locate your new SSD and right-click on it to select the Format option.
From there, you can choose the file system that you want to use (e.g. NTFS) and assign a drive letter.
Once you’ve completed these steps, your SSD partition will be properly formatted and ready to use. Now that you’ve formatted your SSD partition, it’s time to finalize the MBR conversion process. MBR stands for Master Boot Record and converting it to work with your new SSD is essential to ensure that your computer can properly boot up from the new drive.
To do this, you’ll need to use a tool called the MBR2GPT utility which is built into Windows. Simply open up the Command Prompt as an administrator and enter the command ‘mbr2gpt /validate’ to check if your system supports the conversion. If it does, you can then enter the command ‘mbr2gpt /convert’ to complete the conversion process.
Once you’ve done this, your computer will be able to boot up from the new SSD without any issues. This final step is crucial in ensuring that your new SSD is operating at its fullest potential, so don’t skip it!
Restart Your PC and Enjoy
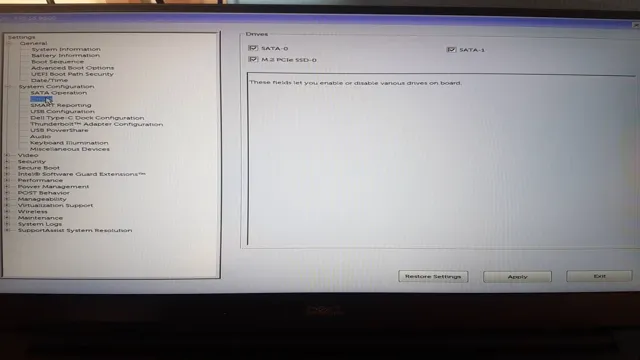
If you’re wondering how to change your SSD to a basic MBR, it’s actually pretty straightforward. The first thing you’ll need to do is boot into the BIOS setup utility. From there, you’ll need to locate the “Boot” tab and then select the “Boot Mode” option.
From here, you’ll want to change the mode from UEFI to Legacy. This should switch your system from using a GPT partition scheme to an MBR partition scheme, effectively allowing you to use your SSD as a basic MBR drive. Finally, once you’ve saved your changes and restarted your system, you should be good to go.
Keep in mind that this process may vary slightly depending on your specific system configuration, so don’t hesitate to consult your system documentation for more detailed instructions. In any case, once you’ve restarted your PC and confirmed that your SSD is now using an MBR partition scheme, you’re good to start enjoying all the benefits of this basic partitioning system.
Conclusion
In summary, changing your SSD to a basic MBR is like trading in your fancy sports car for a classic vintage ride. You’re streamlining your system, simplifying your setup, and reducing the risk of complications down the road. So, buckle up and get ready for a smoother, more straightforward computing experience!”
FAQs
What is an MBR partition?
MBR (Master Boot Record) partition is a type of partition that is used on hard drives to enable use by a computer’s BIOS (Basic Input/Output System) firmware.
How do I convert my SSD to MBR partition style?
Open Disk Management, right-click on the disk you want to convert to MBR partition, select Convert to MBR Disk, and follow the instructions.
What are the advantages of using MBR partition style?
MBR Partition style allows for BIOS-based systems to access the drive boot sectors, it has better compatibility with older systems, and it supports up to four primary partitions.
Can I change my SSD partition style from MBR to GPT?
Yes. You can use the Disk Management tool or the Diskpart command in Windows to convert your MBR partition to GPT partition. However, this process requires data backup and disk cleaning, as the conversion process leads to data deletion.
Is it possible to switch back to MBR partition style after converting it to GPT?
No. If you have converted to GPT Partition, you cannot switch back to MBR Partition style without losing all data and reformatting the drive.