Switching from a traditional hard disk drive (HDD) to a solid-state drive (SSD) for booting up your computer may be the best upgrade you ever make. Imagine turning on your computer and it starts up almost instantly. No more waiting for the system to load up, no more frustratingly slow file transfers — just an overall faster and smoother computer experience.
But how do you make the switch from HDD to SSD? Is it a complicated process? Will you lose any of your files or data? These are common questions when considering an upgrade like this, but the good news is that switching to an SSD for booting up your computer is relatively simple and straightforward. In this blog, we’ll walk you through everything you need to know about switching from HDD to SSD for your computer’s boot drive, including why an SSD is a great choice, tips for selecting the right SSD, and step-by-step instructions for upgrading and transferring your files. By the end of this article, you’ll have a faster, more reliable computer that’s ready to take on any task you throw at it.
Backup important data
If you want to change your system from HDD boot to SSD boot, it is important to remember to backup your important data first. This will protect your files in case of any mishaps during the process. There are several backup options available, such as creating a system image on an external hard drive or using cloud-based storage solutions like Google Drive or Dropbox.
Once you have backed up your data, you can proceed with swapping your HDD for an SSD. Make sure to follow the manufacturer’s instructions carefully and ensure that your SSD is properly installed and recognized by your system. After installation, you can transfer your backed-up data onto your new SSD and enjoy faster boot times and improved overall performance.
Remember to dispose of your old HDD properly in a way that is both secure and eco-friendly.
Create a backup of all important files and data on your HDD.
Backing up your important data is an essential task that every user should consider to protect their data from unexpected loss. It is always better to save your files on an external device, like a USB drive, cloud storage, or an external hard drive. By doing this, you can easily access your data if your computer crashes, gets stolen, or if there is a malware attack.
Additionally, it is recommended to use a reliable backup software to automate the backup process and schedule regular backups so that you don’t forget to save your latest files. When creating a backup, choosing the right storage option is crucial to ensure your data’s safety. Moreover, it is important to keep your backup in a secure location so that only you can access it.
Remember, your data is invaluable, and losing it can be frustrating and time-consuming to recover. Thus, making backups frequently is a smart move to avoid the nightmare of data loss.
Shut down your computer
If you’re wondering how to change from HDD boot to SSD boot, the process isn’t overly complicated. However, it does require a few steps to ensure everything runs smoothly. To start, you’ll need to clone your existing HDD to your new SSD.
This can be done using cloning software, which will transfer all of your data from one drive to the other. Once the cloning is complete, you’ll need to enter your computer’s BIOS and change your boot option from HDD to SSD. This will ensure that your computer boots from the new SSD and not the old HDD.
It’s important to shut down your computer entirely and turn off the power supply before making any hardware changes. This will prevent any damage to your computer and ensure a smooth transition. With these steps, you can easily change from HDD boot to SSD boot and enjoy the benefits of a faster and more efficient computer.
Turn off your computer completely and unplug it from power source.
Shutting down your computer might seem like a simple task, but it’s crucial for the health and longevity of your device. Before you press the power button and walk away, make sure you’re shutting down your computer properly. Click on the start menu and select “shut down” to safely close all your running programs and save any unsaved work.
Once your computer has completely shut down, it’s important to unplug it from the power source to prevent any power surges or damage to your device. This step is often overlooked, but it can save you from costly repairs and ensure that your computer is ready to go the next time you need it. Remember, taking a few extra seconds to properly shut down and unplug your computer can go a long way in keeping it healthy and running smoothly.
Open the case
So, you’re looking to switch from a HDD boot to an SSD boot? The first step is to open up your computer’s case. Depending on your computer’s manufacturer and model, the process for doing this may vary. Some may have screws that need to be removed while others may have latches that need to be released.
Once you have the case open, you’ll need to locate the hard drive bays. Identify which one currently houses your HDD and which one will be used for the SSD. Gently disconnect the cables from the HDD, making sure to keep track of which cable goes where.
Then, carefully remove the HDD from its bay and replace it with the new SSD. Secure the SSD in place, reconnect the necessary cables, and close up the case. Once you power on your computer, it should recognize the new SSD as the primary boot device.
Happy computing!
Remove the screws and open the computer case.
Removing the screws and opening the computer case might sound intimidating, but it’s actually quite simple. First things first, make sure your computer is turned off and unplugged from all power sources. Once you’ve done that, look for the screws that are holding the case in place.
They’ll usually be located on the back or side of the case. Use a screwdriver or a power tool to remove these screws. Once the screws are removed, you should be able to slide or lift off the side panel of the case.
Be careful not to force anything or damage any of the components inside. This will give you access to the inside of the computer. From here, you can make any necessary upgrades or repairs.
Just be sure to handle all components with care and follow a guide or tutorial if you’re unsure of what you’re doing. With the case open, you’ll be able to see the intricate workings of your computer and customize it to your needs. Just make sure to put the screws back in securely so your computer case is properly fastened.
Remove the HDD
If you’re looking to switch from a HDD boot to an SSD boot, the first step is to remove the HDD from your computer. This involves opening up your computer and locating the hard drive bay. Once you find it, you’ll need to disconnect any cables and remove any mounting screws holding the HDD in place.
Then, carefully slide the hard drive out of its bay and set it aside. This may vary depending on your specific computer model, so it’s always a good idea to consult your computer’s manual or seek out online tutorials for detailed instructions. Once you’ve removed the HDD, you can go ahead and install your new SSD and set it up as your primary boot device.
With a little bit of patience and the right tools, switching from a slower HDD boot to a faster SSD boot can be a relatively straightforward process.
Unplug all cables from the old HDD and remove it from the case.
If you’re upgrading or replacing the hard drive on your desktop computer, you’ll first need to remove the old HDD from the case. Before getting started, make sure your computer is fully powered down and unplugged from the wall. Once you are sure that it is safe to proceed, open up the case and locate the hard drive.
It will typically be installed in a metal cage or bracket, depending on the make and model of your computer. Once you’ve found the hard drive, unplug all cables and connectors that are connected to it. There may be one or two data cables, a power connector, and possibly some screws or brackets holding it in place.
Take your time to identify all of these elements and remove them carefully, as to not cause any damage to the Electronics. With all of the cables disconnected, you should be able to slide the old HDD out of its slot. Depending on how it was mounted, you may need to remove some additional brackets or screws to free it completely.
Once you have it out, you can safely dispose of the old hard drive and prepare to install your new one.
Install the SSD
So, you’ve finally made the decision to upgrade to an SSD and you’re wondering, “how do I change from HDD boot to SSD boot?” Well, congratulations on your decision! You’re in for a significant performance boost. The first step is to install the SSD physically into your computer. Make sure the computer is unplugged and open up the case.
Locate the current HDD, and ideally, remove it. You can then replace it with the new SSD, securing it with screws or brackets. If you’re adding the SSD as an additional drive, you’ll need to locate an available SATA connection on the motherboard and plug the SSD in, securing it with screws or brackets as well.
Once you’ve installed the new SSD, you’ll need to set it as the primary boot drive in your computer’s BIOS. You can do this by entering the BIOS setup upon turning on your computer and finding the boot device option. Select the SSD as your primary boot device and save the changes before exiting the BIOS.
Voila! You’ve successfully changed from HDD boot to SSD boot.
Connect the SSD in place of the old HDD.
To install an SSD, first, you need to connect it in place of the old HDD. Here’s how you can do it. Start by turning off your computer and unplugging it from the power source.
Then, locate the old HDD, which is usually located inside the computer case. You may need to completely remove the case cover to access it. Next, gently unplug the cables from the HDD, including the power cable and SATA cable.
Be careful while doing this to avoid damaging any other components of your computer. Once the HDD is disconnected, you can then install the SSD in its place. You will want to connect the SATA cable and power cable to the SSD.
Make sure that they are securely connected, and double-check to ensure that they are plugged in the right orientation. Finally, screw the SSD into place using the same screws that were used to secure the old HDD. Once everything is securely in place, you can close up your computer case and turn your computer back on.
Congratulations, you have successfully installed an SSD! The new SSD will provide faster and more efficient storage for your computer, which will significantly improve its performance and speed. So, the next time you use your computer, you’ll notice a significant improvement and better user experience.
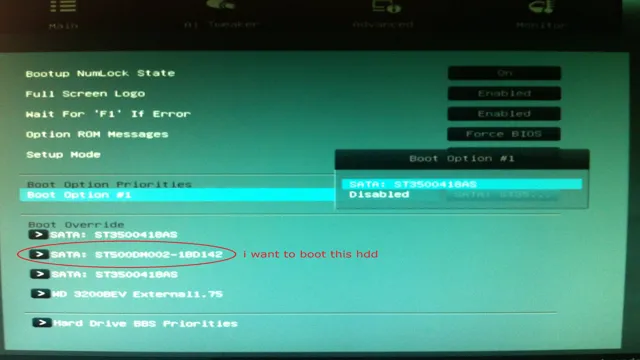
Boot from the SSD
If you have recently upgraded to an SSD and want to make sure your computer is booting from it, fear not, the process is pretty straightforward. Firstly, you’ll need to make sure your SSD is connected to a SATA port on your motherboard and that it’s recognised in the BIOS. You can check this by entering the BIOS/UEFI menu when your computer starts up.
Once you’re in the BIOS, navigate to the ‘Boot’ menu and look for the ‘Boot Priority’ or ‘Boot Order’ setting. Here, you’ll be able to change the order of the boot devices. To boot from your SSD, simply move it to the top of the list.
Remember to save your changes before exiting the BIOS. That’s it! Restart your computer, and your operating system should now boot from your SSD. Don’t worry if you need to boot from your HDD in the future – simply change the boot order again and set the HDD to the top of the list.
With these simple steps, you can easily switch between boot devices without any hassle.
Power on the computer and open the BIOS settings. Change the boot order to SSD.
Boot from the SSD One of the most vital steps in upgrading your computer or laptop is to change the boot order to SSD. This ensures that your computer boots from the solid-state drive instead of the hard disk drive, resulting in faster loading times and improved performance. To get started, power on your computer and enter the BIOS settings by pressing the correct key.
Usually, this key will either be F2, F10, or Delete, depending on your computer. Once you’re in the BIOS settings, navigate to “Startup” or “Boot” options and look for the “Boot Order” option. Then, move the SSD to the top of the list.
If you have multiple drives, ensure that the boot order follows your preference. Typically, you’ll have to press F10 or the respective key to save and exit the BIOS. Restart your computer, and it should boot from the SSD.
The process is much more straightforward than you’d think, and the results speak for themselves. Enjoy faster boot up and loading times and a snappier system overall.
Restore data
If you’re considering upgrading from a slow and outdated HDD boot drive to an SSD boot drive, you’re in luck. It’s actually fairly simple to make the switch. First, you’ll want to clone your current boot drive onto the new SSD using a cloning tool like EaseUS Todo Backup or Acronis True Image.
Once the cloning process is complete, you’ll remove the old boot drive and replace it with the new SSD. Make sure to change the boot order in your BIOS settings to ensure your computer boots from the new SSD. If you’re worried about losing important data during the process, be sure to back up all your files beforehand.
With a bit of know-how and some patience, you can easily change from an HDD boot drive to an SSD boot drive in no time. So go ahead and upgrade your computer’s speed and performance today!
Transfer backed-up data from the old HDD to the new SSD.
If you’ve successfully cloned your old hard drive onto your new solid-state drive (SSD), the next step would be to restore your backed-up data. To transfer data from your old HDD to the new SSD, you can use various backup and recovery software like Acronis True Image or EaseUS Todo Backup. Choose a tool that you’re comfortable with, follow the prompts, and restore the data on your new SSD.
It’s crucial to have your data backed-up before restoring it, as any error or mistake during the process could lead to data loss. Additionally, it’s important to keep in mind that some software may require additional steps or settings, depending on whether you’ve installed a new operating system or not. Don’t hesitate to consult the software’s user manual or online forums for assistance when restoring your data.
Once done, double-check your data to ensure everything is in order, and enjoy the blazing fast speeds of your new SSD.
Enjoy your new faster boot times!
If you’re tired of waiting for your computer to boot up every time you turn it on, upgrading to an SSD boot drive is the perfect solution. But how do you change from an HDD boot to an SSD boot? Luckily, the process is relatively simple. First, you’ll need to clone your HDD boot drive to your new SSD using a cloning software.
Once that’s done, you’ll need to physically install your new SSD into your computer and set it as the primary boot device in your BIOS. Finally, you’ll need to format your old HDD boot drive and delete the boot partition. And there you have it – your computer will now boot up faster than ever before thanks to your new SSD boot drive.
So say goodbye to long boot times and hello to the speed and efficiency of SSD technology.
Conclusion
Changing from HDD boot to SSD boot is like upgrading from roller skates to a sports car. Not only will it be faster and more efficient, but it will also elevate your overall experience. So buckle up, switch to SSD boot, and feel the speed and performance like never before!”
FAQs
What is the difference between HDD boot and SSD boot?
HDD boot refers to booting the operating system from a hard disk drive, while SSD boot refers to booting from a solid-state drive. SSD boot is generally faster than HDD boot.
How can I check if my computer is currently booting from my HDD or SSD?
You can check by opening your system information and checking the boot drive. Another way is to check the boot order in your BIOS settings.
How do I change the boot order in my BIOS to prioritize my SSD?
Restart your computer and enter the BIOS setup by pressing a key like F2 or Delete. Navigate to the boot order and move your SSD to the top of the list. Save and exit the BIOS.
Can I still access my files on my HDD if I switch to SSD boot?
Yes, you can still access your files on your HDD as long as it is still connected to the computer. However, you may need to change the drive letter assigned to your HDD to access it properly.
Is it necessary to transfer my operating system to my SSD to switch to SSD boot?
It is not necessary, but it is recommended to transfer your operating system to your SSD to fully enjoy the benefits of faster boot times and improved system performance.