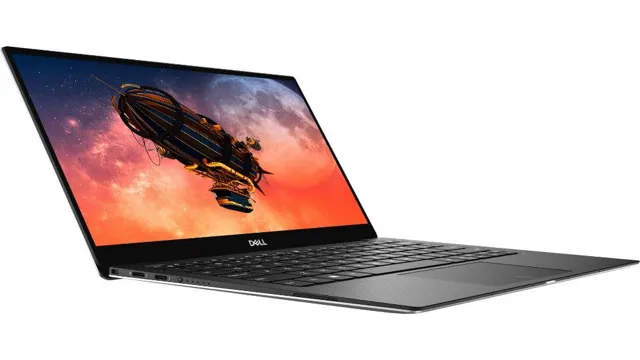
Is your computer slowing down due to insufficient space on your hard drive? Are you considering a hard drive upgrade but don’t know where to start? Do you own a Dell XPS 13 and need a larger SSD capacity? Well, we’ve got a perfect solution for you! Upgrading your XPS 13 SSD to 1TB will give you more space to store your files, pictures, and videos, as well as faster read and write speeds. It’s like upgrading your small closet to a spacious walk-in closet, with plenty of room to store your belongings and move around freely. In this blog post, we will guide you through the process of upgrading your XPS 13 SSD to 1TB and provide you with essential tips to consider before doing so.
So, sit back, relax, and read on to learn all about how to upgrade your XPS 13 SSD to a 1TB one!
Assess Compatibility
If you’re looking to upgrade the SSD in your Dell XPS 13 to 1TB, the first step is to assess compatibility. You’ll want to make sure that the SSD you’re considering is compatible with your specific model of XPS 1 Dell has a list of recommended SSDs that are compatible with the XPS 13, so it’s a good idea to start there.
You’ll want to make sure that the SSD you choose has the same form factor and interface as your current SSD. You’ll also want to make sure that your XPS 13 has the necessary hardware to support a 1TB SSD upgrade. Additionally, you’ll need to make sure that you have the right tools and software to transfer your data from your old SSD to your new one.
With a bit of research and preparation, upgrading your XPS 13 SSD to 1TB can be a great way to improve your computer’s performance and storage capacity.
Check Your Laptop Manual
If you’re considering purchasing a new laptop battery, there are a few factors you need to take into consideration before making your purchase. One important aspect to keep in mind is compatibility. It’s essential that you assess compatibility before purchasing a new battery to ensure that it will work with your laptop.
To do this, the first step is to check your laptop manual to see what type of battery your laptop requires. Different laptops require different batteries, so it’s crucial that you know which type of battery is compatible with your laptop to avoid any issues. Once you have this information, you can begin searching for the right battery for your laptop, ensuring that it’s both compatible and of good quality.
By taking the time to assess compatibility, you can rest assured that your laptop will have the correct battery and run smoothly without any technical difficulties.
Verify if Your Laptop’s Hardware Can Support It
If you’re planning to upgrade your laptop’s operating system, it’s crucial to check if its hardware is compatible with it. A quick way to verify that is by checking the system requirements of the new operating system. Usually, the minimum requirements are the basic hardware that is needed to run the OS, but you should aim for the recommended requirements for a smoother user experience.
If you’re shopping for a new laptop, it’s always best to check its specifications before purchasing and ensure it has the necessary hardware features. Some hardware components that you should consider when assessing compatibility include the processor, RAM, storage space, graphics card, and network adapter. By verifying your laptop’s hardware compatibility, you can avoid facing frustrating software errors, crashes, or decreased performance.
So, if you’re planning to upgrade your laptop’s operating system, take the time to check its system requirements and make sure your laptop has the recommended hardware specifications to support it seamlessly.
Backup Your Data
If you’re looking to upgrade your XPS13 SSD to 1TB, there are a few things you need to consider. First and foremost, before you make any changes to your computer, it’s important to backup all of your important data. This includes documents, photos, videos, and any other files that you don’t want to lose.
You can backup your data onto an external hard drive or a cloud-based service like Dropbox or Google Drive. Once your data is safely backed up, you can then proceed with the SSD upgrade. There are a variety of SSDs on the market, so do your research and choose one that meets your needs and fits your budget.
You’ll also need to make sure that the SSD you choose is compatible with your XPS1 Installation can be a bit tricky, so if you’re not comfortable doing it yourself, it’s best to have a professional handle it for you. With the right SSD and a successful installation, you’ll be enjoying faster speeds and more storage space in no time!
Save Critical Files and Folders
Backing up your data is crucial to protect critical files and folders from loss or corruption. Whether it’s personal photos, important work documents, or sensitive financial information, losing it can be devastating. Imagine spending hours creating a project or editing a photo, and then losing it all due to a computer crash or accidental deletion.
An effective backup strategy can prevent these types of disasters by creating copies of your important files and storing them in a safe location. It’s like having a spare key to your house in case you lose the original. The main keyword here is “backup your data,” and it’s essential to remember that backups should be done regularly and kept up to date to ensure your data is protected.
Create a System Image
Creating a system image is an essential part of backing up your data. It involves making a complete copy of your computer’s hard drive, including the operating system, installed software, and personal files. This process can be a lifesaver if your computer crashes or becomes infected with a virus, as you can restore your system to its previous state using the system image.
To create a system image, you can use the built-in backup tool in Windows, which allows you to choose a backup location, select the drives you want to include, and schedule regular backups. It’s important to keep your system image up-to-date and stored on an external hard drive or cloud storage service. With a reliable system image, you can have peace of mind knowing that your important data is safe and secure.
Choose Your New SSD
If you’re thinking of upgrading your XPS 13 SSD to 1TB, there are a few things you need to consider. First, make sure you’re buying a compatible SSD. The XPS 13 uses an M.
2 NVMe SSD, so that’s what you should look for. You also want to make sure you’re getting a reliable and fast SSD, so do your research and read reviews before making a purchase. Some popular options include the Samsung 970 EVO Plus or the WD Black SN750.
Once you’ve made your purchase, you’ll need to back up your data and then install the new SSD. This can be done by opening up the XPS 13 and swapping out the old SSD. If you’re not comfortable doing this yourself, consider taking your laptop to a professional.
Upgrading your SSD to 1TB can greatly improve the storage capacity and overall performance of your XPS 13, so it’s definitely worth considering if you’re in need of more space.
Research Compatible Drives and Choose Based on Capacity, Performance, and Price
When it comes to choosing a new SSD, there are a few factors to consider: capacity, performance, and price. SSDs come in a variety of sizes, from 128GB to 4TB or more. Consider how much storage you need for your files, applications, and operating system.
Additionally, pay attention to the performance of the drive, which can impact how quickly your computer boots up and loads programs. A drive with a high read speed can significantly improve your user experience. Finally, be mindful of the price of the drive.
While SSDs can be more expensive than traditional hard drives, they provide faster read and write speeds and are more durable. It’s important to balance your needs with your budget to ensure you’re making the best decision for your computer. Overall, there are many great SSDs to choose from that are research-compatible and can improve the speed and performance of your computer.
Consider Brand Reputation
When it comes to choosing a new SSD, brand reputation is an important factor to consider. You want to invest in a brand with a proven track record of providing quality products and reliable customer support. It’s also worth checking out reviews from other users and industry experts to get a sense of the brand’s reputation.
Some brands may also offer unique features or technologies that set them apart from the competition. Overall, taking the time to research and consider different brands will help ensure that you make an informed decision and get the best possible performance from your new SSD.
Install Your New SSD
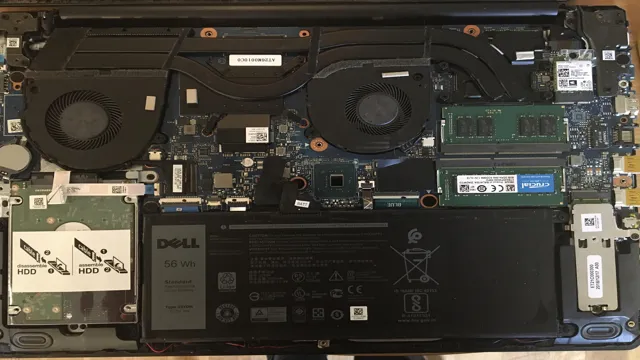
If you’re looking to upgrade your Dell XPS 13’s SSD to a 1TB version, it’s relatively easy to do so. The first step is to find a compatible SSD – you’ll want to make sure it’s an M.2 NVMe drive with a 2280 form factor, since this is the type that the Dell XPS 13 uses.
Once you have your new SSD, you’ll need to clone your current drive onto it. This can be done using a cloning software like Acronis True Image, which will copy over your data onto the new drive. Finally, all you need to do is swap out your old SSD for the new one.
This involves opening up your laptop and removing the current SSD, then inserting the new one in its place. Once the new SSD is installed, you should be good to go – your laptop will have more storage and should run faster than ever before.
Shut Down Laptop and Unplug from Power Source
When it comes to upgrading your laptop, installing a new SSD can significantly improve your system’s performance. However, before you begin the installation process, it is important to shut down your laptop and unplug it from the power source. This precautionary measure will prevent any electrical surge or shock that might damage your laptop or the SSD.
Once you have properly shut down and unplugged your laptop, you can proceed with the installation process. Installing an SSD is a simple process that involves removing the old hard drive, inserting the new SSD into the appropriate slot, and securing it in place with screws. Remember to reconnect any cables that you have removed for the installation process and start up your computer to ensure that the SSD is recognized.
With your new SSD installed, you can enjoy faster boot-up times, quicker application launches, and smoother overall performance.
Remove Case and Locate SSD Slot
Installing a new SSD may seem daunting, but it’s easier than you think. After removing the case, you will need to locate the SSD slot. The SSD slot is usually located near the RAM and CPU, but it may vary depending on your laptop model.
Once you have found the slot, carefully insert the new SSD into the slot, making sure it is fully seated and securely latched. Reattach the case, and you’re done! By upgrading your SSD, you can significantly improve your laptop’s performance, allowing you to run programs and handle files quickly and efficiently. Don’t settle for sluggish performance – install a new SSD today and take your laptop to the next level!
Remove Old SSD and Insert New One
If you’ve decided to upgrade your computer’s solid-state drive (SSD), the first step is to remove the old SSD and insert the new one. This process may seem daunting, but it’s relatively simple with the right tools and some basic know-how. Before you begin, ensure that you have a backup of all your important files and data.
Once you’ve done that, turn off your computer and disconnect all cables and peripherals. Then, locate the old SSD and remove it carefully from its slot. Make sure to handle it gently to avoid damaging it.
Next, take your new SSD and insert it into the slot in the same way as the old one. Finally, reattach all cables and peripherals, turn your computer on, and prepare to enjoy faster performance and improved storage capacity. Remember to dispose of the old SSD responsibly, either by recycling it or donating it to a computer refurbishment program.
Upgrading your SSD is a great way to extend the life of your computer and keep it running smoothly.
Replace Case and Power Up Laptop
If you’re looking to boost your laptop’s speed, replacing the current hard drive with a solid-state drive (SSD) is the way to go. First, power down your laptop and remove the battery. Then, locate the hard drive enclosure and detach it from the laptop’s case.
Once you have removed the old hard drive, you can install the new SSD in its place. Secure the SSD in the enclosure and reattach it to the laptop’s case. Before attaching the battery and powering on the laptop, make sure that all the screws and cables are securely reconnected.
The now installed SSD will provide faster read and write speeds than the previous hard drive, resulting in a quicker boot time and improved overall performance. With the simple upgrade of replacing your hard drive with an SSD, your laptop will feel like a brand new machine all ready to serve you.
Migrate Your Data
Upgrading your XPS 13 SSD to 1TB can provide you with more storage space and faster performance, but it requires migrating your data from the old SSD to the new one. There are several ways to do this, but one popular option is to use cloning software. This software creates an exact copy of your old SSD and transfers it to the new one, so you don’t lose any data or settings in the process.
Some newer laptops, like the XPS 13, allow for user-upgradeable SSDs, which makes the process even easier. However, It’s important to note that upgrading your SSD can void the warranty, so proceed with caution and ensure you know what you are doing. Ultimately, upgrading your XPS 13 SSD can extend the lifespan of your laptop and provide you with a better user experience.
Use a Cloning Software to Copy Files from Old SSD to New SSD
If you’re upgrading to a new SSD, it’s important to migrate your data to ensure a smooth transition without losing any important files or settings. One of the best methods to do this is by using a cloning software, which allows you to copy all of your old SSD’s content to the new one with ease. This way, you won’t have to worry about manually moving files or reinstalling programs, saving you time and hassle.
There are several cloning software programs available to choose from, such as Clonezilla, Macrium Reflect, and EaseUS Todo Backup. These programs make the process straightforward and user-friendly, even for less tech-savvy individuals. By using a cloning software, you can ensure that your new SSD will have all the same data and settings as your old one, without any glitches or lost information.
Overall, if you’re upgrading your SSD, using a cloning software is the way to go.
Verify That All Files Are Transferred Correctly
When migrating your data, one of the most important things you need to do is to verify that all files have been transferred correctly. This ensures that your data remains intact and can be accessed without any corruption or loss. One way to do this is to perform a file comparison between the source and destination folders.
This process involves checking the file size, date modified, and checksum values of each file to ensure that they match. Another reliable method is to use backup software that creates a verification log that confirms the successful transfer of all files. These logs are essential in identifying any failed transfers or data corruption and help to ensure that the migration process is complete and precise.
It’s also recommended to perform periodic backups and data verification to safeguard your data from any potential loss or corruption that can occur during migration. By taking these steps, you can be assured that your data is safe and accessible at all times, even after a migration process.
Enjoy Your Upgraded XPS13 SSD
Upgrading your XPS13 SSD to 1TB is a great idea for those who need more storage space. Firstly, you need to make sure the new SSD is compatible with your XPS13 model. Once you’ve confirmed this, the next step is to back up all your data to an external drive before you start.
After this, you can begin the installation process, which usually involves opening up your laptop and replacing the old SSD with the new one. It’s important to handle the SSD with care, making sure not to touch the components or expose it to static electricity. Once you’ve installed the new SSD, you can restore your data and enjoy faster speeds and more storage space.
Overall, upgrading your XPS13 SSD to 1TB is definitely worth considering for anyone looking to improve the performance and storage capacity of their laptop.
Conclusion
In a world where storage needs are constantly expanding and evolving, upgrading your XPS13 SSD to 1TB has never been easier! With a bit of technical know-how, DIY skills, and the right tools, you can boost your laptop’s storage capacity in no time. Whether you’re a digital nomad or a content creator, this upgrade will keep up with your demanding lifestyle and give you the freedom to store more files, apps, and memories. So don’t settle for limited storage – take your laptop to the next level and unlock its full potential with a 1TB SSD upgrade!”
FAQs
Is it possible to upgrade the SSD in my Dell XPS 13 to 1TB?
Yes, it is possible to upgrade the SSD in the Dell XPS 13 to 1TB by replacing the current SSD with a new 1TB SSD.
What type of SSD should I purchase to upgrade my Dell XPS 13 to 1TB?
You should purchase an M.2 NVMe SSD with a storage capacity of 1TB to upgrade your Dell XPS 13’s storage.
Can I perform the SSD upgrade on my own, or should I get professional help?
It is possible to perform the SSD upgrade on your own, but if you are not comfortable with performing such tasks, it is recommended to seek professional help to avoid any damage to your laptop.
Will upgrading my Dell XPS 13’s SSD void my warranty?
If you perform the upgrade yourself, it is possible that it may void your warranty. It is recommended to contact Dell support for further information on warranty policies related to SSD upgrades.