Ready to give your laptop a performance boost and storage upgrade? Replacing your laptop’s SSD may sound intimidating at first, but it’s actually a fairly simple process that can be done in just a few steps. In this step-by-step guide, we’ll walk you through everything you need to know to replace your laptop’s SSD with ease. Whether you’re looking to increase your storage capacity, improve your laptop’s speed or simply replace a damaged SSD, this guide has got you covered.
So, grab your tools and let’s get started!
Determine Compatibility
If you’re looking to replace your laptop’s SSD with a new one, there are a few things you should consider to ensure compatibility. First, you’ll need to identify the type of SSD your laptop currently uses. This can usually be found in the manufacturer’s specifications or by checking the model number on the current SSD.
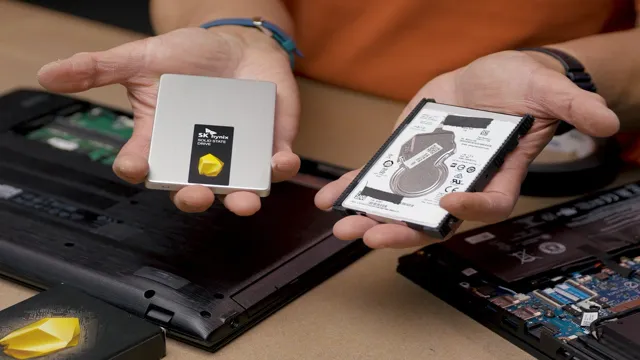
Once you know the type of SSD, you’ll need to make sure that your new SSD matches the same form factor and interface. Most laptops use either a 5-inch SATA SSD or an M.
2 NVMe SSD, but there are other variations as well. Additionally, you’ll want to check the capacity and speed of the new SSD to make sure it meets your needs. Be sure to research your laptop’s limitations and capabilities before making a purchase.
With a bit of research and careful planning, swapping out your old SSD for a new one can be a relatively straightforward process.
Check for compatible SSD size and interface
When it comes to upgrading to an SSD, it’s important to check for compatibility with your computer’s size and interface. Not all SSDs are created equal, and some may not fit or work with your specific system. Before you make a purchase, do your research and check for the size and type of interface your computer uses.
Common sizes for SSDs are 5 inches and 5 inches, while common interface types include SATA, PCIe, and M.
Some computers may have a limited number of available bays or may require specific types of SSDs, so be sure to check your computer’s manual or consult with a professional before making a purchase. By determining compatibility beforehand, you can ensure a smooth and successful upgrade process.
Back Up Data
If you’re looking to replace your laptop’s SSD with a new one, it’s important to back up all of your important data beforehand. This ensures that you don’t lose any files or documents in the transfer process. There are a few different ways to back up your data, including using an external hard drive, cloud storage services like Google Drive or Dropbox, or even a USB flash drive.
Whichever method you choose, be sure to double-check that you’ve backed up everything you need before proceeding with the SSD replacement. Once you’ve successfully replaced the SSD, you can transfer your data back onto your laptop and get back to work as usual. By taking the time to back up your data beforehand, you can ensure a smooth transition to your new SSD without any stress or headaches.
Transfer files to an external hard drive or cloud storage
Backing up your important data is crucial to ensure its safety and accessibility in case of any data loss or damage. One efficient way to back up your data is by transferring it to an external hard drive or cloud storage. An external hard drive allows you to store your data outside of your computer’s internal storage, providing an easy way to keep your files safe and secure.
Alternatively, you can store your files in a cloud storage service like Dropbox or Google Drive, which allows you to access your data from anywhere with an internet connection. By doing so, you can ensure that your important documents, photos, and other files are safely backed up and easily accessible whenever needed. Remember, backup is like an insurance policy that you hope to never use, but the peace of mind it provides is priceless.
Prepare for Installation
If your laptop is running slow, upgrading to a new SSD can be a fantastic way to give it a new lease on life. Before you dive into the installation process, however, it’s important to take a few steps to ensure you’re well-prepared. First and foremost, make sure you have the right tools on hand.
Typically, you’ll need a screwdriver, and depending on the model of your laptop, you may need a specialized tool to remove the battery or other components that are in the way. Check your laptop’s documentation to find out what you’ll need. Secondly, back up all your data to an external hard drive or cloud storage solution.
Once your new SSD is installed, you’ll need to reinstall your operating system and any applications you use, so it’s crucial to have a backup of all your data to make the process as seamless as possible. Lastly, take your time and follow the manufacturer’s instructions closely to ensure a successful and stress-free installation. With these steps in mind, you’ll be well on your way to faster, more reliable performance from your laptop, thanks to your shiny new SSD.
Gather necessary tools and software
Before starting the installation process, it is important to gather all the necessary tools and software required. This will save time and ensure a smooth installation process. The first step is to check the specifications of the software and hardware required for installation.
Ensure that your computer meets the minimum requirements to avoid installation issues. Next, download the installation package from the manufacturer’s website and store it in an easily accessible location. It is also important to have an anti-virus software installed and updated to ensure no malware is downloaded during the process.
Finally, utilize tools like a flash drive or external hard drive to create a backup of your important data before installation. By taking these necessary steps, you will be better prepared for the installation process and can avoid unwanted disruptions.
Access and Remove Current SSD
Looking to upgrade your laptop’s SSD to something faster with more space? The good news is that it’s generally pretty easy to access and replace the existing SSD in most laptops. First, you’ll want to make sure you have the right replacement SSD that’s compatible with your laptop – typically a 5-inch SATA drive or an M.
2 NVMe drive. Once you’ve got that, you’ll need to open up your laptop and locate the existing SSD – this may involve removing the bottom panel of your laptop or other components, so be sure to consult your laptop’s manual or online tutorials for guidance. Once you’ve located the SSD, you can usually remove it by unscrewing a few screws or gently pulling it out of its slot.
Reverse these steps to install your new SSD and you’ll be up and running in no time! With your new SSD, you should notice faster boot times, quicker app launches, and more space to store your files and programs. So why not upgrade your laptop’s performance today?
Follow instructions in laptop manual
If you want to upgrade the SSD on your laptop, the first step is to carefully read the instructions in the laptop manual. This will give you all the details you need on how to access and remove the current SSD. It’s important to handle the SSD with care, as it contains sensitive data that you don’t want to lose.
Once you have read the instructions and feel confident in your ability to perform the upgrade, you can begin the process. Typically, this involves removing the bottom panel of the laptop, locating the current SSD, and unplugging it from the motherboard. Be sure to keep track of any screws or other components you remove, so you can easily reassemble the laptop later on.
With the current SSD removed, you can then install the new SSD and reverse the steps you took to remove the old one. Just remember to take your time and follow all the instructions closely for a successful upgrade.
Install New SSD
Are you looking to improve the storage capacity and speed of your laptop? One way to do this is to replace your current SSD with a new SSD. The first step is to determine the type of SSD your laptop uses, such as SATA or NVMe. Then, you’ll need to purchase a new SSD that is compatible with your laptop and has the storage capacity you need.
Once you have the new SSD, you’ll need to transfer your data from the old SSD to the new one. One option is to use cloning software, which copies everything from the old SSD to the new one. After the data transfer is complete, you can open up your laptop and physically replace the old SSD with the new one.
This may require some technical knowledge, so it’s important to read up on your specific laptop model before attempting to replace the SSD. With the new SSD in place, your laptop should now run faster and have more storage space for all your important files and programs.
Insert new SSD and secure in place
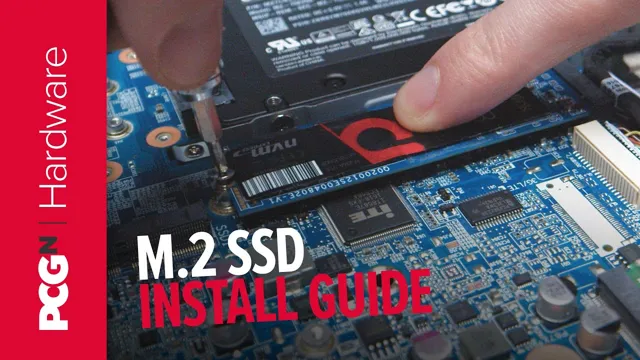
If you’re looking to install a new SSD into your computer, it’s important to do it properly to ensure it works efficiently. Start by opening up your computer and locating the appropriate slot for your new SSD. Gently slide it into place, making sure it’s securely fastened.
Depending on your computer model, it may require screws or a different method of attachment to secure the SSD in place. This step is crucial, as an SSD that isn’t properly secured can lead to damage or data loss. Once you’ve successfully installed the SSD, it’s important to double-check that everything is firmly in place before closing up your computer and turning it on.
With a newly installed SSD, you’ll be able to enjoy faster speeds and increased storage capacity, making it well worth the effort.
Reassemble Laptop
Replacing the SSD in a laptop can be a great way to revive an aging device. However, the thought of having to disassemble and reassemble your laptop can be daunting. But don’t worry, it’s not as difficult as it may seem.
The first step is to gather the necessary tools and locate your old SSD. Next, remove the screws holding the bottom of your laptop in place, and carefully detach the cover. Inside, you should see the old SSD attached to the motherboard.
Gently remove it and replace it with the new SSD, making sure it is securely attached. Finally, re-attach the bottom cover and screws. You’ll want to make sure everything is tightly secured before powering on your device.
Overall, with a little bit of patience and attention to detail, replacing your laptop’s SSD can be a straightforward process that can significantly improve your device’s performance.
Return screws and put back casing
After cleaning your laptop thoroughly, it’s time to reassemble it. First, make sure that you have all the screws you removed during the disassembly process. Then, start by placing the bottom casing back onto the laptop body, ensuring that it snaps back into place.
Make sure that all the corners are aligned and that the casing is flush against the laptop body. Once that’s done, start replacing the screws in their respective holes. Remember, it’s important to put them back in the correct order and position to ensure that they fit properly.
Tighten the screws carefully, making sure not to overdo it. You don’t want to strip the threads or damage the casing. Finally, replace any rubber feet that you might have removed earlier.
With that, your laptop is now fully assembled and ready to use again! In conclusion, reassembling your laptop is a crucial step in laptop cleaning and maintenance. Not only does it keep your laptop functioning properly, but it also helps to prolong its lifespan. Always make sure to keep track of the screws and parts you remove during disassembly and reassemble them in the correct order.
Taking a little extra time to ensure that everything is fitted correctly will save you time and headaches in the long run. So, when it comes to laptop cleaning, taking the time to reassemble correctly is definitely worth it!
Restore Data
Replacing the solid-state drive (SSD) in your laptop with a new one can be a daunting task. However, with some expert guidance, you should be able to do this without much hassle. Once you have installed the new SSD, the next step is to restore your data.
One of the easiest ways to do this is by cloning your old SSD onto the new drive. You can do this by using a disk cloning software that will create a bit-for-bit copy of your old SSD and transfer it to the new one. Alternatively, you can transfer your data manually by backing up your files to an external hard drive and then copying them onto the new SSD.
Whichever method you choose, it is essential to back up your data before you start the process. This will ensure that you don’t lose any important files or data during the transfer. With these steps, you can successfully replace your laptop SSD with a new one and restore your data effortlessly.
Transfer files back from external hard drive or cloud storage
If you need to transfer files back from an external hard drive or cloud storage, the process is fairly simple. First, connect your external hard drive to your computer using a USB cable. Then, open the folder containing the files you want to transfer and select the ones you want to restore.
You can then drag and drop these files onto your desktop or into a different folder on your computer. If you’re restoring files from a cloud storage service, such as Google Drive or Dropbox, simply sign in to your account and select the files you want to restore. Again, you can either drag and drop the files onto your desktop or into a different folder.
Remember to be patient, as large files may take a few minutes to transfer. Once the transfer is complete, you can safely disconnect your external hard drive or log out of your cloud storage account. Restoring your data from an external hard drive or cloud storage is an important step in ensuring your files are secure and always accessible when you need them.
Test New SSD
If you’re looking to replace the SSD in your laptop, you’ll be pleased to know that it’s not as complicated as you might think. Firstly, ensure that the new SSD you’ve chosen is compatible with your laptop. Then, back up any important data from your old SSD before removing it.
Once you’ve done this, it’s time to physically replace the SSD. This will require you to open your laptop and locate the existing SSD. Carefully remove it and replace it with the new SSD.
It’s important to securely fasten the new SSD in place to avoid any future problems. Once everything is in place, it’s time to install the operating system on your new SSD. This can be done using a USB drive with the operating system installer on it.
From there, you can re-install your applications and restore your backed-up data. Congratulations, you’ve successfully installed a new SSD in your laptop!
Ensure proper installation and functioning
When upgrading to a new SSD, it is important to ensure proper installation and functioning. One key step in this process is testing the new SSD to make sure it is working correctly. This can be done by using a benchmark tool that measures the speed and performance of the drive.
By running a benchmark, you can determine if the drive is performing at its optimal level and troubleshoot any issues before they become bigger problems. Additionally, it is important to check that the drive is recognized by your computer’s BIOS and operating system. This can be done by checking the device manager and disk management.
If any issues arise during testing, it is important to address them before using the SSD to store important data. By taking these steps, you can ensure that your new SSD is installed and functioning correctly, providing you with reliable and speedy storage for years to come.
Conclusion
Replacing your laptop SSD with a new one is like upgrading your car’s engine – it’s all about boosting performance and enhancing the overall driving experience! Just like a mechanic would swap out an old engine for a new one, it’s possible (and surprisingly easy) to switch out your old SSD with a new one. All you need are the right tools, a bit of tech savvy, and a willingness to dive into the insides of your laptop. With a new SSD in place, you’ll be zipping through programs and files faster than ever before, and wondering why you waited so long to make the switch.
“
FAQs
What is an SSD?
SSD stands for Solid State Drive. It is a type of storage device that uses flash memory to store data. It is faster and more reliable than a traditional hard drive.
Why should I replace my laptop’s HDD with an SSD?
Replacing your laptop’s HDD with an SSD can significantly improve its performance. SSDs are faster, more reliable and consume less power than traditional hard drives. This can result in faster boot times, improved application loading times, and smoother overall system performance.
Can I replace my laptop’s HDD with any SSD?
No, you cannot replace your laptop’s HDD with any SSD. You need to make sure that the new SSD is compatible with your laptop’s interface and size. Most laptop SSDs are 2.5 inches, but some may require M.2 or PCIe SSDs.
How do I replace my laptop’s HDD with an SSD?
The process may vary depending on your laptop make and model, but typically involves backing up your data, cloning your existing HDD to the new SSD, swapping out the drives, and then installing the cloned data onto the new SSD. It is recommended to seek professional assistance if you are not familiar with the process.