Are you planning to upgrade your computer’s hard drive to a solid-state drive (SSD)? If so, you’re making a great choice that will vastly improve your computer’s speed and performance. But, before you take the plunge, you should consider creating a disk image to copy all your data from the old hard drive to the new SSD. Creating a disk image is like taking a snapshot of your hard drive and saving it as a file.
This file can then be used to transfer your entire operating system, programs, and data to the new SSD, without risking the loss of any files or data. Essentially, it’s like creating an exact duplicate of your hard drive with all your data, profiles, settings, and programs intact. But why create a disk image instead of just copying and pasting your files? Well, copying and pasting looks straightforward, but it is risky and can cause problems.
You may miss a critical file or folder and end up with a non-functional operating system on your new SSD. Fortunately, creating a disk image eliminates this possibility and the inevitable headache that comes with it. Additionally, creating a disk image is incredibly easy and can be done in just a few simple steps, with the right software.
Don’t worry; you won’t need any advanced technical skills to do this. Just make sure you have your new SSD ready to use, and you’re good to go. Overall, creating a disk image to copy your SSD’s data is the best way to upgrade to a new SSD without losing your data or files.
It’s a quick, simple and safe approach that guarantees you have a full backup of your old hard drive. So, before you proceed with your hard drive replacement, make sure to create a disk image, and you’ll be good to go.
Choose a Disk Imaging Software
When it comes to copying an SSD, a disk imaging software is essential. There are many options out there, but choosing the right one can save you time and potential headaches. One popular choice is Acronis True Image, which offers a user-friendly interface and the ability to create full disk images or specific partitions.
Another option is Clonezilla, a free and open-source software that allows for customization options when creating disk images. No matter which software you choose, be sure to back up your data beforehand and follow the instructions carefully to ensure a successful copy. With the right disk imaging software, making an image to copy an SSD has never been easier.
Research popular disk imaging software options
When it comes to choosing a disk imaging software, there are a lot of options available in the market. Some of the most popular disk imaging software includes Acronis True Image, Clonezilla, and Macrium Reflect. Acronis True Image is a feature-rich software that offers comprehensive backup solutions for personal and business users.
It includes advanced features like ransomware protection, disk cloning, and direct-to-cloud backup. On the other hand, Clonezilla is a free and open-source software that offers disk imaging and cloning capabilities. It supports a wide range of file systems and runs on various operating systems.
Lastly, Macrium Reflect is another popular disk imaging software that offers fast and reliable backups. It includes features like disk imaging, backup scheduling, and partition management. Ultimately, the choice of disk imaging software depends on your specific needs and requirements.
It’s important to weigh the features, price, and usability of each option to make an informed decision.
Choose a software with features that fit your needs
If you’re in the market for disk imaging software, it’s important to choose a program that meets your specific needs. Not all disk imaging software is created equal, and different programs offer different features. One key factor to consider is the ease of use.
You want a program that is easy to navigate and doesn’t require a lot of technical expertise. Another factor to consider is the speed of the imaging process. Some programs can take hours or even days to complete an imaging job, while others can do it in just a few minutes.
The keyword for this topic is “disk imaging software,” and by choosing a program that’s tailored to your needs, you can ensure that you’re getting the most out of your investment.
Select the Source SSD
When it comes to creating an image to copy your SSD, the first step is to select the source SSD. This is the SSD that has the data you want to copy. It’s important to choose the right SSD, as it will determine the speed and efficiency of the copying process.
You’ll want to select an SSD that has enough space to hold all of the data you want to copy, and that is in good working condition. Ideally, the SSD should also have a fast read speed, as this will help speed up the copying process. Once you’ve selected the source SSD, you’ll be ready to proceed with creating your image.
Remember, taking the time to choose the right SSD at the beginning will save you time and frustration later on. So, take your time and choose wisely!
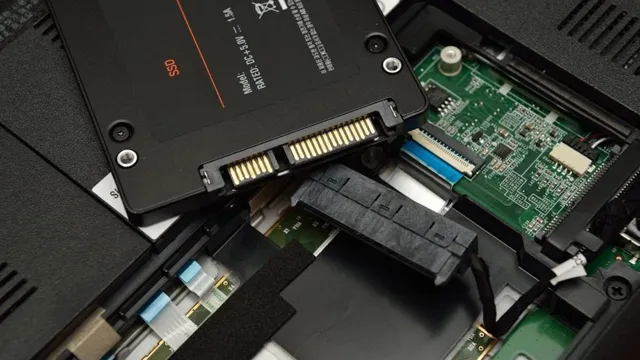
Insert the SSD into a compatible computer slot
After acquiring an SSD, it’s time to get it up and running in a compatible computer slot. The process is simple, and within a few minutes, your computer will be running faster than ever before. The first step is selecting the source SSD.
This involves identifying the device that currently contains the operating system and data you wish to transfer over to the new SSD. Most computers have a primary drive which houses the operating system, and this is where your focus should be. Once you know which drive to copy from, you can begin the cloning process to transfer your data and operating system to the new SSD.
It’s essential to ensure that the new SSD is compatible with the system’s interface and data transfer speed. If all goes according to plan, your computer will boot up faster and run more efficiently. Upgrade your computer today by installing an SSD.
Ensure the SSD is working properly
When attempting to ensure that your SSD is working properly, the first step is to select the source SSD that you want to check. This will typically be your primary hard drive, but it can be any SSD that you want to check. Once you have selected the source SSD, the next step is to run a few tests to make sure that everything is in good working order.
One great tool for doing this is a program called CrystalDiskMark, which can provide you with detailed information about the read and write speeds of your SSD. Another option is to use a program like HD Tune, which can check for any errors or bad sectors on your SSD. Regardless of which tool you choose, it is important to run these tests on a regular basis to ensure that your SSD is functioning properly and to catch any potential issues before they become serious problems.
By taking the time to check and maintain your SSD, you can ensure that your computer runs smoothly and efficiently for years to come.
Connect a Target Hard Drive
If you’re looking to copy an SSD or create a backup image, the first step is to connect your target hard drive. This is the drive you want to copy your SSD to or create a backup image on. You can use an external hard drive enclosure or a USB to SATA adaptor cable to connect your target hard drive.
Once you have connected your target drive, you can use software such as Acronis True Image or Clonezilla to create a backup image or copy your SSD. Make sure you follow the instructions carefully as these programs will guide you through the process step-by-step. The process may take some time depending on the size of your SSD or the amount of data you are copying.
It’s a good idea to have patience and allow your computer to complete the process without interruption. By following these steps, you can make an image or copy your SSD to a target hard drive with ease.
Use an external hard drive or secondary internal drive
External hard drive, secondary internal drive, target hard drive Are you struggling with limited storage space on your computer? Don’t worry, there’s a simple solution: an external hard drive or secondary internal drive. By connecting a target hard drive, you can easily store your documents, photos, videos, and music without compromising your computer’s performance. An external hard drive is a portable device that plugs into your computer’s USB port, making it easy to drag and drop files onto it.
On the other hand, a secondary internal drive is installed directly into your computer, offering larger storage capacity and faster speeds. Whatever option you choose, make sure to keep your files organized by creating folders and moving them to the new drive. This way, you can access your files quickly and efficiently.
Say goodbye to low storage warnings and hello to extra space with an external hard drive or secondary internal drive.
Confirm enough space is available on the target drive
When connecting a target hard drive to ensure enough space is available on the target drive. Now before you start copying files across it’s worth checking if the drive has enough space to take all the data you want to transfer. If the drive doesn’t have enough space it can cause issues, including corrupt data, failed transfers, and even damage to the hard drive.
To avoid this problem, double-check how much space you’ll need, and ensure the target drive has enough room to accommodate it. It’s worth backing up any important files on the target drive to avoid losing anything important in the process. By following these simple steps, you’ll have a smoother, safer data transfer experience that saves you time and stress in the long run.
Begin the Imaging Process
When it comes to copying your SSD, the first step is to create an image of the drive. This can be done using various software tools available online. One popular option is to use a program called Acronis True Image, which allows you to create a full disk image and save it to an external hard drive or other storage device.
Once you have the software installed, you can select the SSD you want to copy and create an image of the entire drive. This will include all of your data, applications, and operating system files. With an image in hand, you can then transfer it to your new SSD or create a bootable USB drive to use for installation.
Making an image to copy your SSD is a simple process that can save you a lot of time and hassle when upgrading your system.
Follow the instructions of your chosen disk imaging software
Now that you have chosen the disk imaging software to use, it’s time to begin the imaging process. Follow the instructions provided by the software, including selecting the source drive and destination drive. Make sure that the destination drive has enough space to store the image file.
You will also need to choose the image format and compression level, if applicable. During the imaging process, avoid using other programs or making changes to the source drive to ensure that the image is created accurately. Disk imaging can be a time-consuming process, so be patient and allow the software to complete the task.
Once the process is complete, you can verify the image file to ensure that it has been created correctly. Overall, disk imaging can be an essential tool for backing up important data or migrating to a new computer. By following the instructions of your chosen software, you can create a reliable image file with ease.
Select the source and target drives
When beginning the imaging process, it’s important to select the source and target drives. The source drive is the original drive that you want to copy, while the target drive is the drive where you want to create the copy. Selecting the correct drives is critical to ensure that you copy the right data and avoid any potential data loss.
It’s always best to select a destination drive that is larger than the source drive to avoid any issues with running out of disk space during the copy process. You can choose from various imaging software options available in the market that will guide you through the process, making it more straightforward for you. Make sure you have enough time set aside for the imaging process, as it can take a while – the exact time depends on the size of the source drive and the speed of your computer.
Be patient and let the software do its job; a successful imaging process will ensure that your data remains secure and intact.
Choose the options for the disk image
When it comes to creating a disk image, there are a variety of options available to choose from. One of the first choices you’ll need to make is what type of image you want to create. There are several types of disk images to choose from, including read-only, read-write, and compressed images.
Depending on your needs, you may want to select one of these options over the others. Another option you’ll need to decide on is the file format of the image. Common formats include ISO, DMG, and IMG.
Make sure to select the appropriate format for your specific needs. Once you’ve made these decisions and selected your desired options, you’re ready to begin the imaging process. The imaging process involves making an exact copy of a disk or partition.
This process can take some time, so be prepared to wait patiently. Once the imaging process is complete, you’ll have an exact replica of the original disk or partition. This can be extremely helpful if you need to transfer data between computers, or if you need to create a backup of important data.
In conclusion, there are several options to consider when creating a disk image, including the type of image and the file format. Once you’ve made your decisions and have begun the imaging process, be sure to be patient and allow enough time for the process to complete. With these considerations in mind, you’ll be well on your way to creating an accurate and useful disk image.
Additional Tips for Success
When it comes to making a perfect image to copy SSD, there are a few additional tips that you can follow to ensure success. Firstly, ensure to create a backup of all your important files before creating the image. This way, in case anything goes wrong, you can always start again without losing your valuable files.
Additionally, it’s essential to ensure that the destination drive has enough storage capacity to hold the image. It’s best to use an external hard drive for this purpose. Moreover, before copying the image to the SSD, ensure to disconnect all external drives to avoid any confusion.
Once copied, it’s advisable to test the SSD to ensure that everything is working correctly. To do this, restart your computer from the SSD just to confirm it’s booting successfully. With these additional tips, you can easily create an image to copy SSD and ensure that your data remains safe and secure.
Create a backup of the disk image for added safety
Creating a backup of the disk image is an important step to ensure added safety for your files. While creating an image of your disk can help you restore your system, creating a backup will give you an added layer of protection. Backing up your disk image can be done through various methods like cloud services or an external hard drive.
Having an additional backup of your disk image can give you peace of mind, especially in case of any unforeseen circumstances like a disk failure or a malware attack. It is always better to be safe than sorry, so make sure you back up your disk image regularly. In this way, you can rest assured that your files will always be secure and accessible whenever you need them.
Remember, prevention is better than cure!
Check that the disk image was created properly
When creating a disk image, it’s crucial to ensure that it was created properly. This step is important because a flawed disk image will lead to errors and issues down the line. One way to check if the disk image was created correctly is to mount it and see if all the files and folders are present.
Another method is to verify the checksum of the disk image against the original. This process confirms that the disk image is an exact copy of the original source. When creating a disk image, it’s best to take your time and carefully follow all the steps to avoid any errors.
With these tips, you can create a perfectly functioning disk image that will make your computing life easier.
Use caution when overwriting or restoring the SSD with the disk image
When it comes to overwriting or restoring an SSD with a disk image, caution is key. One wrong move can result in the loss of all your data, essentially rendering your SSD useless. Here are some additional tips for success: First, make sure to backup all your important data before attempting to overwrite or restore the SSD with the disk image.
This way, if anything goes wrong, you can still retrieve your important files. Second, double-check the disk image you are using is the correct one for your SSD and that it’s not corrupted. Third, be patient and careful during the overwriting or restoring process.
Rushing or making careless mistakes can lead to irreversible consequences. Lastly, don’t hesitate to seek professional help if you’re not confident in your ability to perform the task. In conclusion, following these additional tips can help ensure a successful and stress-free SSD overwrite or restore process.
Conclusion
In conclusion, creating an image of your SSD is the digital equivalent of taking a photocopy of your favorite book. Just like a photocopy, an image provides a perfect replica of your SSD, allowing you to easily transfer all your important files and settings to a new device. So go ahead and get your digital photocopier ready, because with the right software and a bit of know-how, making an SSD image has never been easier!”
FAQs
What is the process to create an image of my SSD?
You can use third-party software like Macrium Reflect or EaseUS Todo Backup to create an image of your SSD.
Can I clone my SSD instead of creating an image?
Yes, you can use cloning software like Acronis True Image or Clonezilla to clone your SSD to another drive.
How do I restore an image of my SSD?
You can use the same software you used to create the image to restore it to a new drive or the same drive.
What are the benefits of creating an image of my SSD?
Creating an image of your SSD allows you to have a backup of your entire system, including settings and installed programs, which can be very helpful in case of a system failure or a malware attack.