Are you ready to take your smart home to the next level? Imagine a seamless home automation setup that integrates your devices, all running efficiently on a robust NAS platform. Installing Home Assistant on QNAP Virtualization Station might just be the game-changer you need. This guide will walk you through the process and highlight its potential for enhancing your smart home experience.
Introduction to Home Assistant and Its Role in Smart Home Automation
Home Assistant is an open-source platform designed for smart home automation. It allows users to control and automate various smart devices, creating a unified and efficient living space. Whether it’s managing lights, thermostats, or security cameras, Home Assistant brings everything together into a single interface.
Why is Home Assistant so popular among tech enthusiasts and smart home owners? The answer lies in its flexibility and extensive compatibility. With over 1,700 integrations available, Home Assistant can connect with almost any smart device. From Philips Hue to Nest thermostats, the possibilities are endless.
Overview of QNAP Virtualization Station
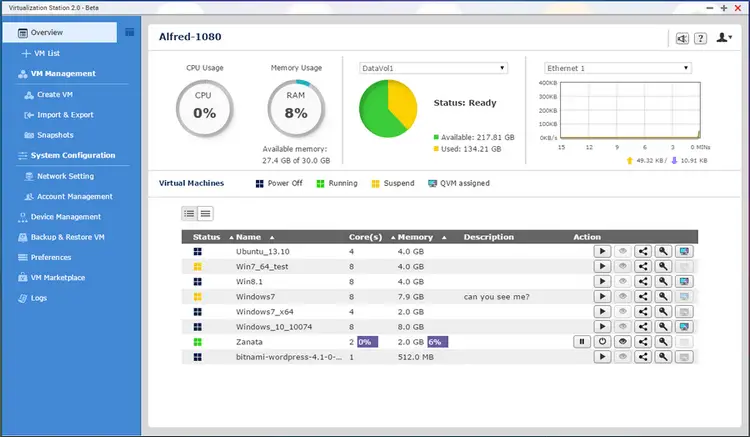
QNAP Virtualization Station is a powerful tool that allows you to run multiple virtual machines (VMs) on a single QNAP NAS. This capability transforms your NAS into a versatile server capable of handling various applications and workloads. By using Virtualization Station, you can consolidate your computing needs into one device, saving space and improving efficiency.
One of the standout features of QNAP Virtualization Station is its ease of use. With a user-friendly interface and comprehensive documentation, even those new to virtualization can get started quickly. The platform supports a wide range of operating systems, including Windows, Linux, and more, making it a versatile choice for any tech enthusiast.
Step-by-Step Guide on How to Install Home Assistant on QNAP Virtualization Station
Preparing Your QNAP NAS
Before you begin, ensure your QNAP NAS meets the necessary requirements. You’ll need a compatible model with sufficient RAM and storage to support the virtual machine.
- Update Firmware: Make sure your QNAP NAS firmware is up to date. Navigate to the Control Panel, select Firmware Update, and follow the prompts.
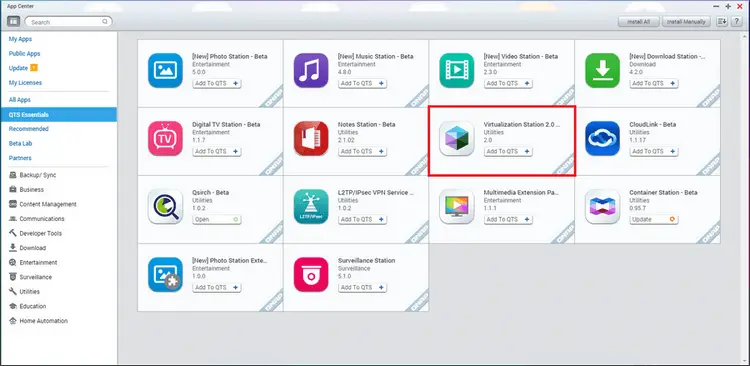
- Install Virtualization Station: Open the App Center on your QNAP NAS, search for Virtualization Station, and click Install.
Setting Up the Virtual Machine
Now that your NAS is prepared, it’s time to set up the virtual machine for Home Assistant.
- Create a New VM:
- Launch Virtualization Station.
- Click on Create VM and select the appropriate operating system for Home Assistant, typically a Linux distribution.
- Allocate resources like CPU, memory, and storage based on your NAS capabilities.
- Download Home Assistant Image:
- Visit the Home Assistant website and download the appropriate image file.
- Upload this image to your QNAP NAS using the File Station.
- Install Home Assistant:
- Mount the Home Assistant image on your virtual machine.
- Follow the installation prompts within the VM to complete the setup.
Configuring Home Assistant
Once installed, you’ll need to configure Home Assistant to communicate with your smart devices.
- Access Home Assistant:
- Open a web browser and enter the IP address of your virtual machine.
- Complete the initial setup wizard and create a user account.
- Add Integrations:
- Navigate to the Integrations page within Home Assistant.
- Add your smart devices by following the on-screen instructions for each integration.
- Customize Your Dashboard:
- Use the Lovelace UI editor to customize your Home Assistant dashboard.
- Create cards and arrange them to display the most important information at a glance.
The Benefits of Integrating Home Assistant with QNAP NAS for Home Automation
Integrating Home Assistant with QNAP NAS offers several advantages. First, it centralizes your smart home management, allowing you to control all your devices from one location. This setup also ensures constant uptime, as QNAP NAS devices are known for their reliability.
Another benefit is the enhanced performance. By leveraging the processing power of your QNAP NAS, Home Assistant runs smoothly and efficiently. This means faster response times and a more seamless experience when interacting with your smart home devices.
Real-World Use Cases and Examples
Scenario 1: Enhanced Security
Imagine receiving real-time alerts on your phone when someone approaches your front door. With Home Assistant and QNAP NAS, you can integrate your security cameras and smart doorbell to create a comprehensive security system.
Scenario 2: Energy Management
Optimize your home’s energy usage by automating lights, thermostats, and power outlets. Home Assistant can provide insights into your energy consumption, helping you make informed decisions to reduce costs.
Scenario 3: Entertainment Hub
Control your home theater system with ease. Integrate your smart TV, speakers, and streaming devices to create the ultimate entertainment experience. Home Assistant’s media controls allow you to manage everything from one interface.
Tips for Optimizing Home Assistant on QNAP NAS
Resource Allocation
Ensure that your virtual machine has sufficient resources. Allocate enough CPU, memory, and storage to handle Home Assistant’s workload without affecting other applications running on your NAS.
Regular Updates
Keep both Home Assistant and QNAP Virtualization Station updated. Regular updates ensure you have the latest features and security patches, maintaining optimal performance.
Backup and Recovery
Set up regular backups of your Home Assistant configuration. QNAP NAS offers several backup solutions that can help you recover quickly in case of any issues.
Conclusion and Future Trends in Home Automation and NAS Integration
Integrating Home Assistant with QNAP Virtualization Station is a powerful way to enhance your smart home experience. This setup provides reliability, performance, and centralized control, making it a valuable addition to any tech enthusiast’s toolkit.
Looking ahead, the future of home automation and NAS integration is promising. Advances in AI and machine learning will further enhance the capabilities of smart home systems, providing even more personalized and efficient experiences.
For those ready to take the plunge, the combination of QNAP NAS and Home Assistant offers a robust platform for exploring the endless possibilities of smart home automation. Explore the potential of this integration and transform your home into a smarter, more efficient space.
Dive into the world of smart homes with Home Assistant and QNAP Virtualization Station—your automated haven awaits!