Are you new to Patriot SSD and wondering how to configure it correctly? Look no further, as we have compiled a comprehensive guide to help you get started. In this blog post, we will cover everything you need to know about configuring Patriot SSD, including understanding the different storage options available, installing the SSD onto your computer, and using software tools to optimize its performance. Patriot SSDs are an excellent choice for those who want to upgrade their computer’s storage system.
They offer lightning-fast read and write speeds, which can significantly improve your computer’s performance. However, configuring Patriot SSDs can be a bit challenging for beginners, which is why we are here to help. In this guide, we will break down every step of the process, making it easy for you to follow along.
We will also provide you with some tips and tricks to ensure that you get the most out of your Patriot SSD. Whether you are a gamer, a graphic designer, or someone who just wants a faster computer, this guide is for you. So, whether you are upgrading your computer or building a new one, this comprehensive guide will enable you to configure your Patriot SSD correctly.
Keep reading to learn more!
Introduction to Patriot SSD Configuration
Configuring a Patriot SSD can be a daunting task for those who aren’t tech-savvy. But fear not, as it’s not as complicated as it may seem. Before getting started, make sure that your computer recognizes the Patriot SSD.
Once you have properly connected the SSD to your computer, you can start configuring it. The first and most important step is to partition the drive and format it. To do this, you can use the Disk Management tool in Windows or Disk Utility on a Mac.
After that, it’s time to activate TRIM, a feature that keeps the Patriot SSD running fast and optimizes its lifespan. This can be done through the command prompt or a third-party tool. Finally, ensure that you have the latest firmware installed, as it often includes performance optimizations and bug fixes.
By following these steps, you can configure your Patriot SSD quickly and easily.
Understanding Patriot SSD Features
Patriot SSD Configuration When it comes to choosing the right SSD for your needs, understanding the features of Patriot SSDs is crucial. The configuration of Patriot SSDs is designed to provide efficient performance and reliability for various computing applications, ranging from gaming to enterprise-level operations. One of the standout features of Patriot SSDs is their use of advanced NAND technology, which provides faster read/write speeds, lower latency, and improved power efficiency.
Additionally, Patriot SSDs come in different form factors to accommodate different computer configurations, such as 5-inch and M.2 SSDs for laptops and desktops.
Choosing the right Patriot SSD configuration can enhance your computing experience and improve your productivity. With Patriot SSDs, you can expect a higher level of durability, security, and speed, making them a top choice for many users. Whether you’re a gamer, content creator, or IT professional, Patriot SSDs offer a range of features to meet your specific needs.
Tools You’ll Need for Configuring Patriot SSD
If you’re looking to configure your Patriot SSD, there are a few tools you’ll need to ensure a smooth process. First and foremost, you’ll need the Patriot SSD Toolbox, which is a free software download that allows you to monitor and manage your SSD’s performance, health, and firmware updates. Additionally, it’s important to have a SATA cable and possibly an external hard drive enclosure for data transfer and cloning.
Finally, a screwdriver set will come in handy if you need to physically install or remove the SSD from your computer. By having these tools on hand, you can easily configure your Patriot SSD and optimize its performance for your specific needs.
Basic Configuration Steps for Patriot SSD
Configuring a Patriot SSD is a straightforward process that can help enhance your computer’s performance effectively. The first step towards configuring your Patriot SSD is to physically install it into your computer. Once it is installed, you will need to initialize and partition the drive using a formatting tool like Disk Management or Disk Utility.
The next step is to ensure that your SSD firmware is up to date by downloading the latest version from the manufacturer’s website and installing it on your computer. Finally, you can optimize your Patriot SSD’s performance by adjusting your computer’s BIOS settings. These settings may include disabling “Load Legacy Option ROM,” “Fast Boot,” and “Secure Boot” functions.
With these basic configuration steps, your Patriot SSD will be fully optimized and ready to enhance your computer’s performance.
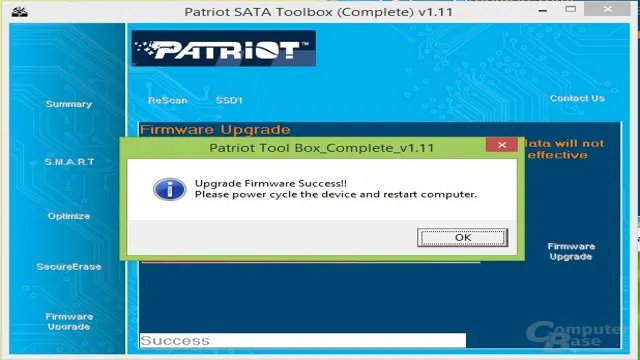
Updating Patriot SSD Firmware
Updating the firmware of your Patriot SSD is crucial to ensure optimal performance and security. Before you begin the process, it’s important to make sure that your system meets the basic configuration requirements. Firstly, ensure that your laptop or desktop is not running on battery power and is instead plugged into a power source.
Secondly, ensure that no other applications or programs are running on your computer as they might interfere with the firmware update process. Finally, make sure that the SSD is connected to your computer through a SATA cable and recognized by the BIOS. Ensuring these basic steps are taken care of will help streamline the firmware update process and prevent any unnecessary errors or complications.
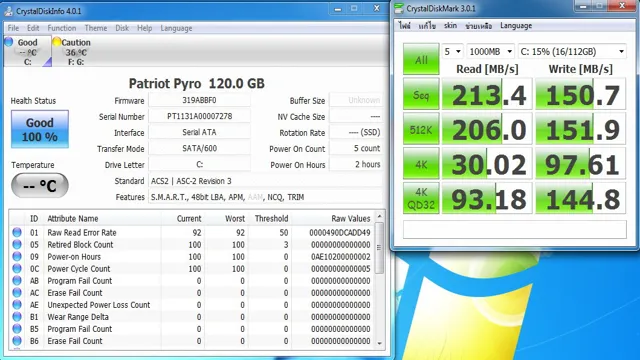
Checking Patriot SSD Health Status
If you’re using a Patriot SSD, it’s crucial to know how to check its health status. Thankfully, it’s relatively easy to do so with some basic configuration steps. Firstly, you’ll need to download the Patriot Toolbox from their website.
Once installed, open it and select your Patriot SSD from the list. Then click on the “Health” tab to view the current health status of your SSD. The Toolbox also provides information on the firmware version, temperature, and usage time.
It’s recommended to check your SSD health status regularly to ensure it’s functioning correctly and avoid potential data loss. By following these simple steps, you can keep your Patriot SSD in excellent condition and mitigate any potential issues.
Configuring Patriot SSD with Patriot Toolbox Software
Configuring Patriot SSD with Patriot Toolbox Software can be a simple process with these basic configuration steps. First, make sure to download the Patriot Toolbox Software from the Patriot website and install it onto your computer. Once installed, connect your Patriot SSD to your computer and open the Patriot Toolbox Software.
From there, you can access various features such as SMART data, firmware updates, and secure erase options. It’s important to regularly check the SMART data to monitor the health and performance of your SSD, and the firmware updates can help improve performance and fix any issues. Finally, the secure erase option can help protect sensitive data by completely wiping the SSD.
By regularly using the Patriot Toolbox Software, you can ensure that your Patriot SSD is running at its best and is secure for your use.
Advanced Configuration Settings for Patriot SSD
If you’re looking to configure your Patriot SSD for optimal performance, there are a few advanced settings you can adjust. One important setting to take note of is the over-provisioning feature, which allows you to reserve a portion of your SSD as a buffer. This can help improve overall performance and longevity.
You may also want to consider adjusting the TRIM and garbage collection settings to ensure your SSD is properly maintaining the data on the drive. Additionally, adjusting the power management settings can help conserve battery life on laptops or other mobile devices. It’s important to note that while these settings can help improve performance, they should only be adjusted if you’re familiar with the potential risks and how to mitigate them.
By configuring your Patriot SSD properly, you can help ensure it operates at peak performance for years to come.
Optimizing Patriot SSD Performance
Patriot SSD performance can be optimized through advanced configuration settings. To enhance the performance of your computer or laptop, it is necessary to adjust the settings to get the best possible results. One such setting is the allocation unit size, which refers to the size of each cluster on the SSD.
A smaller allocation unit size could lead to quicker data transfers and better overall performance. Another setting is the TRIM function, which ensures that deleted data is permanently removed from the drive. Enabling this function can help maintain the performance of your SSD over time.
Optimization can also be achieved through overprovisioning, which reserves a portion of the SSD’s storage capacity for maintenance purposes. Configuring these advanced settings can significantly enhance the performance and lifespan of your Patriot SSD, resulting in an improved user experience.
Customizing Patriot SSD Power Settings
When it comes to optimizing your Patriot SSD, configuring the power settings is crucial to ensure maximum performance and longevity. With advanced configuration settings, you can customize how your SSD functions to meet your specific needs. These settings can help reduce power consumption, increase read and write speeds, and extend the lifespan of your SSD.
By tweaking the power state settings, you can determine how your SSD behaves when idle, under load, or during sleep mode. For example, you may choose to fine-tune the Active State Power Management (ASPM) to minimize power consumption during light usage. Additionally, you might want to adjust the Device Sleep (DevSleep) settings, which can send your SSD into a deeper sleep mode to conserve power.
By customizing these settings, you can get the most out of your Patriot SSD and ensure it performs at its best. With a little experimentation and tweaking, you can achieve an optimal configuration that suits your needs and helps prolong the lifespan of your SSD.
Conclusion: Get the Most Out of Your Patriot SSD
In conclusion, configuring a Patriot SSD is like giving your computer a brand new pair of running shoes – your system will be faster, more efficient, and ready for any task you throw at it. So if you want to boost your computer’s performance, don’t be a couch potato, get up and configure your Patriot SSD today! Trust us, your computer (and your feet) will thank you.”
FAQs
How do I configure the Patriot SSD on my computer?
To configure the Patriot SSD, you can use the built-in disk management tool in Windows. Go to the start menu and search for “Disk Management,” then right-click on the Patriot SSD and select “Format.” Follow the prompts to complete the configuration.
Do I need any special software to configure the Patriot SSD?
No, you don’t need any special software to configure the Patriot SSD. The built-in disk management tool in Windows is sufficient for most users’ needs.
What should I do if the Patriot SSD doesn’t show up in disk management?
If the Patriot SSD doesn’t show up in disk management, make sure it’s properly connected to your computer’s motherboard. You may also need to check the BIOS settings to ensure that the drive is properly detected.
Can I configure the Patriot SSD to work with macOS?
Yes, you can configure the Patriot SSD to work with macOS. However, you may need to format the drive using the appropriate file system (such as APFS) to ensure compatibility with macOS.