Are you looking to change the M.2 SSD configuration jumper but don’t know where to start? Don’t worry, you’re not alone! Many people find this task confusing and complicated. If you’re wondering what the M.
2 SSD configuration jumper is, it’s a small plastic clip or switch located near the M.2 slot on your computer’s motherboard. It changes how your M.
2 drive communicates with your system, allowing you to configure it for compatibility with different types of hardware. Changing the M.2 SSD configuration jumper can be a bit tricky, but with some basic knowledge and a few simple steps, you’ll be able to successfully change it in no time.
In this blog post, we’ll walk you through how to change the M.2 SSD configuration jumper. We’ll explain what the different jumper settings mean, and give you a step-by-step guide on how to change it yourself.
So, whether you’re a tech-savvy professional or a novice computer user, this guide will help you change your M.2 SSD configuration jumper with ease. So, let’s dive in and learn how to change the M.
2 SSD configuration jumper.
What is an M.2 SSD Configuration Jumper?
Have you ever heard of an M.2 SSD configuration jumper? You may be wondering what it is and how it can affect your SSD. Well, a configuration jumper is a small piece of hardware that sets different parameters for your M.
2 SSD. It can be used to enable or disable different features of your SSD such as thermal throttling or power management. Additionally, it can also be used to change the interface of your M.
2 SSD from SATA to NVMe or vice versa. Changing the interface can have a significant impact on the performance of your SSD, so it’s important to ensure that you have the correct jumper setting for your specific needs. If you’re not familiar with the configuration jumper, it’s best to consult with your motherboard or SSD manufacturer to verify the correct settings and avoid any potential issues.
Overall, the configuration jumper is a useful tool for M.2 SSD users who want to fine-tune their SSD’s performance and tailor it to their specific needs.
Explanation of M.2 SSD jumper and its purpose
An M.2 SSD configuration jumper is an electronic component that can be found on some M.2 SSDs.
It is a small switch that can be used to switch between different modes of operation, such as SATA or PCIe mode, depending on the type of motherboard or system they are installed on. The purpose of this jumper is to allow system builders and end-users to configure M.2 SSDs to work optimally with their specific systems, ensuring that they can take full advantage of their storage performance and capabilities.
This jumper is a valuable tool for those that need to configure M.2 SSDs on different systems, as it eliminates the need to worry about compatibility issues and ensures that the SSD is working as intended. For example, if an M.
2 SSD is operating in SATA mode, it may not be able to reach its full potential in terms of data transfer rates and performance, which can be an issue for those relying on their SSD for fast data access. However, by switching the configuration jumper to PCIe mode, users can unlock the full potential of their M.2 SSD.
Overall, the M.2 SSD configuration jumper is a simple yet effective tool that can make a big difference in the performance and usability of an M.2 SSD.
By allowing users to switch between different modes of operation, this jumper can ensure that their M.2 SSD is working optimally with their system, resulting in faster data transfers and improved performance. So, if you are looking to optimize the performance of your M.
Benefits of changing your M.2 SSD configuration jumper
An M.2 SSD configuration jumper is a small device that allows you to change the way your M.2 SSD works.
By changing the jumper settings, you can enable or disable various features such as RAID and boot order. There are many benefits to changing your M.2 SSD configuration jumper, including improved performance, increased stability, and better compatibility with other hardware.
One of the main benefits of changing your M.2 SSD configuration jumper is improved performance. By enabling features like RAID, you can increase the speed and responsiveness of your system.
This is especially important for gamers and other power users who require fast and reliable performance from their computers. Another benefit of changing your M.2 SSD configuration jumper is increased stability.
By disabling unnecessary features, you can reduce the risk of crashes, freezes, and other system errors. This is particularly important for users who rely on their computers for business or other critical applications. Finally, changing your M.
2 SSD configuration jumper can improve compatibility with other hardware. By enabling or disabling certain features, you can ensure that your M.2 SSD works seamlessly with other components in your system.
Step-by-Step Process to Change M.2 SSD Configuration Jumper
Changing the configuration jumper on an M.2 SSD can seem like a daunting task, but with a step-by-step process, it can be easily accomplished. First, you must locate the configuration jumper on the SSD, which is typically located near the M.
2 slot. Next, carefully remove the jumper using a pair of tweezers or a small tool. Once the jumper has been removed, you can then change the configuration settings as needed.
After modifying the settings, carefully replace the jumper in its original position, ensuring that it is properly seated. Finally, test the M.2 SSD to confirm that the changes have been successfully implemented.
By following this process, you can change the configuration of an M.2 SSD without causing any damage, and achieve optimal performance for your system. So, next time you need to change the configuration jumper, don’t worry – it’s simpler than you may think!
Tools required to change M.2 SSD jumper settings
If you are experiencing slow boot or read/write speeds on your M.2 SSD, you might need to change its configuration jumper. Luckily, it is a quick and easy process that requires only a few tools.
To begin, you will need a screwdriver, an anti-static wristband, and the new jumper settings that correspond to your desired configuration. Before you start, make sure to power down your computer and disconnect all cables. Then, ground yourself with the wristband to avoid any static electricity that could damage your hardware.
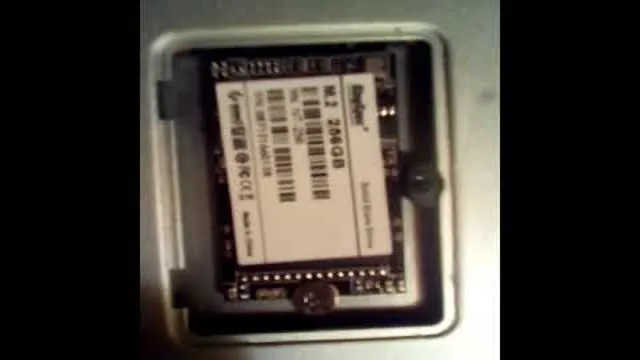
Locate your M.2 SSD and gently remove it from its slot. On the underside, you will see the small jumper pins that control the configuration.
Carefully remove the existing jumper and replace it with the new one, making sure to match the pins correctly. Reinsert the M.2 SSD into its slot, screw it back in place, and reconnect all cables.
Power up your computer and verify that the new configuration has been applied. With these simple steps and tools, you can optimize your M.2 SSD for better performance.
Locating your M.2 SSD on your motherboard
If you want to upgrade your computer’s storage by installing an M.2 SSD, the first step is to locate the M.2 slot on your motherboard.
Typically, M.2 slots are located near the PCI-Express slots or near the RAM slots. Once you locate the M.
2 slot, you need to check the configuration jumper settings. The configuration jumper determines whether you are using an NVMe SSD or a SATA SSD. You can change the configuration jumper easily by sliding it to the correct position.
It’s important to note that some motherboards have multiple M.2 slots, so you need to make sure you’re changing the configuration jumper for the correct slot. By following these simple steps, you’ll be able to easily locate your M.
2 SSD slot and configure the jumper correctly for optimal performance.
Changing M.2 SSD configuration jumper settings
If you need to change the M.2 SSD configuration jumper settings of your SSD, it might sound like a daunting task. However, it is actually a straightforward process that you can do on your own.
The jumper is a small plastic piece that connects two pins on a circuit board, which controls the operation mode of your SSD. Changing the jumper settings can improve the performance of your SSD, or allow it to work with different systems. To begin, you will need to locate the jumper pins on your SSD and determine which position you need to set it to.
Then, you can use a pair of tweezers or a small plastic tool to gently move the jumper to the desired position. It’s important to handle the jumper with care and make sure it is in the correct position before replacing the cover of your device. Overall, the process is relatively simple, and with some patience and attention to detail, you can successfully change the M.
2 SSD configuration jumper settings on your own.
Precautions to Take While Changing M.2 SSD Jumper Settings
Changing the M.2 SSD jumper settings may seem like a simple task, but precautions must be taken to avoid any damage or data loss. Before making any changes, it’s essential to first shut down your computer and disconnect all cables.
Take note of the location of the current jumper and the position it’s set to, so you can return it to the same setting if necessary. When handling the jumper, use an anti-static bracelet or mat to prevent electrostatic discharge from damaging the SSD. Depending on your computer’s manufacturer, the jumper may be in different positions, so it’s important to refer to the user manual or online resources for correct information.
Lastly, double-check the setting before reassembling your computer and turning it back on. By following these steps, you can safely change the configuration jumper on your M.2 SSD without any issues.
How to handle M.2 SSD components properly
M.2 SSD, jumper settings If you’ve been working with computer storage devices for a while, then you’re probably familiar with the M.2 SSD.
This type of storage device is popular due to its small size and high-speed access. However, when it comes to changing the jumper settings on an M.2 SSD, there are a few precautions you need to take.
First, ensure that the device is powered off and that you’re grounded before touching any internal components. Second, be very careful when handling the M.2 SSD as they can be easily damaged if bent or dropped.
It’s best to handle the device by the edges and avoid touching the connectors. Third, make sure you have a clear understanding of the jumper settings you’re changing as incorrectly adjusting these can lead to data loss or device malfunction. With these precautions in mind, you can safely adjust the jumper settings on your M.
2 SSD and enjoy faster and more efficient storage access.
Avoiding damage to your M.2 SSD while changing jumper settings
If you’re planning to change the jumper settings on your M.2 SSD, it’s important to take a few precautions to avoid damaging the drive. First and foremost, make sure you’re grounded while handling the drive.
This can be as simple as touching a grounded metal object before handling the drive or wearing an anti-static wristband. Additionally, be careful when removing and reinserting the drive to avoid damaging the connector pins. It’s also a good idea to consult the manufacturer’s instructions before making any changes to the jumper settings to ensure you’re taking the correct steps.
By taking these precautions, you can avoid potentially costly damage to your M.2 SSD while adjusting its settings to your preferences.
Conclusion
In conclusion, changing your M.2 SSD is as easy as flipping a switch thanks to the configuration jumper. Think of it like a superhero cape that allows your computer to soar to new heights of performance and storage capacity.
So don’t be afraid to take control of your hardware and make the upgrade – with this simple tool, you’ll be soaring in no time.”
FAQs
What is a configuration jumper and how does it relate to changing an M.2 SSD?
A configuration jumper is typically a small plastic piece that is placed over two pins on a circuit board to change or reset certain settings. In the case of changing an M.2 SSD, a configuration jumper may need to be moved to disable the SATA interface before installing the new SSD.
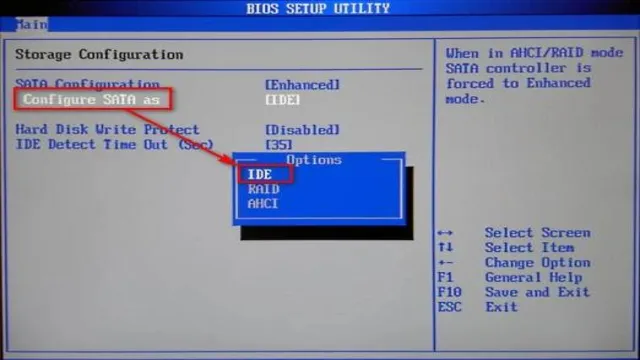
Is it necessary to change any BIOS settings when swapping out an M.2 SSD?
It may be necessary to change BIOS settings to properly recognize and configure the new M.2 SSD. This can include changing the boot order to prioritize the new SSD or enabling/disabling certain interface options.
What are some common reasons to change an M.2 SSD in a computer?
Some common reasons include upgrading to a faster or larger storage capacity, replacing a faulty SSD, or simply to match the needs of changing workloads or software requirements.
What precautions should be taken when handling an M.2 SSD during installation or removal?
It is important to handle the SSD with care to avoid damaging the circuit board or exposing it to static electricity. Additionally, it is important to properly ground yourself before handling the SSD and to follow any specific instructions provided by the manufacturer.