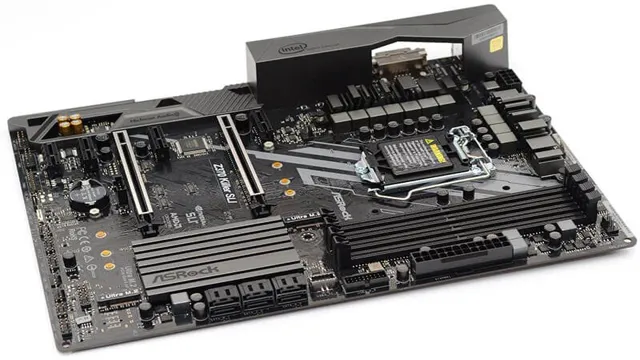
Are you struggling with installing your Ultra M.2 SSD on your ASRock Killer Z370 motherboard? Worry not because we have got you covered with our step-by-step screw guide. With the ever-increasing demand for faster and more efficient storage options, SSDs have become an integral part of modern-day computing.
And the Ultra M.2 SSD is one of the best choices in this regard. However, installing it on your motherboard can be a little overwhelming, especially if you are a novice.
That’s where our screw guide comes in. We have simplified the installation process, making it easy for anyone to follow and complete without any hassle. In just a few steps, you will be able to secure your Ultra M.
2 SSD onto your ASRock Killer Z370 motherboard with minimum effort and time. Whether you are building a new PC or upgrading an existing one, our guide will save you time and money by avoiding the need for professional help. We will provide you with all the necessary information you need to have a successful installation.
So, stay tuned and get ready to learn how to install your Ultra M.2 SSD on your ASRock Killer Z370 motherboard using our screw guide.
Check Compatibility
If you own an ASRock Killer Z370 motherboard and want to install an ultra M.2 SSD, it’s important to first make sure that the SSD is compatible with your motherboard. You can check the compatibility by consulting your motherboard’s manual or visiting the manufacturer’s website for a list of supported devices.
Once you know that your SSD is compatible, the next step is to install it using the appropriate screw. ASRock Killer Z370 motherboards typically use M2_1 and M2_2 slots, and each slot requires a different screw size. For M2_1, you’ll need an M2x3mm screw, while M2_2 requires an M2x4mm screw.
Take your time during installation to avoid damaging your motherboard or SSD, and ensure that the screw is properly tightened so the SSD is secure and won’t move around. With the right SSD and screws, you can enjoy faster boot times and improved performance on your ASRock Killer Z370 motherboard.
Ensure your ASRock Killer Z370 supports Ultra M.2 SSD via the M.2 slot. Consult your manual or ASRock’s website for confirmation.
If you are planning to upgrade your ASRock Killer Z370 system with an Ultra M.2 SSD, it’s important to check for compatibility. The first step is to refer to your manual or visit ASRock’s website to confirm whether your motherboard supports an Ultra M.
2 SSD via the M.2 slot. It’s essential to verify this before making any purchases, as not all M.
2 slots are capable of supporting the high-speed performance of an Ultra M.2 SSD. Moreover, if you’re unsure about how to check for compatibility, you can always reach out to ASRock’s technical support team for further guidance.
It’s important to note that Ultra M.2 SSDs are faster than regular M.2 SSDs, providing faster read and write speeds.
If your motherboard does support Ultra M.2 SSDs, you’ll be able to take advantage of the improved performance and enjoy faster boot times, faster file transfers, and a more responsive system overall. So, if you’re looking to upgrade your storage solution, be sure to check for compatibility with an Ultra M.
2 SSD to make the most of your ASRock Killer Z370 motherboard.
Prepare the Screw
When it comes to installing an ultra M.2 SSD onto an ASRock Killer Z370 motherboard, one of the first steps is to prepare the screw that will secure the SSD in place. This may seem like a minor detail, but it’s important to ensure that the screw is the right size and type for this specific motherboard.
One common type of screw used for this purpose is a small, flathead screw that is designed to fit into a small slot on the motherboard. To prepare the screw, you’ll need to locate it in the kit that came with your motherboard and make sure that it’s the right size and type for your motherboard. Once you have the screw in hand, you’re ready to move on to the next step in the installation process.
By taking the time to prepare the screw properly, you can help ensure that your ultra M.2 SSD will be securely and safely installed onto your ASRock Killer Z370 motherboard.
Locate the screw package that came with your ASRock Killer Z370 motherboard. If you don’t have it, contact ASRock support. Locate the appropriate screw size (usually M2.5×3.5mm) and set it aside.
ASRock Killer Z370 motherboard. When building a PC, it’s crucial to have the right tools and equipment ready for assembling. One important item is the screw package that comes with your ASRock Killer Z370 motherboard.
If you don’t have it, don’t worry as you can always contact ASRock support for assistance. Once you’ve located the screw package, it’s time to find the appropriate screw size (usually M5x
5mm) and set it aside. You don’t want to lose any of the screws as they are small and can be easily misplaced. It’s recommended to have a clean and tidy workspace to avoid any confusion and increase productivity.
By finding the right screw size and preparing it beforehand, you’ll be able to start assembling your new PC without any delay. Remember, building a PC takes time and patience, so it’s best to take it one step at a time.
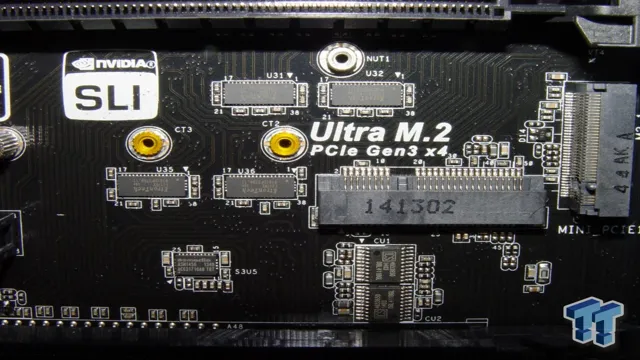
Locate and Position the M.2 Slot
If you want to install an ultra M.2 SSD on your ASRock Killer Z370 motherboard, the first step is to locate and position the M.2 slot.
This slot is typically found near the bottom edge of the motherboard, and it may be covered by a heatsink or a small metal plate that needs to be removed. Once you’ve located the slot and cleared any obstructions, you can gently insert the M.2 SSD card into the slot at a slight angle and then press it down until it clicks into place.
Be sure to secure the M.2 SSD in place with the appropriate screw, which is usually a small, black Phillips-head screw that comes with the motherboard or the SSD itself. With the M.
2 SSD securely installed, you can enjoy faster boot and load times, improved system performance, and increased storage capacity.
Locate the M.2 slot on your ASRock Killer Z370 motherboard. It’s usually located in the middle of the board, above the chipset heatsink. If unsure, consult your manual. Carefully insert your Ultra M.2 SSD into the slot and adjust the screw positioning to line up with the screw hole on the SSD.
If you’re looking to upgrade your ASRock Killer Z370 motherboard with an Ultra M.2 SSD, the first step is to locate and position the M.2 slot.
This slot is usually above the chipset heatsink, towards the middle of the board, but it’s always a good idea to consult your manual if you’re not sure. Once you’ve found the slot, carefully insert your SSD into it, making sure to line up the screw hole with the screw positioning on the motherboard. This will ensure that your SSD is securely in place and won’t move around.
Don’t forget to check the manual for any additional steps or precautions you need to take before installing your new SSD. With the right positioning and proper installation, you’ll be able to enjoy faster speeds and more storage space for all your favorite games and applications. So go ahead, give your motherboard the upgrade it deserves!
Install the Screw
If you’re wondering how to install an ultra M.2 SSD onto your ASRock Killer Z370 motherboard, the first step is to locate the correct screw. This tiny screw is crucial to securing your SSD in place and preventing it from moving around or short-circuiting.
The screw may come with your motherboard or with your SSD kit, but if you can’t find it, you may need to purchase one separately. Once you have the screw, you can begin the installation process by identifying the M.2 slot on your motherboard and gently inserting the SSD into place.
Then, use the screw to secure the SSD in place, being careful not to over tighten or damage the delicate components. With the screw in place, your ultra M.2 SSD is now securely installed and ready to provide lightning-fast storage for your system.
While holding the screw in place with your fingernails, use a small Phillips-head screwdriver to tighten the screw into the designated hole. Don’t over-tighten, as it can damage the SSD or the motherboard.
Installing an SSD might appear to be a daunting task, but it’s simpler than you may think. Once you have the SSD in place, the next step is to secure it with a screw. While holding the screw in place with your fingertips, insert a small Phillips-head screwdriver into the designated hole, and tighten the screw until it is snug.
However, be cautious not to over-tighten, as it can cause harm to the SSD or the motherboard. Over-tightening can also produce undue pressure, resulting in the eventual failure of the screw. Remember, the goal is to make sure the SSD is tightly secured without inflicting any injury.
As a consequence, the screw will keep the SSD firmly in place, and you’ll be able to relish in the speedier performance of your PC.
Testing the Installation
If you’ve just installed an ASRock Killer Z370 motherboard and are wondering how to install an ultra M.2 SSD screw, don’t worry – it’s actually quite simple. The first thing to note is that not all M.
2 SSDs require a screw to be installed. However, if your particular SSD does require a screw, you’ll want to locate the proper screw mount on the motherboard. On the ASRock Killer Z370, this is typically found near the bottom of the motherboard, near the SATA ports.
Once you’ve located the screw mount, take your chosen M.2 SSD screw and carefully insert it into the mount, making sure it’s tight but not too tight. From there, you can slide your M.
2 SSD into place and secure it with the already installed screw. With this quick and easy process, you’ll be up and running with your new ultra M.2 SSD in no time!
Insert the Ultra M.2 SSD into the M.2 slot and power on your ASRock Killer Z370. Confirm the SSD appears in the system BIOS and in Windows Task Manager. You’ve successfully installed your Ultra M.2 SSD onto your ASRock Killer Z370!
After installing your Ultra M.2 SSD onto your ASRock Killer Z370, it’s important to test it to make sure there are no issues. The first thing you should do is enter the system BIOS and confirm that the SSD is appearing correctly.
If it is, then you can move on to checking Windows Task Manager to ensure that it’s recognized by the operating system. Once you’ve confirmed that both the BIOS and Windows are seeing the drive, you’re good to go! A great way to test the speed and performance of your new SSD is to run a benchmark like CrystalDiskMark. This will give you a clear idea of how well the drive is performing.
Another option is to test it out by loading up some of your favorite programs and seeing how quickly they launch. You should notice a significant improvement in speed and load times compared to your old hard drive. In no time, you’ll be enjoying lightning-fast boot times and a faster overall computing experience.
Congratulations on successfully installing your Ultra M.2 SSD onto your ASRock Killer Z370!
Conclusion
In conclusion, installing an ultra M.2 SSD screw on your ASRock Killer Z370 motherboard is as easy as pie. Just locate the M.
2 slot, gently screw in the ultra M.2 SSD and enjoy lightning-fast performance! It’s a great way to give your system that extra boost it needs to take on even the most demanding tasks. So don’t be afraid to dive into the world of ultra M.
2 SSDs and make your computer a true killer! “
FAQs
What type of screw do I need to install an Ultra M.2 SSD on an ASRock Killer Z370 motherboard?
You will need an M.2 screw, which usually comes with the motherboard or the SSD.
Where can I find the Ultra M.2 slot on the ASRock Killer Z370 motherboard?
The Ultra M.2 slot is usually located between the PCIe slots and the RAM slots. Refer to your motherboard manual for more details.
Is there a specific way to insert the Ultra M.2 SSD into the slot on the ASRock Killer Z370 motherboard?
Yes, make sure to align the notches on the SSD with the slot on the motherboard and gently push it in until it clicks into place.
Do I need to adjust any BIOS settings to recognize the Ultra M.2 SSD on the ASRock Killer Z370 motherboard?
Yes, you need to enter the BIOS settings and enable the Ultra M.2 slot as the boot drive or as a storage device. Refer to your motherboard manual for more details.