Are you an avid gamer who needs more storage space for your Alienware laptop? If so, have you considered adding an additional SSD to your device? Not only will it increase your storage capacity, but it will also improve your system’s overall performance. Upgrading your Alienware laptop with an additional solid-state drive (SSD) is a relatively straightforward process. With a few simple steps, you can increase your storage capacity and eliminate the frustration of running out of space.
And, as the popularity of gaming continues to grow, having more storage space is essential. Don’t let limited storage space keep you from immersing yourself in your favorite games. Take advantage of the benefits an additional SSD can bring to your Alienware laptop.
In this blog post, we will guide you through the process of installing an additional SSD and provide some useful tips to help you choose the right one for your needs. Let’s get started!
Check Compatibility with Your PC
If you’re looking to install an additional hard drive or SSD on your Alienware PC, the first step is to check compatibility. Not all Alienware models support the installation of additional storage devices, and even those that do may have certain limitations or requirements. To start, check the specs of your specific model on the Alienware website or user manual.
You’ll want to confirm things like the type and size of the drive you can install, as well as the number of available drive bays. It’s also important to ensure you have the necessary connectors and cables, as well as any additional hardware or software necessary for installation. Taking the time to do this research and preparation upfront can save you a lot of frustration down the line and ensure a successful installation.
Determine SSD Type and Size
When it comes to upgrading your PC with an SSD, it’s important to first check the compatibility with your system. The type and size of SSD you choose should match the specifications of your computer and its motherboard. It’s recommended to consult your manufacturer’s manual or website to see the compatible SSD types and sizes.
Generally, desktop computers can accommodate standard 5-inch and 5-inch SSDs, while laptops may require smaller
8-inch or M.2 SSDs. Additionally, you should also consider the interface type of your motherboard, such as SATA or NVMe, to ensure seamless connectivity with your SSD.
Overall, choosing the right SSD type and size that is compatible with your PC will help optimize its performance and enhance your overall computing experience.
Check Free Drive Bays
When it comes to adding a new hard drive to your computer, you might be wondering how to check if you have any free drive bays available. The first step is to check the compatibility of the hard drive with your PC. Make sure that the drive you are planning to install is compatible with your computer’s motherboard and the BIOS.
Once you have confirmed compatibility, you can open up your computer case and take a look inside to see if there are any empty drive bays available. A drive bay typically consists of a metal bracket that holds the hard drive securely in place, and a data cable and power cable that plug into the back of the drive. An empty drive bay will have the bracket, but no hard drive installed.
If all of your drive bays are filled, you may need to remove one of the existing drives to make room for the new one. Keep in mind that adding a new hard drive will also require you to format and partition it before you can start using it. With these steps in mind, you can confidently add a new hard drive to your computer and expand its storage capacity.
Gather Necessary Tools and Materials
If you’re looking to upgrade your Alienware computer with an additional hard drive or SSD, the first step is to gather the necessary tools and materials for the job. You’ll need a static-free work area, a screwdriver set with various sizes of Phillips and flathead bits, and the new hard drive or SSD that you’ll be installing. It’s also a good idea to have an external hard drive or cloud storage solution set up to back up any important files before you begin.
It’s important to take your time and be careful, as the inside of a computer can be delicate and easily damaged. With the right tools and preparation, however, you should be able to successfully install your new hard drive or SSD and enjoy the added storage and improved performance.
Screwdriver and Screws
When it comes to a DIY project that involves fixing or building something, the first thing you need to do is gather all the necessary tools and materials. If you’re planning to use screws, you’ll need a screwdriver as well. A screwdriver is a tool that is used to insert or remove screws.
It comes in different sizes and types, so make sure you have the right one for the job. There are Phillips head screwdrivers, flat-head screwdrivers, as well as screwdrivers with interchangeable tips. Once you have your screwdriver, it’s time to get the screws you need for your project.
Screws come in various sizes, shapes, and materials, so again, make sure you have the right ones for your project. You wouldn’t want to use the wrong screws and end up with a weak or unstable structure. Before starting the actual work, take some time to familiarize yourself with your tools and materials.
This will ensure that you are prepared and confident in your ability to complete the project successfully.
SSD and SATA Cable
If you’re planning to upgrade your computer’s hard drive, then you’ll need to gather a few tools and materials beforehand to ensure a smooth installation process. One of the essential components needed for this task is an SSD and SATA cable. These two components work together to provide faster data transfer speeds, improved performance, and increased storage capacity.
To start, you’ll need a screwdriver to open up your computer’s casing. It’s also recommended to have an anti-static wristband to prevent any damage caused by electrostatic discharge. Additionally, you might need a small flashlight to see inside your computer’s case and locate the SATA ports.
Once you’ve gathered the necessary tools, you can then install the SSD into your device and connect it to the SATA cable. This process is relatively straightforward and can be completed in a matter of minutes. By upgrading your hard drive with an SSD and SATA cable, you can significantly improve your computer’s overall performance and speed.
Anti-Static Wristband
When working on electronic devices, an anti-static wristband is an essential tool that ensures you don’t damage them. To make your own, you’ll need some tools and materials. Firstly, you will need a length of ribbon elastic that can fit around your wrist comfortably.
It’s essential that it’s elastic because it needs to stretch around your wrist and maintain contact with your skin. You will also need a piece of wire, which will act as a conductor for any static electricity that builds up in your body. You’ll also need a small alligator clip to connect the wire to the elastic ribbon, and a small piece of heat-shrink tubing to secure the wire to the clip.
Finally, you will need a pair of wire cutters and a heat gun to shrink the tubing. With all these materials in hand, making your anti-static wristband should be relatively straightforward. Just follow the instructions carefully and make sure you test your wristband before using it to work on any electronics.
With this tool at your disposal, you can safely handle any electronic device without fear of damaging it due to static electricity.
Mount the SSD in Your PC
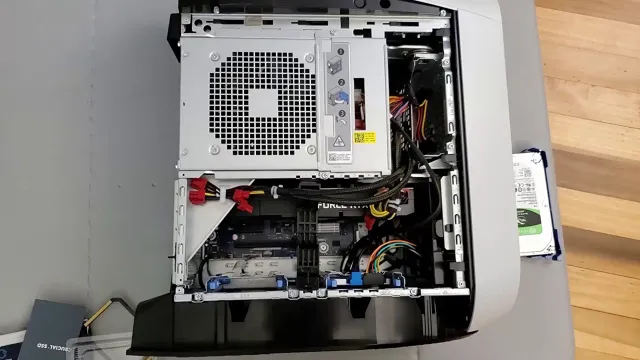
Are you looking to upgrade your Alienware PC with an additional hard drive SSD? Mounting the SSD is a crucial step in the process. First, open up your PC’s case and identify an unused drive bay where you can install the SSD. Before you start, make sure to turn off your computer and disconnect all cables.
Once you’ve identified the drive bay, remove the screws that secure the bay cover and remove the cover. Next, attach the SSD to the bay using the screws provided in the installation kit, and ensure the connections are properly aligned. Once you’re done, screw the bay cover back into place and re-attach all cables.
Finally, close your computer’s case and turn on the power. Your PC should now recognize the new SSD and you’re ready to go. With just a few simple steps, you can significantly increase your PC’s storage capacity and enhance overall performance.
Remove Side Panel
If you’re looking to upgrade the storage in your PC, installing an SSD is the perfect solution. But before you can get to that, you’ll need to remove the side panel of your computer case. This can vary depending on the case you have, but most cases have screws that need to be loosened or removed in order to take off the panel.
Once the panel is off, you’ll be able to access the inside of your PC and find a suitable spot to mount the SSD. It’s important to make sure you have the proper mounting brackets or screws to ensure a secure and stable installation. With the SSD securely mounted in your case, you’ll be able to enjoy faster boot times and improved overall performance.
So go ahead and remove that side panel, and get ready to take your PC to the next level with an SSD upgrade.
Choose a Free Drive Bay
If you’re looking to improve the performance of your PC, one simple step you can take is to mount an SSD in one of the free drive bays. But before diving in, it’s important to choose the right drive bay to avoid any potential compatibility issues. Most modern PCs have multiple drive bays, but some may be better suited for traditional hard drives, while others are designed for SSDs.
Check your PC’s manual or online specifications to determine which bays are available and which are optimal for SSD installation. Once you’ve identified your preferred bay, mounting the SSD is a straightforward process. Simply slide the drive into the bay, secure it with screws or brackets provided by your PC’s manufacturer, and connect the SATA and power cables.
With the SSD installed, you can enjoy faster boot times, app launches, and file transfers, all with minimal effort.
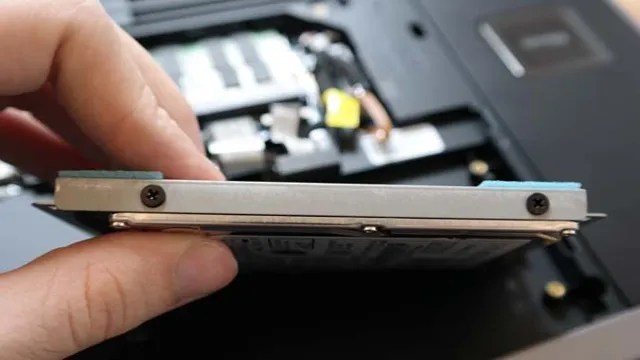
Insert SSD in Bay and Secure It
If you’re looking to upgrade your computer’s storage capabilities, one simple option is to add a solid state drive (SSD). Mounting an SSD in your PC is a straightforward process that can be done with a few basic tools. First, you’ll need to locate an empty bay where the SSD can be installed.
Most modern desktop computers have at least one extra bay for additional storage devices. Next, secure the SSD in the bay using the screws provided. Be sure to tighten the screws enough so that the SSD is firmly in place but not so much that they damage the drive or the bay.
Once your SSD is securely mounted, you can connect it to your computer’s power supply and motherboard using the proper cables. It’s important to ensure that all cables are securely connected to prevent any potential damage or data loss. With your new SSD successfully installed, you can enjoy faster boot times, quicker application launches, and smoother overall performance.
So why wait? Add that extra bit of storage and improve your PC’s functionality today!
Connect and Configure Your SSD
If you own an Alienware computer and want to install an additional hard drive SSD, it’s a straightforward process. The first step is to connect and configure your SSD properly. Make sure you have all the necessary tools, such as a screwdriver and an SATA cable.
Next, open your computer case and locate the empty drive bay. Place your SSD in the bay and secure it with screws. Connect the power cable and SATA cable to the SSD, ensuring that they are firmly attached.
Once you’ve connected the SSD, you’ll need to configure it in Windows. Go to the disk management tool and format the drive. Finally, you can transfer files and data onto your new SSD.
By adding an extra SSD to your Alienware computer, you can increase its storage capacity and improve its overall performance. So don’t hesitate to try it out!
Connect SATA Cable to SSD and Motherboard
When connecting and configuring your SSD, one important step is to connect the SATA cable to both the SSD and motherboard. Your SSD likely has a SATA connector, which is where you’ll insert one end of the cable. The other end of the cable should be inserted into a SATA port on your motherboard.
It’s important to make sure that the cable is securely fastened on both ends to ensure proper data transfer. Depending on your computer’s configuration, you may need to configure your BIOS settings to recognize the new drive. Once connected and configured, your SSD will provide faster read and write speeds compared to traditional hard drives, resulting in improved performance for your computer.
So make sure to connect your SATA cable properly and take advantage of the benefits of an SSD!
Configure SSD in BIOS Settings
SSD Before you can benefit from the fast read and write speeds of your newly installed SSD, you’ll need to configure it within your BIOS settings. The first step is to connect the SSD to your computer through SATA cables. Next, restart your computer and enter BIOS by pressing a specific function key during startup (usually F2 or Del).
Once inside BIOS, navigate to the storage configuration settings and select the option to enable the SSD. You may also need to set the boot order to prioritize the SSD as the primary boot device. Once you have made all the necessary changes, save and exit BIOS, and your computer should now recognize and utilize the full potential of your SSD.
By configuring your SSD in BIOS, you can expect a significant improvement in your computer’s speed and overall performance. So, don’t wait any longer, follow these simple steps, and start enjoying the benefits of your new SSD today!
Test and Verify the Installation
To make sure that your Alienware desktop is running seamlessly with the new additional hard drive or SSD, it’s crucial to test and verify the installation. Even with a straightforward installation process, it’s still important to ensure that everything is working the way it should be. One way to check is to restart your computer and check that the drive has been detected.
From there, you can head to the Disk Management utility to format the drive and assign a drive letter, if necessary. You can also test the new drive by transferring files over, making sure they’re saved to the right location and not the pre-existing drive. By taking the time to test and verify the installation, you can ensure that all your files and applications are running as expected while utilizing the new hard drive.
With the proper installation confirmation, you’re now ready to use your updated Alienware desktop with the new additional hard drive or SSD, enjoying a seamless performance boost.
Conclusion
So there you have it, folks! Installing an additional SSD hard drive into your Alienware just got easier than deciphering an extraterrestrial language. With the right tools and a bit of know-how, you’ll be able to upgrade your storage and fly through the universe of gaming faster than an alien spaceship. So don’t be afraid to boldly go where no gamer has gone before, and embrace this simple modification to your Alienware setup.
Happy gaming!”
FAQs
What type of additional hard drive or SSD is compatible with Alienware?
Alienware is compatible with both 2.5″ and 3.5″ hard drives and SSDs. However, it is recommended to check the specifications of your specific Alienware model to ensure compatibility.
Can I install an additional hard drive or SSD on my own or should I seek professional help?
You can install an additional hard drive or SSD on your own if you have experience with hardware installation. However, if you are not confident in your abilities, it is recommended to seek professional help to avoid any damage to your Alienware.
Are there any specific tools or equipment required for installing an additional hard drive or SSD on an Alienware?
Yes, you will need a screwdriver (usually a Phillips-head), and depending on your Alienware model, you may also need brackets or adapters to mount the hard drive or SSD properly.
Can I clone my existing hard drive onto the new SSD or do I need to reinstall my operating system?
It is recommended to clone your existing hard drive onto the new SSD, which will save you time and effort in reinstalling your operating system and all your programs. There are many free and paid cloning software available online that you can use for this process. However, it is always recommended to back up your data before making any major changes to your system.