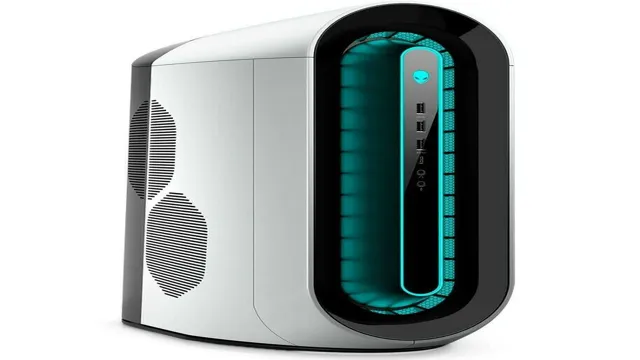
Are you seeking to enhance your Alienware Aurora’s storage capacity? If you’re engaging in high-definition gaming or operating resource-intensive applications, you’ll need extra space to store your files. Fortunately, Alienware Aurora allows you to add an additional hard drive to your system to maximize your storage capacity. However, installing a new hard drive on your own can be intimidating if you’re unfamiliar with the procedures.
But don’t worry, we’ve got you covered! In this article, we’ll walk you through the steps of installing an additional hard drive in your Alienware Aurora. By the end of this guide, you’ll be able to take advantage of more storage space, improved system performance, and an increased gaming experience. So, let’s get started!
Check System Compatibility
If you’re looking to add an additional hard drive or SSD to your Alienware Aurora, one of the first things you need to do is check the system compatibility. Not all hard drives and SSDs will be compatible with your machine, so it’s important to do your research before making a purchase. One of the best ways to do this is to check the manual or online documentation for your system to see what types of hard drives and SSDs are compatible.
You can also reach out to the manufacturer or a trusted computer repair technician for additional guidance. Once you have confirmed compatibility, you’ll need to physically install the drive into your system, which may require opening up the case and connecting cables. But with a bit of research and patience, you can successfully upgrade your Alienware Aurora with an additional hard drive or SSD, boosting its storage and performance capabilities.
Confirm Available Drive Bays and Power Supply
When building or upgrading your computer, you need to make sure that your components are compatible with each other. Specifically, you want to confirm that there are available drive bays and sufficient power supply for your system. Before purchasing any components or starting the build process, it’s crucial to check your motherboard, case, and power supply unit (PSU) specifications.
Look for the type and number of drive bays available, as well as the maximum power output supported by your PSU. This will help ensure that you can install all the necessary components and that your system will run safely and efficiently without any power bottlenecking or overheating issues. By doing this, you can save yourself time, money, and stress from having to replace incompatible parts or dealing with system failures caused by insufficient power supply.
With careful planning and confirmation of system compatibility, you can build a high-performing and reliable computer that meets all your needs.
Choose and Purchase Compatible Drive
When it comes to upgrading your system with a new hard drive, it’s important to make sure that the drive you choose is compatible with your system. A simple method to do this is to check the specifications of both your PC and the hard drive to ensure they match. Some essential components to examine include the interface type, storage capacity, rotational speed, and form factor.
Typically, the majority of modern hard drives promote compatibility with multiple operating systems, including Windows, MacOS, and Linux. When it comes to purchasing a compatible hard drive, it’s crucial to ensure that it meets your storage and performance needs, at an affordable cost. With a bit of research and comparison of various drive models, you can choose the best drive that matches your system requirements, providing you with reliable and efficient performance for years to come.
Preparing for Installation
Installing an additional hard drive or SSD on your Alienware Aurora can be a great way to boost your computer’s performance and storage capacity. However, before you begin the installation process, it’s important to take a few steps to prepare your computer. First, make sure you have all the necessary components, including any mounting brackets or cables, and check your computer’s documentation to determine the best location for your new drive.
You’ll also want to back up any important data, just in case something goes wrong during the installation process. Finally, be sure to power off your computer and unplug all cables before you begin working inside the case. By taking these simple steps, you’ll be well on your way to adding an extra hard drive or SSD to your Alienware Aurora.
Shut Down and Unplug Computer
When it’s time to install new hardware or software on your computer, proper preparation is key. One important step to this preparation is shutting down and unplugging your computer. This might seem like a no-brainer, but it’s important to remember that doing so ensures the safety of both you and your computer.
Before starting any installation process, make sure to save any open documents or programs and shut down your computer completely, not just putting it to sleep or in hibernation mode. Then, unplug the power cord from the wall outlet as well as any peripherals such as a monitor, keyboard, or mouse. This will protect your computer from any power surges or unexpected outages that could harm your device or corrupt your system files.
Keep in mind that leaving your computer plugged in during an installation process could lead to unpredictable results such as software corruption or data loss. Taking the time to shut down and unplug your computer ensures a more successful and smooth installation process.
Open Computer Case and Ground Yourself
Before installing any new components into your computer, it’s important to take the necessary precautions to protect your equipment. One of the first things you should do is to open up the case and ground yourself. This is important because it helps prevent any electrostatic charges from damaging your computer’s components.
To ground yourself, simply touch a metal object, like the case of your computer, to discharge any built-up static electricity in your body. It’s also a good idea to work on a clean, static-free work surface, and to wear an anti-static wrist strap. By following these simple steps, you’ll be able to protect your computer from any accidental damage during the installation process, and ensure that your new components work properly.
Install Mounting Bracket in Available Drive Bay
To begin preparing for installation of a mounting bracket in an available drive bay, the first step is to select a suitable location for the bracket. This can involve identifying an empty drive bay that is the correct size for the bracket, or clearing space in an existing drive bay. Once the location has been chosen, it is time to proceed with installing the bracket.
This process typically involves securing the bracket to the sides of the drive bay using screws or other fasteners. It is important to ensure that the bracket is firmly attached and level, as any looseness or instability could result in damage to the installed hardware or file system. By following these steps and carefully preparing the drive bay for the installation, you can create a stable and secure environment for your hardware and data storage needs.
Installing the Drive
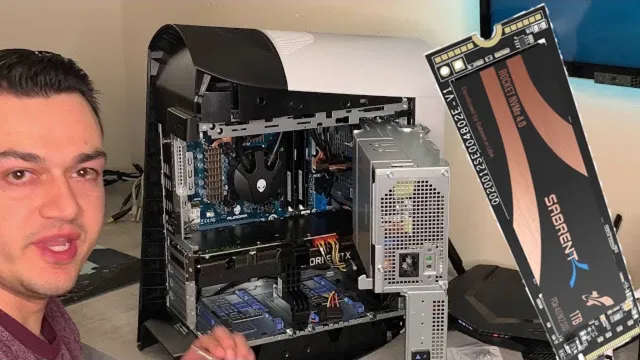
If you’re looking to upgrade your Alienware Aurora’s storage space, installing an additional hard drive or SSD is a great option. The process is relatively straightforward, and shouldn’t take too long even for beginners. First, make sure you have the necessary tools, such as a screwdriver, and the additional drive you want to install.
Start by shutting down your computer, and unplug all cables and cords. Open the computer case, and locate an empty drive bay. Carefully slide the new drive into the bay, and use screws to secure it in place.
Next, connect the necessary cables to the drive, such as the SATA data and power cables. Finally, reattach the computer case, and plug in all cables. Boot up your computer, and your new hard drive or SSD should be recognized instantly! With your added storage, you can easily store more games, movies, and files without worrying about running out of space.
Attach Drive to Mounting Bracket
When it comes to installing a new drive, one of the first steps is to attach it to a mounting bracket. This is an important step that ensures the drive stays securely in place and prevents any potential damage from vibrations or jostling. To begin, locate the mounting brackets in your computer case.
These are usually small metal brackets that will hold the drive in place. Next, carefully align your drive with the bracket and screw it into place using the screws provided. Be sure to tighten the screws firmly, but avoid over-tightening, as this can damage the drive or bracket.
Once the drive is securely attached to the mounting bracket, you can move on to the next step in the installation process. By following these simple steps, you can ensure your new drive is installed properly and will function smoothly for years to come.
Connect Data and Power Cables
When it comes to installing a new drive, connecting the data and power cables can seem like a daunting task. However, with a little bit of know-how, this can be done quickly and easily. The first step is to identify the necessary cables, which typically includes a SATA data cable and a SATA power cable.
Once you have located these, you can start by connecting the SATA data cable to the motherboard, ensuring that it is properly seated in the port. Next, connect the other end of the cable to the drive itself, making sure it is plugged into the correct port. Once this is done, attach the SATA power cable to the drive, ensuring that it is securely connected.
One important thing to keep in mind is to route the cables neatly and avoid any tangles or obstructions that could cause issues down the line. Overall, connecting the data and power cables may seem intimidating at first, but with a little careful attention, you can install your new drive with ease.
Replace Computer Case and Reconnect Everything
Installing the drive is an essential step when replacing your computer case and reconnecting everything. To begin, locate an available drive bay in the new case and remove the front panel if necessary. Next, insert the drive into the bay, ensuring it is properly aligned with the screw holes.
Attach the drive to the case using screws and a screwdriver. Be careful not to over-tighten the screws as this can damage the drive. Once the drive is securely in place, connect the SATA and power cables to the appropriate ports on the motherboard and drive.
The SATA cable should be connected to the SATA port labeled “SATA0” or “SATA” The power cable should be connected to the drive’s power port. Finally, plug in any necessary cables to the case’s front panel ports.
With the drive installed and properly connected, you can turn on your computer and ensure that it is recognized in the BIOS. By following these steps, you can easily install a new drive and get your computer up and running again in no time.
Formatting and Initialization
If you’re looking to add an additional hard drive or SSD to your Alienware Aurora, the process is easier than you might think. One option is to use the extra 5-inch drive bay located at the bottom of the case near the power supply.
To install your new drive, power down your Aurora and unplug all cables, then locate and remove the cover for the drive bay. You will need to align the SATA connectors and power cable for your new drive and then secure the drive using the provided screws. Once your new drive is securely in place, you can boot up your Aurora and initialize the drive in the Windows Disk Management tool.
From there, you can format the drive and start using it for storage or as a boot drive for your operating system. With this simple process, you can easily expand the storage capacity of your Alienware Aurora and take advantage of the benefits of high-speed SSD storage.
Initialize New Drive in Disk Management
When you purchase a new hard disk drive (HDD) or solid-state drive (SSD) for your computer, it needs to be formatted and initialized before you can use it. Formatting and initialization involves preparing the drive to store data by configuring it to work with your operating system. In Windows, you can do this using the Disk Management tool.
To initialize a new drive in Disk Management, you first need to connect it to your computer and open the Disk Management window. Look for the new drive, which will be marked as unallocated and listed as disk 1, disk 2, etc. Right-click on the unallocated space and select “New Simple Volume.
” Follow the prompts to format and partition the drive. Once complete, your new drive will be ready for use and you can start saving files, installing programs, and backing up your data. Remember that initializing a drive will erase all existing data, so be sure to back up any important files before starting the process.
Format the Drive for Use in File System
When it comes to preparing a new drive for use as a file system, formatting and initialization are crucial steps that cannot be skipped. Formatting a drive involves dividing it into sectors and preparing it to store data in a specific file system, such as NTFS or FAT3 During this process, all data on the drive is wiped clean, making it a blank slate for new files to occupy.
Initialization involves setting up the drive’s internal structures, such as its partition table, boot sector, and file system structures. This process also prepares the drive for use with a specific operating system, ensuring that it will work seamlessly with your computer or device. Without proper formatting and initialization, your newly acquired drive may not work as intended, leading to data loss, corruption, or other malfunctions.
Therefore, it’s essential to take the time to format and initialize your drive correctly to ensure its longevity and reliability.
Conclusion
In conclusion, expanding your Alienware Aurora’s storage capacity with an additional SSD is a smart move. Not only will it provide you with more space to store your games, media, and other important files, but it will also improve overall performance and speed up load times. So don’t be afraid to boldly go where no gamer has gone before and install that extra hard drive.
Your Alienware Aurora will thank you, and so will your inner geek.”
FAQs
What are the physical dimensions of additional hard drives or SSDs that an Alienware Aurora can support?
The Alienware Aurora desktop can accommodate additional 2.5-inch (SSDs) and 3.5-inch (hard drives) storage drives.
How many additional storage drives can be installed on the Alienware Aurora?
The Alienware Aurora supports up to two additional storage drives for SATA and M.2 drives, allowing for additional storage and faster boot times.
Can you transfer data to the new drive from the old drive?
Yes, you can easily transfer data from the old drive to the new one using cloning software such as Macrium Reflect or EaseUS Todo.
Do you need any additional cables or screws to install the new storage drives?
The Alienware Aurora usually comes with extra cables and screws to attach the new hard drives or SSDs to the system. However, you may need to purchase additional adapters depending on your preferred installation method.