Are you tired of slow boot-up speeds and sluggish performance on your Acer E15 laptop? It might be time to consider upgrading to a faster storage solution, like an M.2 SSD. With its blazing-fast read and write speeds, an M.
2 SSD can give your system a significant performance boost. But how do you install an M.2 SSD in your Acer E15? Don’t worry – you don’t need to be a computer expert to do it.
In this guide, we’ll walk you through the step-by-step process of installing an M.2 SSD in your Acer E1 We’ll cover everything from selecting the right SSD for your system to physically installing the SSD and configuring it in your BIOS.
So whether you’re a gamer looking for faster load times or a professional needing to handle large files quickly, an M.2 SSD can be a great investment for your Acer E1 Let’s get started and give your system the speed boost it deserves!
Step One: Check Compatibility
If you’re looking to install an M.2 SSD in your Acer E15 laptop, the first thing you need to do is check compatibility. Not all Acer E15 models come with an M.
2 slot, so it’s important to make sure your specific model supports this type of SSD. You can check your laptop’s manual or look up the specifications online to see if it has an M.2 slot available.
If it does, you’re good to go! However, if it doesn’t, you may need to consider other options or look into upgrading to a different laptop model first. It’s always better to check compatibility before investing in any hardware upgrades to avoid disappointment or frustration later on.
Check motherboard compatibility with M.2 SSD
When building a computer, it’s important to check the motherboard compatibility with the M.2 SSD you plan to use. M.
2 SSDs are becoming increasingly popular due to their compact size and fast performance, but not all motherboards are compatible with them. The first step in checking compatibility is to consult the motherboard’s manual or specifications online to see if it supports the M.2 form factor and the type of M.
2 SSD you plan to use. Some M.2 SSDs use the PCIe interface, while others use SATA, so it’s important to verify that the motherboard supports the type of interface your SSD uses.
Another consideration is the length of the M.2 drive, as some motherboards only support certain lengths. It’s essential to ensure compatibility to avoid frustration and wasted money on incompatible components.

Step Two: Open Laptop
Now that you have your tools ready, it’s time to open up your Acer E15 and get ready to install that M.2 SSD. Before you start, make sure your laptop is turned off and unplugged.
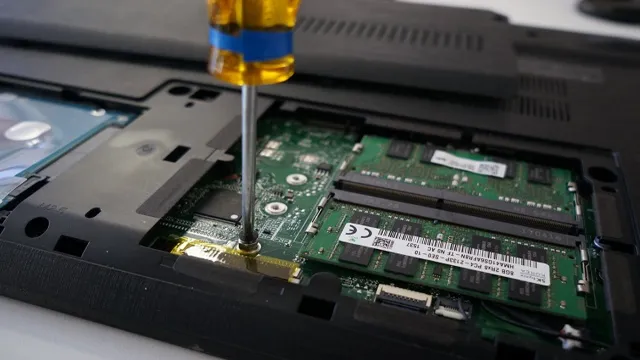
Once you’ve done that, simply flip over your laptop and remove the screws on the bottom panel using your screwdriver. Be sure to keep these screws in a safe place so you don’t lose them! You may notice that some panels are easier to remove than others, so take your time and be gentle. Once you’ve removed the bottom panel, locate the M.
2 slot on the motherboard. It may be labeled “SSD” or “M.2”, and it’s usually located near the Wi-Fi card.
Insert your M.2 SSD into the slot at a slight angle, making sure the notches are aligned. Gently press down on the SSD to secure it in place.
And that’s it – your Acer E15 laptop is now ready for lightning-fast performance with its new M.2 SSD.
Power down and turn over laptop, remove battery
So you want to open up your laptop, eh? Well, before we dive into all the technical details, let’s start with step two: actually opening up your device. Now, the first thing you’ll want to do is power down your laptop and turn it over onto a flat surface. Make sure you’ve removed the battery, as this will ensure that there’s no power going to the machine and eliminate any possibility of shock.
Once you’ve done that, you can start to remove the screws that secure the laptop’s bottom cover. This can be a bit tricky, so be sure to have a proper screwdriver that fits the screws perfectly to avoid stripping them. Once all the screws are removed, carefully pry open the cover with a plastic pry tool or your fingers.
Be gentle and make sure to evenly distribute force along the edges or you might snap the plastic snap-in tabs. When the cover is loose, lift it up and remove it, taking care not to damage any of the components underneath. And voila! You’ve successfully opened up your laptop.
Now, let’s see what’s inside.
Step Three: Insert M.2 SSD
If you’re looking to add some extra storage space to your Acer E15 laptop, installing an M.2 SSD is a great option. To get started, you’ll need to turn off your laptop and remove the back panel.
Look for the M.2 slot, which is typically located near the Wi-Fi card. Carefully insert the SSD into the slot and secure it with the screw provided.
Make sure the SSD is properly aligned and inserted all the way in before screwing it down. Once you’ve installed the SSD, you can put the back panel back on and turn your laptop back on. The new SSD will need to be initialized and formatted before you can start using it, so be sure to follow the instructions provided by your operating system or software.
Overall, installing an M.2 SSD in your Acer E15 is a relatively simple and effective way to boost your computer’s storage capacity and performance.
Locate M.2 slot and insert SSD at a 30 degree angle
M.2 SSD Welcome back to our step-by-step guide on how to install an M.2 SSD in your computer.
In this step, we’ll go over how to insert the M.2 SSD into the slot. Firstly, locate the M.
2 slot on your computer’s motherboard. The M.2 slot is a long, narrow slot typically located close to the central chipset.
Some motherboards may have more than one M.2 slot, so be sure to consult your motherboard’s manual if you’re unsure which slot to use. Once you’ve located the M.
2 slot, you’re ready to insert the M.2 SSD. To insert the M.
2 SSD, insert it into the slot at a 30-degree angle. You should feel the SSD slide in smoothly and securely. It’s important to be gentle when inserting the M.
Step Four: Secure M.2 SSD
Now that we’ve prepared the Acer E15 laptop for the installation of an M.2 SSD, it’s time to secure the new drive in place. The first step is to locate the M.
2 SSD slot on the motherboard. Sometimes, the slot may be labeled, but if not, you can refer to the laptop’s manual or do a quick online search. Next, gently insert the M.
2 SSD into the slot, ensuring the notches on the SSD align with those on the slot. Push the SSD in until it clicks into place. It’s essential to securely fasten the SSD, so be sure to replace any screws or reattach any clips that were removed during the preparation process.
Now that the M.2 SSD is installed, let’s move on to configuring and formatting it to ensure optimal performance and storage capacity.
Insert screw in designated slot to secure SSD
If you’re looking to install an M.2 SSD onto your computer’s motherboard, you’ll need to secure it in its designated slot. This is a relatively simple process, and all you need is a screwdriver and the screw provided with your motherboard.
First, locate the M.2 slot on your motherboard. Once you’ve found it, carefully insert the M.
2 SSD into the slot, making sure it’s level and properly aligned. Next, take the screw and insert it into the hole on the motherboard that’s designated for securing the M.2 SSD.
Using a screwdriver, turn the screw clockwise until it’s firmly in place. It’s essential that the screw is securely fastened, as a loose M.2 SSD can cause damage to your computer and potentially result in data loss.
Once you’ve completed this step, your M.2 SSD is secure and ready to be used to enhance your computer’s performance. So, go ahead and take your computer to the next level by following these simple steps and enjoy the faster read and write speeds that an M.
2 SSD delivers.
Step Five: Reassemble Laptop
Now that you’ve successfully installed the M.2 SSD onto your Acer E15, it’s time to reassemble your laptop. Start by placing the bottom cover back onto the laptop and screwing it back in place.
Make sure every screw goes in securely, but don’t overtighten them. Next, snap the keyboard back into place, connecting the ribbon cable to the motherboard. Lastly, reinstall the battery and the access cover.
Once everything is securely in place, power on your Acer E15 and check to make sure everything is working properly. Congratulations! You have successfully installed an M.2 SSD onto your Acer E15, giving it a significant boost in speed and performance.
Replace battery and power on laptop
After successfully replacing your laptop battery, it’s time to reassemble your device and power it on. Remember to be gentle while putting back the screws, and make sure you place each one correctly. Once you’re sure everything is in place, insert the battery, connect the charger, and press the power button.
If it doesn’t turn on immediately, don’t panic. Sometimes it takes a few seconds for the laptop to start up again, especially if it’s been off for a while. Take a deep breath and wait a bit before trying again.
Once it powers on, check to make sure everything is working correctly. Ensure the battery is charging, and if the laptop seems to be running slow, give it time to sync and update all of its software. With patience and care, you’ll have your fully functional laptop up and running in no time!
Step Six: Format M.2 SSD
Now that you have installed your new M.2 SSD into your Acer E15 laptop, the next step is formatting it. To format the M.
2 SSD on your Acer E15, go to the Disk Management tool. You can access it by simply typing “disk management” in the start menu. Once there, locate the new drive and right-click on it.
Choose “New Simple Volume” and click on “Next”. You can then follow the Wizard to format the M.2 SSD drive.
Be sure to select the desired file system – NTFS is usually the best choice, as it supports large files and has higher security. Finally, give the new drive a name and click on “Finish”. The formatting process will now begin, and depending on the size of your drive, it may take several minutes to complete.
Once finished, you can start using your M.2 SSD as an additional storage space for your laptop. Don’t forget to transfer your important files to the new drive to free up space on your primary hard drive.
With these simple steps, you can maximize the storage capacity and performance of your Acer E1
Format SSD in Disk Manager
When it comes to setting up a new M.2 SSD, formatting is a necessary step in preparing it for use. Luckily, Windows 10’s disk management tool makes the process straightforward and quick.
To format an M.2 SSD in disk manager, first, make sure it is recognized by your computer. Then, open the Windows search feature and type in “disk management.
” From there, locate your new SSD and right-click to select “format.” You will be prompted to choose a file system (usually NTFS) and give the drive a name. Once you’ve made your selections, hit “ok” and wait for the drive to format.
It’s a simple process, but one that can save you a lot of headaches down the line. By formatting your new M.2 SSD, you can enjoy faster speeds and more storage capacity than ever before.
Conclusion
In conclusion, installing an M.2 SSD on your Acer E15 is like adding Nitro to a sleek sportscar. It’s a simple upgrade that boosts your system’s speed and performance, giving your workflow an extra kick in the pants.
Don’t let slow load times or laggy performance hold you back – take your computing game to the next level with an M.2 SSD installation! And who knows, you may just become the envy of all your tech-savvy friends. Happy upgrading!”
FAQs
What is an m.2 SSD and why should I install one in my Acer E15?
An m.2 SSD is a form of solid state drive that is smaller and faster than a traditional hard drive. Installing one in your Acer E15 can greatly improve its performance and load times.
What size m.2 SSD should I get for my Acer E15?
The Acer E15 has a designated M.2 slot that can accommodate SSDs that are 2280, 2260, 2242, and 2230 in size. You should choose the size that best suits your storage needs and budget.
How do I physically install the m.2 SSD in my Acer E15?
First, ensure that your laptop is turned off and unplugged. Remove the back panel to access the M.2 slot. Gently insert the SSD into the slot at a 30-degree angle and then push it down until it clicks into place. Replace the back panel and then power on your laptop.
Do I need to do anything else after installing the m.2 SSD in my Acer E15?
You will need to initialize and format the SSD in Windows Disk Management before it can be used. You can also transfer your operating system and frequently used applications to the SSD for even faster performance.